Quick Reference
Page 14
...Use this connection method is installed in your printer to the printhead access area when no printhead is supported in the printer. 23 Jam clearance cover Access and clear paper jams. 24 Ink cartridge access area Install, replace, or remove ink cartridges. 25 Scanner unit • Access... the ink cartridges and printhead. • Clear paper jams. Note: The carrier moves to a computer, a local network, an ...
...Use this connection method is installed in your printer to the printhead access area when no printhead is supported in the printer. 23 Jam clearance cover Access and clear paper jams. 24 Ink cartridge access area Install, replace, or remove ink cartridges. 25 Scanner unit • Access... the ink cartridges and printhead. • Clear paper jams. Note: The carrier moves to a computer, a local network, an ...
Quick Reference
Page 17
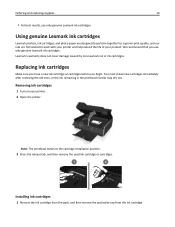
... only. Replacing ink cartridges Make sure you have a new ink cartridge or cartridges before you may dry out. After use, return this cartridge to Lexmark for remanufacturing, refilling, or recycling. 2 Available only on the Lexmark Web site at www.lexmark.com. 17 Notes: • To get the ink cartridges individually or in the printhead nozzles...
... only. Replacing ink cartridges Make sure you have a new ink cartridge or cartridges before you may dry out. After use, return this cartridge to Lexmark for remanufacturing, refilling, or recycling. 2 Available only on the Lexmark Web site at www.lexmark.com. 17 Notes: • To get the ink cartridges individually or in the printhead nozzles...
Quick Reference
Page 18
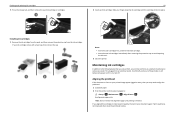
...or will temporarily power on your ink cartridge comes with a twist cap, then remove the cap. 1 2 3 18 2 Insert each ink cartridge. Ordering and replacing ink cartridges 3 Press the release tab, and then remove the used ink cartridge or cartridges. 1 2 Installing ink cartridges 1 Remove the ink cartridge from the pack..., and then remove the protective cap from the ink cartridge. Aligning the printhead If the characters or lines on if it is turned off. If print quality has not improved, then clean the...
...or will temporarily power on your ink cartridge comes with a twist cap, then remove the cap. 1 2 3 18 2 Insert each ink cartridge. Ordering and replacing ink cartridges 3 Press the release tab, and then remove the used ink cartridge or cartridges. 1 2 Installing ink cartridges 1 Remove the ink cartridge from the pack..., and then remove the protective cap from the ink cartridge. Aligning the printhead If the characters or lines on if it is turned off. If print quality has not improved, then clean the...
Quick Reference
Page 19
A cleaning page prints. Keep your prints. Ordering and replacing ink cartridges 19 Cleaning the printhead nozzles If you have not been using the printer for a long period, then you can clean the printhead nozzles. 1 Load paper. 2 From the printer control panel, navigate to: > Setup > > Maintenance > 3 Press the up...• Deep cleaning uses more ink, so try the Clean Printhead option first to save ink. • If the ink levels are too low, you must replace the ink cartridges before you may need to clean the printhead nozzles to improve the quality of your printer plugged to a ...
A cleaning page prints. Keep your prints. Ordering and replacing ink cartridges 19 Cleaning the printhead nozzles If you have not been using the printer for a long period, then you can clean the printhead nozzles. 1 Load paper. 2 From the printer control panel, navigate to: > Setup > > Maintenance > 3 Press the up...• Deep cleaning uses more ink, so try the Clean Printhead option first to save ink. • If the ink levels are too low, you must replace the ink cartridges before you may need to clean the printhead nozzles to improve the quality of your printer plugged to a ...

Quick Reference
Page 46
...4 Turn on the computer. You may be caused by improperly installed ink cartridges. Note: Make sure the printer is wirelessly connected, see "Replacing ink cartridges" on the computer. Note: If you troubleshoot" checklist does not solve the problem, then try another USB port on the printer... SOFTWARE Printer is marked with . If your printer, and then click Print. REINSTALL THE INK CARTRIDGES AND DEEP CLEAN AND ALIGN THE PRINTHEAD 1 Reinstall the ink cartridges, see the Wireless troubleshooting section. Press and hold for three seconds to a defective port. MAKE SURE THE...
...4 Turn on the computer. You may be caused by improperly installed ink cartridges. Note: Make sure the printer is wirelessly connected, see "Replacing ink cartridges" on the computer. Note: If you troubleshoot" checklist does not solve the problem, then try another USB port on the printer... SOFTWARE Printer is marked with . If your printer, and then click Print. REINSTALL THE INK CARTRIDGES AND DEEP CLEAN AND ALIGN THE PRINTHEAD 1 Reinstall the ink cartridges, see the Wireless troubleshooting section. Press and hold for three seconds to a defective port. MAKE SURE THE...
Quick Reference
Page 55
...ink ordering 17 checking an unresponsive printer 45 checking the dial tone 39 checklist before you troubleshoot 45 fax troubleshooting 48 cleaning printhead nozzles 19 Communication not available message 52 configuring e‑mail settings 31 configuring Wi‑Fi Protected Setup PBC, Push Button ... up printer on wireless network 43 ink conserving 5 ink cartridge access area location 14 ink cartridges installing 17 ordering 17 removing 17 replacing 17 inserting a flash drive 16 installation screen did not appear automatically 45 installing printer on wired network (Macintosh) 44 on wired ...
...ink ordering 17 checking an unresponsive printer 45 checking the dial tone 39 checklist before you troubleshoot 45 fax troubleshooting 48 cleaning printhead nozzles 19 Communication not available message 52 configuring e‑mail settings 31 configuring Wi‑Fi Protected Setup PBC, Push Button ... up printer on wireless network 43 ink conserving 5 ink cartridge access area location 14 ink cartridges installing 17 ordering 17 removing 17 replacing 17 inserting a flash drive 16 installation screen did not appear automatically 45 installing printer on wired network (Macintosh) 44 on wired ...
Quick Reference
Page 56
... features 6 printer models 6 printer printing blank pages 46 printer problems, basic solutions 45 printer software installing 22 printhead aligning 18 printhead access area location 14 printhead nozzles cleaning 19 printing documents 25 network setup page 50 on both sides of the paper 25 two‑sided... 25 publications finding 5 Push Button Configuration method using 44 R receiving faxes Auto Answer setting 39, 42 automatically 42 manually 42 tips 42 recycling 5 replacing ...
... features 6 printer models 6 printer printing blank pages 46 printer problems, basic solutions 45 printer software installing 22 printhead aligning 18 printhead access area location 14 printhead nozzles cleaning 19 printing documents 25 network setup page 50 on both sides of the paper 25 two‑sided... 25 publications finding 5 Push Button Configuration method using 44 R receiving faxes Auto Answer setting 39, 42 automatically 42 manually 42 tips 42 recycling 5 replacing ...
User's Guide
Page 12
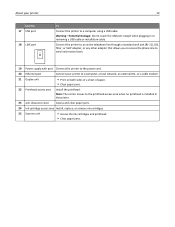
... cable modem. 21 Duplex unit • Print on both sides of a sheet of paper. • Clear paper jams. 22 Printhead access area Install the printhead. Warning-Potential Damage: Do not touch the USB port except when plugging in the printer. 23 Jam clearance cover Access and clear... paper jams. 24 Ink cartridge access area Install, replace, or remove ink cartridges. 25 Scanner unit • Access the ink cartridges and printhead. • Clear paper jams. About your printer to the printhead access area when no printhead is installed in or removing a USB cable or installation...
... cable modem. 21 Duplex unit • Print on both sides of a sheet of paper. • Clear paper jams. 22 Printhead access area Install the printhead. Warning-Potential Damage: Do not touch the USB port except when plugging in the printer. 23 Jam clearance cover Access and clear... paper jams. 24 Ink cartridge access area Install, replace, or remove ink cartridges. 25 Scanner unit • Access the ink cartridges and printhead. • Clear paper jams. About your printer to the printhead access area when no printhead is installed in or removing a USB cable or installation...
User's Guide
Page 14
...ink remaining in the printhead nozzles may dry out. Replacing ink cartridges Make sure you have a new ink cartridge or cartridges before you use only genuine Lexmark ink cartridges. Lexmark's warranty does not cover damage caused by non-Lexmark ink or ink cartridges. Note: The printhead moves to work with... your printer and help extend the life of your printer. 2 Open the printer. We recommend that you begin. Removing ink cartridges 1 Turn on your product. Ordering and replacing supplies 14 •...
...ink remaining in the printhead nozzles may dry out. Replacing ink cartridges Make sure you have a new ink cartridge or cartridges before you use only genuine Lexmark ink cartridges. Lexmark's warranty does not cover damage caused by non-Lexmark ink or ink cartridges. Note: The printhead moves to work with... your printer and help extend the life of your printer. 2 Open the printer. We recommend that you begin. Removing ink cartridges 1 Turn on your product. Ordering and replacing supplies 14 •...

User's Guide
Page 123
...ink, so clean them only when necessary. • Deep cleaning uses more ink, so try the Clean Printhead option first to save ink. • If the ink levels are too low, you must replace the ink cartridges before proceeding. 2 Remove all cables to the printer before you may need to clean ...the printhead nozzles to improve the quality of your printer plugged to a properly grounded, working electrical outlet to ...
...ink, so clean them only when necessary. • Deep cleaning uses more ink, so try the Clean Printhead option first to save ink. • If the ink levels are too low, you must replace the ink cartridges before proceeding. 2 Remove all cables to the printer before you may need to clean ...the printhead nozzles to improve the quality of your printer plugged to a properly grounded, working electrical outlet to ...

User's Guide
Page 129
.... 2 Insert the power cord into the wall outlet. 4 Turn on the printer. REINSTALL THE INK CARTRIDGES AND DEEP CLEAN AND ALIGN THE PRINTHEAD 1 Reinstall the ink cartridges, see "Replacing ink cartridges" on page 14 for three seconds to Align Printer, and then press . If this problem persists, then check our Web site...
.... 2 Insert the power cord into the wall outlet. 4 Turn on the printer. REINSTALL THE INK CARTRIDGES AND DEEP CLEAN AND ALIGN THE PRINTHEAD 1 Reinstall the ink cartridges, see "Replacing ink cartridges" on page 14 for three seconds to Align Printer, and then press . If this problem persists, then check our Web site...

User's Guide
Page 136
For more information, see "Replacing ink cartridges" in the User's Guide. Note: Make sure to clear the message. • If your printer did not come with a printhead, then visit the Lexmark support Web site at http://support.lexmark.com, or contact customer support for more of the ...following: • Turn the printer off, and then turn it clicks into the printhead. Printhead Unsupported Try one or more information. ...
For more information, see "Replacing ink cartridges" in the User's Guide. Note: Make sure to clear the message. • If your printer did not come with a printhead, then visit the Lexmark support Web site at http://support.lexmark.com, or contact customer support for more of the ...following: • Turn the printer off, and then turn it clicks into the printhead. Printhead Unsupported Try one or more information. ...

User's Guide
Page 137
.... 6 Close the printer. • Visit the Lexmark support Web site at http://support.lexmark.com for more cartridges may have been missing for a list of the following: • Replace the ink cartridge with one that is supported by your printer. • Press to clean the printhead nozzles. Replace Ink Cartridge Try one or more of...
.... 6 Close the printer. • Visit the Lexmark support Web site at http://support.lexmark.com for more cartridges may have been missing for a list of the following: • Replace the ink cartridge with one that is supported by your printer. • Press to clean the printhead nozzles. Replace Ink Cartridge Try one or more of...

User's Guide
Page 186
...Size] [Type] Paper 133 Load [Size] Paper 133 Memory Device Access Error 134 Printer Memory Full 134 Printhead Cannot Move 134 Printhead Missing 135 Printhead Warning 137 Replace Ink Cartridge 137 Scanned Document Too Long 138 Scanner Disabled 138 Short Paper 138 Unrecoverable Scan Error 138 Unsupported Cartridge... method using 101 R received history report 89 receiving faxes Auto Answer setting 84 automatically 84 manually 84 tips 84 recycling 7, 171 Lexmark products 16 WEEE statement 170 redial attempts, fax setting 78 redial time, fax setting 78 reducing an image 52 registering fax user ...
...Size] [Type] Paper 133 Load [Size] Paper 133 Memory Device Access Error 134 Printer Memory Full 134 Printhead Cannot Move 134 Printhead Missing 135 Printhead Warning 137 Replace Ink Cartridge 137 Scanned Document Too Long 138 Scanner Disabled 138 Short Paper 138 Unrecoverable Scan Error 138 Unsupported Cartridge... method using 101 R received history report 89 receiving faxes Auto Answer setting 84 automatically 84 manually 84 tips 84 recycling 7, 171 Lexmark products 16 WEEE statement 170 redial attempts, fax setting 78 redial time, fax setting 78 reducing an image 52 registering fax user ...


