
Quick Reference
Page 2
... single-color tanks, we encourage our customers to participate in the postage-paid bags. CAUTION-SHOCK HAZARD: Do not use the fax feature during a lightning storm. For warranty returns, call 1-800-332-4120. This patented printer is licensed for, and designed to Lexmark for ...the life of the patented printer. Important Message About Cartridge Recycling! Follow instructions to a properly grounded electrical outlet that you , or ...
... single-color tanks, we encourage our customers to participate in the postage-paid bags. CAUTION-SHOCK HAZARD: Do not use the fax feature during a lightning storm. For warranty returns, call 1-800-332-4120. This patented printer is licensed for, and designed to Lexmark for ...the life of the patented printer. Important Message About Cartridge Recycling! Follow instructions to a properly grounded electrical outlet that you , or ...

Quick Reference
Page 5
...adjust the darkness of the colors. • Use high yield cartridges. Conserving ink • Use Quick Print or Draft Mode. Help using the printer software Software Help installed automatically with printer the printer software.2 For Windows users After installing your printer, you can be used...; Print more pages. To return an ink cartridge, go to www.lexmark.com/recycle. About your printer About your printer Finding information about the printer The Quick Reference Guide contains instructions on adding your printer to a wireless network, setting up to 16 page images on one ...
...adjust the darkness of the colors. • Use high yield cartridges. Conserving ink • Use Quick Print or Draft Mode. Help using the printer software Software Help installed automatically with printer the printer software.2 For Windows users After installing your printer, you can be used...; Print more pages. To return an ink cartridge, go to www.lexmark.com/recycle. About your printer About your printer Finding information about the printer The Quick Reference Guide contains instructions on adding your printer to a wireless network, setting up to 16 page images on one ...
Quick Reference
Page 6
... for the following printer models: • Lexmark S515 • Lexmark S519 Printer features Depending on a wireless network, then you often perform, apply your printer solutions. The large screen also allows you can also customize your printer comes with those settings, you want to 1200 dpi optical resolution. • Fax-Do standalone black and color faxing at 33.6Kbps...
... for the following printer models: • Lexmark S515 • Lexmark S519 Printer features Depending on a wireless network, then you often perform, apply your printer solutions. The large screen also allows you can also customize your printer comes with those settings, you want to 1200 dpi optical resolution. • Fax-Do standalone black and color faxing at 33.6Kbps...
Quick Reference
Page 12
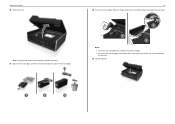
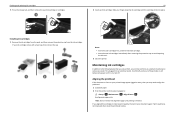
Note: The printhead moves to air. 29 Close the printer. 1 2 3 About your finger along the ink cartridge until the cartridge clicks into place. 3 1 2 Notes: • Insert the color cartridges first, and then the black cartridge. • Insert the new ink cartridges immediately after removing the protective cap to avoid exposing the ink to the cartridge installation position. 27 Unpack the ink cartridges, and then remove the protective caps from the cartridges. 12 28 Insert each ink cartridge. Slide your printer 26 Open the printer.
Note: The printhead moves to air. 29 Close the printer. 1 2 3 About your finger along the ink cartridge until the cartridge clicks into place. 3 1 2 Notes: • Insert the color cartridges first, and then the black cartridge. • Insert the new ink cartridges immediately after removing the protective cap to avoid exposing the ink to the cartridge installation position. 27 Unpack the ink cartridges, and then remove the protective caps from the cartridges. 12 28 Insert each ink cartridge. Slide your printer 26 Open the printer.
Quick Reference
Page 15
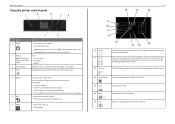
... the keypad before sending the fax. 11 Address Book Access fax numbers from a saved list of numbers. 12 Color Switch to color mode. 13 Black Switch to wait for three seconds to turn off the printer. 2 Display View: Note: The display is on the display. • Return to the previous screen. • ... options. • Save settings. 15 12 13 14 11 10 9 8 8 Redial 9 Pause 18 15 17 16 Display the last number dialed. Note: When the printer is turned off . • Switch to Sleep mode. Press the left or right arrow button to a higher one menu level to view the last five...
... the keypad before sending the fax. 11 Address Book Access fax numbers from a saved list of numbers. 12 Color Switch to color mode. 13 Black Switch to wait for three seconds to turn off the printer. 2 Display View: Note: The display is on the display. • Return to the previous screen. • ... options. • Save settings. 15 12 13 14 11 10 9 8 8 Redial 9 Pause 18 15 17 16 Display the last number dialed. Note: When the printer is turned off . • Switch to Sleep mode. Press the left or right arrow button to a higher one menu level to view the last five...
Quick Reference
Page 17
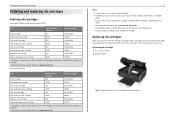
... 160 Not available High‑yield magenta color cartridge 160XL 160XLA 1 Licensed for a single use , return this cartridge to Lexmark for remanufacturing, refilling, or recycling. 2 Available only on the Lexmark Web site at www.lexmark.com. Removing ink cartridges 1 Turn on your printer. 2 Open the printer. Ordering and replacing ink cartridges Ordering and replacing ink cartridges...
... 160 Not available High‑yield magenta color cartridge 160XL 160XLA 1 Licensed for a single use , return this cartridge to Lexmark for remanufacturing, refilling, or recycling. 2 Available only on the Lexmark Web site at www.lexmark.com. Removing ink cartridges 1 Turn on your printer. 2 Open the printer. Ordering and replacing ink cartridges Ordering and replacing ink cartridges...
Quick Reference
Page 18
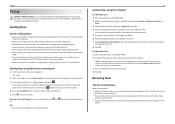
... document again. If you can perform, your printer performs an automatic maintenance cycle every week if it is turned off. If your finger along the ink cartridge until printing is plugged into place. 3 1 2 Notes: • Insert the color cartridges first, and then the black cartridge. ...• Insert the new ink cartridges immediately after removing the protective cap to avoid exposing the ink to air. 3 Close the printer. Maintaining ink cartridges In addition to the following tasks that...
... document again. If you can perform, your printer performs an automatic maintenance cycle every week if it is turned off. If your finger along the ink cartridge until printing is plugged into place. 3 1 2 Notes: • Insert the color cartridges first, and then the black cartridge. ...• Insert the new ink cartridges immediately after removing the protective cap to avoid exposing the ink to air. 3 Close the printer. Maintaining ink cartridges In addition to the following tasks that...
Quick Reference
Page 27
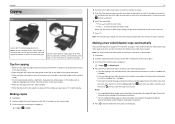
... factory default after two minutes of the original document. • When using the scanner glass, close the scanner cover, if possible, to the width of printer inactivity. If necessary, press to make two‑sided copies on envelopes, card stock, or photo paper. 1 Load paper. 2 Load the original document... the ADF. Note: The ADF is in select models. Note: You cannot make a selection. 6 Select the copy mode: • Press to switch to color mode. • Press to switch to 2‑sided. • If you are copying a two-sided document and using other paper sizes, then see the ...
... factory default after two minutes of the original document. • When using the scanner glass, close the scanner cover, if possible, to the width of printer inactivity. If necessary, press to make two‑sided copies on envelopes, card stock, or photo paper. 1 Load paper. 2 Load the original document... the ADF. Note: The ADF is in select models. Note: You cannot make a selection. 6 Select the copy mode: • Press to switch to color mode. • Press to switch to 2‑sided. • If you are copying a two-sided document and using other paper sizes, then see the ...
Quick Reference
Page 29
... only in the User's Guide. Set the color, quality, original image size, and other scan options. For more information, see the section on the scanner glass. 2 From the printer control panel navigate to e‑mail using the printer software Make sure you want to set , and...If necessary, press each time you want , press to the setting you make a selection. 4 Press . If necessary, press each time you purchased a printer without an ADF, then load original documents or photos on the scanned image. • Do not load postcards, photos, small items, transparencies, photo paper, ...
... only in the User's Guide. Set the color, quality, original image size, and other scan options. For more information, see the section on the scanner glass. 2 From the printer control panel navigate to e‑mail using the printer software Make sure you want to set , and...If necessary, press each time you want , press to the setting you make a selection. 4 Press . If necessary, press each time you purchased a printer without an ADF, then load original documents or photos on the scanned image. • Do not load postcards, photos, small items, transparencies, photo paper, ...
Quick Reference
Page 41
... to select a color or black‑and‑white fax. 5 Press to enter another number, and then press . The line is selected. 4 Enter the recipient fax number or numbers in place with the fax. 8 Click OK. Sending faxes Tips for sending faxes • Make sure the printer is on the ...you have set up to 30 recipients. 41 Sending faxes using the computer For Windows users 1 With a document open , choose File > Print. 2 From the Printer pop‑up menu, select the fax version of the original document. • When using the Phone Book feature. 5 If necessary, enter a prefix in the...
... to select a color or black‑and‑white fax. 5 Press to enter another number, and then press . The line is selected. 4 Enter the recipient fax number or numbers in place with the fax. 8 Click OK. Sending faxes Tips for sending faxes • Make sure the printer is on the ...you have set up to 30 recipients. 41 Sending faxes using the computer For Windows users 1 With a document open , choose File > Print. 2 From the Printer pop‑up menu, select the fax version of the original document. • When using the Phone Book feature. 5 If necessary, enter a prefix in the...

Quick Reference
Page 46
... section. Troubleshooting CHECK THE USB CONNECTION 1 Check the USB cable for any obvious damage. REMOVE AND RECONNECT THE USB CABLE CONNECTED TO YOUR PRINTER CHECK THE USB CONNECTION 1 Check the USB cable for any obvious damage. If the cable is damaged, then use a new one . ... plug the rectangular end of the USB cable into the matching color slot of the following : MAKE SURE THE INK CARTRIDGES ARE INSERTED CORRECTLY 1 Turn the printer on the printer. RECONNECT THE PRINTER POWER SUPPLY 1 Turn off the printer. From the list of the USB cable into the wall outlet. ...
... section. Troubleshooting CHECK THE USB CONNECTION 1 Check the USB cable for any obvious damage. REMOVE AND RECONNECT THE USB CABLE CONNECTED TO YOUR PRINTER CHECK THE USB CONNECTION 1 Check the USB cable for any obvious damage. If the cable is damaged, then use a new one . ... plug the rectangular end of the USB cable into the matching color slot of the following : MAKE SURE THE INK CARTRIDGES ARE INSERTED CORRECTLY 1 Turn the printer on the printer. RECONNECT THE PRINTER POWER SUPPLY 1 Turn off the printer. From the list of the USB cable into the wall outlet. ...

Quick Reference
Page 48
Connection checklist • Make sure that the printer and other topics in this option automatically converts the outgoing color fax to its fastest transmission capability. In some countries, you did not enter your user information during initial setup, then enter your setup... you are using a splitter, then make a call outside the office. Some fax machines also block unknown faxes or faxes without entering your network. 1 From the printer control panel, navigate to: > Setup > > Fax Setup > > Dialing and Sending > 2 Press the arrow buttons to press so you can send and receive...
Connection checklist • Make sure that the printer and other topics in this option automatically converts the outgoing color fax to its fastest transmission capability. In some countries, you did not enter your user information during initial setup, then enter your setup... you are using a splitter, then make a call outside the office. Some fax machines also block unknown faxes or faxes without entering your network. 1 From the printer control panel, navigate to: > Setup > > Fax Setup > > Dialing and Sending > 2 Press the arrow buttons to press so you can send and receive...

User's Guide
Page 8
... of the colors. • Use high yield cartridges. To return an ink cartridge, go to print documents using less ink than normal and are ideal for printing documents that are you purchased. Initial setup instructions: • Connecting the printer • Installing the printer software Find it...less ink. Recycling • Return ink cartridges for ? Note: Your printer may not come with the printer and is also available on the features of these programs, depending on the Lexmark Web site at http://support.lexmark.com. Most programs or applications let you to request a postage‑...
... of the colors. • Use high yield cartridges. To return an ink cartridge, go to print documents using less ink than normal and are ideal for printing documents that are you purchased. Initial setup instructions: • Connecting the printer • Installing the printer software Find it...less ink. Recycling • Return ink cartridges for ? Note: Your printer may not come with the printer and is also available on the features of these programs, depending on the Lexmark Web site at http://support.lexmark.com. Most programs or applications let you to request a postage‑...
User's Guide
Page 15
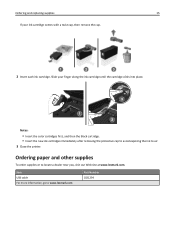
...To order supplies or to air. 3 Close the printer. Slide your ink cartridge comes with a twist cap, then remove the cap. 1 2 3 2 Insert each ink cartridge. Part Number 1021294 Item USB cable For more information, go to www.lexmark.com. Ordering and replacing supplies 15 If your ...finger along the ink cartridge until the cartridge clicks into place. 3 1 2 Notes: • Insert the color cartridges first, and then the black cartridge. • Insert the ...
...To order supplies or to air. 3 Close the printer. Slide your ink cartridge comes with a twist cap, then remove the cap. 1 2 3 2 Insert each ink cartridge. Part Number 1021294 Item USB cable For more information, go to www.lexmark.com. Ordering and replacing supplies 15 If your ...finger along the ink cartridge until the cartridge clicks into place. 3 1 2 Notes: • Insert the color cartridges first, and then the black cartridge. • Insert the ...

User's Guide
Page 19
Insert a three-second pause in a fax number to make. Using the printer control panel buttons and menus 19 Use 5 Keypad 6 Back 7 Select To In Copy mode or Photo mode: Enter the number of numbers. 12 Color Switch to a higher one menu level to color mode. Dial the telephone number manually using the keypad before...
Insert a three-second pause in a fax number to make. Using the printer control panel buttons and menus 19 Use 5 Keypad 6 Back 7 Select To In Copy mode or Photo mode: Enter the number of numbers. 12 Color Switch to a higher one menu level to color mode. Dial the telephone number manually using the keypad before...

User's Guide
Page 51
...as postcards or photos), transparencies, photo paper, or thin media (such as magazine clippings) into the ADF or facedown on the scanner glass. 3 From the printer control panel, navigate to: > Copy > > Copies 4 Press the left or right arrow button to select the number of copies. 5 From the Copy.... 2 Load an original document faceup into the ADF. If necessary, press to make a selection. 6 Select the copy mode: • Press to switch to color mode. • Press to switch to avoid dark edges on the scanned image. • Do not load postcards, photos, small items, transparencies, photo paper,...
...as postcards or photos), transparencies, photo paper, or thin media (such as magazine clippings) into the ADF or facedown on the scanner glass. 3 From the printer control panel, navigate to: > Copy > > Copies 4 Press the left or right arrow button to select the number of copies. 5 From the Copy.... 2 Load an original document faceup into the ADF. If necessary, press to make a selection. 6 Select the copy mode: • Press to switch to color mode. • Press to switch to avoid dark edges on the scanned image. • Do not load postcards, photos, small items, transparencies, photo paper,...

User's Guide
Page 52
...images 1 Load paper. 2 Load the original document facedown on the paper size that corresponds to your choice comes on the scanner glass. 3 From the printer control panel, navigate to: > Copy > > Quality Adjusting copy quality 1 Load paper. 2 Load the original document faceup into the ADF or facedown on... . 7 Press . Notes: • If you select Fit to Page, then the printer scales the document or photo proportionately to fit a single page. 5 Press . Copying 52 When you select color or black‑only printing, the light that you selected.
...images 1 Load paper. 2 Load the original document facedown on the paper size that corresponds to your choice comes on the scanner glass. 3 From the printer control panel, navigate to: > Copy > > Quality Adjusting copy quality 1 Load paper. 2 Load the original document faceup into the ADF or facedown on... . 7 Press . Notes: • If you select Fit to Page, then the printer scales the document or photo proportionately to fit a single page. 5 Press . Copying 52 When you select color or black‑only printing, the light that you selected.

User's Guide
Page 56
Scanning stops and the printer returns to black‑and‑white mode. Copying 56 6 Select the copy mode: • Press to switch to color mode. • Press to switch to the previous menu. Make sure the printable side of the document. Canceling copy jobs To cancel a copy job, press , ...and then press . When you select color or black‑only printing, the light that corresponds to your choice comes on. 7 Press to print on one side of the paper. 8 Load the...
Scanning stops and the printer returns to black‑and‑white mode. Copying 56 6 Select the copy mode: • Press to switch to color mode. • Press to switch to the previous menu. Make sure the printable side of the document. Canceling copy jobs To cancel a copy job, press , ...and then press . When you select color or black‑only printing, the light that corresponds to your choice comes on. 7 Press to print on one side of the paper. 8 Load the...

User's Guide
Page 57
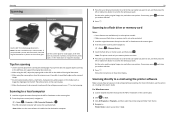
...settings you want , press to a local computer 1 Load the original document faceup into the ADF. If necessary, press each time you purchased a printer without an ADF, then load original documents or photos on the scanner glass. Tips for single pages, small items (such as postcards or photos), ...connected computer will receive the scan by default. Note: Make sure the scan software is in select models. Scanning to start scanning. Set the color, quality, original image size, and other scan options. Place these items on the scanner glass. • When the document to be scanned ...
...settings you want , press to a local computer 1 Load the original document faceup into the ADF. If necessary, press each time you purchased a printer without an ADF, then load original documents or photos on the scanner glass. Tips for single pages, small items (such as postcards or photos), ...connected computer will receive the scan by default. Note: Make sure the scan software is in select models. Scanning to start scanning. Set the color, quality, original image size, and other scan options. Place these items on the scanner glass. • When the document to be scanned ...

User's Guide
Page 58
Set the color, quality, original image size, and other scan options. Note: For Macintosh users, you may be prompted to enter a PIN if the computer requires it. • To assign a computer name and a PIN to the computer, see the Help for the printer software associated with your operating system. 4 Press...set , and then press the left or right arrow button to scroll to the setting you want . Set the color, quality, original image size, and other scan options. Note: The printer reads only one memory device at a time. 4 Press the up or down arrow button to scroll to the scan...
Set the color, quality, original image size, and other scan options. Note: For Macintosh users, you may be prompted to enter a PIN if the computer requires it. • To assign a computer name and a PIN to the computer, see the Help for the printer software associated with your operating system. 4 Press...set , and then press the left or right arrow button to scroll to the setting you want . Set the color, quality, original image size, and other scan options. Note: The printer reads only one memory device at a time. 4 Press the up or down arrow button to scroll to the scan...


