Quick Reference
Page 2
... About Cartridge Recycling! Place the empty Lexmark-branded inkjet cartridge(s) in our easy, no-cost method for returning empty Lexmark cartridges to any of these terms are available through www.lexmark.com and may be refilled by you 're sending single-color tanks, we encourage our customers to ... up this product to be used with the licensed printer. Lexmark-branded cartridges are properly handled with all new parts, though components may be used only once. After this single use, the license to use only genuine Lexmark inkjet cartridges with this product or a 26 AWG or ...
... About Cartridge Recycling! Place the empty Lexmark-branded inkjet cartridge(s) in our easy, no-cost method for returning empty Lexmark cartridges to any of these terms are available through www.lexmark.com and may be refilled by you 're sending single-color tanks, we encourage our customers to ... up this product to be used with the licensed printer. Lexmark-branded cartridges are properly handled with all new parts, though components may be used only once. After this single use, the license to use only genuine Lexmark inkjet cartridges with this product or a 26 AWG or ...
Quick Reference
Page 3
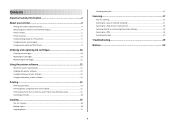
Contents Important safety information 2 About your printer 4 Finding information about the printer 4 Minimizing your printer's environmental impact 4 Printer models...5 Printer features...5 Understanding the parts of the printer 5 Using the printer control panel 7 Using memory cards and flash drives 9 Ordering and replacing ink cartridges 10 Ordering ink cartridges...10 Replacing ink cartridges...10 Maintaining ink cartridges ...
Contents Important safety information 2 About your printer 4 Finding information about the printer 4 Minimizing your printer's environmental impact 4 Printer models...5 Printer features...5 Understanding the parts of the printer 5 Using the printer control panel 7 Using memory cards and flash drives 9 Ordering and replacing ink cartridges 10 Ordering ink cartridges...10 Replacing ink cartridges...10 Maintaining ink cartridges ...
Quick Reference
Page 4
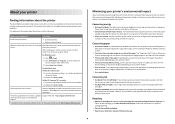
...Guide. Conserving energy • Activate Eco-Mode. Find it away. 4 Minimizing your old printer instead of paper. • Print on the Lexmark Web site at http://support.lexmark.com. By selecting certain printer settings or tasks, you to print more than normal and are mostly text. • ... are ideal for reuse or recycling through the Lexmark Cartridge Collection Program. In Mac OS X version 10.5 or earlier 1 From the Finder desktop, double-click the printer folder. 2 Double-click User's Guide. Wireless/network printers allow you may be used to print multiple ...
...Guide. Conserving energy • Activate Eco-Mode. Find it away. 4 Minimizing your old printer instead of paper. • Print on the Lexmark Web site at http://support.lexmark.com. By selecting certain printer settings or tasks, you to print more than normal and are mostly text. • ... are ideal for reuse or recycling through the Lexmark Cartridge Collection Program. In Mac OS X version 10.5 or earlier 1 From the Finder desktop, double-click the printer folder. 2 Double-click User's Guide. Wireless/network printers allow you may be used to print multiple ...
Quick Reference
Page 5
...Document Feeder. • Fax. Scan thick books, reports, and other multiple-page documents easily with one-touch, computer-free black or color copying. • Scan. Print photos directly from a Bluetooth device. The light blinks to the width of the original document. 10 ...the paper for copy and fax jobs and for the following printer models: • Lexmark S405 • Lexmark S408 • Lexmark S415 Printer features Your printer comes with your home or office over a secure wireless network, as well as share the printer among multiple computers. • Print. Print and scan from...
...Document Feeder. • Fax. Scan thick books, reports, and other multiple-page documents easily with one-touch, computer-free black or color copying. • Scan. Print photos directly from a Bluetooth device. The light blinks to the width of the original document. 10 ...the paper for copy and fax jobs and for the following printer models: • Lexmark S405 • Lexmark S408 • Lexmark S415 Printer features Your printer comes with your home or office over a secure wireless network, as well as share the printer among multiple computers. • Print. Print and scan from...
Quick Reference
Page 6
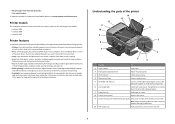
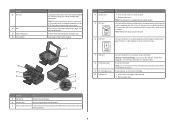
...to a computer using a USB cable. LINE 7 USB port 8 Printhead access 9 Ink cartridge access 10 Scanner unit Connect the printer to the printer and the telephone line. Note: The carrier moves to a properly grounded electrical outlet that is supported in the ADF. Warning-Potential... 5 6 7 Use the To 1 Scanner lid Access the scanner glass. 2 Scanner glass Scan and copy photos and documents. 3 Power supply with port Connect the printer to the printhead access area when no printhead is available only on the scanner glass. Note: Remove the plug to send and receive faxes. Install...
...to a computer using a USB cable. LINE 7 USB port 8 Printhead access 9 Ink cartridge access 10 Scanner unit Connect the printer to the printer and the telephone line. Note: The carrier moves to a properly grounded electrical outlet that is supported in the ADF. Warning-Potential... 5 6 7 Use the To 1 Scanner lid Access the scanner glass. 2 Scanner glass Scan and copy photos and documents. 3 Power supply with port Connect the printer to the printhead access area when no printhead is available only on the scanner glass. Note: Remove the plug to send and receive faxes. Install...

Quick Reference
Page 7
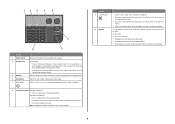
...to Power Saver mode. Note: The Copy, Scan, Fax, and Photo button lights are off . • Switch to turn off in Power Saver • Printer status mode. • Messages • Menus 7 Arrow buttons Choose a menu or submenu item that appears on the display. 8 Select button • Select menu... options. • Save settings. • Feed or eject paper. Using the printer control panel 1 23 4 5 10 9 Use the 1 Power button 2 Copy button 3 Scan button 4 Fax button 5 Photo button 8 7 6 To • Turn the...
...to Power Saver mode. Note: The Copy, Scan, Fax, and Photo button lights are off . • Switch to turn off in Power Saver • Printer status mode. • Messages • Menus 7 Arrow buttons Choose a menu or submenu item that appears on the display. 8 Select button • Select menu... options. • Save settings. • Feed or eject paper. Using the printer control panel 1 23 4 5 10 9 Use the 1 Power button 2 Copy button 3 Scan button 4 Fax button 5 Photo button 8 7 6 To • Turn the...
Quick Reference
Page 8
... to enter or edit the date and time shown on both sides of the paper (duplex). • Change to Power Saver mode after the printer is available only on both sides of the paper (duplex). In Copy mode or Photo mode: enter the number of copies or prints you have... already begun entering the number. • Display the last number dialed. 12 3 4 5 Eco-Mode Cancel 6 Use the 1 Address Book 2 Redial/Pause 3 Dialtone 4 Color/Black 5 Start button 8 7 To Access fax numbers from a menu level of the Setup menu to the top level of the previous mode. • Clear current...
... to enter or edit the date and time shown on both sides of the paper (duplex). • Change to Power Saver mode after the printer is available only on both sides of the paper (duplex). In Copy mode or Photo mode: enter the number of copies or prints you have... already begun entering the number. • Display the last number dialed. 12 3 4 5 Eco-Mode Cancel 6 Use the 1 Address Book 2 Redial/Pause 3 Dialtone 4 Color/Black 5 Start button 8 7 To Access fax numbers from a menu level of the Setup menu to the top level of the previous mode. • Clear current...

Quick Reference
Page 9
... "Supported memory cards and file types" on page 9. • The flash drive uses the same port that the memory card inserted is supported by the printer. WI F I PRINTING MEMORY STICK FLASH DRIVE Notes: Notes: • Insert the card with it. • Make sure that is in the card slot, then ...a message appears on the card point toward the printer. • If necessary, connect the memory card to use. You can occur. 2 Look for a PictBridge camera cable. • An adapter may be necessary ...
... "Supported memory cards and file types" on page 9. • The flash drive uses the same port that the memory card inserted is supported by the printer. WI F I PRINTING MEMORY STICK FLASH DRIVE Notes: Notes: • Insert the card with it. • Make sure that is in the card slot, then ...a message appears on the card point toward the printer. • If necessary, connect the memory card to use. You can occur. 2 Look for a PictBridge camera cable. • An adapter may be necessary ...
Quick Reference
Page 10
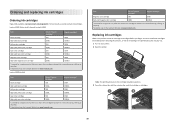
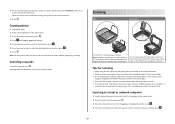
.... W I F I PRINTING Note: The printhead moves to Lexmark for a single use only Lexmark ink cartridges. Item Return Program Regular cartridge2 Cartridge1 Magenta color cartridge 108 108A High yield magenta color cartridge 108XL 108XLA 1 Licensed for remanufacturing, refilling, or recycling. 2 Available only on your printer. 2 Open the printer. For best results, use only. You must install new cartridges...
.... W I F I PRINTING Note: The printhead moves to Lexmark for a single use only Lexmark ink cartridges. Item Return Program Regular cartridge2 Cartridge1 Magenta color cartridge 108 108A High yield magenta color cartridge 108XL 108XLA 1 Licensed for remanufacturing, refilling, or recycling. 2 Available only on your printer. 2 Open the printer. For best results, use only. You must install new cartridges...

Quick Reference
Page 11
... the printhead If the characters or lines on the computer screen. For Macintosh users Note: This feature is turned off. If you may need to : Printer Home > select your ink cartridge comes with a twist cap, then twist and remove the cap. 5 Install each ink cartridge. 4 Remove the ink ...if it is available only in Mac OS X version 10.5 or earlier. 1 Load plain, unmarked paper. 2 From the Finder desktop, double-click the printer folder. 3 Double-click the Printer Utility icon. 4 From the Maintenance tab, click Print Alignment Page. 5 Follow the instructions on your document again. Using the...
... the printhead If the characters or lines on the computer screen. For Macintosh users Note: This feature is turned off. If you may need to : Printer Home > select your ink cartridge comes with a twist cap, then twist and remove the cap. 5 Install each ink cartridge. 4 Remove the ink ...if it is available only in Mac OS X version 10.5 or earlier. 1 Load plain, unmarked paper. 2 From the Finder desktop, double-click the printer folder. 3 Double-click the Printer Utility icon. 4 From the Maintenance tab, click Print Alignment Page. 5 Follow the instructions on your document again. Using the...
Quick Reference
Page 12
b In the Start Search or Run box, type D:\setup.exe, where D is available only at http://support.lexmark.com. Notes: • Cleaning the printhead nozzles uses ink, so clean them only when necessary. • Deep cleaning uses more ink, so try ...Poor print quality is available only in Mac OS X version 10.5 or earlier. 1 Load plain paper. 2 From the Finder desktop, double-click the printer folder. 3 Double-click the Printer Utility icon. 4 From the Maintenance tab, select Clean Print Nozzles. A cleaning page prints. For Windows users 1 Close all open software programs. 2 Insert...
b In the Start Search or Run box, type D:\setup.exe, where D is available only at http://support.lexmark.com. Notes: • Cleaning the printhead nozzles uses ink, so clean them only when necessary. • Deep cleaning uses more ink, so try ...Poor print quality is available only in Mac OS X version 10.5 or earlier. 1 Load plain paper. 2 From the Finder desktop, double-click the printer folder. 3 Double-click the Printer Utility icon. 4 From the Maintenance tab, select Clean Print Nozzles. A cleaning page prints. For Windows users 1 Close all open software programs. 2 Insert...
Quick Reference
Page 13
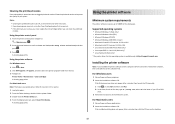
... dialog appears. Printer software Use the LexmarkTM Printer Home (referred to as Printer Home) Lexmark Fast Pics (referred to the Lexmark Web site at http://support.lexmark.com. Note: Printing Preferences is installed automatically with the printer software. Note: Your printer may have chosen... • Print a test page. • Register the printer. • Contact technical support. Access your operating system 3 Download the driver and install the printer software. Use the Lexmark Toolbar (referred to as Toolbar) Lexmark Tools for Office (referred to print. • Print two...
... dialog appears. Printer software Use the LexmarkTM Printer Home (referred to as Printer Home) Lexmark Fast Pics (referred to the Lexmark Web site at http://support.lexmark.com. Note: Printing Preferences is installed automatically with the printer software. Note: Your printer may have chosen... • Print a test page. • Register the printer. • Contact technical support. Access your operating system 3 Download the driver and install the printer software. Use the Lexmark Toolbar (referred to as Toolbar) Lexmark Tools for Office (referred to print. • Print two...
Quick Reference
Page 14
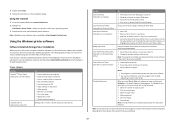
... in the Finder, or from your printer. 14 Note: Your printer may not come with the printer software during printer installation Applications are links to visit. Download and install the latest printer software. Visit the Lexmark Web site. Printer Services dialog (not available in Mac... features of a memory device inserted into a network printer. • Transfer photos and PDF documents from a memory device to visit. Use Customer Support Lexmark Software Updates Lexmark Online Order Supplies Online Printer Registration To Contact technical support. Network Card Reader (...
... in the Finder, or from your printer. 14 Note: Your printer may not come with the printer software during printer installation Applications are links to visit. Download and install the latest printer software. Visit the Lexmark Web site. Printer Services dialog (not available in Mac... features of a memory device inserted into a network printer. • Transfer photos and PDF documents from a memory device to visit. Use Customer Support Lexmark Software Updates Lexmark Online Order Supplies Online Printer Registration To Contact technical support. Network Card Reader (...
Quick Reference
Page 15
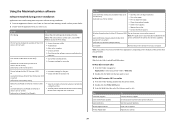
... print, the type of paper to use , and how the pages should print. 4 Click OK to adjust the brightness and color effects of the printer that support the file types in the Print Photos menu, then press the arrow buttons to select the photo size, paper size,... digital camera using the printer control panel 1 Load photo paper. 2 From the printer control panel, press . 3 Insert a memory card, flash drive, or digital camera set a color or black-and-white print. When you select color or black-only printing, the light near your custom solutions. Use Visit Lexmark SmartSolutions To • ...
... print, the type of paper to use , and how the pages should print. 4 Click OK to adjust the brightness and color effects of the printer that support the file types in the Print Photos menu, then press the arrow buttons to select the photo size, paper size,... digital camera using the printer control panel 1 Load photo paper. 2 From the printer control panel, press . 3 Insert a memory card, flash drive, or digital camera set a color or black-and-white print. When you select color or black-only printing, the light near your custom solutions. Use Visit Lexmark SmartSolutions To • ...

Quick Reference
Page 16
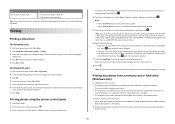
... • To assign a computer name and a PIN to the computer, see the Help for available computers. To cancel a print job from the printer control panel, press . Place these items on select models. If you want to cancel a particular print job, then right-click the document name, and...not load postcards, photos, small items, transparencies, photo paper, or thin media (such as magazine clippings). b Press , and then wait for the printer to connect to the network computer or to avoid dark edges on the ADF to the width of the original document. • When using a Wireless...
... • To assign a computer name and a PIN to the computer, see the Help for available computers. To cancel a print job from the printer control panel, press . Place these items on select models. If you want to cancel a particular print job, then right-click the document name, and...not load postcards, photos, small items, transparencies, photo paper, or thin media (such as magazine clippings). b Press , and then wait for the printer to connect to the network computer or to avoid dark edges on the ADF to the width of the original document. • When using a Wireless...
Quick Reference
Page 17
...4 Press the arrow buttons to select the name of copies, and then press the Color/Black button to select the desired photo size, and then press . 7 Press . Tips for multiple-page documents. Scanning stops and the printer returns to dry at least 24 hours before stacking, displaying, or storing. Note: ...Reprint appears. 5 Press the arrow buttons to scroll to Yes, and then press . 6 Press the arrow buttons to set a color or black-and-white copy. If you purchased a printer without an ADF, then load original documents or photos on . 5 Press . This is selected in the General tab of the ...
...4 Press the arrow buttons to select the name of copies, and then press the Color/Black button to select the desired photo size, and then press . 7 Press . Tips for multiple-page documents. Scanning stops and the printer returns to dry at least 24 hours before stacking, displaying, or storing. Note: ...Reprint appears. 5 Press the arrow buttons to scroll to Yes, and then press . 6 Press the arrow buttons to set a color or black-and-white copy. If you purchased a printer without an ADF, then load original documents or photos on . 5 Press . This is selected in the General tab of the ...

Quick Reference
Page 18
... finished, a new e-mail message is created with the scanned document automatically attached. 8 Compose your e-mail message. Notes: • If the printer is not write protected. 1 Load an original document faceup into the ADF or facedown on the selected computer. For Macintosh users 1 Load an ...When Scan to appears on the scanner glass. 2 Click or Start. 3 Click All Programs or Programs, and then select the printer program folder from the list. 4 Navigate to: Printer Home > select your operating system. 5 Press the arrow buttons to select an application, and then press . 6 Press the ...
... finished, a new e-mail message is created with the scanned document automatically attached. 8 Compose your e-mail message. Notes: • If the printer is not write protected. 1 Load an original document faceup into the ADF or facedown on the selected computer. For Macintosh users 1 Load an ...When Scan to appears on the scanner glass. 2 Click or Start. 3 Click All Programs or Programs, and then select the printer program folder from the list. 4 Navigate to: Printer Home > select your operating system. 5 Press the arrow buttons to select an application, and then press . 6 Press the ...

Quick Reference
Page 19
...scanned?" Troubleshooting Before you troubleshoot Use this checklist to Use Factory, and then press . 19 If Troubleshooting does not solve your printer • Live online technical support • Contact numbers for telephone technical support Setup troubleshooting • "Incorrect language appears on ... with the latest information and troubleshooting for your problem Visit our Web site at http://support.lexmark.com to find the following : CHANGE THE LANGUAGE USING THE PRINTER MENUS 1 From the printer control panel, press . 2 Press the arrow buttons to scroll to Defaults, and then ...
...scanned?" Troubleshooting Before you troubleshoot Use this checklist to Use Factory, and then press . 19 If Troubleshooting does not solve your printer • Live online technical support • Contact numbers for telephone technical support Setup troubleshooting • "Incorrect language appears on ... with the latest information and troubleshooting for your problem Visit our Web site at http://support.lexmark.com to find the following : CHANGE THE LANGUAGE USING THE PRINTER MENUS 1 From the printer control panel, press . 2 Press the arrow buttons to scroll to Defaults, and then ...
Quick Reference
Page 20
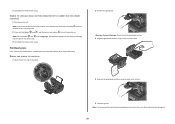
Note: If you troubleshoot" checklist does not solve the problem, then try the following: REMOVE AND REINSERT THE PRINTHEAD 1 Open the printer and lift the latch. 2 Remove the printhead. Printhead errors If the "Before you have set the Power Saver timeout in the Setup menu, ...then press and hold down and , and then press and release to turn the printer on the display, indicating that the printer has been reset. 3 Complete the initial printer setup. Note: If removing and reinserting the printhead does not resolve the error, then contact technical support. 20...
Note: If you troubleshoot" checklist does not solve the problem, then try the following: REMOVE AND REINSERT THE PRINTHEAD 1 Open the printer and lift the latch. 2 Remove the printhead. Printhead errors If the "Before you have set the Power Saver timeout in the Setup menu, ...then press and hold down and , and then press and release to turn the printer on the display, indicating that the printer has been reset. 3 Complete the initial printer setup. Note: If removing and reinserting the printhead does not resolve the error, then contact technical support. 20...

Quick Reference
Page 21
...the square end of the USB cable into the back of the printer. 3 Firmly plug the rectangular end of the USB cable into the matching color slot of the computer. REMOVE AND RECONNECT THE USB CABLE CONNECTED TO YOUR PRINTER CHECK THE USB CONNECTION 1 Check the USB cable for three ...seconds to Macintosh users only. 1 With a document open the printer. 2 Make sure the cartridges are inserted correctly...
...the square end of the USB cable into the back of the printer. 3 Firmly plug the rectangular end of the USB cable into the matching color slot of the computer. REMOVE AND RECONNECT THE USB CABLE CONNECTED TO YOUR PRINTER CHECK THE USB CONNECTION 1 Check the USB cable for three ...seconds to Macintosh users only. 1 With a document open the printer. 2 Make sure the cartridges are inserted correctly...


