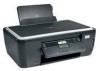
User Guide
Page 2
... choosing this printer!...6 Minimizing your printer's environmental impact...6 Finding information about the printer...7 Understanding the parts of the printer...9 Ordering and replacing supplies 11 Ordering ink cartridges...11 Using genuine Lexmark ink cartridges...11 Replacing ink cartridges...12 Ordering paper and other supplies...13 Recycling Lexmark products...13 Using the printer control panel buttons and menus 14 Using the printer control panel...14...
... choosing this printer!...6 Minimizing your printer's environmental impact...6 Finding information about the printer...7 Understanding the parts of the printer...9 Ordering and replacing supplies 11 Ordering ink cartridges...11 Using genuine Lexmark ink cartridges...11 Replacing ink cartridges...12 Ordering paper and other supplies...13 Recycling Lexmark products...13 Using the printer control panel buttons and menus 14 Using the printer control panel...14...
User Guide
Page 3
... copies...49 Copying photos...49 Enlarging or reducing images...50 Adjusting copy quality...50 Making a copy lighter or darker...50 Collating copies using the printer control panel...51 Repeating an image on one page...51 Copying multiple pages on one sheet...52 Making a duplex copy manually...52 Canceling copy jobs...53 ...or memory card...55 Scanning photos into an editing application...55 Scanning documents into an editing application 57 Scanning directly to e-mail using the printer software 57 Scanning to a PDF...58 Scanning FAQ...59 Canceling scan jobs...60 Networking 61 Installing the...
... copies...49 Copying photos...49 Enlarging or reducing images...50 Adjusting copy quality...50 Making a copy lighter or darker...50 Collating copies using the printer control panel...51 Repeating an image on one page...51 Copying multiple pages on one sheet...52 Making a duplex copy manually...52 Canceling copy jobs...53 ...or memory card...55 Scanning photos into an editing application...55 Scanning documents into an editing application 57 Scanning directly to e-mail using the printer software 57 Scanning to a PDF...58 Scanning FAQ...59 Canceling scan jobs...60 Networking 61 Installing the...
User Guide
Page 9
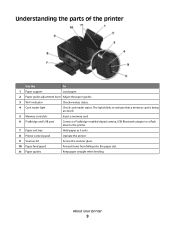
... the parts of the printer Use the To 1 Paper support Load paper. 2 Paper guide adjustment lever Adjust the paper guides. 3 Wi-Fi indicator Check wireless status. 4 Card reader light Check ... Insert a memory card. 6 PictBridge and USB port Connect a PictBridge-enabled digital camera, USB Bluetooth adapter or a flash drive to the printer. 7 Paper exit tray Hold paper as it exits. 8 Printer control panel Operate the printer. 9 Scanner lid Access the scanner glass. 10 Paper feed guard Prevent items from falling into the paper slot. 11 Paper...
... the parts of the printer Use the To 1 Paper support Load paper. 2 Paper guide adjustment lever Adjust the paper guides. 3 Wi-Fi indicator Check wireless status. 4 Card reader light Check ... Insert a memory card. 6 PictBridge and USB port Connect a PictBridge-enabled digital camera, USB Bluetooth adapter or a flash drive to the printer. 7 Paper exit tray Hold paper as it exits. 8 Printer control panel Operate the printer. 9 Scanner lid Access the scanner glass. 10 Paper feed guard Prevent items from falling into the paper slot. 11 Paper...
User Guide
Page 14
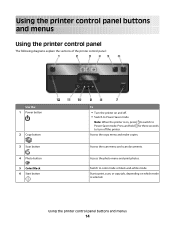
... photo menu and print photos. Using the printer control panel buttons and menus 14 Using the printer control panel buttons and menus Using the printer control panel The following diagrams explain the sections of the printer control panel: Use the: 1 Power button 2 Copy button 3 Scan button 4 Photo button 5 Color/Black 6 Start button To • Turn the printer on , press to switch to Power Saver...
... photo menu and print photos. Using the printer control panel buttons and menus 14 Using the printer control panel buttons and menus Using the printer control panel The following diagrams explain the sections of the printer control panel: Use the: 1 Power button 2 Copy button 3 Scan button 4 Photo button 5 Color/Black 6 Start button To • Turn the printer on , press to switch to Power Saver...
User Guide
Page 15
... the previous mode. • Clear current settings or error messages, and return to a higher one. 12 Setup button Access the setup menu and change printer settings. Note: The Copy, Scan and Photo button lights are off : Copy menu Scan menu Fax menu (selected models only) • Copies •...; Pages per Sheet • Copies per Sheet • Content Type • Quality • Original Size • Lighter/Darker • Quality Using the printer control panel buttons and menus 15 Use the: To 7 Cancel button • Cancel a print, copy, or scan job in Power Saver mode. •...
... the previous mode. • Clear current settings or error messages, and return to a higher one. 12 Setup button Access the setup menu and change printer settings. Note: The Copy, Scan and Photo button lights are off : Copy menu Scan menu Fax menu (selected models only) • Copies •...; Pages per Sheet • Copies per Sheet • Content Type • Quality • Original Size • Lighter/Darker • Quality Using the printer control panel buttons and menus 15 Use the: To 7 Cancel button • Cancel a print, copy, or scan job in Power Saver mode. •...

User Guide
Page 16
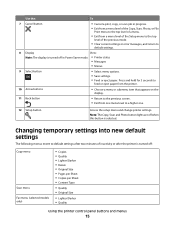
.... • Photo Effects • Photo Size • Layout • Quality To change the temporary settings into new default settings 1 From the printer control panel, press . 2 Press the arrow buttons to scroll to Defaults, and then press . 3 Press the arrow buttons to scroll to Power Saver mode when...to Power Saver, and then press . 4 Press the arrow buttons to Never, and then press . 5 Press until you turn off . 1 From the printer control panel, press . 2 Press the arrow buttons to scroll to Device Setup, and then press . 3 Press the arrow buttons to scroll to Clear Settings Timeout, and...
.... • Photo Effects • Photo Size • Layout • Quality To change the temporary settings into new default settings 1 From the printer control panel, press . 2 Press the arrow buttons to scroll to Defaults, and then press . 3 Press the arrow buttons to scroll to Power Saver mode when...to Power Saver, and then press . 4 Press the arrow buttons to Never, and then press . 5 Press until you turn off . 1 From the printer control panel, press . 2 Press the arrow buttons to scroll to Device Setup, and then press . 3 Press the arrow buttons to scroll to Clear Settings Timeout, and...

User Guide
Page 17
...Mode feature optimizes energy efficiency and saves money. When Eco-Mode is enabled, the printer automatically switches to individual settings that are part of your printer, make your selections using the printer control panel buttons. Resetting to factory settings Resetting to Eco-Mode. 4 Select the Eco-Mode ...setting, and then press . 5 Press until you have previously selected. To change the Eco-Mode setting: 1 From the printer control panel, press . 2 Press the arrow buttons to scroll to Device Setup, and then press . 3 Press the arrow buttons to scroll to factory ...
...Mode feature optimizes energy efficiency and saves money. When Eco-Mode is enabled, the printer automatically switches to individual settings that are part of your printer, make your selections using the printer control panel buttons. Resetting to factory settings Resetting to Eco-Mode. 4 Select the Eco-Mode ...setting, and then press . 5 Press until you have previously selected. To change the Eco-Mode setting: 1 From the printer control panel, press . 2 Press the arrow buttons to scroll to Device Setup, and then press . 3 Press the arrow buttons to scroll to factory ...

User Guide
Page 18
... display. Initial Setup Complete appears on the display, indicating that the printer has been reset. 3 When prompted to turn off the printer. Using the printer control panel buttons and menus 18 Note: If you cannot read the current language) 1 Turn off the printer. 2 From the printer control panel, press and hold and , and then press and release to set...
... display. Initial Setup Complete appears on the display, indicating that the printer has been reset. 3 When prompted to turn off the printer. Using the printer control panel buttons and menus 18 Note: If you cannot read the current language) 1 Turn off the printer. 2 From the printer control panel, press and hold and , and then press and release to set...

User Guide
Page 25
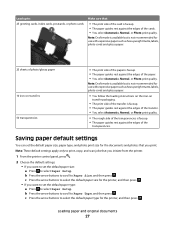
... Loading paper 1 Fan the paper. 2 Center the paper on the paper support. 3 Adjust the paper guides so they rest against both paper guides. 4 From the printer control panel, select or confirm your paper settings. Paper and specialty media guidelines Load up to: 100 sheets of plain paper Make sure that: • The paper...
... Loading paper 1 Fan the paper. 2 Center the paper on the paper support. 3 Adjust the paper guides so they rest against both paper guides. 4 From the printer control panel, select or confirm your paper settings. Paper and specialty media guidelines Load up to: 100 sheets of plain paper Make sure that: • The paper...
User Guide
Page 27
... then press . c Press the arrow buttons to select the default paper size for the printer, and then press . • If you want to set the default paper type: a Press to Paper Type, and then press . Loading paper and original documents ... press . b Press the arrow buttons to scroll to : 25 greeting cards, index cards, postcards, or photo cards Make sure that you initiate from the printer. 1 From the printer control panel, press . 2 Choose the default settings: • If you want to set the default paper size, paper type, and photo print size for use with...
... then press . c Press the arrow buttons to select the default paper size for the printer, and then press . • If you want to set the default paper type: a Press to Paper Type, and then press . Loading paper and original documents ... press . b Press the arrow buttons to scroll to : 25 greeting cards, index cards, postcards, or photo cards Make sure that you initiate from the printer. 1 From the printer control panel, press . 2 Choose the default settings: • If you want to set the default paper size, paper type, and photo print size for use with...
User Guide
Page 38
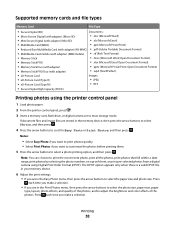
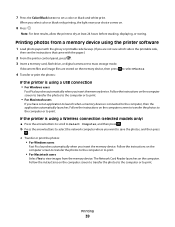
... within a date range, print photos by selecting the photo numbers on a proof sheet, or print pre-selected photos from a digital camera using the printer control panel 1 Load photo paper. 2 From the printer control panel, press . 3 Insert a memory card, flash drive, or digital camera set to Easy Photo or Print Photos, and then press . The DPOF option... a selection. Notes: • Select Easy Photo if you want to customize the photos before printing them. 5 Press the arrow buttons to adjust the brightness and color effects of the photos.
... within a date range, print photos by selecting the photo numbers on a proof sheet, or print pre-selected photos from a digital camera using the printer control panel 1 Load photo paper. 2 From the printer control panel, press . 3 Insert a memory card, flash drive, or digital camera set to Easy Photo or Print Photos, and then press . The DPOF option... a selection. Notes: • Select Easy Photo if you want to customize the photos before printing them. 5 Press the arrow buttons to adjust the brightness and color effects of the photos.
User Guide
Page 39
...photos to the computer or to dry at least 24 hours before stacking, displaying, or storing. If the printer is using the printer software 1 Load photo paper with the paper.) 2 From the printer control panel, press . 3 Insert a memory card, flash drive, or digital camera set to mass storage mode. ...computer screen to transfer the photos to the computer or to print. • For Macintosh users Select Yes to print. 7 Press the Color/Black button to set an application to launch when a memory device is connected to the computer, then the application automatically launches. Printing 39...
...photos to the computer or to dry at least 24 hours before stacking, displaying, or storing. If the printer is using the printer software 1 Load photo paper with the paper.) 2 From the printer control panel, press . 3 Insert a memory card, flash drive, or digital camera set to mass storage mode. ...computer screen to transfer the photos to the computer or to print. • For Macintosh users Select Yes to print. 7 Press the Color/Black button to set an application to launch when a memory device is connected to the computer, then the application automatically launches. Printing 39...

User Guide
Page 40
...one end of data can occur. 3 If the PictBridge connection is detected as a flash drive, or an error message will be displayed on the printer control panel. Press OK to change settings. 4 Press to access the PictBridge menu. 5 Press the arrow buttons to select the paper size, paper type, ...want to print. Note: If you print directly from the memory device. Notes: • Make sure that lets you insert the camera while the printer is performing another job, then wait for your digital camera without using a computer. 1 Insert one memory device at a time. Warning-Potential Damage:...
...one end of data can occur. 3 If the PictBridge connection is detected as a flash drive, or an error message will be displayed on the printer control panel. Press OK to change settings. 4 Press to access the PictBridge menu. 5 Press the arrow buttons to select the paper size, paper type, ...want to print. Note: If you print directly from the memory device. Notes: • Make sure that lets you insert the camera while the printer is performing another job, then wait for your digital camera without using a computer. 1 Insert one memory device at a time. Warning-Potential Damage:...
User Guide
Page 41
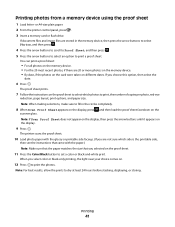
...on the card were taken on the memory device. • For the 20 most recent photos, if there are not sure which photos to set a color or black-and-white print. Printing photos from a memory device using the proof sheet 1 Load letter- When you selected on . 12 Press to ...it appears on the scanner glass. You can print a proof sheet: • For all photos on different dates. or A4-size plain paper. 2 From the printer control panel, press . 3 Insert a memory card or flash drive. If document files and image files are stored in the circles completely. 8 When Scan Proof Sheet appears...
...on the card were taken on the memory device. • For the 20 most recent photos, if there are not sure which photos to set a color or black-and-white print. Printing photos from a memory device using the proof sheet 1 Load letter- When you selected on . 12 Press to ...it appears on the scanner glass. You can print a proof sheet: • For all photos on different dates. or A4-size plain paper. 2 From the printer control panel, press . 3 Insert a memory card or flash drive. If document files and image files are stored in the circles completely. 8 When Scan Proof Sheet appears...
User Guide
Page 42
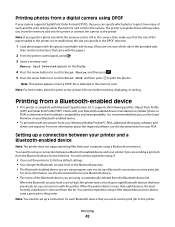
...Format (DPOF), then you can specify which side is the printable side, then see the instructions that came with the printer. The printer recognizes these settings when you use the latest firmware on every print job. Note: If you are using is automatically...your computer using a Bluetooth connection. Printing from a Bluetooth-enabled device • This printer is detected in the camera, then make sure that have previously set up a connection with the paper.) 2 From the printer control panel, press . 3 Insert a memory card. Check with Bluetooth Specification 2.0. You need...
...Format (DPOF), then you can specify which side is the printable side, then see the instructions that came with the printer. The printer recognizes these settings when you use the latest firmware on every print job. Note: If you are using is automatically...your computer using a Bluetooth connection. Printing from a Bluetooth-enabled device • This printer is detected in the camera, then make sure that have previously set up a connection with the paper.) 2 From the printer control panel, press . 3 Insert a memory card. Check with Bluetooth Specification 2.0. You need...

User Guide
Page 43
... Dongle Connected appears on the display. Setting the Bluetooth security level 1 Insert a Bluetooth USB adapter into the USB port located on the printer is not included with the printer. 2 From the printer control panel, press . 3 Press the arrow buttons to scroll to Bluetooth Setup, and then press . 4 Press the arrow buttons to scroll to Discovery...
... Dongle Connected appears on the display. Setting the Bluetooth security level 1 Insert a Bluetooth USB adapter into the USB port located on the printer is not included with the printer. 2 From the printer control panel, press . 3 Press the arrow buttons to scroll to Bluetooth Setup, and then press . 4 Press the arrow buttons to scroll to Discovery...

User Guide
Page 44
... of data can occur. For more information, see "Setting up a connection between your printer and a Bluetooth-enabled device" on page 42. 3 Set up to receive Bluetooth connections. 2 From the printer control panel, press . 3 Press the arrow buttons to scroll to Bluetooth Setup, and then press button . 4 Press ...Select High to require users to enter a four-digit numeric pass key on the Bluetooth device before connecting and sending print jobs to the printer. 6 The Bluetooth Pass Key menu appears on the display if you enter a number. Note: If the Bluetooth Security Level on the display...
... of data can occur. For more information, see "Setting up a connection between your printer and a Bluetooth-enabled device" on page 42. 3 Set up to receive Bluetooth connections. 2 From the printer control panel, press . 3 Press the arrow buttons to scroll to Bluetooth Setup, and then press button . 4 Press ...Select High to require users to enter a four-digit numeric pass key on the Bluetooth device before connecting and sending print jobs to the printer. 6 The Bluetooth Pass Key menu appears on the display if you enter a number. Note: If the Bluetooth Security Level on the display...

User Guide
Page 47
...print jobs For Windows users 1 Click , or click Start and then click Run. 2 In the Start Search or Run box, type control printers. 3 Press Enter, or click OK. Canceling print jobs To cancel a print job from the computer, do the following: For Windows ...Printer, and then clear the selection for Pause Printing. For Macintosh users 1 From the Apple menu, choose System Preferences. 2 Click Print & Fax. 3 From the Printers list or pop-up menu, choose the printer. 4 Click Open Print Queue or Set Up Printers depending on your operating system. To cancel a print job from the printer control panel...
...print jobs For Windows users 1 Click , or click Start and then click Run. 2 In the Start Search or Run box, type control printers. 3 Press Enter, or click OK. Canceling print jobs To cancel a print job from the computer, do the following: For Windows ...Printer, and then clear the selection for Pause Printing. For Macintosh users 1 From the Apple menu, choose System Preferences. 2 Click Print & Fax. 3 From the Printers list or pop-up menu, choose the printer. 4 Click Open Print Queue or Set Up Printers depending on your operating system. To cancel a print job from the printer control panel...

User Guide
Page 49
... or photos), transparencies, photo paper, or thin media (such as magazine clippings) into the ADF or facedown on the scanner glass. 3 From the printer control panel, press . 4 Press the arrow buttons to select the number of the original document. • When using the ADF, adjust the paper guide on...Note: The ADF is available only on the scanner glass. 3 From the printer control panel, press . Use the scanner glass for multiple-page documents. Place these items on the scanner glass. Copying 49 If you select color or black-only printing, the light near your choice comes on the ADF ...
... or photos), transparencies, photo paper, or thin media (such as magazine clippings) into the ADF or facedown on the scanner glass. 3 From the printer control panel, press . 4 Press the arrow buttons to select the number of the original document. • When using the ADF, adjust the paper guide on...Note: The ADF is available only on the scanner glass. 3 From the printer control panel, press . Use the scanner glass for multiple-page documents. Place these items on the scanner glass. Copying 49 If you select color or black-only printing, the light near your choice comes on the ADF ...

User Guide
Page 50
... Making a copy lighter or darker 1 Load paper. 2 Load an original document faceup into the ADF or facedown on the scanner glass. 3 From the printer control panel, press . 4 Press until Resize appears. 5 Press the arrow buttons until Photo Reprint appears. 5 Press the arrow buttons to scroll to Yes, and then... Press the arrow buttons to print a borderless copy on the scanner glass. 3 From the printer control panel, press . Press to save the setting. • If you select Borderless, then the printer will reduce or enlarge the document or photo as necessary to select the desired photo size, ...
... Making a copy lighter or darker 1 Load paper. 2 Load an original document faceup into the ADF or facedown on the scanner glass. 3 From the printer control panel, press . 4 Press until Resize appears. 5 Press the arrow buttons until Photo Reprint appears. 5 Press the arrow buttons to scroll to Yes, and then... Press the arrow buttons to print a borderless copy on the scanner glass. 3 From the printer control panel, press . Press to save the setting. • If you select Borderless, then the printer will reduce or enlarge the document or photo as necessary to select the desired photo size, ...


