
User's Guide
Page 7
... the quality of your old printer instead of throwing it here Setup documentation The setup documentation came with fewer cartridges. • Clean the printhead. Follow the instructions to www.lexmark.com/recycle. Initial setup instructions: • Connecting the printer • Installing the printer software Find it away. • Recycle paper from discarded...
... the quality of your old printer instead of throwing it here Setup documentation The setup documentation came with fewer cartridges. • Clean the printhead. Follow the instructions to www.lexmark.com/recycle. Initial setup instructions: • Connecting the printer • Installing the printer software Find it away. • Recycle paper from discarded...
User's Guide
Page 10
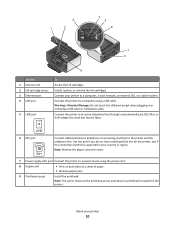
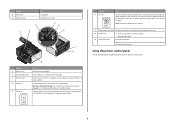
... country or region. Warning-Potential Damage: Do not touch the USB port except when plugging in the printer. Connect your printer to the printhead access area when no printhead is supported in your printer 10 3 1 2 4 5 6 7 8 9 Use the 1 Scanner unit 2 Ink cartridge access 3 Ethernet port 4... the power cord. 8 Duplex unit • Print on both sides of a sheet of paper. • Remove paper jams. 9 Printhead access Install the printhead. Install, replace, or remove the ink cartridges. Connect the printer to an active telephone line (through a standard wall jack, DSL filter...
... country or region. Warning-Potential Damage: Do not touch the USB port except when plugging in the printer. Connect your printer to the printhead access area when no printhead is supported in your printer 10 3 1 2 4 5 6 7 8 9 Use the 1 Scanner unit 2 Ink cartridge access 3 Ethernet port 4... the power cord. 8 Duplex unit • Print on both sides of a sheet of paper. • Remove paper jams. 9 Printhead access Install the printhead. Install, replace, or remove the ink cartridges. Connect the printer to an active telephone line (through a standard wall jack, DSL filter...
User's Guide
Page 12
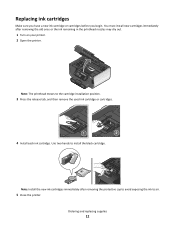
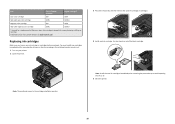
Note: Install the new ink cartridges immediately after removing the old ones or the ink remaining in the printhead nozzles may dry out. 1 Turn on your printer. 2 Open the printer. Ordering and replacing supplies 12 Use two hands to the cartridge installation position. ... or cartridges. 4 Install each ink cartridge. Replacing ink cartridges Make sure you have a new ink cartridge or cartridges before you begin. Note: The printhead moves to install the black cartridge. You must install new cartridges immediately after removing the protective cap to avoid exposing the ink to air. 5 Close...
Note: Install the new ink cartridges immediately after removing the old ones or the ink remaining in the printhead nozzles may dry out. 1 Turn on your printer. 2 Open the printer. Ordering and replacing supplies 12 Use two hands to the cartridge installation position. ... or cartridges. 4 Install each ink cartridge. Replacing ink cartridges Make sure you have a new ink cartridge or cartridges before you begin. Note: The printhead moves to install the black cartridge. You must install new cartridges immediately after removing the protective cap to avoid exposing the ink to air. 5 Close...
User's Guide
Page 22
... icon. 3 From the Web Links tab, select the link you purchased. Use the To Network Card Reader (in Mac OS X version 10.6) or Lexmark Network Card Reader (in Mac OS X version 10.5 or earlier) (referred to as Printer Utility) • Get help with cartridge installation. •... Print a test page. • Print an alignment page. • Clean the printhead nozzles. • Order ink or supplies. • Register the printer. • Contact technical support. Note: Your printer may not come with the printer...
... icon. 3 From the Web Links tab, select the link you purchased. Use the To Network Card Reader (in Mac OS X version 10.6) or Lexmark Network Card Reader (in Mac OS X version 10.5 or earlier) (referred to as Printer Utility) • Get help with cartridge installation. •... Print a test page. • Print an alignment page. • Clean the printhead nozzles. • Order ink or supplies. • Register the printer. • Contact technical support. Note: Your printer may not come with the printer...
User's Guide
Page 125
.... If you aligned the cartridges to improve print quality, then print your printed image appear jagged or wavy, then you may need to align the printhead. Using the printer control panel 1 Load plain paper. 2 From the printer control panel, navigate to : Printer Home > select your printer > Maintenance tab > Align cartridges 5 Follow...
.... If you aligned the cartridges to improve print quality, then print your printed image appear jagged or wavy, then you may need to align the printhead. Using the printer control panel 1 Load plain paper. 2 From the printer control panel, navigate to : Printer Home > select your printer > Maintenance tab > Align cartridges 5 Follow...
User's Guide
Page 126
... double-click the printer folder. 3 Double-click the Printer Utility icon. 4 From the Maintenance tab, select Clean Print Nozzles. Notes: • Cleaning the printhead nozzles uses ink, so clean them only when necessary. • Deep cleaning uses more ink, so try the Clean... From the printer control panel, navigate to: > Maintenance > 2 Press the up or down arrow button to scroll to the printer before you can clean the printhead nozzles. A cleaning page prints. Using the printer software For Windows users 1 Click or Start. 2 Click All Programs or Programs, and then select the printer...
... double-click the printer folder. 3 Double-click the Printer Utility icon. 4 From the Maintenance tab, select Clean Print Nozzles. Notes: • Cleaning the printhead nozzles uses ink, so clean them only when necessary. • Deep cleaning uses more ink, so try the Clean... From the printer control panel, navigate to: > Maintenance > 2 Press the up or down arrow button to scroll to the printer before you can clean the printhead nozzles. A cleaning page prints. Using the printer software For Windows users 1 Click or Start. 2 Click All Programs or Programs, and then select the printer...
User's Guide
Page 128
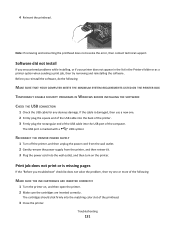
... the Service Center, use the Service Center link. If Troubleshooting does not solve your problem Visit our Web site at http://support.lexmark.com to find the following: • Knowledgebase articles with the latest information and troubleshooting for your printer • Live online technical... any errors. • Check for telephone technical support Setup troubleshooting • "Incorrect language appears on the display" on page 129 • "Printhead errors" on page 129 • "Software did not install" on an error message dialog, click the For additional assistance, use one of these...
... the Service Center, use the Service Center link. If Troubleshooting does not solve your problem Visit our Web site at http://support.lexmark.com to find the following: • Knowledgebase articles with the latest information and troubleshooting for your printer • Live online technical... any errors. • Check for telephone technical support Setup troubleshooting • "Incorrect language appears on the display" on page 129 • "Printhead errors" on page 129 • "Software did not install" on an error message dialog, click the For additional assistance, use one of these...

User's Guide
Page 129
... the Setup menu, then press and hold down and , and then press and release to Use Factory, and then press . 5 Complete the initial printer setup. Printhead errors If the "Before you troubleshoot" checklist does not solve the problem, then try one or more of the following : Troubleshooting 129 CHANGE THE LANGUAGE...
... the Setup menu, then press and hold down and , and then press and release to Use Factory, and then press . 5 Complete the initial printer setup. Printhead errors If the "Before you troubleshoot" checklist does not solve the problem, then try one or more of the following : Troubleshooting 129 CHANGE THE LANGUAGE...

User's Guide
Page 130
REMOVE AND REINSERT THE PRINTHEAD 1 Open the printer and lift the latch. 2 2 Remove the printhead. 3 Wipe the printhead contacts using a clean, lint-free cloth. Troubleshooting 130
REMOVE AND REINSERT THE PRINTHEAD 1 Open the printer and lift the latch. 2 2 Remove the printhead. 3 Wipe the printhead contacts using a clean, lint-free cloth. Troubleshooting 130
User's Guide
Page 131
... the problem, then try removing and reinstalling the software. Print job does not print or is marked with a USB symbol. 4 Reinsert the printhead. Note: If removing and reinserting the printhead does not resolve the error, then contact technical support. The cartridges should click firmly into the matching color slot of the computer... the wall outlet. 2 Gently remove the power supply from the printer, and then reinsert it. 3 Plug the power cord into the USB port of the printhead. 3 Close the printer.
... the problem, then try removing and reinstalling the software. Print job does not print or is marked with a USB symbol. 4 Reinsert the printhead. Note: If removing and reinserting the printhead does not resolve the error, then contact technical support. The cartridges should click firmly into the matching color slot of the computer... the wall outlet. 2 Gently remove the power supply from the printer, and then reinsert it. 3 Plug the power cord into the USB port of the printhead. 3 Close the printer.
User's Guide
Page 133
... off slowly, then the printer is finished. A cleaning page prints. 6 Press the arrow buttons to scroll to fit, make sure the printhead is printing blank pages Blank pages may be caused by improperly installed ink cartridges. to wake up the If this problem persists, then check ...firmware. Troubleshooting 133 Printer is properly seated, and then try one or more information. REINSTALL THE INK CARTRIDGES AND DEEP CLEAN AND ALIGN THE PRINTHEAD 1 Reinstall the ink cartridges, see "Replacing ink cartridges" on and off the printer, and then unplug the power cord from the wall outlet...
... off slowly, then the printer is finished. A cleaning page prints. 6 Press the arrow buttons to scroll to fit, make sure the printhead is printing blank pages Blank pages may be caused by improperly installed ink cartridges. to wake up the If this problem persists, then check ...firmware. Troubleshooting 133 Printer is properly seated, and then try one or more information. REINSTALL THE INK CARTRIDGES AND DEEP CLEAN AND ALIGN THE PRINTHEAD 1 Reinstall the ink cartridges, see "Replacing ink cartridges" on and off the printer, and then unplug the power cord from the wall outlet...
User's Guide
Page 139
SELECT A HIGHER PRINT QUALITY FROM THE PRINTER SOFTWARE MAKE SURE THE INK CARTRIDGES ARE PROPERLY INSTALLED ALIGN THE PRINTHEAD CLEAN OR DEEP CLEAN THE PRINTHEAD NOZZLES Note: If these solutions do not remove the streaks or lines on printed image If the "Before you troubleshoot" checklist does not solve the ...
SELECT A HIGHER PRINT QUALITY FROM THE PRINTER SOFTWARE MAKE SURE THE INK CARTRIDGES ARE PROPERLY INSTALLED ALIGN THE PRINTHEAD CLEAN OR DEEP CLEAN THE PRINTHEAD NOZZLES Note: If these solutions do not remove the streaks or lines on printed image If the "Before you troubleshoot" checklist does not solve the ...
User's Guide
Page 184
...run fax software 147 cannot scan to computer over a network 142 cannot send faxes 143 cartridges, ink ordering 11 using genuine Lexmark 11 changing Power Saver timeout 16 changing printing mode 55 changing temporary settings into default 17 changing wireless settings after installation (Mac... troubleshoot 128 fax troubleshooting 143 memory card troubleshooting 149 choosing a splitter, faxing 90 cleaning exterior of the printer 126 cleaning printhead nozzles 126 Club Internet 100 coated paper loading 32 collating copies 62 Communication not available message 164 computer slows down when printing...
...run fax software 147 cannot scan to computer over a network 142 cannot send faxes 143 cartridges, ink ordering 11 using genuine Lexmark 11 changing Power Saver timeout 16 changing printing mode 55 changing temporary settings into default 17 changing wireless settings after installation (Mac... troubleshoot 128 fax troubleshooting 143 memory card troubleshooting 149 choosing a splitter, faxing 90 cleaning exterior of the printer 126 cleaning printhead nozzles 126 Club Internet 100 coated paper loading 32 collating copies 62 Communication not available message 164 computer slows down when printing...

User's Guide
Page 188
...problems, basic solutions 128 Printer Settings 84 printer software installing 25 uninstalling 24 printer, setting as default 55 printhead aligning 125 printhead access location 9 printhead error 129 printhead nozzles cleaning 126 printing collate 37 custom-size paper 41 documents 36 documents from memory card or flash ...finding 7 R received history report 94 receiving faxes Auto Answer setting 88, 89 automatically 88 manually 89 tips 88, 89 recycling 6 Lexmark products 13 WEEE statement 171 redial attempts, fax setting 83 redial time, fax setting 83 reducing an image 60 registering fax user ...
...problems, basic solutions 128 Printer Settings 84 printer software installing 25 uninstalling 24 printer, setting as default 55 printhead aligning 125 printhead access location 9 printhead error 129 printhead nozzles cleaning 126 printing collate 37 custom-size paper 41 documents 36 documents from memory card or flash ...finding 7 R received history report 94 receiving faxes Auto Answer setting 88, 89 automatically 88 manually 89 tips 88, 89 recycling 6 Lexmark products 13 WEEE statement 171 redial attempts, fax setting 83 redial time, fax setting 83 reducing an image 60 registering fax user ...
User's Guide
Page 189
... print through USB 134 incorrect language appears on display 129 page does not print 131 printer does not respond 133 printer printing blank pages 133 printhead error 129 software did not install 131 shared printing 110 sharing printer in Windows 109 software Service Center 128 software did not install 131 software... print through USB 134 incorrect language appears on display 129 page does not print 131 printer does not respond 133 printer printing blank pages 133 printhead error 129 software did not install 131
... print through USB 134 incorrect language appears on display 129 page does not print 131 printer does not respond 133 printer printing blank pages 133 printhead error 129 software did not install 131 shared printing 110 sharing printer in Windows 109 software Service Center 128 software did not install 131 software... print through USB 134 incorrect language appears on display 129 page does not print 131 printer does not respond 133 printer printing blank pages 133 printhead error 129 software did not install 131
Quick Reference
Page 4
....6 1 From the Applications folder in a minimum-power standby mode after the printer is left idle for reuse or recycling through the Lexmark Cartridge Collection Program. These features clean the printhead nozzles to automatically print on both sides of throwing it here Initial setup instructions • Quick Setup sheet • Hardware Setup Wizard...
....6 1 From the Applications folder in a minimum-power standby mode after the printer is left idle for reuse or recycling through the Lexmark Cartridge Collection Program. These features clean the printhead nozzles to automatically print on both sides of throwing it here Initial setup instructions • Quick Setup sheet • Hardware Setup Wizard...
Quick Reference
Page 6
Using the printer control panel The following diagrams explain the sections of paper. • Remove paper jams. 9 Printhead access Install the printhead. Connect your country or region. Connect the printer to a computer using the power cord. 8 Duplex unit • Print on both sides of a sheet of the .... LINE Use the 6 EXT port EXT To Connect additional devices (telephone or answering machine) to send and receive faxes. Note: The carrier moves to the printhead access area when no printhead is supported in your printer to a power source using a USB cable.
Using the printer control panel The following diagrams explain the sections of paper. • Remove paper jams. 9 Printhead access Install the printhead. Connect your country or region. Connect the printer to a computer using the power cord. 8 Duplex unit • Print on both sides of a sheet of the .... LINE Use the 6 EXT port EXT To Connect additional devices (telephone or answering machine) to send and receive faxes. Note: The carrier moves to the printhead access area when no printhead is supported in your printer to a power source using a USB cable.
Quick Reference
Page 10
...Install the new ink cartridges immediately after removing the old ones or the ink remaining in the printhead nozzles may dry out. 1 Turn on the Lexmark Web site at www.lexmark.com. After use only. You must install new cartridges immediately after removing the protective cap ...cartridge 100XL 100XLA Magenta color cartridge 100 100A High yield magenta color cartridge 100XL 100XLA 1 Licensed for a single use , return this cartridge to Lexmark for remanufacturing, refilling, or recycling. 2 Available only on your printer. 2 Open the printer. 3 Press the release tab, and then ...
...Install the new ink cartridges immediately after removing the old ones or the ink remaining in the printhead nozzles may dry out. 1 Turn on the Lexmark Web site at www.lexmark.com. After use only. You must install new cartridges immediately after removing the protective cap ...cartridge 100XL 100XLA Magenta color cartridge 100 100A High yield magenta color cartridge 100XL 100XLA 1 Licensed for a single use , return this cartridge to Lexmark for remanufacturing, refilling, or recycling. 2 Available only on your printer. 2 Open the printer. 3 Press the release tab, and then ...
Quick Reference
Page 11
...first to save ink. • If the ink levels are too low, you must replace the ink cartridges before you may need to align the printhead. Using the printer software For Windows users 1 Click or Start. 2 Click All Programs or Programs, and then select the printer program folder from... the Finder desktop, double-click the printer folder. 3 Double-click the Printer Utility icon. 4 From the Maintenance tab, select Clean Print Nozzles. Aligning the printhead If the characters or lines on the computer screen. Note: Do not remove the alignment page until printing is turned off. If print quality has...
...first to save ink. • If the ink levels are too low, you must replace the ink cartridges before you may need to align the printhead. Using the printer software For Windows users 1 Click or Start. 2 Click All Programs or Programs, and then select the printer program folder from... the Finder desktop, double-click the printer folder. 3 Double-click the Printer Utility icon. 4 From the Maintenance tab, select Clean Print Nozzles. Aligning the printhead If the characters or lines on the computer screen. Note: Do not remove the alignment page until printing is turned off. If print quality has...
Quick Reference
Page 14
...: Your printer may not come with cartridge installation. • Print a test page. • Print an alignment page. • Clean the printhead nozzles. • Order ink or supplies. • Register the printer. • Contact technical support. In Mac OS X version 10.5 or... Registration To Contact technical support. Note: Your printer may not come with these applications, depending on a wireless network. Use the To Lexmark Printer Utility (not available in Mac OS X version 10.6) (referred to as Wireless Setup Assistant) Uninstaller Remove the printer software from your...
...: Your printer may not come with cartridge installation. • Print a test page. • Print an alignment page. • Clean the printhead nozzles. • Order ink or supplies. • Register the printer. • Contact technical support. In Mac OS X version 10.5 or... Registration To Contact technical support. Note: Your printer may not come with these applications, depending on a wireless network. Use the To Lexmark Printer Utility (not available in Mac OS X version 10.6) (referred to as Wireless Setup Assistant) Uninstaller Remove the printer software from your...


