
User's Guide
Page 11
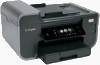
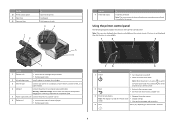
... ADF. Insert a memory card. Load paper. Warning-Potential Damage: Do not touch the USB port except when plugging in or removing a USB cable or installation cable. 5 Power supply with port Connect the printer to the printer. Operate the printer. Use the 5...feeding it exits. 3 4 1 2 5 6 7 Use the To 1 Scanner unit • Access the ink cartridges and printhead. • Remove paper jams. 2 Ink cartridge access Install, replace, or remove ink cartridges. 3 Ethernet port Connect your printer 11 Connect a PictBridge-enabled digital camera, a USB Bluetooth adapter, or a ...
... ADF. Insert a memory card. Load paper. Warning-Potential Damage: Do not touch the USB port except when plugging in or removing a USB cable or installation cable. 5 Power supply with port Connect the printer to the printer. Operate the printer. Use the 5...feeding it exits. 3 4 1 2 5 6 7 Use the To 1 Scanner unit • Access the ink cartridges and printhead. • Remove paper jams. 2 Ink cartridge access Install, replace, or remove ink cartridges. 3 Ethernet port Connect your printer 11 Connect a PictBridge-enabled digital camera, a USB Bluetooth adapter, or a ...
User's Guide
Page 14
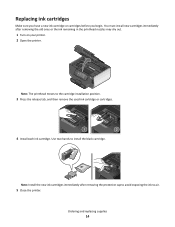
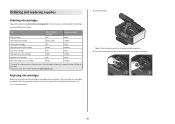
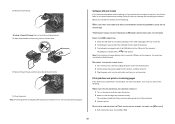
... used ink cartridge or cartridges. 1 2 4 Install each ink cartridge. Ordering and replacing supplies 14 You must install new cartridges immediately after removing the protective cap to avoid exposing the ink to air. 5 Close the printer. Replacing ink cartridges Make sure you have a new ink ...cartridge or cartridges before you begin. Note: Install the new ink cartridges immediately after removing the old ones or the ink remaining in the printhead nozzles may dry out. 1 Turn on your printer. 2 Open the printer. 2 Note: The...
... used ink cartridge or cartridges. 1 2 4 Install each ink cartridge. Ordering and replacing supplies 14 You must install new cartridges immediately after removing the protective cap to avoid exposing the ink to air. 5 Close the printer. Replacing ink cartridges Make sure you have a new ink ...cartridge or cartridges before you begin. Note: Install the new ink cartridges immediately after removing the old ones or the ink remaining in the printhead nozzles may dry out. 1 Turn on your printer. 2 Open the printer. 2 Note: The...
User's Guide
Page 24
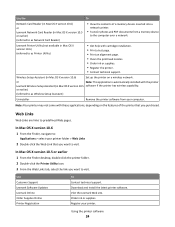
.... • Print a test page. • Print an alignment page. • Clean the printhead nozzles. • Order ink or supplies. • Register the printer. • Contact technical support. Visit the Lexmark Web site. In Mac OS X version 10.5 or earlier 1 From the Finder desktop, double-...Card Reader (in Mac OS X version 10.5 or earlier) (referred to as Wireless Setup Assistant) Uninstaller Remove the printer software from a memory device to the computer over a network. Lexmark Printer Utility (not available in Mac OS X version 10.6) (referred to predefined Web pages. Note: Your...
.... • Print a test page. • Print an alignment page. • Clean the printhead nozzles. • Order ink or supplies. • Register the printer. • Contact technical support. Visit the Lexmark Web site. In Mac OS X version 10.5 or earlier 1 From the Finder desktop, double-...Card Reader (in Mac OS X version 10.5 or earlier) (referred to as Wireless Setup Assistant) Uninstaller Remove the printer software from a memory device to the computer over a network. Lexmark Printer Utility (not available in Mac OS X version 10.6) (referred to predefined Web pages. Note: Your...
User's Guide
Page 110
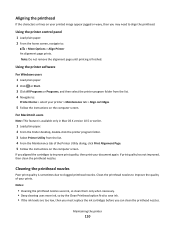
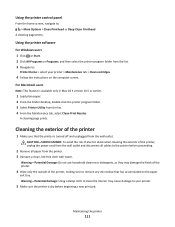
...list. 4 From the Maintenance tab of your printer > Maintenance tab > Align cartridges 5 Follow the instructions on the computer screen. Note: Do not remove the alignment page until printing is available only in Mac OS X version 10.5 or earlier. 1 Load plain paper. 2 From the Finder desktop, ...double-click the printer program folder. 3 Select Printer Utility from the list. 4 Navigate to align the printhead. Cleaning the printhead nozzles Poor print quality is sometimes due to save ink. • If the ink levels are too low, then you must replace the ink...
...list. 4 From the Maintenance tab of your printer > Maintenance tab > Align cartridges 5 Follow the instructions on the computer screen. Note: Do not remove the alignment page until printing is available only in Mac OS X version 10.5 or earlier. 1 Load plain paper. 2 From the Finder desktop, ...double-click the printer program folder. 3 Select Printer Utility from the list. 4 Navigate to align the printhead. Cleaning the printhead nozzles Poor print quality is sometimes due to save ink. • If the ink levels are too low, then you must replace the ink...
User's Guide
Page 111
... all paper from the list. 3 Navigate to: Printer Home > select your printer. 5 Make sure the printer is dry before proceeding. 2 Remove all cables to remove any ink residue that the printer is available only in Mac OS X version 10.5 or earlier. 1 Load plain paper. 2 From the Finder...with water. Warning-Potential Damage: Do not use household cleaners or detergents, as they may cause damage to : > More Options > Clean Printhead or Deep Clean Printhead A cleaning page prints. For Macintosh users Note: This feature is turned off and unplugged from the list. 4 From the Maintenance tab, ...
... all paper from the list. 3 Navigate to: Printer Home > select your printer. 5 Make sure the printer is dry before proceeding. 2 Remove all cables to remove any ink residue that the printer is available only in Mac OS X version 10.5 or earlier. 1 Load plain paper. 2 From the Finder...with water. Warning-Potential Damage: Do not use household cleaners or detergents, as they may cause damage to : > More Options > Clean Printhead or Deep Clean Printhead A cleaning page prints. For Macintosh users Note: This feature is turned off and unplugged from the list. 4 From the Maintenance tab, ...
User's Guide
Page 114
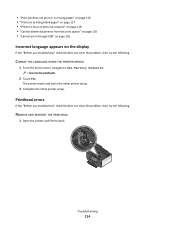
... appears on the display If the "Before you troubleshoot" checklist does not solve the problem, then try the following : REMOVE AND REINSERT THE PRINTHEAD 1 Open the printer and lift the latch. 2 Troubleshooting 114 Printhead errors If the "Before you troubleshoot" checklist does not solve the problem, then try the following : CHANGE THE LANGUAGE...
... appears on the display If the "Before you troubleshoot" checklist does not solve the problem, then try the following : REMOVE AND REINSERT THE PRINTHEAD 1 Open the printer and lift the latch. 2 Troubleshooting 114 Printhead errors If the "Before you troubleshoot" checklist does not solve the problem, then try the following : CHANGE THE LANGUAGE...

User's Guide
Page 115
... installing, or if your printer does not appear in the list in the Printers folder or as a printer option when sending a print job, then try removing and reinstalling the software. Note: If removing and reinserting the printhead does not resolve the error, then contact technical support.
... installing, or if your printer does not appear in the list in the Printers folder or as a printer option when sending a print job, then try removing and reinstalling the software. Note: If removing and reinserting the printhead does not resolve the error, then contact technical support.
User's Guide
Page 116
... are inserted correctly. RECONNECT THE PRINTER POWER SUPPLY 1 Turn off the printer, and then unplug the power cord from the wall outlet. 2 Gently remove the power supply from the printer, and then reinsert it. 3 Plug the power cord into the matching color slot of printers in the Default tab.... MAKE SURE THE PRINT JOB IS NOT PAUSED MAKE SURE YOUR PRINTER IS SET AS THE DEFAULT PRINTER Troubleshooting 116 From the list of the printhead. 3 Close the printer. If the cable is marked with a USB symbol. Note: If you troubleshoot" checklist does not solve the problem, then try one . ...
... are inserted correctly. RECONNECT THE PRINTER POWER SUPPLY 1 Turn off the printer, and then unplug the power cord from the wall outlet. 2 Gently remove the power supply from the printer, and then reinsert it. 3 Plug the power cord into the matching color slot of printers in the Default tab.... MAKE SURE THE PRINT JOB IS NOT PAUSED MAKE SURE YOUR PRINTER IS SET AS THE DEFAULT PRINTER Troubleshooting 116 From the list of the printhead. 3 Close the printer. If the cable is marked with a USB symbol. Note: If you troubleshoot" checklist does not solve the problem, then try one . ...
User's Guide
Page 117
... page prints. 4 Navigate to fit, make sure the printhead is damaged, then use a new one minute, reconnect the power cord into the power supply. 4 Turn on the computer. REMOVE AND RECONNECT THE USB CABLE CONNECTED TO YOUR PRINTER CHECK THE USB CONNECTION 1 Check the USB cable for more ...printer is marked with . REINSTALL THE INK CARTRIDGES AND DEEP CLEAN AND ALIGN THE PRINTHEAD 1 Reinstall the ink cartridges, see "Replacing ink cartridges" on page 14 for any obvious damage. Note: Do not remove the alignment page until printing is printing blank pages Blank pages may have problems, ...
... page prints. 4 Navigate to fit, make sure the printhead is damaged, then use a new one minute, reconnect the power cord into the power supply. 4 Turn on the computer. REMOVE AND RECONNECT THE USB CABLE CONNECTED TO YOUR PRINTER CHECK THE USB CONNECTION 1 Check the USB cable for more ...printer is marked with . REINSTALL THE INK CARTRIDGES AND DEEP CLEAN AND ALIGN THE PRINTHEAD 1 Reinstall the ink cartridges, see "Replacing ink cartridges" on page 14 for any obvious damage. Note: Do not remove the alignment page until printing is printing blank pages Blank pages may have problems, ...

User's Guide
Page 123
...ADD MEMORY Consider purchasing more of the following : MAXIMIZE COMPUTER PROCESSING SPEED • Close all applications not in the document. • Remove as many unused fonts as possible from your system. SELECT A HIGHER PRINT QUALITY FROM THE PRINTER SOFTWARE MAKE SURE THE INK CARTRIDGES ARE... PROPERLY INSTALLED ALIGN THE PRINTHEAD CLEAN OR DEEP CLEAN THE PRINTHEAD NOZZLES Note: If these solutions do not remove the streaks or lines on printed image If the "Before you troubleshoot" checklist does not solve ...
...ADD MEMORY Consider purchasing more of the following : MAXIMIZE COMPUTER PROCESSING SPEED • Close all applications not in the document. • Remove as many unused fonts as possible from your system. SELECT A HIGHER PRINT QUALITY FROM THE PRINTER SOFTWARE MAKE SURE THE INK CARTRIDGES ARE... PROPERLY INSTALLED ALIGN THE PRINTHEAD CLEAN OR DEEP CLEAN THE PRINTHEAD NOZZLES Note: If these solutions do not remove the streaks or lines on printed image If the "Before you troubleshoot" checklist does not solve ...
Quick Reference
Page 6
... the printer control panel The following diagrams explain the sections of paper. • Remove paper jams. Use the 7 Printhead access To Install the printhead. Note: When the printer is installed in or removing a USB cable or installation cable. 5 Power supply with port Connect the printer ... as it exits. 3 4 5 6 7 Use the To 1 Scanner unit • Access the ink cartridges and printhead. • Remove paper jams. 2 Ink cartridge access Install, replace, or remove ink cartridges. 3 Ethernet port Connect your printer to a computer, a local network, an external DSL, or a cable...
... the printer control panel The following diagrams explain the sections of paper. • Remove paper jams. Use the 7 Printhead access To Install the printhead. Note: When the printer is installed in or removing a USB cable or installation cable. 5 Power supply with port Connect the printer ... as it exits. 3 4 5 6 7 Use the To 1 Scanner unit • Access the ink cartridges and printhead. • Remove paper jams. 2 Ink cartridge access Install, replace, or remove ink cartridges. 3 Ethernet port Connect your printer to a computer, a local network, an external DSL, or a cable...
Quick Reference
Page 10
...use, return this cartridge to the cartridge installation position. 3 Press the release tab, and then remove the used ink cartridge or cartridges. 1 2 10 Lexmark Pro800 Series models Item Return Program Regular cartridge2 Cartridge1 Black cartridge 100 100A High yield black cartridge ... 2 Available only on your printer. 2 Open the printer. 2 Note: The printhead moves to Lexmark for a single use only Lexmark ink cartridges. You must install new cartridges immediately after removing the old ones or the ink remaining in the printhead nozzles may dry out. 1 Turn on the...
...use, return this cartridge to the cartridge installation position. 3 Press the release tab, and then remove the used ink cartridge or cartridges. 1 2 10 Lexmark Pro800 Series models Item Return Program Regular cartridge2 Cartridge1 Black cartridge 100 100A High yield black cartridge ... 2 Available only on your printer. 2 Open the printer. 2 Note: The printhead moves to Lexmark for a single use only Lexmark ink cartridges. You must install new cartridges immediately after removing the old ones or the ink remaining in the printhead nozzles may dry out. 1 Turn on the...
Quick Reference
Page 11
...screen, navigate to air. 5 Close the printer. Note: Install the new ink cartridges immediately after removing the protective cap to avoid exposing the ink to : > More Options > Clean Printhead or Deep Clean Printhead A cleaning page prints. Using the printer software For Windows users 1 Load plain paper. 2 Click ... maintenance cycle every week if it is sometimes due to : > More Options > Align Printer An alignment page prints. Cleaning the printhead nozzles Poor print quality is turned off. It will briefly come out of your document again. Using the printer software For Windows users...
...screen, navigate to air. 5 Close the printer. Note: Install the new ink cartridges immediately after removing the protective cap to avoid exposing the ink to : > More Options > Clean Printhead or Deep Clean Printhead A cleaning page prints. Using the printer software For Windows users 1 Load plain paper. 2 Click ... maintenance cycle every week if it is sometimes due to : > More Options > Align Printer An alignment page prints. Cleaning the printhead nozzles Poor print quality is turned off. It will briefly come out of your document again. Using the printer software For Windows users...
Quick Reference
Page 14
... Note: Your printer may not come with cartridge installation. • Print a test page. • Print an alignment page. • Clean the printhead nozzles. • Order ink or supplies. • Register the printer. • Contact technical support. Register your printer. • Visit the SmartSolutions ...Utility icon. 3 From the Web Links tab, select the link you want to as Wireless Setup Assistant) Uninstaller Remove the printer software from a memory device to the computer over a network. Visit the Lexmark Web site. Download and install the latest printer software.
... Note: Your printer may not come with cartridge installation. • Print a test page. • Print an alignment page. • Clean the printhead nozzles. • Order ink or supplies. • Register the printer. • Contact technical support. Register your printer. • Visit the SmartSolutions ...Utility icon. 3 From the Web Links tab, select the link you want to as Wireless Setup Assistant) Uninstaller Remove the printer software from a memory device to the computer over a network. Visit the Lexmark Web site. Download and install the latest printer software.

Quick Reference
Page 21
...To open the Service Center, use the Service Center link. If Troubleshooting does not solve your problem Visit our Web site at support.lexmark.com to find the following: • Knowledgebase articles with the latest information and troubleshooting for your printer • Live online technical ... display If the "Before you troubleshoot" checklist does not solve the problem, then try the following : REMOVE AND REINSERT THE PRINTHEAD 1 Open the printer and lift the latch. 2 21 Printhead errors If the "Before you troubleshoot" checklist does not solve the problem, then try the following :...
...To open the Service Center, use the Service Center link. If Troubleshooting does not solve your problem Visit our Web site at support.lexmark.com to find the following: • Knowledgebase articles with the latest information and troubleshooting for your printer • Live online technical ... display If the "Before you troubleshoot" checklist does not solve the problem, then try the following : REMOVE AND REINSERT THE PRINTHEAD 1 Open the printer and lift the latch. 2 21 Printhead errors If the "Before you troubleshoot" checklist does not solve the problem, then try the following :...
Quick Reference
Page 22
... > Print. 22 If the cable is marked with a USB symbol. The USB port is damaged, then use a new one or more of the printhead. 3 Close the printer. 2 Remove the printhead. Print job does not print or is missing pages If the "Before you continue to a defective port. Warning-Potential Damage: Do not touch... BOX TEMPORARILY DISABLE SECURITY PROGRAMS IN WINDOWS BEFORE INSTALLING THE SOFTWARE CHECK THE USB CONNECTION 1 Check the USB cable for any obvious damage. Note: If removing and reinserting the printhead does not resolve the error, then contact technical support.
... > Print. 22 If the cable is marked with a USB symbol. The USB port is damaged, then use a new one or more of the printhead. 3 Close the printer. 2 Remove the printhead. Print job does not print or is missing pages If the "Before you continue to a defective port. Warning-Potential Damage: Do not touch... BOX TEMPORARILY DISABLE SECURITY PROGRAMS IN WINDOWS BEFORE INSTALLING THE SOFTWARE CHECK THE USB CONNECTION 1 Check the USB cable for any obvious damage. Note: If removing and reinserting the printhead does not resolve the error, then contact technical support.
Quick Reference
Page 23
... troubleshoot" checklist does not solve the problem, then try another USB port on the printer. 23 REMOVE AND REINSTALL THE PRINTER SOFTWARE Printer is marked with . REINSTALL THE INK CARTRIDGES AND DEEP CLEAN AND ALIGN THE PRINTHEAD 1 Reinstall the ink cartridges, see the Wireless troubleshooting section. If the cartridges do not seem...
... troubleshoot" checklist does not solve the problem, then try another USB port on the printer. 23 REMOVE AND REINSTALL THE PRINTER SOFTWARE Printer is marked with . REINSTALL THE INK CARTRIDGES AND DEEP CLEAN AND ALIGN THE PRINTHEAD 1 Reinstall the ink cartridges, see the Wireless troubleshooting section. If the cartridges do not seem...


