
User's Guide for Windows
Page 2
... user documentation, to a professional service person. Lexmark may use the fax feature during a lightning storm. In other countries. This publication could include technical inaccuracies or typographical errors. In the United Kingdom and Eire, call +44 (0)8704 440 044. Other trademarks are trademarks of operation in this agreement are the user's responsibility. Changes are not sure whether you . UNITED STATES GOVERNMENT RIGHTS This software...
... user documentation, to a professional service person. Lexmark may use the fax feature during a lightning storm. In other countries. This publication could include technical inaccuracies or typographical errors. In the United Kingdom and Eire, call +44 (0)8704 440 044. Other trademarks are trademarks of operation in this agreement are the user's responsibility. Changes are not sure whether you . UNITED STATES GOVERNMENT RIGHTS This software...
User's Guide for Windows
Page 4
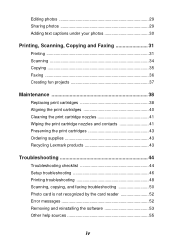
... 31 Scanning 34 Copying 35 Faxing 36 Creating fun projects 37 Maintenance 38 Replacing print cartridges 38 Aligning the print cartridges 40 Cleaning the print cartridge nozzles 41 Wiping the print cartridge nozzles and contacts 41 Preserving the print cartridges 43 Ordering supplies 43 Recycling Lexmark products 43 Troubleshooting 44 Troubleshooting checklist 44 Setup troubleshooting 46 Printing troubleshooting 48 Scanning, copying, and faxing troubleshooting 50 Photo card is not recognized by the card reader 52 Error messages 52 Removing and reinstalling the software 53...
... 31 Scanning 34 Copying 35 Faxing 36 Creating fun projects 37 Maintenance 38 Replacing print cartridges 38 Aligning the print cartridges 40 Cleaning the print cartridge nozzles 41 Wiping the print cartridge nozzles and contacts 41 Preserving the print cartridges 43 Ordering supplies 43 Recycling Lexmark products 43 Troubleshooting 44 Troubleshooting checklist 44 Setup troubleshooting 46 Printing troubleshooting 48 Scanning, copying, and faxing troubleshooting 50 Photo card is not recognized by the card reader 52 Error messages 52 Removing and reinstalling the software 53...
User's Guide for Windows
Page 6
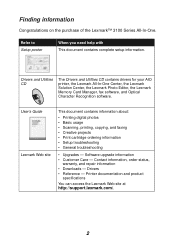
... Lexmark Photo Editor, the Lexmark Memory Card Manager, fax software, and Optical Character Recognition software. Printer documentation and product specifications You can access the Lexmark Web site at http://support.lexmark.com/. 2 Drivers • Reference - User's Guide Lexmark Web site This document contains information about: • Printing digital photos • Basic usage • Scanning, printing, copying, and faxing • Creative projects • Print cartridge ordering information • Setup troubleshooting • General troubleshooting • Upgrades...
... Lexmark Photo Editor, the Lexmark Memory Card Manager, fax software, and Optical Character Recognition software. Printer documentation and product specifications You can access the Lexmark Web site at http://support.lexmark.com/. 2 Drivers • Reference - User's Guide Lexmark Web site This document contains information about: • Printing digital photos • Basic usage • Scanning, printing, copying, and faxing • Creative projects • Print cartridge ordering information • Setup troubleshooting • General troubleshooting • Upgrades...
User's Guide for Windows
Page 9
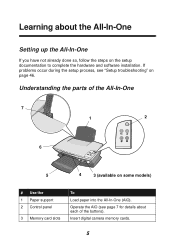
Understanding the parts of the buttons). Operate the AIO (see "Setup troubleshooting" on page 46. Learning about each of the All-In-One 7 1 2 6 5 4 3 (available on the setup documentation to complete the hardware and software installation. Insert digital camera memory cards. 5 If problems occur during the setup process, see page 7 for details about the All-In-One Setting up the All-In-One If you have not already done so, follow the steps on some models) # Use the 1 Paper support 2 Control panel 3 Memory card slots To Load paper into the All-In-One (AIO).
Understanding the parts of the buttons). Operate the AIO (see "Setup troubleshooting" on page 46. Learning about each of the All-In-One 7 1 2 6 5 4 3 (available on the setup documentation to complete the hardware and software installation. Insert digital camera memory cards. 5 If problems occur during the setup process, see page 7 for details about the All-In-One Setting up the All-In-One If you have not already done so, follow the steps on some models) # Use the 1 Paper support 2 Control panel 3 Memory card slots To Load paper into the All-In-One (AIO).
User's Guide for Windows
Page 13
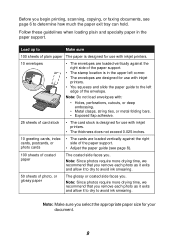
.... 25 sheets of card stock • The card stock is designed for use with inkjet printers. • You squeeze and slide the paper guide to Make sure 100 sheets of plain paper The paper is in the paper support. Note: Make sure you begin printing, scanning, copying, or faxing documents, see page 8). 100 sheets of photo, or glossy paper The glossy or coated side faces you . Before you select the appropriate paper size for your document. 9 Follow...
.... 25 sheets of card stock • The card stock is designed for use with inkjet printers. • You squeeze and slide the paper guide to Make sure 100 sheets of plain paper The paper is in the paper support. Note: Make sure you begin printing, scanning, copying, or faxing documents, see page 8). 100 sheets of photo, or glossy paper The glossy or coated side faces you . Before you select the appropriate paper size for your document. 9 Follow...

User's Guide for Windows
Page 18
... a blank paper size. • Choose what type of the scanned area. • Lighten or darken your copies. • Enlarge or reduce your copies. • Adjust the size of image is being scanned. • Choose how the scan will be used. Note: Click See More Copy Settings to view all settings. 14 Note: Click See More Scan Settings to view all settings. • Select a blank paper size. • Select the quantity and color of...
... a blank paper size. • Choose what type of the scanned area. • Lighten or darken your copies. • Enlarge or reduce your copies. • Adjust the size of image is being scanned. • Choose how the scan will be used. Note: Click See More Copy Settings to view all settings. 14 Note: Click See More Scan Settings to view all settings. • Select a blank paper size. • Select the quantity and color of...
User's Guide for Windows
Page 21
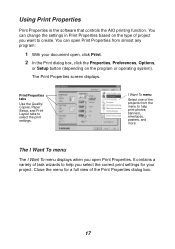
... operating system). Print Properties tabs Use the Quality/ Copies, Paper Setup, and Print Layout tabs to help you want to help print photos, banners, envelopes, posters, and more. Using Print Properties Print Properties is the software that controls the AIO printing function. You can open Print Properties from the menu to select the print settings. It contains a variety of task wizards to create. Close the menu for your document open Print Properties. I Want To menu displays when you open , click Print...
... operating system). Print Properties tabs Use the Quality/ Copies, Paper Setup, and Print Layout tabs to help you want to help print photos, banners, envelopes, posters, and more. Using Print Properties Print Properties is the software that controls the AIO printing function. You can open Print Properties from the menu to select the print settings. It contains a variety of task wizards to create. Close the menu for your document open Print Properties. I Want To menu displays when you open , click Print...
User's Guide for Windows
Page 22
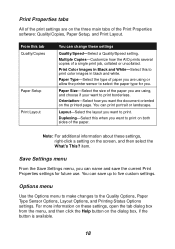
... paper type for future use. Layout-Select the layout you are on the three main tabs of the Print Properties software: Quality/Copies, Paper Setup, and Print Layout. For more information on these settings, open the tab dialog box from the menu, and then click the Help button on both sides of the paper. Save Settings menu From the Save Settings menu, you want to print borderless. Options menu Use the Options menu to make changes...
... paper type for future use. Layout-Select the layout you are on the three main tabs of the Print Properties software: Quality/Copies, Paper Setup, and Print Layout. For more information on these settings, open the tab dialog box from the menu, and then click the Help button on both sides of the paper. Save Settings menu From the Save Settings menu, you want to print borderless. Options menu Use the Options menu to make changes...
User's Guide for Windows
Page 23
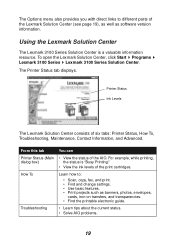
... Lexmark Solution Center The Lexmark 3100 Series Solution Center is "Busy Printing." • View the ink levels of the Lexmark Solution Center (see page 19), as well as banners, photos, envelopes, cards, iron-on transfers, and transparencies. • Find the printable electronic guide. The Options menu also provides you with direct links to : • Scan, copy, fax, and print. • Find and change settings. • Use basic features. • Print projects such as software...
... Lexmark Solution Center The Lexmark 3100 Series Solution Center is "Busy Printing." • View the ink levels of the Lexmark Solution Center (see page 19), as well as banners, photos, envelopes, cards, iron-on transfers, and transparencies. • Find the printable electronic guide. The Options menu also provides you with direct links to : • Scan, copy, fax, and print. • Find and change settings. • Use basic features. • Print projects such as software...
User's Guide for Windows
Page 42
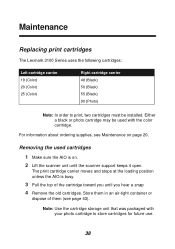
... scanner support keeps it open. Maintenance Replacing print cartridges The Lexmark 3100 Series uses the following cartridges: Left cartridge carrier 19 (Color) 20 (Color) 25 (Color) Right cartridge carrier 48 (Black) 50 (Black) 55 (Black) 90 (Photo) Note: In order to store cartridges for future use. 38 The print cartridge carrier moves and stops at the loading position unless the AIO is on page 20. Note: Use the cartridge storage unit that was packaged with the color cartridge. Removing the used with your photo cartridge to print, two cartridges...
... scanner support keeps it open. Maintenance Replacing print cartridges The Lexmark 3100 Series uses the following cartridges: Left cartridge carrier 19 (Color) 20 (Color) 25 (Color) Right cartridge carrier 48 (Black) 50 (Black) 55 (Black) 90 (Photo) Note: In order to store cartridges for future use. 38 The print cartridge carrier moves and stops at the loading position unless the AIO is on page 20. Note: Use the cartridge storage unit that was packaged with the color cartridge. Removing the used with your photo cartridge to print, two cartridges...
User's Guide for Windows
Page 48
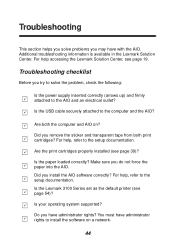
... paper into the AIO. Is the paper loaded correctly? Is the USB cable securely attached to the computer and the AIO? Make sure you remove the sticker and transparent tape from both the computer and AIO on a network. 44 Is the Lexmark 3100 Series set as the default printer (see page 39)? For help , refer to the setup documentation. For help , refer to the setup documentation. Are the print cartridges properly installed (see page...
... paper into the AIO. Is the paper loaded correctly? Is the USB cable securely attached to the computer and the AIO? Make sure you remove the sticker and transparent tape from both the computer and AIO on a network. 44 Is the Lexmark 3100 Series set as the default printer (see page 39)? For help , refer to the setup documentation. For help , refer to the setup documentation. Are the print cartridges properly installed (see page...
User's Guide for Windows
Page 49
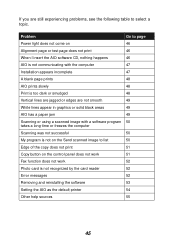
... the control panel does not work 51 Fax function does not work 52 Photo card is too dark or smudged 48 Vertical lines are jagged or edges are still experiencing problems, see the following table to list 50 Edge of the copy does not print 51 Copy button on the Send scanned image to select a topic. Problem Go to page Power light does not come on 46 Alignment page or test page does not print 46...
... the control panel does not work 51 Fax function does not work 52 Photo card is too dark or smudged 48 Vertical lines are jagged or edges are still experiencing problems, see the following table to list 50 Edge of the copy does not print 51 Copy button on the Send scanned image to select a topic. Problem Go to page Power light does not come on 46 Alignment page or test page does not print 46...
User's Guide for Windows
Page 50
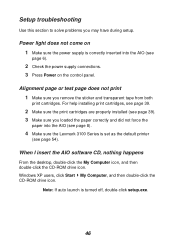
... the AIO (see page 8). 4 Make sure the Lexmark 3100 Series is turned off, double-click setup.exe. 46 For help installing print cartridges, see page 39. 2 Make sure the print cartridges are properly installed (see page 39). 3 Make sure you loaded the paper correctly and did not force the paper into the AIO (see page 54). Note: If auto launch is set as the default printer (see page 6). 2 Check the power supply connections. 3 Press Power on the control panel. Windows XP users, click Start My...
... the AIO (see page 8). 4 Make sure the Lexmark 3100 Series is turned off, double-click setup.exe. 46 For help installing print cartridges, see page 39. 2 Make sure the print cartridges are properly installed (see page 39). 3 Make sure you loaded the paper correctly and did not force the paper into the AIO (see page 54). Note: If auto launch is set as the default printer (see page 6). 2 Check the power supply connections. 3 Press Power on the control panel. Windows XP users, click Start My...
User's Guide for Windows
Page 52
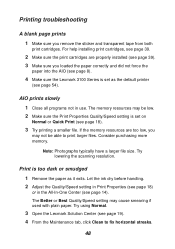
... in use. Printing troubleshooting A blank page prints 1 Make sure you loaded the paper correctly and did not force the paper into the AIO (see page 8). 4 Make sure the Lexmark 3100 Series is too dark or smudged 1 Remove the paper as the default printer (see page 54). Try lowering the scanning resolution. Let the ink dry before handling. 2 Adjust the Quality/Speed setting in Print Properties (see page 19). 4 From the Maintenance tab, click Clean to print larger files. The memory...
... in use. Printing troubleshooting A blank page prints 1 Make sure you loaded the paper correctly and did not force the paper into the AIO (see page 8). 4 Make sure the Lexmark 3100 Series is too dark or smudged 1 Remove the paper as the default printer (see page 54). Try lowering the scanning resolution. Let the ink dry before handling. 2 Adjust the Quality/Speed setting in Print Properties (see page 19). 4 From the Maintenance tab, click Clean to print larger files. The memory...
User's Guide for Windows
Page 53
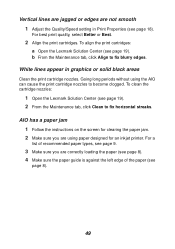
... setting in graphics or solid black areas Clean the print cartridge nozzles. For best print quality, select Better or Best. 2 Align the print cartridges. b From the Maintenance tab, click Align to fix horizontal streaks. For a list of recommended paper types, see page 9. 3 Make sure you are correctly loading the paper (see page 8). 4 Make sure the paper guide is against the left edge of the paper (see page 18). Going long periods without using paper designed for clearing the paper jam. 2 Make...
... setting in graphics or solid black areas Clean the print cartridge nozzles. For best print quality, select Better or Best. 2 Align the print cartridges. b From the Maintenance tab, click Align to fix horizontal streaks. For a list of recommended paper types, see page 9. 3 Make sure you are correctly loading the paper (see page 8). 4 Make sure the paper guide is against the left edge of the paper (see page 18). Going long periods without using paper designed for clearing the paper jam. 2 Make...

User's Guide for Windows
Page 54
... Scan Settings. 3 Click Display Advanced Scan Settings. 4 From the Scan tab of Advanced Scan Settings, enter a lower scan resolution. My program is generally set much lower. Scanning was not successful The software may not be installed properly. Scanning, copying, and faxing troubleshooting Scanning or using a scanned image with the computer" on the Send scanned image to list To add your program to the Send scanned image to save your changes. 50 To change the scanning resolution: 1 Open the Lexmark All-In-One Center (see page...
... Scan Settings. 3 Click Display Advanced Scan Settings. 4 From the Scan tab of Advanced Scan Settings, enter a lower scan resolution. My program is generally set much lower. Scanning was not successful The software may not be installed properly. Scanning, copying, and faxing troubleshooting Scanning or using a scanned image with the computer" on the Send scanned image to list To add your program to the Send scanned image to save your changes. 50 To change the scanning resolution: 1 Open the Lexmark All-In-One Center (see page...
User's Guide for Windows
Page 56
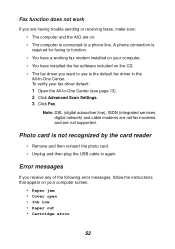
... fax driver you are having trouble sending or receiving faxes, make sure: • The computer and the AIO are not supported. To verify your computer screen. • Paper jam • Cover open • Ink Low • Paper out • Cartridge error 52 Fax function does not work If you want to use is not recognized by the card reader • Remove and then reinsert the photo card. • Unplug and then plug the USB cable...
... fax driver you are having trouble sending or receiving faxes, make sure: • The computer and the AIO are not supported. To verify your computer screen. • Paper jam • Cover open • Ink Low • Paper out • Cartridge error 52 Fax function does not work If you want to use is not recognized by the card reader • Remove and then reinsert the photo card. • Unplug and then plug the USB cable...

User's Guide for Windows
Page 62
...18 black cartridge part number 38 Black Copy button 7 blank page prints 48 borderless photos printing 27 both sides, printing on, see duplexing C card stock loading 9 cartridges aligning 40 cleaning nozzles 41 part numbers 38 viewing ink levels of 19 wiping 41 cartridges, print aligning 40 cleaning contacts 41 cleaning nozzles 41 installing 39 part numbers 38 preserving 43 removing 38 replacing 38 choosing layout for photos 26 cleaning, print cartridge nozzles 41 coated paper loading 9 color cartridge part number 38 Contact Information tab 20 contacts, wiping 41 control panel 7 copies 18 copy...
...18 black cartridge part number 38 Black Copy button 7 blank page prints 48 borderless photos printing 27 both sides, printing on, see duplexing C card stock loading 9 cartridges aligning 40 cleaning nozzles 41 part numbers 38 viewing ink levels of 19 wiping 41 cartridges, print aligning 40 cleaning contacts 41 cleaning nozzles 41 installing 39 part numbers 38 preserving 43 removing 38 replacing 38 choosing layout for photos 26 cleaning, print cartridge nozzles 41 coated paper loading 9 color cartridge part number 38 Contact Information tab 20 contacts, wiping 41 control panel 7 copies 18 copy...
User's Guide for Windows
Page 63
...Memory Card Manager using 22 memory cards inserting 11 multiple copies 18 multiple images 15 N nozzles, print wiping 41 O ordering supplies 43 orientation selecting 18 P page layouts, selecting borderless 26 greeting card 26 picture package 26 purchased 26 scrapbook page 26 paper acceptable types of 31 loading 31 Paper Feed button 7 Paper Setup tab 18 paper size selecting 18 paper type selecting 18 part numbers black cartridge 38 color cartridge 38 photo cartridge 38 parts control panel 5 memory card slots 5 paper support 5 scanner unit 6 parts of your All-In-One 5 photo cards loading 9 photo...
...Memory Card Manager using 22 memory cards inserting 11 multiple copies 18 multiple images 15 N nozzles, print wiping 41 O ordering supplies 43 orientation selecting 18 P page layouts, selecting borderless 26 greeting card 26 picture package 26 purchased 26 scrapbook page 26 paper acceptable types of 31 loading 31 Paper Feed button 7 Paper Setup tab 18 paper size selecting 18 paper type selecting 18 part numbers black cartridge 38 color cartridge 38 photo cartridge 38 parts control panel 5 memory card slots 5 paper support 5 scanner unit 6 parts of your All-In-One 5 photo cards loading 9 photo...
User's Guide for Windows
Page 64
... 27 printing problems 48 blank page prints 48 Printing Status window changing appearance of 20 Q Quality/Copies tab 18 R recycling Lexmark products 43 reinstalling software 53 removing print cartridges 38 removing software 53 repeat images 15 replacing print cartridges 38 S Safety information ii Save Settings menu 18 Saved Images page Open with... section 15 Print a Copy...section 16 Scan button 7 scan settings 14 scanning 34 scrapbook pages 30 settings, saving for future use 18 setup troubleshooting 46 software All-In-One Center 13 Memory Card Manager 22 Photo Editor 21 Print Properties...
... 27 printing problems 48 blank page prints 48 Printing Status window changing appearance of 20 Q Quality/Copies tab 18 R recycling Lexmark products 43 reinstalling software 53 removing print cartridges 38 removing software 53 repeat images 15 replacing print cartridges 38 S Safety information ii Save Settings menu 18 Saved Images page Open with... section 15 Print a Copy...section 16 Scan button 7 scan settings 14 scanning 34 scrapbook pages 30 settings, saving for future use 18 setup troubleshooting 46 software All-In-One Center 13 Memory Card Manager 22 Photo Editor 21 Print Properties...


