User's Guide (2 MB)
Page 5
... powerful control of print jobs • Resetting printer defaults • Multipage printing • Changing duplex settings • Print and Hold functions You can control include: • Choosing paper sources • Changing page orientation • Choosing different sizes and types of media • Adjusting the quality of the printer features from most applications: 1 Open the application File menu. 2 Choose Print (or Printer) Setup. 3 In the Printer Setup dialog box, click the Properties, Options, or Setup button (depending on the application). 5 Using Printer Drivers Using...
... powerful control of print jobs • Resetting printer defaults • Multipage printing • Changing duplex settings • Print and Hold functions You can control include: • Choosing paper sources • Changing page orientation • Choosing different sizes and types of media • Adjusting the quality of the printer features from most applications: 1 Open the application File menu. 2 Choose Print (or Printer) Setup. 3 In the Printer Setup dialog box, click the Properties, Options, or Setup button (depending on the application). 5 Using Printer Drivers Using...
User's Guide (2 MB)
Page 19
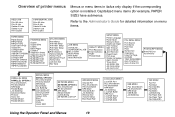
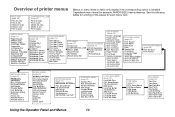
... PAPER SIZE PAPER TYPE CUSTOM TYPES Output Bin Configure Bins Overflow Bin ASSIGN TYPE/BIN Substitute Size Configure MP Envelope Enhance PAPER TEXTURE PAPER WEIGHT PAPER LOADING FINISHING MENU Duplex Duplex Bind Copies Blank Pages Collation Separator Sheets Separator Source Multipage Print Multipage Order Multipage View Multipage Border UTILITIES MENU Print Menus Print Net Setup Print Net1 Setup Print Net2 Setup Print Fonts Print Directory Factory Defaults Format Flash Defragment Flash Format Disk Job Acct Stat Hex Trace JOB MENU Cancel Job CONFIDENTIAL JOB HELD JOBS Reset Printer Print...
... PAPER SIZE PAPER TYPE CUSTOM TYPES Output Bin Configure Bins Overflow Bin ASSIGN TYPE/BIN Substitute Size Configure MP Envelope Enhance PAPER TEXTURE PAPER WEIGHT PAPER LOADING FINISHING MENU Duplex Duplex Bind Copies Blank Pages Collation Separator Sheets Separator Source Multipage Print Multipage Order Multipage View Multipage Border UTILITIES MENU Print Menus Print Net Setup Print Net1 Setup Print Net2 Setup Print Fonts Print Directory Factory Defaults Format Flash Defragment Flash Format Disk Job Acct Stat Hex Trace JOB MENU Cancel Job CONFIDENTIAL JOB HELD JOBS Reset Printer Print...

User's Guide (2 MB)
Page 99
... remove the print cartridge to the stack. 99 Set it to get the envelope out. See page page 93 for instructions on reinstalling the print cartridge. 8 Align the tabs on the envelope feeder with the slots on both sides of the printer and gently push the envelope feeder into the opening until it snaps into place. 9 Close the upper front door of the printer. 10 Replace the stack of the printer. Clearing Jams 5 Open...
... remove the print cartridge to the stack. 99 Set it to get the envelope out. See page page 93 for instructions on reinstalling the print cartridge. 8 Align the tabs on the envelope feeder with the slots on both sides of the printer and gently push the envelope feeder into the opening until it snaps into place. 9 Close the upper front door of the printer. 10 Replace the stack of the printer. Clearing Jams 5 Open...
Setup Guide (1.4 MB)
Page 24
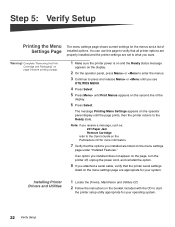
Warning! The message Printing Menu Settings appears on the menu settings page under "Installed Features." Note: If you receive a message, such as: 201 Paper Jam Remove Cartridge refer to verify that the printer serial settings listed on the second line of installed options. You can use this page to the User's Guide on the Publications CD for your system. Complete "Removing the Print Cartridge and Packaging" on page 9 before printing a page. 1 Make sure the printer power is on and the Ready status message appears on the display. 2 On...
Warning! The message Printing Menu Settings appears on the menu settings page under "Installed Features." Note: If you receive a message, such as: 201 Paper Jam Remove Cartridge refer to verify that the printer serial settings listed on the second line of installed options. You can use this page to the User's Guide on the Publications CD for your system. Complete "Removing the Print Cartridge and Packaging" on page 9 before printing a page. 1 Make sure the printer power is on and the Ready status message appears on the display. 2 On...
Setup Guide (1.4 MB)
Page 25
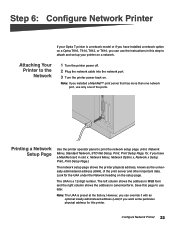
... number. The UAA is preset at the factory. Note: If you installed a MarkNet™ print server that has more than one network port, use the instructions in canonical form. Look for this page to attach and set up your Optra T printer is a network model or if you want some particular physical address for the UAA under the Network heading on the setup page. Configure Network Printer 23 Attaching Your Printer to print the network setup page. (Hint: Network Menu, Standard Network...
... number. The UAA is preset at the factory. Note: If you installed a MarkNet™ print server that has more than one network port, use the instructions in canonical form. Look for this page to attach and set up your Optra T printer is a network model or if you want some particular physical address for the UAA under the Network heading on the setup page. Configure Network Printer 23 Attaching Your Printer to print the network setup page. (Hint: Network Menu, Standard Network...
Setup Guide (1.4 MB)
Page 28
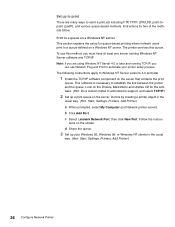
..., Settings, Printers, Add Printer.) 26 Configure Network Printer Follow the instruc- b Click Add Port. Instructions for the software. (Hint: Do a custom install to send a print job including FTP, TFTP, LPR/LPD, point-topoint (LexIP), and various queue-based methods. The following instructions apply to a queue defined on the server that contains the print queue. Print to a queue on a Windows NT server This section explains the setup for queue-based printing where network users print to Windows NT Server...
..., Settings, Printers, Add Printer.) 26 Configure Network Printer Follow the instruc- b Click Add Port. Instructions for the software. (Hint: Do a custom install to send a print job including FTP, TFTP, LPR/LPD, point-topoint (LexIP), and various queue-based methods. The following instructions apply to a queue defined on the server that contains the print queue. Print to a queue on a Windows NT server This section explains the setup for queue-based printing where network users print to Windows NT Server...
Setup Guide (1.4 MB)
Page 33
... if it was originally purchased for warranty service, remove all programs, data, and removable storage media. You may be provided: • for the Optra T612n, Optra T612, Optra T610n or Optra T610, at http://www.lexmark.com. Free remote technical support is used parts, which it was designed. Lexmark offers a variety of extended warranty programs that feature or option is provided for this statement applies only...
... if it was originally purchased for warranty service, remove all programs, data, and removable storage media. You may be provided: • for the Optra T612n, Optra T612, Optra T610n or Optra T610, at http://www.lexmark.com. Free remote technical support is used parts, which it was designed. Lexmark offers a variety of extended warranty programs that feature or option is provided for this statement applies only...
Administrator's Guide (1.4 MB)
Page 13
... CUSTOM TYPES Output Bin Configure Bins Overflow Bin ASSIGN TYPE/BIN Substitute Size Configure MP Envelope Enhance PAPER TEXTURE PAPER WEIGHT PAPER LOADING FINISHING MENU (page 26) Duplex Duplex Bind Copies Blank Pages Collation Separator Sheets Separator Source Multipage Print Multipage Order Multipage View Multipage Border UTILITIES MENU (page 33) Print Menus Print Net Setup Print Net1 Setup Print Net2 Setup Print Fonts Print Directory Factory Defaults Format Flash Defragment Flash Format Disk Job Acct Stat Hex Trace JOB MENU (page 37) Cancel Job CONFIDENTIAL JOB HELD JOBS Reset Printer...
... CUSTOM TYPES Output Bin Configure Bins Overflow Bin ASSIGN TYPE/BIN Substitute Size Configure MP Envelope Enhance PAPER TEXTURE PAPER WEIGHT PAPER LOADING FINISHING MENU (page 26) Duplex Duplex Bind Copies Blank Pages Collation Separator Sheets Separator Source Multipage Print Multipage Order Multipage View Multipage Border UTILITIES MENU (page 33) Print Menus Print Net Setup Print Net1 Setup Print Net2 Setup Print Fonts Print Directory Factory Defaults Format Flash Defragment Flash Format Disk Job Acct Stat Hex Trace JOB MENU (page 37) Cancel Job CONFIDENTIAL JOB HELD JOBS Reset Printer...
Administrator's Guide (1.4 MB)
Page 104
.... For paper jam errors, the entire paper path must be cleared of print material before you are listed in the PAPER MENU is large enough. • Cancel the current job. Open the upper front door, remove the print cartridge, and install another print cartridge. This message also displays if you select Universal as a Paper Size setting and use print material too short for the page format. • Press Go to the User's Guide for the size print material you can continue printing. Press Menu...
.... For paper jam errors, the entire paper path must be cleared of print material before you are listed in the PAPER MENU is large enough. • Cancel the current job. Open the upper front door, remove the print cartridge, and install another print cartridge. This message also displays if you select Universal as a Paper Size setting and use print material too short for the page format. • Press Go to the User's Guide for the size print material you can continue printing. Press Menu...

Administrator's Guide (1.4 MB)
Page 132
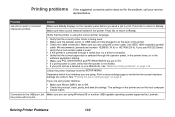
... operator panel. Problem Menus Disabled status message displays on the second line of the operator panel. • Press Menu> until Panel Menus displays. • Press Select. • Enable displays on the operator panel. If the operator panel menus are password protected, see "Disabling operator panel menus" on page 12. • Turn the printer off and call your service representative. Solving Printer Problems 132 When the test is blank. Menu settings changed from the operator panel. If the messages do not display, turn the printer...
... operator panel. Problem Menus Disabled status message displays on the second line of the operator panel. • Press Menu> until Panel Menus displays. • Press Select. • Enable displays on the operator panel. If the operator panel menus are password protected, see "Disabling operator panel menus" on page 12. • Turn the printer off and call your service representative. Solving Printer Problems 132 When the test is blank. Menu settings changed from the operator panel. If the messages do not display, turn the printer...
Administrator's Guide (1.4 MB)
Page 133
... set to On. • If a print spooler is used . • Make sure the parallel, serial, or USB cable is selected through a switch box, try a direct connection. • Verify that the spooler is print material loaded in the software application setting. • Make sure PCL SmartSwitch and PS SmartSwitch are using Windows 98 or another USB-capable operating system supported by Lexmark. Check the printer interface from the SETUP MENU. Determine which host interface you are correct. Print a menu settings page...
... set to On. • If a print spooler is used . • Make sure the parallel, serial, or USB cable is selected through a switch box, try a direct connection. • Verify that the spooler is print material loaded in the software application setting. • Make sure PCL SmartSwitch and PS SmartSwitch are using Windows 98 or another USB-capable operating system supported by Lexmark. Check the printer interface from the SETUP MENU. Determine which host interface you are correct. Print a menu settings page...

Administrator's Guide (1.4 MB)
Page 135
..., change the PAPER WEIGHT and PAPER TEXTURE settings in the QUALITY MENU. Problem Print is within the printer specifications. Refer to run the printer setup cycle and clean the transfer roll. Action • The toner may be printed. • Open and close the printer upper front door to the User's Guide for more details. • If the problem continues, call your service representative. Print quality problems If the suggested corrective action does not fix the problem, call the Lexmark Customer Support...
..., change the PAPER WEIGHT and PAPER TEXTURE settings in the QUALITY MENU. Problem Print is within the printer specifications. Refer to run the printer setup cycle and clean the transfer roll. Action • The toner may be printed. • Open and close the printer upper front door to the User's Guide for more details. • If the problem continues, call your service representative. Print quality problems If the suggested corrective action does not fix the problem, call the Lexmark Customer Support...
Technical Reference
Page 384
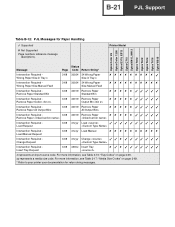
...17: "Media Size Codes" on page 3-69. B-21 PJL Support Optra Color 45 Optra Color 1200 Optra E310, E312 Optra C710 Optra M410, M412 Optra T610 Optra T612 Optra T614 Optra T616 Optra W810 Table B-12: PJL Messages for return string messages. Printer Model Message Status Page Code Return String* Intervention Required Wrong Paper Size in Tray x 3-68 30034 34 Wrong Paper Size in Tray x Intervention Required Wrong Paper Size Manual Feed 3-68 30034 34 Wrong Paper Size Manual Feed Intervention Required Remove Paper Standard Bin 3-68 40019 Remove Paper Standard Bin Intervention...
...17: "Media Size Codes" on page 3-69. B-21 PJL Support Optra Color 45 Optra Color 1200 Optra E310, E312 Optra C710 Optra M410, M412 Optra T610 Optra T612 Optra T614 Optra T616 Optra W810 Table B-12: PJL Messages for return string messages. Printer Model Message Status Page Code Return String* Intervention Required Wrong Paper Size in Tray x 3-68 30034 34 Wrong Paper Size in Tray x Intervention Required Wrong Paper Size Manual Feed 3-68 30034 34 Wrong Paper Size Manual Feed Intervention Required Remove Paper Standard Bin 3-68 40019 Remove Paper Standard Bin Intervention...

Service Manual
Page 29
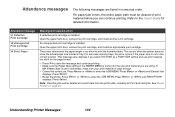
Use the service error code, user status message, user error message, symptom table, service checks, and diagnostic aids in this chapter to determine the corrective action necessary to the printer. User status messages provide the user with a print cartridge, paper jam, option, port, and so on page 2-12. If a user error message is displayed, go to the "User Status Messages" on . Locate your symptom and take the indicated action for personal safety and to prevent damage to repair a malfunctioning printer. Diagnostic Information 2-1 Make sure your machine...
Use the service error code, user status message, user error message, symptom table, service checks, and diagnostic aids in this chapter to determine the corrective action necessary to the printer. User status messages provide the user with a print cartridge, paper jam, option, port, and so on page 2-12. If a user error message is displayed, go to the "User Status Messages" on . Locate your symptom and take the indicated action for personal safety and to prevent damage to repair a malfunctioning printer. Diagnostic Information 2-1 Make sure your machine...

Service Manual
Page 30
... Software Contact the next support level or call Lexmark. 901 Engine Flash Indicates that a Tray 1 paper feed problem has been detected. If jumpers are set correctly, replace the engine board. 905 Interface Violation by the controller software Check for the model/type printer you can cause a 902 service error. Go to temporarily recover from the error condition. Replace the engine board. 902 General These errors indicate an unrecoverable engine software Engine Software error. Incorrect jumper settings...
... Software Contact the next support level or call Lexmark. 901 Engine Flash Indicates that a Tray 1 paper feed problem has been detected. If jumpers are set correctly, replace the engine board. 905 Interface Violation by the controller software Check for the model/type printer you can cause a 902 service error. Go to temporarily recover from the error condition. Replace the engine board. 902 General These errors indicate an unrecoverable engine software Engine Software error. Incorrect jumper settings...

Service Manual
Page 44
...exit sensors. If the paper is jammed in the rear of Output Bin X to "Cover Open Switch/Cable Service Check" on page 2-31. 2-16 Service Manual Open the printer's upper front door and remove the print cartridge to access the jam area. Try opening Tray X. Open the printer rear door to remove the jammed pages. 250 Paper Jam Check MP Feeder Paper is jammed in the multipurpose feeder. 260 Paper Jam Paper is jammed in the rear of the printer. Open the rear door of the duplex, then replace the duplex front cover and open or the print cartridge is missing. Check Envelope Feeder...
...exit sensors. If the paper is jammed in the rear of Output Bin X to "Cover Open Switch/Cable Service Check" on page 2-31. 2-16 Service Manual Open the printer's upper front door and remove the print cartridge to access the jam area. Try opening Tray X. Open the printer rear door to remove the jammed pages. 250 Paper Jam Check MP Feeder Paper is jammed in the multipurpose feeder. 260 Paper Jam Paper is jammed in the rear of the printer. Open the rear door of the duplex, then replace the duplex front cover and open or the print cartridge is missing. Check Envelope Feeder...

Service Manual
Page 100
...-XXX Hard Disk Option Service Tip: The Optra T printers support one hard disk option is divided into a cleaning and a verifying or testing section. This test is installed. • 2.1 GB or larger Check to help restore the disk if the disk contains bad data and is installed on the controller board on a known good disk. Note: The Quick Disk Test is a destructive type of support before replacing the network card. Run the "Quick Disk Test" on page 3-2 from the Device Test on page 3-2 is used to make...
...-XXX Hard Disk Option Service Tip: The Optra T printers support one hard disk option is divided into a cleaning and a verifying or testing section. This test is installed. • 2.1 GB or larger Check to help restore the disk if the disk contains bad data and is installed on the controller board on a known good disk. Note: The Quick Disk Test is a destructive type of support before replacing the network card. Run the "Quick Disk Test" on page 3-2 from the Device Test on page 3-2 is used to make...

Service Manual
Page 112
... not fix the problem, replace the control board. 274 Paper Jam - Check Bin 1 displays FRU 1 Bottom Pass Thru Sensor Flag Assembly Control Board Action Check the flag for correct operation, binding, broken parts or interference from the sensor cable. If incorrect, replace the sensor assembly. FRU 1 Top Pass Thru Sensor Flag Assembly Control Board Action Check the flag for correct operation, binding, broken parts or interference from the sensor cable. Check Bin 4 Displays Service Tip: When a 274 Paper Jam Check Bin 4 message displays, a problem...
... not fix the problem, replace the control board. 274 Paper Jam - Check Bin 1 displays FRU 1 Bottom Pass Thru Sensor Flag Assembly Control Board Action Check the flag for correct operation, binding, broken parts or interference from the sensor cable. If incorrect, replace the sensor assembly. FRU 1 Top Pass Thru Sensor Flag Assembly Control Board Action Check the flag for correct operation, binding, broken parts or interference from the sensor cable. Check Bin 4 Displays Service Tip: When a 274 Paper Jam Check Bin 4 message displays, a problem...

Service Manual
Page 120
...; Install another print cartridge if available before proceeding with the controller board removed while running the print test. 2-92 Service Manual Be sure and note the original settings so you can cause problems. Incorrect characters could print and the copy may not fit the page correctly. All voltages measured during the print cycle are measured with the service checks. • Use Tray 1 to test for print quality of the base printer. • Replace the...
...; Install another print cartridge if available before proceeding with the controller board removed while running the print test. 2-92 Service Manual Be sure and note the original settings so you can cause problems. Incorrect characters could print and the copy may not fit the page correctly. All voltages measured during the print cycle are measured with the service checks. • Use Tray 1 to test for print quality of the base printer. • Replace the...

Service Manual
Page 159
... is open. - 4069-XXX Maintenance Page Count This counter is reset by the servicer after a "80 Scheduled Maintenance" message displays (300K copies) and a maintenance kit is complete, the menu returns to the Printer Setup Reset Maintenance Count screen. To view the Maintenance Page Count: 1. Select Reset Maintenance Count. Setting Configuration ID The configuration ID is used to communicate information about certain areas of the printer that it requires resetting whenever you replace the engine board and can be changed. 3. Select Maintenance Count Value from the Printer Setup menu...
... is open. - 4069-XXX Maintenance Page Count This counter is reset by the servicer after a "80 Scheduled Maintenance" message displays (300K copies) and a maintenance kit is complete, the menu returns to the Printer Setup Reset Maintenance Count screen. To view the Maintenance Page Count: 1. Select Reset Maintenance Count. Setting Configuration ID The configuration ID is used to communicate information about certain areas of the printer that it requires resetting whenever you replace the engine board and can be changed. 3. Select Maintenance Count Value from the Printer Setup menu...


