Printer Languages and Interfaces Technical Reference
Page 62
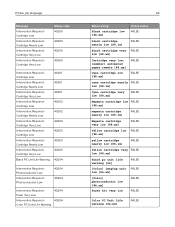
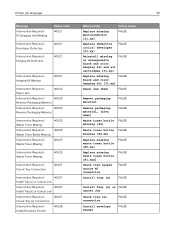
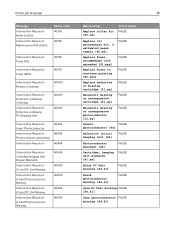
...Low Intervention Required Cartridge Very Low Intervention Required Cartridge Low Intervention Required Cartridge Nearly Low Intervention Required Cartridge Very Low Black PC Unit Life Warning 40201 40201 40201 40202 40202 40202 40203 40203 40203 40204 Intervention Required Photoconductor Low Intervention Required Photoconductor Low 40204 ... FALSE [88.xx] yellow cartridge nearly low [88.1x] FALSE Yellow cartridge very FALSE low [88.xx] Black pc unit life warning [84] [Color] imaging unit low [84.xx] FALSE FALSE [Color] photoconductor low [84.xx] Fuser kit very low FALSE FALSE Color PC...
...Low Intervention Required Cartridge Very Low Intervention Required Cartridge Low Intervention Required Cartridge Nearly Low Intervention Required Cartridge Very Low Black PC Unit Life Warning 40201 40201 40201 40202 40202 40202 40203 40203 40203 40204 Intervention Required Photoconductor Low Intervention Required Photoconductor Low 40204 ... FALSE [88.xx] yellow cartridge nearly low [88.1x] FALSE Yellow cartridge very FALSE low [88.xx] Black pc unit life warning [84] [Color] imaging unit low [84.xx] FALSE FALSE [Color] photoconductor low [84.xx] Fuser kit very low FALSE FALSE Color PC...
Printer Languages and Interfaces Technical Reference
Page 63
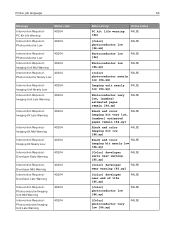
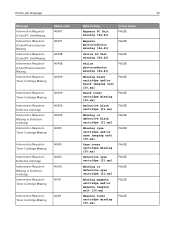
... Low 40204 Intervention Required Developer Early Warning 40204 Intervention Required Developer Mid Warning Intervention Required Developer Late Warning 40204 40204 Intervention Required Photoconductor/Imaging Unit Mid Warning Intervention Required Photoconductor/Imaging Unit Late Warning 40204 40204 63 Return string PC kit life warning [84] Online status FALSE [Color] photoconductor low [84.xx] Photoconductor low...
... Low 40204 Intervention Required Developer Early Warning 40204 Intervention Required Developer Mid Warning Intervention Required Developer Late Warning 40204 40204 Intervention Required Photoconductor/Imaging Unit Mid Warning Intervention Required Photoconductor/Imaging Unit Late Warning 40204 40204 63 Return string PC kit life warning [84] Online status FALSE [Color] photoconductor low [84.xx] Photoconductor low...
Printer Languages and Interfaces Technical Reference
Page 69
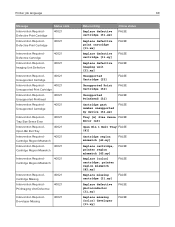
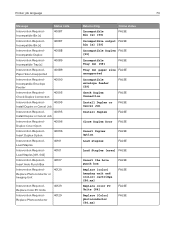
...Cartridge Intervention Required Defective Print Cartridge Status code 40021 40021 Intervention Required Defective Cartridge Intervention Required Imaging Unit Defective 40021 40021 Intervention Required Unsupported Cartridge 40021 Intervention Required - 40021 Unsupported Print Cartridge ...40021 Cartridge Region Mismatch Intervention Required - 40021 Cartridge Region Mismatch Intervention Required Cartridge Missing Intervention Required PC/Imaging Unit Defective 40021 40021 Intervention Required Developer Missing 40021 Return string Replace defective cartridge [31.xx] Online ...
...Cartridge Intervention Required Defective Print Cartridge Status code 40021 40021 Intervention Required Defective Cartridge Intervention Required Imaging Unit Defective 40021 40021 Intervention Required Unsupported Cartridge 40021 Intervention Required - 40021 Unsupported Print Cartridge ...40021 Cartridge Region Mismatch Intervention Required - 40021 Cartridge Region Mismatch Intervention Required Cartridge Missing Intervention Required PC/Imaging Unit Defective 40021 40021 Intervention Required Developer Missing 40021 Return string Replace defective cartridge [31.xx] Online ...
Printer Languages and Interfaces Technical Reference
Page 70
Printer job language 70 Message Intervention Required PC/Imaging Unit Missing Intervention Required Developer Defective Intervention Required Imaging Kit Defective Status code 40021 40021 40021 Intervention Required Imaging Kit Missing 40021 Intervention Required Paper Jam 40022 Intervention Required - 40025 Remove ... [color] developer [31.xy] FALSE Reinstall missing or unresponsive black and color imaging kit and all cartridges [31.xy] FALSE Replace missing FALSE black and color imaging kit [31.xy] Paper Jam [2xx] FALSE Remove packaging material Remove packaging material...
Printer job language 70 Message Intervention Required PC/Imaging Unit Missing Intervention Required Developer Defective Intervention Required Imaging Kit Defective Status code 40021 40021 40021 Intervention Required Imaging Kit Missing 40021 Intervention Required Paper Jam 40022 Intervention Required - 40025 Remove ... [color] developer [31.xy] FALSE Reinstall missing or unresponsive black and color imaging kit and all cartridges [31.xy] FALSE Replace missing FALSE black and color imaging kit [31.xy] Paper Jam [2xx] FALSE Remove packaging material Remove packaging material...
Printer Languages and Interfaces Technical Reference
Page 73
...Staples [G11, G12] 40101 Intervention Required Insert Hole Punch Box 40107 Intervention Required - 40129 Replace Photoconductor or Imaging Unit Intervention Required Replace Color PC Units Intervention Required Replace Photoconductor 40129 40129 Return string Incompatible Bin [x] [59] Online status FALSE Incompatible output FALSE ... Load staples FALSE FALSE Load Staples [area] FALSE Insert the hole punch box Replace [color] imaging unit and [color] cartridge [84.xx] Replace color PC Units [84] Replace [Color] photoconductor [84.xx] FALSE FALSE FALSE FALSE Printer job language 73...
...Staples [G11, G12] 40101 Intervention Required Insert Hole Punch Box 40107 Intervention Required - 40129 Replace Photoconductor or Imaging Unit Intervention Required Replace Color PC Units Intervention Required Replace Photoconductor 40129 40129 Return string Incompatible Bin [x] [59] Online status FALSE Incompatible output FALSE ... Load staples FALSE FALSE Load Staples [area] FALSE Insert the hole punch box Replace [color] imaging unit and [color] cartridge [84.xx] Replace color PC Units [84] Replace [Color] photoconductor [84.xx] FALSE FALSE FALSE FALSE Printer job language 73...
Printer Languages and Interfaces Technical Reference
Page 74
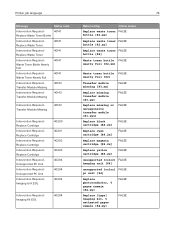
...Required Replace Cartridge Intervention Required Replace Cartridge Intervention Required Unsupported PC Unit Intervention Required Unsupported PC Unit Intervention Required Imaging Unit EOL 40200 40201 40202 40203 40204 40204 40204 Intervention Required Imaging Kit EOL 40204 Return string Online status Replace waste toner ... [88.2x] FALSE Replace yellow cartridge [88.2x] FALSE unsupported [color] FALSE imaging unit [84] unsupported [color] FALSE pc unit [84] Replace photoconductor, 0 pages remain [84.xy] Replace [type] imaging kit, 0 estimated pages remain [84.xy] FALSE FALSE
...Required Replace Cartridge Intervention Required Replace Cartridge Intervention Required Unsupported PC Unit Intervention Required Unsupported PC Unit Intervention Required Imaging Unit EOL 40200 40201 40202 40203 40204 40204 40204 Intervention Required Imaging Kit EOL 40204 Return string Online status Replace waste toner ... [88.2x] FALSE Replace yellow cartridge [88.2x] FALSE unsupported [color] FALSE imaging unit [84] unsupported [color] FALSE pc unit [84] Replace photoconductor, 0 pages remain [84.xy] Replace [type] imaging kit, 0 estimated pages remain [84.xy] FALSE FALSE
Printer Languages and Interfaces Technical Reference
Page 75
... 40204 Intervention Required Developer EOL 40204 Intervention Required Replace Toner 40300 Intervention Required - 40300 Unsupported Print Cartridge Intervention Required - PC/Imaging Unit Unsupported 40300 Intervention Required Unsupported Developer 40300 Intervention Required Imaging Kit Unsupported 40300 Intervention Required Replace Toner Intervention Required Replace Toner 40301 40302 Return string Replace [color] developer [85.xy] Online...
... 40204 Intervention Required Developer EOL 40204 Intervention Required Replace Toner 40300 Intervention Required - 40300 Unsupported Print Cartridge Intervention Required - PC/Imaging Unit Unsupported 40300 Intervention Required Unsupported Developer 40300 Intervention Required Imaging Kit Unsupported 40300 Intervention Required Replace Toner Intervention Required Replace Toner 40301 40302 Return string Replace [color] developer [85.xy] Online...
Printer Languages and Interfaces Technical Reference
Page 78
... Defective or Missing Cartridge Intervention Required Defective or Missing PC/Imaging Unit 40400 40400 Intervention Required Insert Photoconductor Intervention Required Photoconductor Abnormal Intervention Required - 40404 40404 40404 Intervention Required ...Cartridge/Imaging Unit Region Mismatch Intervention Required [Color] PC Unit Missing Intervention Required [Color] Photoconductor Missing Intervention Required [Color] PC Unit Missing Intervention Required [Color] Photoconductor Missing 40404 40405 40405 40406...
... Defective or Missing Cartridge Intervention Required Defective or Missing PC/Imaging Unit 40400 40400 Intervention Required Insert Photoconductor Intervention Required Photoconductor Abnormal Intervention Required - 40404 40404 40404 Intervention Required ...Cartridge/Imaging Unit Region Mismatch Intervention Required [Color] PC Unit Missing Intervention Required [Color] Photoconductor Missing Intervention Required [Color] PC Unit Missing Intervention Required [Color] Photoconductor Missing 40404 40405 40405 40406...
Printer Languages and Interfaces Technical Reference
Page 79
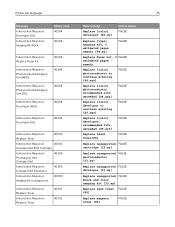
... Intervention Required Toner Cartridge Missing 40411 Return string Magenta PC Unit missing [84.41] Magenta photoconductor missing [84.41] Yellow PC Unit missing [84.41] Yellow photoconductor missing [84.41] Missing black cartridge and/or black imaging unit [30.xx] Black toner cartridge missing [30.xx] Defective... black cartridge [31.xx] Missing or defective black cartridge [31.xx] Missing cyan cartridge and/or cyan imaging unit [30.xx] Cyan toner cartridge missing [30.xx] Defective cyan cartridge [31.xx] Missing or defective cyan cartridge [31.xx] Missing ...
... Intervention Required Toner Cartridge Missing 40411 Return string Magenta PC Unit missing [84.41] Magenta photoconductor missing [84.41] Yellow PC Unit missing [84.41] Yellow photoconductor missing [84.41] Missing black cartridge and/or black imaging unit [30.xx] Black toner cartridge missing [30.xx] Defective... black cartridge [31.xx] Missing or defective black cartridge [31.xx] Missing cyan cartridge and/or cyan imaging unit [30.xx] Cyan toner cartridge missing [30.xx] Defective cyan cartridge [31.xx] Missing or defective cyan cartridge [31.xx] Missing ...

Printer Languages and Interfaces Technical Reference
Page 80
... Tray [x] Return string Defective magenta cartridge [31.xx] Online status FALSE Missing or defective magenta cartridge [31.xx] FALSE Missing yellow cartridge and/or yellow imaging unit [30.xx] FALSE Yellow toner cartridge missing [30.xx] FALSE Defective yellow cartridge [31.xx] FALSE Missing or defective yellow cartridge [31.xx] FALSE Fuser...
... Tray [x] Return string Defective magenta cartridge [31.xx] Online status FALSE Missing or defective magenta cartridge [31.xx] FALSE Missing yellow cartridge and/or yellow imaging unit [30.xx] FALSE Yellow toner cartridge missing [30.xx] FALSE Defective yellow cartridge [31.xx] FALSE Missing or defective yellow cartridge [31.xx] FALSE Fuser...

Users Guide PDF
Page 72
For more advanced system support tasks, see the Networking Guide on the toner cartridge, imaging unit, and maintenance kit. Notes: • Selectable alerts can be notified when supplies run nearly low, low, very low, or reach their end‑... can view the printer status and do print-related tasks you might normally do while standing at http://support.lexmark.com. Accessing the remote control panel The remote control panel on the Lexmark support Web site at the network printer. 1 Open a Web browser, and then type the printer IP address in to...
For more advanced system support tasks, see the Networking Guide on the toner cartridge, imaging unit, and maintenance kit. Notes: • Selectable alerts can be notified when supplies run nearly low, low, very low, or reach their end‑... can view the printer status and do print-related tasks you might normally do while standing at http://support.lexmark.com. Accessing the remote control panel The remote control panel on the Lexmark support Web site at the network printer. 1 Open a Web browser, and then type the printer IP address in to...

Users Guide PDF
Page 120
...a proxy server, then temporarily disable it to be set for each supply, select one of estimated remaining supply that appears at http://support.lexmark.com. For more advanced system support tasks, see the Networking Guide on the printer home screen. Checking the virtual display 1 Open a ... notification options: Notification Description Off The normal printer behavior for all selectable alerts can be set on the toner cartridge, imaging unit, and maintenance kit. • All selectable alerts can be set for some supply conditions. 1 Open a Web browser, and then type...
...a proxy server, then temporarily disable it to be set for each supply, select one of estimated remaining supply that appears at http://support.lexmark.com. For more advanced system support tasks, see the Networking Guide on the printer home screen. Checking the virtual display 1 Open a ... notification options: Notification Description Off The normal printer behavior for all selectable alerts can be set on the toner cartridge, imaging unit, and maintenance kit. • All selectable alerts can be set for some supply conditions. 1 Open a Web browser, and then type...

Users Guide PDF
Page 134
... printer settings even when you are available only when the printer is located at the top left corner of the home screen and appears as Imaging unit low or Cartridge Low. • Show intervention messages and the instructions on how to clear them. 7 Status/Supplies • Show a printer warning or error message...
... printer settings even when you are available only when the printer is located at the top left corner of the home screen and appears as Imaging unit low or Cartridge Low. • Show intervention messages and the instructions on how to clear them. 7 Status/Supplies • Show a printer warning or error message...

Users Guide PDF
Page 169
... address in the TCP/IP section in the address field. Using MS812de 169 Notes: • Selectable alerts can be set on the toner cartridge, imaging unit, and maintenance kit. • All selectable alerts can be set for the end‑of‑life supply condition. Warning The printer displays the warning...
... address in the TCP/IP section in the address field. Using MS812de 169 Notes: • Selectable alerts can be set on the toner cartridge, imaging unit, and maintenance kit. • All selectable alerts can be set for the end‑of‑life supply condition. Warning The printer displays the warning...

Users Guide PDF
Page 252
... fuser. Warning-Potential Damage: Do not expose the imaging unit to direct light for extended periods of time may cause print quality problems. • Pull down the printer rear door. Maintaining the printer 252 MS817 and MS818 Regular cartridges Item Regular cartridge Worldwide High...instruction sheet that came with the part. Lexmark roller kit and part number Type Printer engine roller maintenance kit Part number 40X7706 Ordering a maintenance kit To identify the supported fuser type, view the label on replacing the imaging unit, see the instruction sheet that came ...
... fuser. Warning-Potential Damage: Do not expose the imaging unit to direct light for extended periods of time may cause print quality problems. • Pull down the printer rear door. Maintaining the printer 252 MS817 and MS818 Regular cartridges Item Regular cartridge Worldwide High...instruction sheet that came with the part. Lexmark roller kit and part number Type Printer engine roller maintenance kit Part number 40X7706 Ordering a maintenance kit To identify the supported fuser type, view the label on replacing the imaging unit, see the instruction sheet that came ...
Users Guide PDF
Page 255
Warning-Potential Damage: When replacing a toner cartridge, do not leave the imaging unit exposed to direct light for an extended period of the cartridge with the arrows on the side rails inside the printer. Maintaining the printer 255 3 ...
Warning-Potential Damage: When replacing a toner cartridge, do not leave the imaging unit exposed to direct light for an extended period of the cartridge with the arrows on the side rails inside the printer. Maintaining the printer 255 3 ...

Users Guide PDF
Page 256
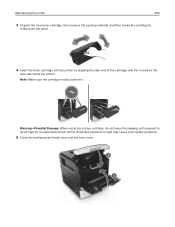
Maintaining the printer 256 Replacing the imaging unit 1 Lift the front cover, and then pull down the multipurpose feeder door. 1 2 2 Pull out the toner cartridge from the printer using the handle. 3 Lift the green handle, and then pull out the imaging unit from the printer. 1 2
Maintaining the printer 256 Replacing the imaging unit 1 Lift the front cover, and then pull down the multipurpose feeder door. 1 2 2 Pull out the toner cartridge from the printer using the handle. 3 Lift the green handle, and then pull out the imaging unit from the printer. 1 2

Users Guide PDF
Page 257
Warning-Potential Damage: Do not expose the imaging unit to light may affect the print quality of future print jobs. 6 Insert the imaging unit into the printer by aligning the arrows on the side rails of the imaging unit with the arrows on the side rails inside the printer. Doing so may cause print quality problems. Warning-Potential Damage: Do not touch the photoconductor drum. Extended exposure to direct light for more than 10 minutes. Maintaining the printer 257 4 Unpack the new imaging unit, and then shake it. 5 Remove all packing material from the imaging unit.
Warning-Potential Damage: Do not expose the imaging unit to light may affect the print quality of future print jobs. 6 Insert the imaging unit into the printer by aligning the arrows on the side rails of the imaging unit with the arrows on the side rails inside the printer. Doing so may cause print quality problems. Warning-Potential Damage: Do not touch the photoconductor drum. Extended exposure to direct light for more than 10 minutes. Maintaining the printer 257 4 Unpack the new imaging unit, and then shake it. 5 Remove all packing material from the imaging unit.

Users Guide PDF
Page 267
Clearing jams 267 Paper jam in the front door CAUTION-HOT SURFACE: The inside of injury from a hot component, allow the surface to cool before touching it. 1 Open the front cover and the multipurpose feeder. 1 2 2 Remove the toner cartridge. 3 Remove the imaging unit. 1 2 Warning-Potential Damage: Do not expose the imaging unit to light may cause print quality problems. Extended exposure to direct light for more than 10 minutes. To reduce the risk of the printer might be hot.
Clearing jams 267 Paper jam in the front door CAUTION-HOT SURFACE: The inside of injury from a hot component, allow the surface to cool before touching it. 1 Open the front cover and the multipurpose feeder. 1 2 2 Remove the toner cartridge. 3 Remove the imaging unit. 1 2 Warning-Potential Damage: Do not expose the imaging unit to light may cause print quality problems. Extended exposure to direct light for more than 10 minutes. To reduce the risk of the printer might be hot.

Users Guide PDF
Page 268
Paper jam in the rear door CAUTION-HOT SURFACE: The inside of the printer as a guide. 6 Insert the toner cartridge. 7 Close the multipurpose feeder door and the front cover. 8 If necessary, press on the control panel. Clearing jams 268 4 Remove the jammed paper. Note: Make sure that all paper fragments are removed. 5 Insert the imaging unit. 1 2 Note: Use the arrows on the side of the printer might be hot. To reduce the risk of injury from a hot component, allow the surface to cool before touching it.
Paper jam in the rear door CAUTION-HOT SURFACE: The inside of the printer as a guide. 6 Insert the toner cartridge. 7 Close the multipurpose feeder door and the front cover. 8 If necessary, press on the control panel. Clearing jams 268 4 Remove the jammed paper. Note: Make sure that all paper fragments are removed. 5 Insert the imaging unit. 1 2 Note: Use the arrows on the side of the printer might be hot. To reduce the risk of injury from a hot component, allow the surface to cool before touching it.


