User's Guide
Page 11
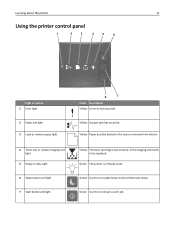
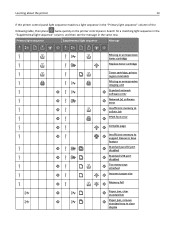
... the printer 11 Using the printer control panel 1 2 3 4 5 6 Light or button 1 Error light 2 Paper jam light 3 Load or remove paper light 4 Toner low or replace imaging unit light 5 Ready or data light 6 Sleep button and light 7 Start button and light 8 7 Color Description Yellow An error has occurred. Green Use this to enable...
... the printer 11 Using the printer control panel 1 2 3 4 5 6 Light or button 1 Error light 2 Paper jam light 3 Load or remove paper light 4 Toner low or replace imaging unit light 5 Ready or data light 6 Sleep button and light 7 Start button and light 8 7 Color Description Yellow An error has occurred. Green Use this to enable...
User's Guide
Page 12
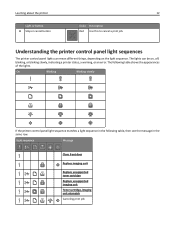
... of the lights. The following table, then see the message in the same row. Light sequence Message Close front door Replace imaging unit Replace unsupported toner cartridge Replace unsupported imaging unit Toner cartridge, imaging unit mismatch Canceling print job Understanding the printer control panel light sequences The printer control panel lights can be on the light...
... of the lights. The following table, then see the message in the same row. Light sequence Message Close front door Replace imaging unit Replace unsupported toner cartridge Replace unsupported imaging unit Toner cartridge, imaging unit mismatch Canceling print job Understanding the printer control panel light sequences The printer control panel lights can be on the light...
User's Guide
Page 13
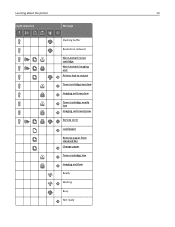
Learning about the printer 13 Light sequence Message Flushing buffer Resolution reduced Non-Lexmark toner cartridge Non-Lexmark imaging unit Printer had to restart Toner cartridge very low Imaging unit very low Toner cartridge nearly low Imaging unit nearly low Service error Load paper Remove paper from standard bin Change paper Toner cartridge low Imaging unit low Ready Waiting Busy Not ready
Learning about the printer 13 Light sequence Message Flushing buffer Resolution reduced Non-Lexmark toner cartridge Non-Lexmark imaging unit Printer had to restart Toner cartridge very low Imaging unit very low Toner cartridge nearly low Imaging unit nearly low Service error Load paper Remove paper from standard bin Change paper Toner cartridge low Imaging unit low Ready Waiting Busy Not ready
User's Guide
Page 14
... same row. Primary light sequence Supplemental light sequence Message Missing or unresponsive toner cartridge Replace toner cartridge Toner cartridge, printer region mismatch Missing or unresponsive imaging unit Standard network software error Network [x] software error Insufficient memory to collate job PPDS font error Complex page Insufficient memory to support Resource Save feature Standard...
... same row. Primary light sequence Supplemental light sequence Message Missing or unresponsive toner cartridge Replace toner cartridge Toner cartridge, printer region mismatch Missing or unresponsive imaging unit Standard network software error Network [x] software error Insufficient memory to collate job PPDS font error Complex page Insufficient memory to support Resource Save feature Standard...
User's Guide
Page 82
Part name Lexmark Return Program Regular Imaging unit 500Z 500ZA Storing supplies Choose a cool, clean storage area for extended periods of time may cause imaging unit parts to fail prior to exhaustion of toner from toner cartridge. Do not expose supplies to use them. For more information on replacing the imaging unit, see the instruction sheet that... sunlight • Temperatures above 35°C (95°F) • High humidity above 80% • Salty air • Corrosive gases • Heavy dust Ordering an imaging unit Extremely low print coverage for the printer supplies.
Part name Lexmark Return Program Regular Imaging unit 500Z 500ZA Storing supplies Choose a cool, clean storage area for extended periods of time may cause imaging unit parts to fail prior to exhaustion of toner from toner cartridge. Do not expose supplies to use them. For more information on replacing the imaging unit, see the instruction sheet that... sunlight • Temperatures above 35°C (95°F) • High humidity above 80% • Salty air • Corrosive gases • Heavy dust Ordering an imaging unit Extremely low print coverage for the printer supplies.
User's Guide
Page 83
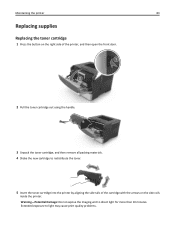
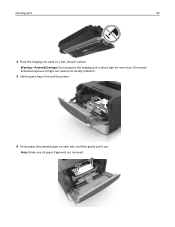
Warning-Potential Damage: Do not expose the imaging unit to redistribute the toner. 5 Insert the toner cartridge into the printer by aligning the side rails of the cartridge with the arrows on the side ...
Warning-Potential Damage: Do not expose the imaging unit to redistribute the toner. 5 Insert the toner cartridge into the printer by aligning the side rails of the cartridge with the arrows on the side ...
User's Guide
Page 84
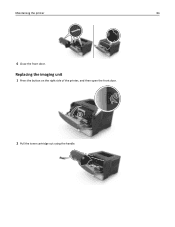
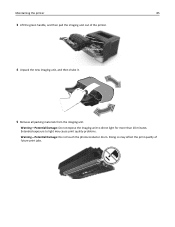
Maintaining the printer 84 6 Close the front door. Replacing the imaging unit 1 Press the button on the right side of the printer, and then open the front door. 1 2 2 Pull the toner cartridge out using the handle.
Maintaining the printer 84 6 Close the front door. Replacing the imaging unit 1 Press the button on the right side of the printer, and then open the front door. 1 2 2 Pull the toner cartridge out using the handle.
User's Guide
Page 85
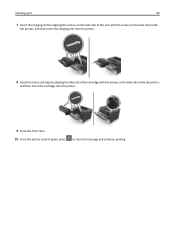
Extended exposure to direct light for more than 10 minutes. Doing so may cause print quality problems. Warning-Potential Damage: Do not touch the photoconductor drum. Warning-Potential Damage: Do not expose the imaging unit to light may affect the print quality of the printer. 4 Unpack the new imaging unit, and then shake it. 5 Remove all packing materials from the imaging unit. Maintaining the printer 85 3 Lift the green handle, and then pull the imaging unit out of future print jobs.
Extended exposure to direct light for more than 10 minutes. Doing so may cause print quality problems. Warning-Potential Damage: Do not touch the photoconductor drum. Warning-Potential Damage: Do not expose the imaging unit to light may affect the print quality of the printer. 4 Unpack the new imaging unit, and then shake it. 5 Remove all packing materials from the imaging unit. Maintaining the printer 85 3 Lift the green handle, and then pull the imaging unit out of future print jobs.
User's Guide
Page 86
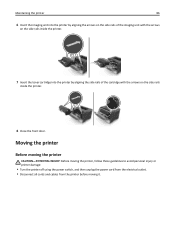
.... • Disconnect all cords and cables from the printer before moving it. Maintaining the printer 86 6 Insert the imaging unit into the printer by aligning the arrows on the side rails of the imaging unit with the arrows on the side rails inside the printer. 7 Insert the toner cartridge into the printer by aligning...
.... • Disconnect all cords and cables from the printer before moving it. Maintaining the printer 86 6 Insert the imaging unit into the printer by aligning the arrows on the side rails of the imaging unit with the arrows on the side rails inside the printer. 7 Insert the toner cartridge into the printer by aligning...
User's Guide
Page 88
... some supplies for assessing the status of the following notification options: Notes: • Selectable alerts can be set on the Lexmark Web site at http://support.lexmark.com. Notes: • Print a network setup page or menu settings page, and then locate the printer IP address in...system support tasks, see the Networking Guide on the Software and Documentation CD or the Embedded Web Server Administrator's Guide on the toner cartridge and imaging unit. • All selectable alerts can view some supply conditions. 1 Open a Web browser, and then type the printer IP address in the ...
... some supplies for assessing the status of the following notification options: Notes: • Selectable alerts can be set on the Lexmark Web site at http://support.lexmark.com. Notes: • Print a network setup page or menu settings page, and then locate the printer IP address in...system support tasks, see the Networking Guide on the Software and Documentation CD or the Embedded Web Server Administrator's Guide on the toner cartridge and imaging unit. • All selectable alerts can view some supply conditions. 1 Open a Web browser, and then type the printer IP address in the ...
User's Guide
Page 94
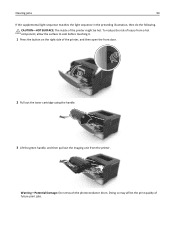
... the printer, and then open the front door. 1 2 2 Pull out the toner cartridge using the handle. 3 Lift the green handle, and then pull out the imaging unit from the printer. Clearing jams 94 If the supplemental light sequence matches the light sequence in the preceding illustration, then do the following.
... the printer, and then open the front door. 1 2 2 Pull out the toner cartridge using the handle. 3 Lift the green handle, and then pull out the imaging unit from the printer. Clearing jams 94 If the supplemental light sequence matches the light sequence in the preceding illustration, then do the following.
User's Guide
Page 95
Note: Make sure all paper fragments are removed. Extended exposure to direct light for more than 10 minutes. Clearing jams 95 4 Place the imaging unit aside on each side, and then gently pull it out. Warning-Potential Damage: Do not expose the imaging unit to light can cause print quality problems. 5 Lift the green flap in front of the printer. 6 Firmly grasp the jammed paper on a flat, smooth surface.
Note: Make sure all paper fragments are removed. Extended exposure to direct light for more than 10 minutes. Clearing jams 95 4 Place the imaging unit aside on each side, and then gently pull it out. Warning-Potential Damage: Do not expose the imaging unit to light can cause print quality problems. 5 Lift the green flap in front of the printer. 6 Firmly grasp the jammed paper on a flat, smooth surface.
User's Guide
Page 96
Clearing jams 96 7 Insert the imaging unit by aligning the arrows on the side rails of the unit with the arrows on the side rails inside the printer, and then insert the imaging unit into the printer. 8 Insert the toner cartridge by aligning the side rails of the cartridge with the arrows on the side rails inside the printer, and then insert the cartridge into the printer. 9 Close the front door. 10 From the printer control panel, press to clear the message and continue printing.
Clearing jams 96 7 Insert the imaging unit by aligning the arrows on the side rails of the unit with the arrows on the side rails inside the printer, and then insert the imaging unit into the printer. 8 Insert the toner cartridge by aligning the side rails of the cartridge with the arrows on the side rails inside the printer, and then insert the cartridge into the printer. 9 Close the front door. 10 From the printer control panel, press to clear the message and continue printing.
User's Guide
Page 108
...following: 1 Check if the toner cartridge and imaging unit are MICR or non‑MICR supplies. Notes: • Use a MICR toner cartridge and imaging unit for printing checks and other similar documents. • Use a non-MICR toner cartridge and imaging unit for regular print jobs. Note: For the ...list of supported supplies, see the "Maintaining the printer" chapter of the User's Guide or visit http://support.lexmark.com. 2 Change the toner cartridge or imaging unit so that both are both MICR or ...
...following: 1 Check if the toner cartridge and imaging unit are MICR or non‑MICR supplies. Notes: • Use a MICR toner cartridge and imaging unit for printing checks and other similar documents. • Use a non-MICR toner cartridge and imaging unit for regular print jobs. Note: For the ...list of supported supplies, see the "Maintaining the printer" chapter of the User's Guide or visit http://support.lexmark.com. 2 Change the toner cartridge or imaging unit so that both are both MICR or ...
User's Guide
Page 117
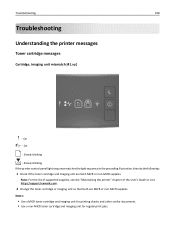
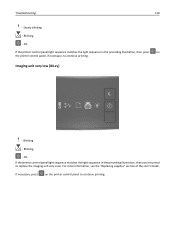
Troubleshooting 117 Imaging unit messages Imaging unit low [84.xy] ‑ Blinking ‑ On If the printer control panel light sequence matches the light sequence in the preceding illustration, then you may need to continue printing. Imaging unit nearly low [84.xy] If necessary, press on the printer control panel to order an imaging unit.
Troubleshooting 117 Imaging unit messages Imaging unit low [84.xy] ‑ Blinking ‑ On If the printer control panel light sequence matches the light sequence in the preceding illustration, then you may need to continue printing. Imaging unit nearly low [84.xy] If necessary, press on the printer control panel to order an imaging unit.
User's Guide
Page 118
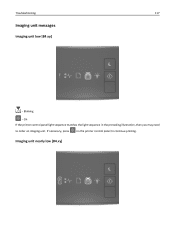
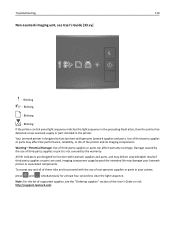
Imaging unit very low [84.xy] ‑ Blinking ‑ Blinking ‑ On If the printer control panel light sequence matches the light sequence in the preceding illustration, ...; Blinking ‑ On If the printer control panel light sequence matches the light sequence in the preceding illustration, then you may need to replace the imaging unit very soon. For more information, see the "Replacing supplies" section of the User's Guide.
Imaging unit very low [84.xy] ‑ Blinking ‑ Blinking ‑ On If the printer control panel light sequence matches the light sequence in the preceding illustration, ...; Blinking ‑ On If the printer control panel light sequence matches the light sequence in the preceding illustration, then you may need to replace the imaging unit very soon. For more information, see the "Replacing supplies" section of the User's Guide.
User's Guide
Page 119
... components. Use of third-party supplies or parts is designed to function with Lexmark supplies and parts, and may affect the performance, reliability, or life of the printer and its imaging components. Imaging component usage beyond the intended life may damage your printer, press and simultaneously ...party supplies or parts may deliver unpredictable results if third-party supplies or parts are used. Troubleshooting 119 Non-Lexmark imaging unit, see the "Ordering supplies" section of third-party supplies or parts can affect warranty coverage. Damage caused by the warranty.
... components. Use of third-party supplies or parts is designed to function with Lexmark supplies and parts, and may affect the performance, reliability, or life of the printer and its imaging components. Imaging component usage beyond the intended life may damage your printer, press and simultaneously ...party supplies or parts may deliver unpredictable results if third-party supplies or parts are used. Troubleshooting 119 Non-Lexmark imaging unit, see the "Ordering supplies" section of third-party supplies or parts can affect warranty coverage. Damage caused by the warranty.
User's Guide
Page 120
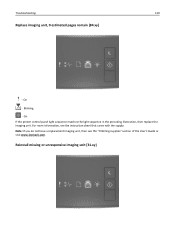
Troubleshooting 120 Replace imaging unit, 0 estimated pages remain [84.xy] ‑ On ‑ Blinking ‑ On If the printer control panel light sequence matches the light sequence in the preceding illustration, then replace the imaging unit. Note: If you do not have a replacement imaging unit, then see the instruction sheet that came with the supply. For more information, see the "Ordering supplies" section of the User's Guide or visit www.lexmark.com. Reinstall missing or unresponsive imaging unit [31.xy]
Troubleshooting 120 Replace imaging unit, 0 estimated pages remain [84.xy] ‑ On ‑ Blinking ‑ On If the printer control panel light sequence matches the light sequence in the preceding illustration, then replace the imaging unit. Note: If you do not have a replacement imaging unit, then see the instruction sheet that came with the supply. For more information, see the "Ordering supplies" section of the User's Guide or visit www.lexmark.com. Reinstall missing or unresponsive imaging unit [31.xy]
User's Guide
Page 121
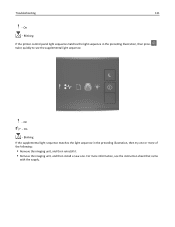
Troubleshooting 121 ‑ On ‑ Blinking If the printer control panel light sequence matches the light sequence in the preceding illustration, then press twice quickly to see the supplemental light sequence. ‑ On ‑ On ‑ Blinking If the supplemental light sequence matches the light sequence in the preceding illustration, then try one or more information, see the instruction sheet that came with the supply. For more of the following: • Remove the imaging unit, and then reinstall it. • Remove the imaging unit, and then install a new one.
Troubleshooting 121 ‑ On ‑ Blinking If the printer control panel light sequence matches the light sequence in the preceding illustration, then press twice quickly to see the supplemental light sequence. ‑ On ‑ On ‑ Blinking If the supplemental light sequence matches the light sequence in the preceding illustration, then try one or more information, see the instruction sheet that came with the supply. For more of the following: • Remove the imaging unit, and then reinstall it. • Remove the imaging unit, and then install a new one.
User's Guide
Page 122
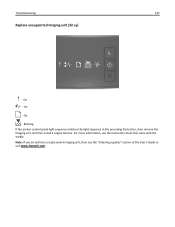
Troubleshooting 122 Replace unsupported imaging unit [32.xy] ‑ On ‑ On ‑ On ‑ Blinking If the printer control panel light sequence matches the light sequence in the preceding illustration, then remove the imaging unit, and then install a supported one. Note: If you do not have a replacement imaging unit, then see the instruction sheet that came with the supply. For more information, see the "Ordering supplies" section of the User's Guide or visit www.lexmark.com.
Troubleshooting 122 Replace unsupported imaging unit [32.xy] ‑ On ‑ On ‑ On ‑ Blinking If the printer control panel light sequence matches the light sequence in the preceding illustration, then remove the imaging unit, and then install a supported one. Note: If you do not have a replacement imaging unit, then see the instruction sheet that came with the supply. For more information, see the "Ordering supplies" section of the User's Guide or visit www.lexmark.com.


