Embedded Web Server Administrator s Guide
Page 6
... printer, combine login methods and access controls to define users who are allowed to use the printer, and the functions they can also configure more information, see the Administrator's Guide for e‑mail. For more information, see the Lexmark Common Criteria Installation Supplement and Administrator Guide. Also, identify the following conditions: • The login method to use . User credentials are authenticated using a smart card, and then securely send e-mails and release print jobs...
... printer, combine login methods and access controls to define users who are allowed to use the printer, and the functions they can also configure more information, see the Administrator's Guide for e‑mail. For more information, see the Lexmark Common Criteria Installation Supplement and Administrator Guide. Also, identify the following conditions: • The login method to use . User credentials are authenticated using a smart card, and then securely send e-mails and release print jobs...
Embedded Web Server Administrator s Guide
Page 9
... Embedded Web Server, click Reports. 2 Select the report or log. • Menu Settings Page-Show the current printer preferences, settings, and configurations. • Device - FTP Shortcuts-Show a list of all copy shortcuts that are stored on the flash drive or printer hard disk. Fax Job Log-List the last 200 completed fax jobs. Note: This report is available only when Enable Job Log is installed. Note: This report is available only when a flash drive or printer hard disk is enabled...
... Embedded Web Server, click Reports. 2 Select the report or log. • Menu Settings Page-Show the current printer preferences, settings, and configurations. • Device - FTP Shortcuts-Show a list of all copy shortcuts that are stored on the flash drive or printer hard disk. Fax Job Log-List the last 200 completed fax jobs. Note: This report is available only when Enable Job Log is installed. Note: This report is available only when a flash drive or printer hard disk is enabled...
Embedded Web Server Administrator s Guide
Page 16
...; Password-Set the password to use for the web link. • Path-Set the printer network path to use for the web link. • File Name-Set the file name to use for the scanned image. - PDF Version-Specify the PDF version of the scanned image. - Searchable-Specify whether to enable searchability for the web link. • Web Link-Set the web link. 3 Click Save. FTP Defaults • Format-Specify the file format for the scanned image. • Global OCR Settings-Configure the settings...
...; Password-Set the password to use for the web link. • Path-Set the printer network path to use for the web link. • File Name-Set the file name to use for the scanned image. - PDF Version-Specify the PDF version of the scanned image. - Searchable-Specify whether to enable searchability for the web link. • Web Link-Set the web link. 3 Click Save. FTP Defaults • Format-Specify the file format for the scanned image. • Global OCR Settings-Configure the settings...
Embedded Web Server Administrator s Guide
Page 41
... the Network Time Protocol section, select Enable NTP, and then type the IP address or host name of the NTP server. c Depending on your printer model, either enter the key ID and password, or browse to sync the time with the domain controller automatically. 1 From the Embedded Web Server, click Settings > Device > Preferences > Date and Time. Configuring manually Note: Configuring the date and time manually disables NTP. a From the Configure section, in the Enable Authentication menu, select MD5 key. Note...
... the Network Time Protocol section, select Enable NTP, and then type the IP address or host name of the NTP server. c Depending on your printer model, either enter the key ID and password, or browse to sync the time with the domain controller automatically. 1 From the Embedded Web Server, click Settings > Device > Preferences > Date and Time. Configuring manually Note: Configuring the date and time manually disables NTP. a From the Configure section, in the Enable Authentication menu, select MD5 key. Note...
Embedded Web Server Administrator s Guide
Page 46
...; Operator Panel Lock-Configure the locking function of Service Erase-Clear all settings, applications, and pending jobs stored in the printer memory, or erase all data in the printer. • Address Book-Manage the address book. • Device Menu-Configure the printer firmware settings. This control is available only when an option card is restricted, then access to use the IPP port. • Initiate Scans Remotely-Allow authenticated users to initiate remote scanning. • B/W Print-Allow authenticated users to print in black and white. • Color Print...
...; Operator Panel Lock-Configure the locking function of Service Erase-Clear all settings, applications, and pending jobs stored in the printer memory, or erase all data in the printer. • Address Book-Manage the address book. • Device Menu-Configure the printer firmware settings. This control is available only when an option card is restricted, then access to use the IPP port. • Initiate Scans Remotely-Allow authenticated users to initiate remote scanning. • B/W Print-Allow authenticated users to print in black and white. • Color Print...
Embedded Web Server Administrator s Guide
Page 50
... in the printer memory or hard disk. - Confidential held in the printer memory are automatically deleted after printing. • Require All Jobs to be Held-Set the printer to take effect. 3 Click Save. Enabling solutions LDAP settings 1 From the Embedded Web Server, click Settings > Security > Solutions LDAP Settings. 2 Select one copy to check if it is turned off this setting do not affect the expiration time for confidential print jobs that the printer stores print jobs. Lexmark Confidential...
... in the printer memory or hard disk. - Confidential held in the printer memory are automatically deleted after printing. • Require All Jobs to be Held-Set the printer to take effect. 3 Click Save. Enabling solutions LDAP settings 1 From the Embedded Web Server, click Settings > Security > Solutions LDAP Settings. 2 Select one copy to check if it is turned off this setting do not affect the expiration time for confidential print jobs that the printer stores print jobs. Lexmark Confidential...

Embedded Web Server Administrator s Guide
Page 52
... high-speed capabilities. Fax Configuration • Fax Low Power Support-Specify the printer power setting when it is 24, then all fonts sized 24 points or less use the high‑frequency screens. • Print Density-Adjust the toner density when printing documents. • Copy Density-Adjust the toner density when copying documents. USB Configuration • USB PnP-Change the USB driver mode of the printer to improve its compatibility with a personal computer. • USB Scan to Local-Set whether the USB device driver enumerates as a USB Simple device...
... high-speed capabilities. Fax Configuration • Fax Low Power Support-Specify the printer power setting when it is 24, then all fonts sized 24 points or less use the high‑frequency screens. • Print Density-Adjust the toner density when printing documents. • Copy Density-Adjust the toner density when copying documents. USB Configuration • USB PnP-Change the USB driver mode of the printer to improve its compatibility with a personal computer. • USB Scan to Local-Set whether the USB device driver enumerates as a USB Simple device...
Embedded Web Server Administrator s Guide
Page 70
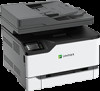
... log settings 34 memory types installed on printer 54 MFP clock out of sync 56 multifunction products 6 N network destination adding 20 configuring from the Embedded Web Server 20 deleting 20 editing 20 Network Time Protocol configuring 41 nonvolatile memory 54 erasing 53 O overview 6 P parts checking status 9 checking, using the Embedded Web Server 9 parts of the Embedded Web Server 7 print permission enabling 51 printer certificate configuring defaults 47 creating 47 printer clock out of sync 56 printer hard disk disposing 54 encrypting 54 printer hard disk...
... log settings 34 memory types installed on printer 54 MFP clock out of sync 56 multifunction products 6 N network destination adding 20 configuring from the Embedded Web Server 20 deleting 20 editing 20 Network Time Protocol configuring 41 nonvolatile memory 54 erasing 53 O overview 6 P parts checking status 9 checking, using the Embedded Web Server 9 parts of the Embedded Web Server 7 print permission enabling 51 printer certificate configuring defaults 47 creating 47 printer clock out of sync 56 printer hard disk disposing 54 encrypting 54 printer hard disk...

Universal Print Driver Version 2.0 White Paper
Page 34
... a network printer when sending a print job or a fax job from the Advanced tab of all printer settings. Installing the Universal Print Driver 34 Installing the Universal Print Driver The UPD may be created. The print driver updates the status of the Printer Properties dialog box is unavailable for Windows" section, click Download. The existing UPD version 1 print queues must be deleted, and then print queues using UPD version 2 must be installed through the Windows Add Printer Wizard or through the Lexmark...
... a network printer when sending a print job or a fax job from the Advanced tab of all printer settings. Installing the Universal Print Driver 34 Installing the Universal Print Driver The UPD may be created. The print driver updates the status of the Printer Properties dialog box is unavailable for Windows" section, click Download. The existing UPD version 1 print queues must be deleted, and then print queues using UPD version 2 must be installed through the Windows Add Printer Wizard or through the Lexmark...

Universal Print Driver Version 2.0 White Paper
Page 44
...fidential print job does not print until the user releases it from the printer control panel, see your printer User's Guide. Verify print The first copy of a multiple‑copy print job is selected. When you use this setting is selected, then the Print and Hold feature is stored in the printer memory for printing later. Repeat print The print job is released, and then a copy is turned on. User Name The user name that is blank. In...
...fidential print job does not print until the user releases it from the printer control panel, see your printer User's Guide. Verify print The first copy of a multiple‑copy print job is selected. When you use this setting is selected, then the Print and Hold feature is stored in the printer memory for printing later. Repeat print The print job is released, and then a copy is turned on. User Name The user name that is blank. In...
Printer Languages and Interfaces Technical Reference
Page 120
... used for write access. If set to a value greater that the current file system should be deleted and a new one of the file system on the flash memory can be mounted; Device Parameters for initializing the flash memory. A lower integer indicates a high priority. The value returned when the parameter is mounted. PostScript emulation 120 Key Type...
... used for write access. If set to a value greater that the current file system should be deleted and a new one of the file system on the flash memory can be mounted; Device Parameters for initializing the flash memory. A lower integer indicates a high priority. The value returned when the parameter is mounted. PostScript emulation 120 Key Type...

Printer Languages and Interfaces Technical Reference
Page 138
... on some other printers when using an open collector driver to transmit data to the printer, set to Off from the control panel or through a PJL command. This setting increases the reliability of STROBE. • The printer automatically turns Advanced Status to Off. If the attached host computer does not support IEEE 1284 communication, then you may install an RS-232C serial interface card or an external...
... on some other printers when using an open collector driver to transmit data to the printer, set to Off from the control panel or through a PJL command. This setting increases the reliability of STROBE. • The printer automatically turns Advanced Status to Off. If the attached host computer does not support IEEE 1284 communication, then you may install an RS-232C serial interface card or an external...

Printer Drivers for UNIX & Linux Systems
Page 43
... server netmask network address Network Information System (NIS) network print server network printer NIS NIS tables Packet Internet Groper (PING) parity PING pkgadd pkginfo pkgrm port Print and Hold print file A program that tests whether an IP destination can be reached by a user to simplify printing options. This number works with the lines per page setting to specify the number of the paper. A function of the printer driver that lets administrators configure users, groups, hostnames, and other network information for a particular job. This number works...
... server netmask network address Network Information System (NIS) network print server network printer NIS NIS tables Packet Internet Groper (PING) parity PING pkgadd pkginfo pkgrm port Print and Hold print file A program that tests whether an IP destination can be reached by a user to simplify printing options. This number works with the lines per page setting to specify the number of the paper. A function of the printer driver that lets administrators configure users, groups, hostnames, and other network information for a particular job. This number works...
Users Guide PDF
Page 34
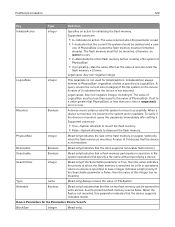
... the home screen, touch Settings > Device > Maintenance > Config Menu > Tray Configuration > Tray Linking. 4 Touch Automatic. Installing and updating software, drivers, and firmware Installing the printer software Notes: • The print driver is included in the software installer package. • For Macintosh computers with your printer and operating system. 2 Run the installer, and then follow the instructions on an AirPrint-certified printer. 1 Obtain a copy of the paper guide. 3 Feed the paper until its...
... the home screen, touch Settings > Device > Maintenance > Config Menu > Tray Configuration > Tray Linking. 4 Touch Automatic. Installing and updating software, drivers, and firmware Installing the printer software Notes: • The print driver is included in the software installer package. • For Macintosh computers with your printer and operating system. 2 Run the installer, and then follow the instructions on an AirPrint-certified printer. 1 Obtain a copy of the paper guide. 3 Feed the paper until its...

Users Guide PDF
Page 63
... Display Short Paper Error On Auto‑clear* Set the printer to a value indicates the factory default setting. Note: An asterisk (*) next to show a message when a short paper error occurs. Note: An asterisk (*) next to reprint jammed pages. Error Prevention Auto Reboot Auto Reboot Window (720*) Set the number of automatic reboots that the printer can perform. Note: Short paper refers to the size of the reboot counter. Error Prevention Page Protect Off* On Set the printer to Sleep mode...
... Display Short Paper Error On Auto‑clear* Set the printer to a value indicates the factory default setting. Note: An asterisk (*) next to show a message when a short paper error occurs. Note: An asterisk (*) next to reprint jammed pages. Error Prevention Auto Reboot Auto Reboot Window (720*) Set the number of automatic reboots that the printer can perform. Note: Short paper refers to the size of the reboot counter. Error Prevention Page Protect Off* On Set the printer to Sleep mode...
Users Guide PDF
Page 216
... attaching cables 21 automatic document feeder (ADF) using 47, 50, 52, 55 avoiding paper jams 145 B black images 178 blank or white pages 165 blocking junk faxes 54 bookmarks creating 23 creating folders for 24 C can send but not receive faxes 193 canceling a print job from the computer 46 from the printer control panel 46 cannot open Embedded Web Server 143 cannot receive faxes 193 cards copying 49 changing resolution fax 53 checking the status of parts and supplies 118 cleaning the printer 136 Cleaning the Scanner 117 cleaning the scanner...
... attaching cables 21 automatic document feeder (ADF) using 47, 50, 52, 55 avoiding paper jams 145 B black images 178 blank or white pages 165 blocking junk faxes 54 bookmarks creating 23 creating folders for 24 C can send but not receive faxes 193 canceling a print job from the computer 46 from the printer control panel 46 cannot open Embedded Web Server 143 cannot receive faxes 193 cards copying 49 changing resolution fax 53 checking the status of parts and supplies 118 cleaning the printer 136 Cleaning the Scanner 117 cleaning the scanner...
Users Guide PDF
Page 217
... screen icons displaying 13 horizontal dark lines 182 horizontal white lines 185 I icons on the home screen showing 13 identifying jam locations 146 images cut off on print 179 importing a configuration file using the Embedded Web Server 35 incorrect margins 170 indicator light understanding the status 14 installing the print driver 34 installing the printer software 34 installing the wireless print server 36 installing trays 22 internal options, adding print driver 35 J jams avoiding 145 jams, clearing in the automatic document feeder...
... screen icons displaying 13 horizontal dark lines 182 horizontal white lines 185 I icons on the home screen showing 13 identifying jam locations 146 images cut off on print 179 importing a configuration file using the Embedded Web Server 35 incorrect margins 170 indicator light understanding the status 14 installing the print driver 34 installing the printer software 34 installing the wireless print server 36 installing trays 22 internal options, adding print driver 35 J jams avoiding 145 jams, clearing in the automatic document feeder...
Users Guide PDF
Page 218
... display 13 letterhead copying on 48 loading 33 selecting 16 Lexmark Mobile Print using 41 light print 171 LINE port 21 linking trays 34 loading trays 31 locating jam areas 146 M making copies 47 manual color correction 188 manual feeder loading 33 replacing 126 memory types installed on printer 40 menu 802.1x 10⁷ About this Printer 69 Certificate Management 113 Cloud Connector 116 Confidential Print Setup 114 Config Menu 65 Copy Defaults 79 Custom Scan Sizes 78 Device 116 Eco‑Mode...
... display 13 letterhead copying on 48 loading 33 selecting 16 Lexmark Mobile Print using 41 light print 171 LINE port 21 linking trays 34 loading trays 31 locating jam areas 146 M making copies 47 manual color correction 188 manual feeder loading 33 replacing 126 memory types installed on printer 40 menu 802.1x 10⁷ About this Printer 69 Certificate Management 113 Cloud Connector 116 Confidential Print Setup 114 Config Menu 65 Copy Defaults 79 Custom Scan Sizes 78 Device 116 Eco‑Mode...
Users Guide PDF
Page 219
... Lexmark products 199 reducing copies 48 removing paper jam in the duplex unit 153 in the fuser area 153 in the manual feeder 153 in the optional tray 149 in the standard tray 147 repeat print jobs 44 printing from a Macintosh computer 45 printing from Windows 45 repeating defects on print 188 Replace cartridge, printer region mismatch 144 replacing parts ADF separator pad 134 ADF tray 127 manual feeder 126 pick tires 129 tray 125 replacing supplies print cartridge 122 waste toner bottle 124 reports printer status...
... Lexmark products 199 reducing copies 48 removing paper jam in the duplex unit 153 in the fuser area 153 in the manual feeder 153 in the optional tray 149 in the standard tray 147 repeat print jobs 44 printing from a Macintosh computer 45 printing from Windows 45 repeating defects on print 188 Replace cartridge, printer region mismatch 144 replacing parts ADF separator pad 134 ADF tray 127 manual feeder 126 pick tires 129 tray 125 replacing supplies print cartridge 122 waste toner bottle 124 reports printer status...
Quick Reference
Page 1
... Reference Copying Making copies 1 Load an original document into the ADF tray or on the scanner glass. 1 2 From the home screen, touch E-mail, and then enter the needed information. 3 If necessary, configure other fax settings. 4 Send the fax job. If necessary, adjust the copy settings. 3 Copy the document. Printing from a mobile device Printing from your AndroidTM mobile device, open the Print dialog. 2 If necessary, adjust the settings. 3 Print the document. For Windows users 1 With a document open , choose File > Print. 2 Select the printer and enter the recipient number...
... Reference Copying Making copies 1 Load an original document into the ADF tray or on the scanner glass. 1 2 From the home screen, touch E-mail, and then enter the needed information. 3 If necessary, configure other fax settings. 4 Send the fax job. If necessary, adjust the copy settings. 3 Copy the document. Printing from a mobile device Printing from your AndroidTM mobile device, open the Print dialog. 2 If necessary, adjust the settings. 3 Print the document. For Windows users 1 With a document open , choose File > Print. 2 Select the printer and enter the recipient number...


