Printer Languages and Interfaces Technical Reference
Page 72
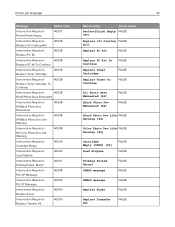
...PerfectFinish Empty FALSE [87] Replace Oil Coating FALSE Roll Replace PC Kit FALSE Replace PC Kit To Continue Replace Toner Cartridge Replace Toner To Continue FALSE FALSE FALSE All Photo Devs Exhausted [84] Black Photo Dev Exhausted [84] FALSE FALSE Black ... Intervention Required Replace PC Kit 40038 Intervention Required - 40038 Replace PC Kit To Continue Intervention Required Replace Toner Cartridge 40038 Intervention Required - 40038 Replace Toner Cartridge To Continue Intervention Required - 40038 84 All Photo Devs Exhausted Intervention Required - 84 Black Photo Dev ...
...PerfectFinish Empty FALSE [87] Replace Oil Coating FALSE Roll Replace PC Kit FALSE Replace PC Kit To Continue Replace Toner Cartridge Replace Toner To Continue FALSE FALSE FALSE All Photo Devs Exhausted [84] Black Photo Dev Exhausted [84] FALSE FALSE Black ... Intervention Required Replace PC Kit 40038 Intervention Required - 40038 Replace PC Kit To Continue Intervention Required Replace Toner Cartridge 40038 Intervention Required - 40038 Replace Toner Cartridge To Continue Intervention Required - 40038 84 All Photo Devs Exhausted Intervention Required - 84 Black Photo Dev ...
Printer Languages and Interfaces Technical Reference
Page 79
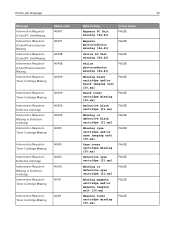
... 40407 40407 40408 40408 40409 Intervention Required Toner Cartridge Missing Intervention Required Defective Cartridge Intervention Required Missing or Defective Cartridge Intervention Required Toner Cartridge Missing 40409 40409 40409 40410 Intervention Required Toner Cartridge Missing Intervention Required Defective Cartridge Intervention Required Missing or Defective Cartridge Intervention Required Toner Cartridge Missing 40410 40410 40410 40411 Intervention Required Toner Cartridge Missing 40411 Return string Magenta PC Unit...
... 40407 40407 40408 40408 40409 Intervention Required Toner Cartridge Missing Intervention Required Defective Cartridge Intervention Required Missing or Defective Cartridge Intervention Required Toner Cartridge Missing 40409 40409 40409 40410 Intervention Required Toner Cartridge Missing Intervention Required Defective Cartridge Intervention Required Missing or Defective Cartridge Intervention Required Toner Cartridge Missing 40410 40410 40410 40411 Intervention Required Toner Cartridge Missing 40411 Return string Magenta PC Unit...

Printer Languages and Interfaces Technical Reference
Page 80
... Ready RDYMSG Power Saver Toner Low Toner Low Not Ready Not Ready Online status TRUE TRUE TRUE TRUE TRUE FALSE FALSE Printer job language 80 Message Intervention Required Defective Cartridge Intervention Required Missing or Defective Cartridge Intervention Required Toner Cartridge Missing Status code 40411 40411 40412 Intervention Required Toner Cartridge Missing 40412 Intervention Required Defective Cartridge 40412 Intervention Required -
... Ready RDYMSG Power Saver Toner Low Toner Low Not Ready Not Ready Online status TRUE TRUE TRUE TRUE TRUE FALSE FALSE Printer job language 80 Message Intervention Required Defective Cartridge Intervention Required Missing or Defective Cartridge Intervention Required Toner Cartridge Missing Status code 40411 40411 40412 Intervention Required Toner Cartridge Missing 40412 Intervention Required Defective Cartridge 40412 Intervention Required -

Paper and Specialty Media Guide PDF
Page 19
Partial sheets also contaminate the printer and the cartridge with a converter or a vendor who has extensive knowledge about label support for selecting and using the proper type of labels continuously. • Do not use ... liners are using paper 19 • Use full label sheets. Peeled off labels could cause jams. The label or adhesive could void the printer and toner cartridge warranties. • Flex, fan, and align the label edges before loading. • Use only label sheets that have no gaps between the labels. • Do...
Partial sheets also contaminate the printer and the cartridge with a converter or a vendor who has extensive knowledge about label support for selecting and using the proper type of labels continuously. • Do not use ... liners are using paper 19 • Use full label sheets. Peeled off labels could cause jams. The label or adhesive could void the printer and toner cartridge warranties. • Flex, fan, and align the label edges before loading. • Use only label sheets that have no gaps between the labels. • Do...
Paper and Specialty Media Guide PDF
Page 24
...thinner, but are similar to the unique construction of the form feeds into the printer first. When printing on the printer and cartridge, which leads to toner buildup in the output bin. Printing on labels Print on your printer, see "Printer-specific paper support" on the back ... special maintenance. We recommend designing a 1‑mm (0.04‑in the tray so the paper portion of integrated forms, you replace the toner cartridge. Depending on full label sheets only. Maintenance procedures Note: These procedures apply only to a base material (generally paper).
...thinner, but are similar to the unique construction of the form feeds into the printer first. When printing on the printer and cartridge, which leads to toner buildup in the output bin. Printing on labels Print on your printer, see "Printer-specific paper support" on the back ... special maintenance. We recommend designing a 1‑mm (0.04‑in the tray so the paper portion of integrated forms, you replace the toner cartridge. Depending on full label sheets only. Maintenance procedures Note: These procedures apply only to a base material (generally paper).

Lexmark MS32x 42x 52x 62x series Disassembly of Waste Electrical and Electronic Equipment
Page 2
... Mercury containing components, such as switches or backlighting lamps Batteries Quantity 0 0 1 Printed circuit boards greater than 10 cm2 multiple Toner cartridges, liquid and pasty, as well as colour toner Plastic containing brominated flame retardants 2 multiple Asbestos waste and components which contain asbestos Cathode ray tubes Chlorofluorocarbons (CFC), Hydrochlorofluorocarbons (HCFC)... 0 0 0 0 0 1 0 0 1 2 multiple Notes N/A N/A Lithium Manganese Dioxide coin cell located on Power Supply For details, see Annex C For details, see Annex B Options: 1 - Toner cartridge 1 -
... Mercury containing components, such as switches or backlighting lamps Batteries Quantity 0 0 1 Printed circuit boards greater than 10 cm2 multiple Toner cartridges, liquid and pasty, as well as colour toner Plastic containing brominated flame retardants 2 multiple Asbestos waste and components which contain asbestos Cathode ray tubes Chlorofluorocarbons (CFC), Hydrochlorofluorocarbons (HCFC)... 0 0 0 0 0 1 0 0 1 2 multiple Notes N/A N/A Lithium Manganese Dioxide coin cell located on Power Supply For details, see Annex C For details, see Annex B Options: 1 - Toner cartridge 1 -

Lexmark MS32x 42x 52x 62x series Disassembly of Waste Electrical and Electronic Equipment
Page 4
MS32x, MS42x, MS52x, MS62x Series Location Toner Cartridge Imaging Unit Doc No.: Rev. 01 Page 4 of 18
MS32x, MS42x, MS52x, MS62x Series Location Toner Cartridge Imaging Unit Doc No.: Rev. 01 Page 4 of 18

Users Guide PDF
Page 40
... An asterisk (*) next to come on when a printer error occurs. Note: This menu item appears only in some printer models. Supplies Cartridge Alarm Off Single* Continuous Set the number of times that the printer uses to estimate supply usage and trigger custom notifications when ...Control Off Single* Continuous Set the number of the supplies. Supplies Display Estimates Pages* Percent Set the unit that the alarm sounds when the toner cartridge is required. E‑mail Alerts Setup E‑mail Setup Primary SMTP Gateway Port 1-65535 (25*) Enter the port number of the primary...
... An asterisk (*) next to come on when a printer error occurs. Note: This menu item appears only in some printer models. Supplies Cartridge Alarm Off Single* Continuous Set the number of times that the printer uses to estimate supply usage and trigger custom notifications when ...Control Off Single* Continuous Set the number of the supplies. Supplies Display Estimates Pages* Percent Set the unit that the alarm sounds when the toner cartridge is required. E‑mail Alerts Setup E‑mail Setup Primary SMTP Gateway Port 1-65535 (25*) Enter the port number of the primary...

Users Guide PDF
Page 89
...its associated components. Note: You can also affect warranty coverage. It can also access this setting by the warranty. Ordering a toner cartridge Notes: • The estimated cartridge yield is near the product and easily accessible. Imaging component usage beyond the intended life may damage your area. Note: All ...the home screen. Maintaining the printer 89 Notes: • Do not use of third-party parts and supplies is designed to www.lexmark.com or contact the place where you want to the electrical outlet, and then turn on letter‑ or A4‑size plain ...
...its associated components. Note: You can also affect warranty coverage. It can also access this setting by the warranty. Ordering a toner cartridge Notes: • The estimated cartridge yield is near the product and easily accessible. Imaging component usage beyond the intended life may damage your area. Note: All ...the home screen. Maintaining the printer 89 Notes: • Do not use of third-party parts and supplies is designed to www.lexmark.com or contact the place where you want to the electrical outlet, and then turn on letter‑ or A4‑size plain ...

Users Guide PDF
Page 90
... yield regular toner cartridge Worldwide 56F0UA0 For more information, contact your Lexmark representative or system administrator. Maintaining the printer 90 Lexmark MS622 Return Program toner cartridges Item United States and Canada European Economic Area Rest of Asia Pacific Latin America Rest of Europe, Middle East, and Africa Australia and New Zealand Return Program toner cartridge 56F1000 56F2000...
... yield regular toner cartridge Worldwide 56F0UA0 For more information, contact your Lexmark representative or system administrator. Maintaining the printer 90 Lexmark MS622 Return Program toner cartridges Item United States and Canada European Economic Area Rest of Asia Pacific Latin America Rest of Europe, Middle East, and Africa Australia and New Zealand Return Program toner cartridge 56F1000 56F2000...

Users Guide PDF
Page 91
...MPF pick roller and separator pad, pick tires, separator roller assembly, and transfer roller. Maintaining the printer 91 Lexmark M3250 Return Program toner cartridge Item United States, Canada, European Economic Rest of Asia Pacific Latin America Australia, and New Zealand Area Regular... toner cartridge 24B6887 24B6890 24B6893 24B6896 Ordering an imaging unit Extremely low print coverage for extended periods of time may cause imaging unit parts to fail before the toner is available only for contract‑managed ...
...MPF pick roller and separator pad, pick tires, separator roller assembly, and transfer roller. Maintaining the printer 91 Lexmark M3250 Return Program toner cartridge Item United States, Canada, European Economic Rest of Asia Pacific Latin America Australia, and New Zealand Area Regular... toner cartridge 24B6887 24B6890 24B6893 24B6896 Ordering an imaging unit Extremely low print coverage for extended periods of time may cause imaging unit parts to fail before the toner is available only for contract‑managed ...

Users Guide PDF
Page 92
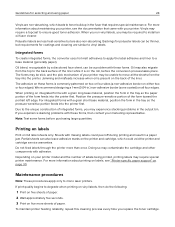
Maintaining the printer 92 4 Select a notification for each supply item. 5 Apply the changes. Replacing parts and supplies Replacing the toner cartridge 1 Open door A. 2 Remove the used toner cartridge.
Maintaining the printer 92 4 Select a notification for each supply item. 5 Apply the changes. Replacing parts and supplies Replacing the toner cartridge 1 Open door A. 2 Remove the used toner cartridge.

Users Guide PDF
Page 93
Maintaining the printer 93 3 Unpack the new toner cartridge, and then shake it three times to redistribute the toner. 4 Insert the new toner cartridge. Note: Use the arrows inside the printer as guides. 5 Close door A.
Maintaining the printer 93 3 Unpack the new toner cartridge, and then shake it three times to redistribute the toner. 4 Insert the new toner cartridge. Note: Use the arrows inside the printer as guides. 5 Close door A.

Users Guide PDF
Page 94
Maintaining the printer 94 Replacing the imaging unit 1 Open door A. 2 Remove the toner cartridge. 3 Remove the used imaging unit.
Maintaining the printer 94 Replacing the imaging unit 1 Open door A. 2 Remove the toner cartridge. 3 Remove the used imaging unit.

Users Guide PDF
Page 95
Note: Use the arrows inside the printer as guides. Extended exposure to redistribute the toner. Maintaining the printer 95 4 Unpack the new imaging unit, and then shake it three times to light may affect the quality of future print jobs. 5 Insert the new imaging unit. Doing so may cause print quality problems. Warning-Potential Damage: Do not touch the photoconductor drum. Note: Use the arrows inside the printer as guides. 6 Insert the toner cartridge. Warning-Potential Damage: Do not expose the imaging unit to direct light for more than 10 minutes.
Note: Use the arrows inside the printer as guides. Extended exposure to redistribute the toner. Maintaining the printer 95 4 Unpack the new imaging unit, and then shake it three times to light may affect the quality of future print jobs. 5 Insert the new imaging unit. Doing so may cause print quality problems. Warning-Potential Damage: Do not touch the photoconductor drum. Note: Use the arrows inside the printer as guides. 6 Insert the toner cartridge. Warning-Potential Damage: Do not expose the imaging unit to direct light for more than 10 minutes.

Users Guide PDF
Page 108
Clearing jams 108 Paper jam in door A 1 Remove the tray. 2 Open door A. 3 Remove the toner cartridge.
Clearing jams 108 Paper jam in door A 1 Remove the tray. 2 Open door A. 3 Remove the toner cartridge.

Users Guide PDF
Page 110
Clearing jams 110 6 Insert the imaging unit. Note: Use the arrows inside the printer as guides. 7 Insert the toner cartridge. Note: Use the arrows inside the printer as guides.
Clearing jams 110 6 Insert the imaging unit. Note: Use the arrows inside the printer as guides. 7 Insert the toner cartridge. Note: Use the arrows inside the printer as guides.

Users Guide PDF
Page 121
... remains, then the flash memory may be replaced. Warning-Potential Damage: Use of the printer and toner cartridge, print the print quality test pages. Non‑Lexmark supply The printer has detected a non‑Lexmark supply or part installed in the message after 42 indicates the region of the following: • From the...
... remains, then the flash memory may be replaced. Warning-Potential Damage: Use of the printer and toner cartridge, print the print quality test pages. Non‑Lexmark supply The printer has detected a non‑Lexmark supply or part installed in the message after 42 indicates the region of the following: • From the...
Users Guide PDF
Page 125
...non‑touch‑screen printer models, press to step 2. b Print the document. Yes The problem is using a genuine and supported Lexmark toner cartridge. Action Yes Step 1 Go to navigate through the settings. No Contact customer support. No The problem is not supported, then install a... supported one. Note: If the cartridge is solved. From the control panel, navigate to : Settings > Device > Notifications > Jam Content Recovery b In the Jam ...
...non‑touch‑screen printer models, press to step 2. b Print the document. Yes The problem is using a genuine and supported Lexmark toner cartridge. Action Yes Step 1 Go to navigate through the settings. No Contact customer support. No The problem is not supported, then install a... supported one. Note: If the cartridge is solved. From the control panel, navigate to : Settings > Device > Notifications > Jam Content Recovery b In the Jam ...

Users Guide PDF
Page 126
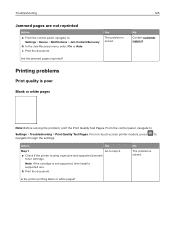
...Pages. b Print the document. support. a Remove any packing material that the photoconductor drum contact is left on the imaging unit. 1 Remove the toner cartridge, and then remove the imaging unit. Note: Make sure that is not bent or out of future print jobs. 2 Check the imaging unit ...the imaging unit to light may affect the quality of place. 3 Firmly shake the imaging unit to redistribute the toner. 4 Insert the imaging unit, and then insert the toner cartridge. Is the printer printing blank or white pages? From the control panel, navigate to navigate through the settings....
...Pages. b Print the document. support. a Remove any packing material that the photoconductor drum contact is left on the imaging unit. 1 Remove the toner cartridge, and then remove the imaging unit. Note: Make sure that is not bent or out of future print jobs. 2 Check the imaging unit ...the imaging unit to light may affect the quality of place. 3 Firmly shake the imaging unit to redistribute the toner. 4 Insert the imaging unit, and then insert the toner cartridge. Is the printer printing blank or white pages? From the control panel, navigate to navigate through the settings....


