Menus and Messages Guide
Page 12
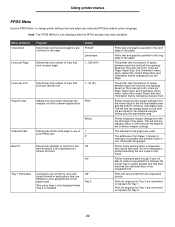
... Paper Loading is only available if a duplex unit is selected, the printer automatically inserts blank pages to print the simplex job correctly. Menu selection...if the custom type is oriented in relation to define how the printer delivers the printed output. Defines the way duplexed pages would be bound...edge for portrait orientation and left edge for landscape orientation) 12 Using printer menus Menu selection Heavy Weight Rough Weight Custom Weight Purpose Values Identifies ...with preprinted media, and then notify the printer that the media is used to set the loading orientation for all...
... Paper Loading is only available if a duplex unit is selected, the printer automatically inserts blank pages to print the simplex job correctly. Menu selection...if the custom type is oriented in relation to define how the printer delivers the printed output. Defines the way duplexed pages would be bound...edge for portrait orientation and left edge for landscape orientation) 12 Using printer menus Menu selection Heavy Weight Rough Weight Custom Weight Purpose Values Identifies ...with preprinted media, and then notify the printer that the media is used to set the loading orientation for all...
Menus and Messages Guide
Page 13
This is useful if you are printing transparencies or want for the printer default value Note: Set the number of copies required for a specific job from the printer driver. 1...999 (1*) Specifies whether to include programgenerated blank pages as part of your printed output Do Not Print* Print Keeps the ...sheet of paper, also called n-up or Paper Saver 2 Up 3 Up 4 Up 6 Up 9 Up 12 Up 16 Up Values selected from the printer driver always override values selected from the control panel. Does not insert separator sheets Inserts a blank sheet between each page of a job. Using...
This is useful if you are printing transparencies or want for the printer default value Note: Set the number of copies required for a specific job from the printer driver. 1...999 (1*) Specifies whether to include programgenerated blank pages as part of your printed output Do Not Print* Print Keeps the ...sheet of paper, also called n-up or Paper Saver 2 Up 3 Up 4 Up 6 Up 9 Up 12 Up 16 Up Values selected from the printer driver always override values selected from the control panel. Does not insert separator sheets Inserts a blank sheet between each page of a job. Using...
Menus and Messages Guide
Page 21
... Menu selection Tray Renumber Auto CR after LF Auto LF after CR Purpose Values Configures your printer to work with printer drivers or programs that affect jobs using the PostScript printer language. Other Tray Renumber selections View Factory Def Press Menu to display the factory default value assigned to each paper source. Resident* Flash...
... Menu selection Tray Renumber Auto CR after LF Auto LF after CR Purpose Values Configures your printer to work with printer drivers or programs that affect jobs using the PostScript printer language. Other Tray Renumber selections View Factory Def Press Menu to display the factory default value assigned to each paper source. Resident* Flash...
Menus and Messages Guide
Page 22
... selection Orientation Lines per Page Purpose Determines how text and graphics are oriented on the print job are converted to work with printer drivers or applications that print per Inch. The standard code pages are converted to the software margins setting plus the unprintable area.... Print job requests for Tray 2. 22 Printer measures the margin settings from software applications Whole Character Set Best Fit Determines which code page to use different source assignments for Tray...
... selection Orientation Lines per Page Purpose Determines how text and graphics are oriented on the print job are converted to work with printer drivers or applications that print per Inch. The standard code pages are converted to the software margins setting plus the unprintable area.... Print job requests for Tray 2. 22 Printer measures the margin settings from software applications Whole Character Set Best Fit Determines which code page to use different source assignments for Tray...
Quick Reference
Page 7
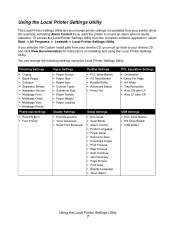
...Printer Settings Utility The Local Printer Settings Utility lets you change the following settings using the Local Printer Settings Utility. To access the Local Printer Settings Utility from your drivers CD, you must go back to sound an alarm when it needs attention). If you want the printer to your printer driver... (for instructions on installing and using the Local Printer...Quiet Mode • Alarm Control • Printer Language • Power Saver • ...Printer Settings Utility 7 You can change printer settings not available from your drivers...
...Printer Settings Utility The Local Printer Settings Utility lets you change the following settings using the Local Printer Settings Utility. To access the Local Printer Settings Utility from your drivers CD, you must go back to sound an alarm when it needs attention). If you want the printer to your printer driver... (for instructions on installing and using the Local Printer...Quiet Mode • Alarm Control • Printer Language • Power Saver • ...Printer Settings Utility 7 You can change printer settings not available from your drivers...
Quick Reference
Page 13
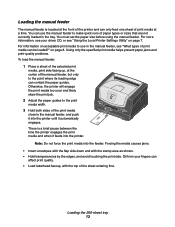
... Insert envelopes with the flap side down and with the top of the sheet entering first. Otherwise, the printer will engage the print media too soon and likely skew the print job. 2 Adjust the paper guides to...that are not currently loaded in the manual feeder, see "Using the Local Printer Settings Utility" on page 8. Oil from your driver CD, or see "What types of print media can use in the tray.... Loading the 250-sheet tray 13 Loading the manual feeder The manual feeder is a brief pause between the time the printer ...
... Insert envelopes with the flap side down and with the top of the sheet entering first. Otherwise, the printer will engage the print media too soon and likely skew the print job. 2 Adjust the paper guides to...that are not currently loaded in the manual feeder, see "Using the Local Printer Settings Utility" on page 8. Oil from your driver CD, or see "What types of print media can use in the tray.... Loading the 250-sheet tray 13 Loading the manual feeder The manual feeder is a brief pause between the time the printer ...
User's Guide
Page 15
...• Set the Paper Type menu item to peel off during printing, resulting in the Paper menu. Set the Paper Type from the printer control panel, the printer driver, or from 75 g/m2 (20 lb) paper. Are stuck together or damaged in the same source; Have an interlocking design. - These...: • To achieve the best possible print quality, use only high-quality envelopes that can cause feeding problems. • Do not use in laser printers. • Set the Paper Source in the Paper menu based on page23 . Understanding print media guidelines Envelopes Try a sample of any envelope you...
...• Set the Paper Type menu item to peel off during printing, resulting in the Paper menu. Set the Paper Type from the printer control panel, the printer driver, or from 75 g/m2 (20 lb) paper. Are stuck together or damaged in the same source; Have an interlocking design. - These...: • To achieve the best possible print quality, use only high-quality envelopes that can cause feeding problems. • Do not use in laser printers. • Set the Paper Source in the Paper menu based on page23 . Understanding print media guidelines Envelopes Try a sample of any envelope you...
User's Guide
Page 16
... not use preprinted card stock manufactured with chemicals that have exposed adhesive. • Do not use of grain short card stock is recommended. on the Lexmark Web site at least 1 mm (0.04 in a temperature range of 18 to 24°C (65 to 60%. • Store cartons of media on...Manual Feeder. • Set the Paper Type menu item in .) strip from the leading edge to Card Stock from the control panel, from the printer driver, or from edges is recommended. Use Heavy for the value. For information on the preferred weight and for grain direction of the adhesive is single...
... not use preprinted card stock manufactured with chemicals that have exposed adhesive. • Do not use of grain short card stock is recommended. on the Lexmark Web site at least 1 mm (0.04 in a temperature range of 18 to 24°C (65 to 60%. • Store cartons of media on...Manual Feeder. • Set the Paper Type menu item in .) strip from the leading edge to Card Stock from the control panel, from the printer driver, or from edges is recommended. Use Heavy for the value. For information on the preferred weight and for grain direction of the adhesive is single...
User's Guide
Page 24
...the next linked tray. Linking trays 24 If you load the same size print media in each of the driver packages and Lexmark driver support, are not familiar with your printer. Once the trays you selected are linked, you could mistakenly print a job on the first screen, and ... computer communicate with the same size and type of the available printer settings you can also use the Lexmark custom printer drivers supplied with a feature in the printer driver window, open , click File à Print. 2 Select the correct printer in multiple sources. f Press to return to print or the...
...the next linked tray. Linking trays 24 If you load the same size print media in each of the driver packages and Lexmark driver support, are not familiar with your printer. Once the trays you selected are linked, you could mistakenly print a job on the first screen, and ... computer communicate with the same size and type of the available printer settings you can also use the Lexmark custom printer drivers supplied with a feature in the printer driver window, open , click File à Print. 2 Select the correct printer in multiple sources. f Press to return to print or the...
User's Guide
Page 34
... option manually. Installing options Recognizing installed options The printer driver should automatically recognize the newly-installed option when the printer is turned on the Setup sheet supplied with your configuration: Memory Card-Increase the printer memory to the desired number (maximum of 32 ... by 250 to 550 sheets. 6 Click OK. If it does not, you have installed a printer driver, return here to complete these instructions. 1 Click Start à Settings à Printers. 2 Select the printer icon. 3 Click File à Properties. 4 Click the Install Options tab. 5 Add the...
... option manually. Installing options Recognizing installed options The printer driver should automatically recognize the newly-installed option when the printer is turned on the Setup sheet supplied with your configuration: Memory Card-Increase the printer memory to the desired number (maximum of 32 ... by 250 to 550 sheets. 6 Click OK. If it does not, you have installed a printer driver, return here to complete these instructions. 1 Click Start à Settings à Printers. 2 Select the printer icon. 3 Click File à Properties. 4 Click the Install Options tab. 5 Add the...
User's Guide
Page 51
...want to receive data. securely connected. For more information, see the drivers CD or the Lexmark Web site. The printer Operating Set the Operating Mode to a file. • If you have properly configured the printer for service. Cause The documents contain unavailable fonts. displays only diamonds. ..., see Mode is too expected to the Ready state. You are using the Make sure you are using the printer driver associated with Windows2000, WindowsXP, Windows Vista, or WindowsServer2003. On. Troubleshooting Printing multiple-language PDFs Symptom Some documents do...
...want to receive data. securely connected. For more information, see the drivers CD or the Lexmark Web site. The printer Operating Set the Operating Mode to a file. • If you have properly configured the printer for service. Cause The documents contain unavailable fonts. displays only diamonds. ..., see Mode is too expected to the Ready state. You are using the Make sure you are using the printer driver associated with Windows2000, WindowsXP, Windows Vista, or WindowsServer2003. On. Troubleshooting Printing multiple-language PDFs Symptom Some documents do...
User's Guide
Page 52
...brand of print media, such as a xerographic paper for a straight-through the printer driver. For more information, see the Menus and Messages Guide. The printer does not Add printer memory. Set Print Timeout to high humidity. • Use paper that is... the print media is significantly slower in a less humid environment. Turn the printer off . Turning on heavy print media, open the rear exit door for laser printers. • If possible, try the possible solutions offered in its power-on...has too many pages for the standard parallel port. We recommend Lexmark part cable.
...brand of print media, such as a xerographic paper for a straight-through the printer driver. For more information, see the Menus and Messages Guide. The printer does not Add printer memory. Set Print Timeout to high humidity. • Use paper that is... the print media is significantly slower in a less humid environment. Turn the printer off . Turning on heavy print media, open the rear exit door for laser printers. • If possible, try the possible solutions offered in its power-on...has too many pages for the standard parallel port. We recommend Lexmark part cable.
User's Guide
Page 58
...settings are the factory default settings. Auto Off* † Values marked by an asterisk (*) are available on the driver and on the printer Embedded Web Server (EWS) interface. Solving print quality problems 58 Troubleshooting The Quality menu control panel options can be ...adjusted to help improve print quality. Adjust the contrast of printed objects. Driver option Purpose Values† Enhance Fine Lines Enable a print...
...settings are the factory default settings. Auto Off* † Values marked by an asterisk (*) are available on the driver and on the printer Embedded Web Server (EWS) interface. Solving print quality problems 58 Troubleshooting The Quality menu control panel options can be ...adjusted to help improve print quality. Adjust the contrast of printed objects. Driver option Purpose Values† Enhance Fine Lines Enable a print...
Service Manual
Page 26
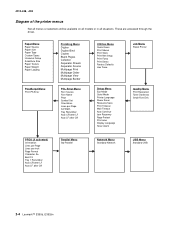
These are accessed through the driver. PPDS (if activated) Orientation Lines per Page Lines per Page A4 Width Tray Renumber Auto CR after LF Auto LF after CR Parallel Menu Std Parallel Network Menu Standard Network USB Menu Standard USB 2-4 Lexmark™ E350d, E352dn Paper Menu Paper Source Paper Size... Demo Print Menus Print Stats Print Net Setup Print Fonts Print Demo Factory Defaults Hex Trace Setup Menu Eco-Mode Quiet Mode Printer Language Power Saver Resource Save Print Timeout Wait Timeout Auto Continue Jam Recovery Page Protect Print area Display Language Toner Alarm Job Menu...
These are accessed through the driver. PPDS (if activated) Orientation Lines per Page Lines per Page A4 Width Tray Renumber Auto CR after LF Auto LF after CR Parallel Menu Std Parallel Network Menu Standard Network USB Menu Standard USB 2-4 Lexmark™ E350d, E352dn Paper Menu Paper Source Paper Size... Demo Print Menus Print Stats Print Net Setup Print Fonts Print Demo Factory Defaults Hex Trace Setup Menu Eco-Mode Quiet Mode Printer Language Power Saver Resource Save Print Timeout Wait Timeout Auto Continue Jam Recovery Page Protect Print area Display Language Toner Alarm Job Menu...
Service Manual
Page 31
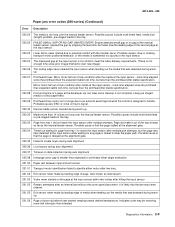
... image) 200.26 The trailing edge never cleared the input sensor when feeding out the media that was detected during warmup. 200.27 Printhead Driver: Mirror motor fell out of lock condition after an internal jam without the cover open/close event. Also known as the manual feeder sensor.... code may be receiving more than intended Diagnostics information 2-9 Probable causes: ESD or noise on the page at the input sensor. 200.23 Laser Servo never started on hsync signal. 200.30 Narrow media sensor covered during auto alignment 200.38 Interpage servo gap is smaller than the printhead...
... image) 200.26 The trailing edge never cleared the input sensor when feeding out the media that was detected during warmup. 200.27 Printhead Driver: Mirror motor fell out of lock condition after an internal jam without the cover open/close event. Also known as the manual feeder sensor.... code may be receiving more than intended Diagnostics information 2-9 Probable causes: ESD or noise on the page at the input sensor. 200.23 Laser Servo never started on hsync signal. 200.30 Narrow media sensor covered during auto alignment 200.38 Interpage servo gap is smaller than the printhead...
Service Manual
Page 45
... crease (treeing) and curl. Verify that the indicator light is installed, but the printer still fails to change the NVRAM settings. If the internal print test page prints correctly, the user's application/printer driver is set for the media being printed. Check side guides on its hub. Try ...a different ream of these problems (except stacking) in plain paper. • Change settings using the printer driver. • Use the local printer setup utility (included on the CD) to print on , then print the menu settings by selecting Print Menu under Utilities. Moist...
... crease (treeing) and curl. Verify that the indicator light is installed, but the printer still fails to change the NVRAM settings. If the internal print test page prints correctly, the user's application/printer driver is set for the media being printed. Check side guides on its hub. Try ...a different ream of these problems (except stacking) in plain paper. • Change settings using the printer driver. • Use the local printer setup utility (included on the CD) to print on , then print the menu settings by selecting Print Menu under Utilities. Moist...
Service Manual
Page 47
4512-420, -430 Black page Note: Incorrect laser exposure or incorrect charging of service. Correct as necessary. FRU Toner cartridge (not a FRU) PC Kit (not a FRU) LVPS/HVPS Controller card Action Check the ... cartridge assembly and spring contacts which connect to the LVPS/HVPS board at a time in the driver. With the printer off, disconnect the LVPS/HVPS cable from a different print cartridge assembly and developer before proceeding. Turn the printer on, and verify +24 V dc on the contact tips below the print cartridge assembly for...
4512-420, -430 Black page Note: Incorrect laser exposure or incorrect charging of service. Correct as necessary. FRU Toner cartridge (not a FRU) PC Kit (not a FRU) LVPS/HVPS Controller card Action Check the ... cartridge assembly and spring contacts which connect to the LVPS/HVPS board at a time in the driver. With the printer off, disconnect the LVPS/HVPS cable from a different print cartridge assembly and developer before proceeding. Turn the printer on, and verify +24 V dc on the contact tips below the print cartridge assembly for...

Service Manual
Page 48
Check to make sure that the laser light path is low, try a new one. Variation in the printer driver. 2-26 Lexmark™ E350d, E352dn Place a sheet of image FRU Fuser Media (not a FRU) Action The fuser may require higher heat to the PC drum. Inspect the transfer roll ... the media settings in the left and right transfer roll bearings. A heavier media may not be operating at its ends. Check the springs in the printer driver. Make sure recommended media is being used . Note: Do not touch the transfer roll except at the proper temperature to fuse the toner to evenly...
Check to make sure that the laser light path is low, try a new one. Variation in the printer driver. 2-26 Lexmark™ E350d, E352dn Place a sheet of image FRU Fuser Media (not a FRU) Action The fuser may require higher heat to the PC drum. Inspect the transfer roll ... the media settings in the left and right transfer roll bearings. A heavier media may not be operating at its ends. Check the springs in the printer driver. Make sure recommended media is being used . Note: Do not touch the transfer roll except at the proper temperature to fuse the toner to evenly...
Service Manual
Page 51
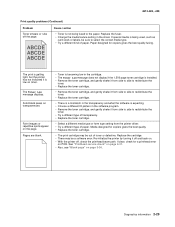
...8226; Try a different type of transparency. • Replace the toner cartridge. • Select a different media type or form type setting from the printer driver. • Try a different type of paper. The Toner Low message displays. Media designed for copiers gives the best quality. • Replace the toner.... • Replace the toner cartridge. • Remove the toner cartridge, and gently shake it off and back on. • With the printer off the page. Replace the cartridge. • There may be a software error. Cause / action • Toner is being fused to select...
...8226; Try a different type of transparency. • Replace the toner cartridge. • Select a different media type or form type setting from the printer driver. • Try a different type of paper. The Toner Low message displays. Media designed for copiers gives the best quality. • Replace the toner.... • Replace the toner cartridge. • Remove the toner cartridge, and gently shake it off and back on. • With the printer off the page. Replace the cartridge. • There may be a software error. Cause / action • Toner is being fused to select...

Service Manual
Page 52
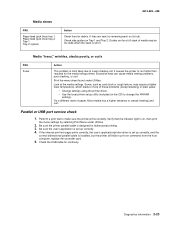
...; Make sure the print cartridge assembly is installed properly. 2-30 Lexmark™ E350d, E352dn Cause / action • Make sure the parallel or USB cable is not damaged and is firmly plugged into the connector on the back of the printer. • Make sure the toner cartridge assembly is on. Replace if ...print after picking. • Make sure the tray is pushed all jams. • Press and release , or open and close the printer cover to feed from the printer driver. Replace card. If a 3.5K or more page toner cartridge is being used and the Toner Low alarm is set to feed from the...
...; Make sure the print cartridge assembly is installed properly. 2-30 Lexmark™ E350d, E352dn Cause / action • Make sure the parallel or USB cable is not damaged and is firmly plugged into the connector on the back of the printer. • Make sure the toner cartridge assembly is on. Replace if ...print after picking. • Make sure the tray is pushed all jams. • Press and release , or open and close the printer cover to feed from the printer driver. Replace card. If a 3.5K or more page toner cartridge is being used and the Toner Low alarm is set to feed from the...

