Menus and Messages Guide
Page 31
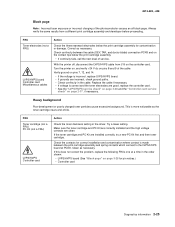
.... Wait for this printer. • Load the appropriate media in the Setup Menu - All settings in the current job from 600 dots per inch (dpi) to 300 dpi to activate the link buffer changes. - The printer is resetting the counter that tracks wear on the photoconductor. Insert or replace... the toner cartridge. The printer is processing data through the specified USB port. The printer has received a page of data to print, but is waiting for...
.... Wait for this printer. • Load the appropriate media in the Setup Menu - All settings in the current job from 600 dots per inch (dpi) to 300 dpi to activate the link buffer changes. - The printer is resetting the counter that tracks wear on the photoconductor. Insert or replace... the toner cartridge. The printer is processing data through the specified USB port. The printer has received a page of data to print, but is waiting for...
Menus and Messages Guide
Page 33
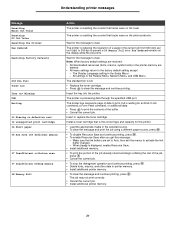
... message number and description of the problem. 33 Understanding printer messages Message 58 Too many trays attached 80 Scheduled maintenance 81 Engine Code CFC Failure 84 Photoconduct life warning 84 Replace Photoconductor 84 PC unit abnormal 88 Toner low 200 Paper jam... • To clear the message, and continue printing, press . • Replace the photoconductor unit. • To clear the message, and continue printing, press . • Replace the photoconductor unit. • Replace the photoconductor unit. • Replace the toner cartridge. • To clear the message, and continue ...
... message number and description of the problem. 33 Understanding printer messages Message 58 Too many trays attached 80 Scheduled maintenance 81 Engine Code CFC Failure 84 Photoconduct life warning 84 Replace Photoconductor 84 PC unit abnormal 88 Toner low 200 Paper jam... • To clear the message, and continue printing, press . • Replace the photoconductor unit. • To clear the message, and continue printing, press . • Replace the photoconductor unit. • Replace the photoconductor unit. • Replace the toner cartridge. • To clear the message, and continue ...
Quick Reference
Page 4
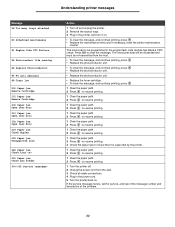
Common light sequences (continued) = On = Blinking = Slow blink Empty = Off Printer Condition Complex page Continue Toner Low / Error Replace PC Kit Load Paper Paper Jam Ready Cancel job/ Reset printer Load print media Load manual feeder Toner low Toner cartridge region mismatch Photoconductor kit life warning Replace photoconductor (printer hard stop) Programming engine code/ Programming system code Understanding the control panel lights 4
Common light sequences (continued) = On = Blinking = Slow blink Empty = Off Printer Condition Complex page Continue Toner Low / Error Replace PC Kit Load Paper Paper Jam Ready Cancel job/ Reset printer Load print media Load manual feeder Toner low Toner cartridge region mismatch Photoconductor kit life warning Replace photoconductor (printer hard stop) Programming engine code/ Programming system code Understanding the control panel lights 4
User's Guide
Page 3
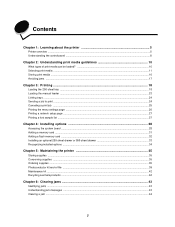
Contents Chapter 1: Learning about the printer 5 Printer overview ...5 Understanding the control panel ...8 Chapter 2: Understanding print media guidelines 10 What types of print media can be loaded? ...10 Selecting print ... 250-sheet drawer or 550-sheet drawer 33 Recognizing installed options ...34 Chapter 5: Maintaining the printer 35 Storing supplies ...35 Conserving supplies ...35 Ordering supplies ...35 Photoconductor kit end-of-life ...39 Maintenance kit ...42 Recycling Lexmark products ...42 Chapter 6: Clearing jams 43 Identifying jams ...43 Understanding jam messages ...43 Clearing...
Contents Chapter 1: Learning about the printer 5 Printer overview ...5 Understanding the control panel ...8 Chapter 2: Understanding print media guidelines 10 What types of print media can be loaded? ...10 Selecting print ... 250-sheet drawer or 550-sheet drawer 33 Recognizing installed options ...34 Chapter 5: Maintaining the printer 35 Storing supplies ...35 Conserving supplies ...35 Ordering supplies ...35 Photoconductor kit end-of-life ...39 Maintenance kit ...42 Recycling Lexmark products ...42 Chapter 6: Clearing jams 43 Identifying jams ...43 Understanding jam messages ...43 Clearing...
User's Guide
Page 36
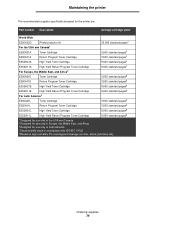
... recommended supplies specifically designed for the printer are: Part number Description Average cartridge yield* World Wide E250X22G Photoconductor kit 30,000 standard pages† For the USA and Canada1 E250A21A Toner Cartridge 3,500 standard pages1 E250A11A Return Program Toner Cartridge 3,500 standard pages1 ...
... recommended supplies specifically designed for the printer are: Part number Description Average cartridge yield* World Wide E250X22G Photoconductor kit 30,000 standard pages† For the USA and Canada1 E250A21A Toner Cartridge 3,500 standard pages1 E250A11A Return Program Toner Cartridge 3,500 standard pages1 ...
User's Guide
Page 39
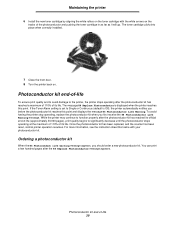
... its life. The toner cartridge clicks into place when correctly installed. 7 Close the front door. 8 Turn the printer back on. The message 84 Replace Photoconductor is Off), the printer automatically notifies you should order a new photoconductor kit. For more information, see the instruction sheet that came with the white arrows on the tracks of...
... its life. The toner cartridge clicks into place when correctly installed. 7 Close the front door. 8 Turn the printer back on. The message 84 Replace Photoconductor is Off), the printer automatically notifies you should order a new photoconductor kit. For more information, see the instruction sheet that came with the white arrows on the tracks of...

User's Guide
Page 40
b Lower the front door. c Grasp the toner cartridge handle, and pull up and out. 4 Unpack the new photoconductor kit. a Press the button on the base of -life 40 Note: Do not press the button on the print cartridge assembly Place ...period of time. b Grasp the toner cartridge handle, and pull up and out. Photoconductor kit end-of the print cartridge assembly. Maintaining the printer Changing a photoconductor kit Warning: When replacing a photoconductor kit, do not leave the new photoconductor kit exposed to release the front door. Extended light exposure can cause print quality ...
b Lower the front door. c Grasp the toner cartridge handle, and pull up and out. 4 Unpack the new photoconductor kit. a Press the button on the base of -life 40 Note: Do not press the button on the print cartridge assembly Place ...period of time. b Grasp the toner cartridge handle, and pull up and out. Photoconductor kit end-of the print cartridge assembly. Maintaining the printer Changing a photoconductor kit Warning: When replacing a photoconductor kit, do not leave the new photoconductor kit exposed to release the front door. Extended light exposure can cause print quality ...

User's Guide
Page 41
... of the print cartridge assembly with the green arrows on the tracks in the printer and pushing the print cartridge assembly in as far as it will go . 7 Close the front door. 8 Turn the printer back on. 9 Reset the photoconductor counter (see Printing the menu settings page on the toner cartridge with the...
... of the print cartridge assembly with the green arrows on the tracks in the printer and pushing the print cartridge assembly in as far as it will go . 7 Close the front door. 8 Turn the printer back on. 9 Reset the photoconductor counter (see Printing the menu settings page on the toner cartridge with the...
User's Guide
Page 55
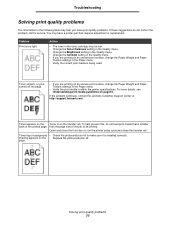
... toner in the toner cartridge may be printed. If the problem continues, contact the Lexmark Customer Support Center at http://support.lexmark.com . page. Toner fog or background • Check the photoconductor kit to make sure it is within the printer specifications. Toner smears, or print comes off the page. • If you are...
... toner in the toner cartridge may be printed. If the problem continues, contact the Lexmark Customer Support Center at http://support.lexmark.com . page. Toner fog or background • Check the photoconductor kit to make sure it is within the printer specifications. Toner smears, or print comes off the page. • If you are...
User's Guide
Page 56
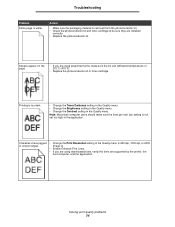
...Image Q. • Enable Enhance Fine Lines. • If you are using downloaded fonts, verify the fonts are installed correctly. • Replace the photoconductor kit. Action • Make sure the packaging material is too dark. • Change the Toner Darkness setting in the Quality menu. • Change...Characters have jagged or uneven edges. • Change the Print Resolution setting in the Quality menu to be sure they are supported by the printer, the host computer, and the application. Streaks appear on the page. • If you are using preprinted forms, make sure the ...
...Image Q. • Enable Enhance Fine Lines. • If you are using downloaded fonts, verify the fonts are installed correctly. • Replace the photoconductor kit. Action • Make sure the packaging material is too dark. • Change the Toner Darkness setting in the Quality menu. • Change...Characters have jagged or uneven edges. • Change the Print Resolution setting in the Quality menu to be sure they are supported by the printer, the host computer, and the application. Streaks appear on the page. • If you are using preprinted forms, make sure the ...
User's Guide
Page 57
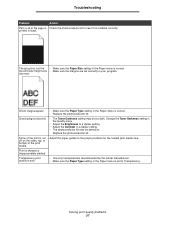
...may be too dark. Some of the print is cut off on the sides, top, or bottom of the page is Check the photoconductor kit to Transparency. Troubleshooting Problem Action Part or all of the print media. top and side margins are • Make sure the ...is poor. • Use only transparencies recommended by the printer manufacturer. • Make sure the Paper Type setting in the Paper menu is installed correctly. Replace the photoconductor kit. Adjust the paper guides to a darker setting. • The photoconductor kit may be defective. Print is correct. Solving print ...
...may be too dark. Some of the print is cut off on the sides, top, or bottom of the page is Check the photoconductor kit to Transparency. Troubleshooting Problem Action Part or all of the print media. top and side margins are • Make sure the ...is poor. • Use only transparencies recommended by the printer manufacturer. • Make sure the Paper Type setting in the Paper menu is installed correctly. Replace the photoconductor kit. Adjust the paper guides to a darker setting. • The photoconductor kit may be defective. Print is correct. Solving print ...

User's Guide
Page 72
...39 ordering 39 recycling 42 preprinted forms 13 print cartridge See toner cartridge print media jams avoiding 17 print media specifications 11 printer settings 7 printhead lens, cleaning 59 printing 18 problems control panel 51 blank 51 displays black diamonds 51 incorrect characters print 52...sending a job to print 24 Simple Network Management Protocol 63 supplies conserving 35 recycling 42 storing 35 supplies ordering maintenance kit 42 photoconductor kit 39 toner cartridge 37 system board accessing 28 system password setting 63 T toner cartridge changing 37 ordering 37 recycling 42 ...
...39 ordering 39 recycling 42 preprinted forms 13 print cartridge See toner cartridge print media jams avoiding 17 print media specifications 11 printer settings 7 printhead lens, cleaning 59 printing 18 problems control panel 51 blank 51 displays black diamonds 51 incorrect characters print 52...sending a job to print 24 Simple Network Management Protocol 63 supplies conserving 35 recycling 42 storing 35 supplies ordering maintenance kit 42 photoconductor kit 39 toner cartridge 37 system board accessing 28 system password setting 63 T toner cartridge changing 37 ordering 37 recycling 42 ...

Service Manual
Page 16
...Item 4512-420 Lexmark E350d Available input trays 250-sheet tray ✔ 550-sheet option drawer ✔ 550-sheet tray ✔ Dust cover ✔ Toner and photoconductor Toner cartridge 1,500 standard pages SWE¹ 3,500 standard pages SWE¹ High toner cartridge Photoconductor kit 9,000 ...standard pages¹ Up to 30,000 ² ¹ Declared value in accordance with ISO/IEC 19752 ² Based on approximately 5% coverage, actual yield may vary 4512-430 Lexmark E352dn 2,500 standard pages SWE¹...
...Item 4512-420 Lexmark E350d Available input trays 250-sheet tray ✔ 550-sheet option drawer ✔ 550-sheet tray ✔ Dust cover ✔ Toner and photoconductor Toner cartridge 1,500 standard pages SWE¹ 3,500 standard pages SWE¹ High toner cartridge Photoconductor kit 9,000 ...standard pages¹ Up to 30,000 ² ¹ Declared value in accordance with ISO/IEC 19752 ² Based on approximately 5% coverage, actual yield may vary 4512-430 Lexmark E352dn 2,500 standard pages SWE¹...
Service Manual
Page 21
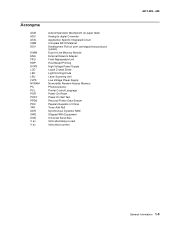
... Replaceable Unit Host Based Printing High Voltage Power Supply Liquid Crystal Diode Light Emitting Diode Laser Scanning Unit Low Voltage Power Supply Nonvolatile Random Access Memory Photoconductor Printer Control Language Power-On Reset Power-On Self Test Personal Printer Data Stream People's Republic of China Toner Add Roll Synchronous Dynamic RAM Shipped With Equipment...
... Replaceable Unit Host Based Printing High Voltage Power Supply Liquid Crystal Diode Light Emitting Diode Laser Scanning Unit Low Voltage Power Supply Nonvolatile Random Access Memory Photoconductor Printer Control Language Power-On Reset Power-On Self Test Personal Printer Data Stream People's Republic of China Toner Add Roll Synchronous Dynamic RAM Shipped With Equipment...
Service Manual
Page 29
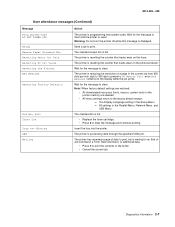
... to prevent a 38 Memory Full error. The printer has received a page of a page in the printer memory are deleted. • All menu settings return to print. The printer is waiting for the message to clear. Res Reduced remains on the photoconductor. All settings in the Setup Menu - Insert ...the tray into the printer. Wait for the message to clear and the printer to reset. 4512-420, -430 User attendance...
... to prevent a 38 Memory Full error. The printer has received a page of a page in the printer memory are deleted. • All menu settings return to print. The printer is waiting for the message to clear. Res Reduced remains on the photoconductor. All settings in the Setup Menu - Insert ...the tray into the printer. Wait for the message to clear and the printer to reset. 4512-420, -430 User attendance...

Service Manual
Page 46
... roll gear. • If there is blank. 2. Turn on page 3-28. 2-24 Lexmark™ E350d, E352dn Four pages print to the right of the manual for repeating defects. The first page.... Release the buttons when Performing Self Test displays. Use the test pages to expose the photoconductor resulting in that order. 4512-420, -430 Print quality service checks Note: Ensure the ... a defective printhead assembly, LVPS/HVPS, or controller card. • Printhead errors typically result in printer service errors unless there is blockage of service. Try a different toner cartridge and PC kit. ...
... roll gear. • If there is blank. 2. Turn on page 3-28. 2-24 Lexmark™ E350d, E352dn Four pages print to the right of the manual for repeating defects. The first page.... Release the buttons when Performing Self Test displays. Use the test pages to expose the photoconductor resulting in that order. 4512-420, -430 Print quality service checks Note: Ensure the ... a defective printhead assembly, LVPS/HVPS, or controller card. • Printhead errors typically result in printer service errors unless there is blockage of service. Try a different toner cartridge and PC kit. ...
Service Manual
Page 47
...the toner cartridge and PC Kit are clean. Clean as necessary. Correct as necessary. Turn the printer on, and verify +24 V dc on the controller card. Make sure the toner cartridge ... If this does not correct the problem, replace the following FRUs one at PCN3. With the printer off, disconnect the LVPS/HVPS cable from a different print cartridge assembly and developer before proceeding. ... below the print cartridge assembly. • If continuity fails, call the next level of the photoconductor causes an all black page. Check continuity between the cable (DEV, TAR, and doctor blade)...
...the toner cartridge and PC Kit are clean. Clean as necessary. Correct as necessary. Turn the printer on, and verify +24 V dc on the controller card. Make sure the toner cartridge ... If this does not correct the problem, replace the following FRUs one at PCN3. With the printer off, disconnect the LVPS/HVPS cable from a different print cartridge assembly and developer before proceeding. ... below the print cartridge assembly. • If continuity fails, call the next level of the photoconductor causes an all black page. Check continuity between the cable (DEV, TAR, and doctor blade)...

Service Manual
Page 48
...printer driver. 2-26 Lexmark™ E350d, E352dn Place a sheet of wear, damage or contamination. Inspect the transfer roll for more information. Check the media settings in the printer driver. Note: Do not touch the transfer roll except at the proper temperature to fuse the toner to make sure that the laser... to heavier paper or even card stock. Check to the paper. A heavier media may have an unbalanced force against the PC (photoconductor) drum. Check the springs in image density horizontally across page FRU PC Kit (not a FRU) Transfer roll Action The charge roll...
...printer driver. 2-26 Lexmark™ E350d, E352dn Place a sheet of wear, damage or contamination. Inspect the transfer roll for more information. Check the media settings in the printer driver. Note: Do not touch the transfer roll except at the proper temperature to fuse the toner to make sure that the laser... to heavier paper or even card stock. Check to the paper. A heavier media may have an unbalanced force against the PC (photoconductor) drum. Check the springs in image density horizontally across page FRU PC Kit (not a FRU) Transfer roll Action The charge roll...

Service Manual
Page 56
... 1. "Demo Mode" on page 3-4. "Reduced Curl" on page 3-3. "USB Speed" on page 3-2. Press to zero. Turn off the printer. 2. The message CONFIG MENU displays on the features and options of the operator panel. Reset Maint Count To reset the Maint Cnt Value: ... represents the number of printed sides (duplexed=2 sides). "Energy Conserve" on page 3-3. Reset PC Cnt When you install a new photoconductor, this operation. 3-2 Lexmark™ E350d, E352dn Press to reset the counter to reset the counter. "Print quality pages (Prt Quality Pgs)" on page 3-3. To reset ...
... 1. "Demo Mode" on page 3-4. "Reduced Curl" on page 3-3. "USB Speed" on page 3-2. Press to zero. Turn off the printer. 2. The message CONFIG MENU displays on the features and options of the operator panel. Reset Maint Count To reset the Maint Cnt Value: ... represents the number of printed sides (duplexed=2 sides). "Energy Conserve" on page 3-3. Reset PC Cnt When you install a new photoconductor, this operation. 3-2 Lexmark™ E350d, E352dn Press to reset the counter to reset the counter. "Print quality pages (Prt Quality Pgs)" on page 3-3. To reset ...
Service Manual
Page 143
... roll 2-31 service error codes 2-12 service menus 3-1 special tools 1-8 specifications connectivity 1-5 input trays 1-4 memory 1-3 operating systems 1-5 photoconductor capacity 1-4 print media 1-6 print speed 1-3 toner capacity 1-4 start 2-1 strobe adjustment 3-20 symptom tables 2-15 POST 2-15 printer 2-16 T test pages Print Quality Pages 3-14 Quick Test 3-7 tires, removal 4-38 tools 1-8 Top Margin 3-7 Transfer 3-21...
... roll 2-31 service error codes 2-12 service menus 3-1 special tools 1-8 specifications connectivity 1-5 input trays 1-4 memory 1-3 operating systems 1-5 photoconductor capacity 1-4 print media 1-6 print speed 1-3 toner capacity 1-4 start 2-1 strobe adjustment 3-20 symptom tables 2-15 POST 2-15 printer 2-16 T test pages Print Quality Pages 3-14 Quick Test 3-7 tires, removal 4-38 tools 1-8 Top Margin 3-7 Transfer 3-21...


