User's Guide
Page 5
... supplies, parts, materials (such as "Remarketer." For customers outside of Lexmark specifications • Refurbishment, repair, refilling or remanufacture by the time the printer spends in each mode's energy usage. Lexmark E340, E342n This limited warranty applies to this product only if it , ... for a specified period of Watts, the power consumption should transfer proof of the printer. The factory default Power Saver Timeout is designed with Lexmark user's guides, manuals, instructions or guidance • Unsuitable physical or operating environment • Maintenance by ...
... supplies, parts, materials (such as "Remarketer." For customers outside of Lexmark specifications • Refurbishment, repair, refilling or remanufacture by the time the printer spends in each mode's energy usage. Lexmark E340, E342n This limited warranty applies to this product only if it , ... for a specified period of Watts, the power consumption should transfer proof of the printer. The factory default Power Saver Timeout is designed with Lexmark user's guides, manuals, instructions or guidance • Unsuitable physical or operating environment • Maintenance by ...

User's Guide
Page 8
... ...22 Chapter 4: Print media tasks and tips 23 What types of print media can be loaded 23 Where can print media be loaded in the printer 24 Tips on choosing the right print media 25 Paper ...25 Preprinted forms and letterhead 25 Transparencies ...25 Envelopes ...25 Labels ...26 Card stock ...27... How to load the 250-sheet and 550-sheet trays 29 Extending the tray for legal or folio size paper 32 How to load the manual feeder 33 How to use the rear exit 33 How to clear paper jams 35 Chapter 5: Printing tasks 38 How to...
... ...22 Chapter 4: Print media tasks and tips 23 What types of print media can be loaded 23 Where can print media be loaded in the printer 24 Tips on choosing the right print media 25 Paper ...25 Preprinted forms and letterhead 25 Transparencies ...25 Envelopes ...25 Labels ...26 Card stock ...27... How to load the 250-sheet and 550-sheet trays 29 Extending the tray for legal or folio size paper 32 How to load the manual feeder 33 How to use the rear exit 33 How to clear paper jams 35 Chapter 5: Printing tasks 38 How to...
User's Guide
Page 11
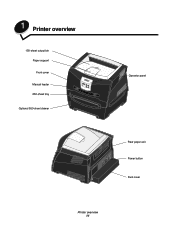
1 Printer overview 150-sheet output bin Paper support Front cover Manual feeder 250-sheet tray Optional 550-sheet drawer Operator panel Rear paper exit Power button Dust cover Printer overview 11
1 Printer overview 150-sheet output bin Paper support Front cover Manual feeder 250-sheet tray Optional 550-sheet drawer Operator panel Rear paper exit Power button Dust cover Printer overview 11

User's Guide
Page 18
...network computer you are working on, and for the address under the "TCP/IP" heading on the printer system board. They can be added to the Lexmark Web site at www.lexmark.com for the printer. Look for a Knowledgebase article about 64 bit support for the latest information. Refer to the... want to enable to print to the printer. If you must manually assign an IP address to the shared printer. If your computer. Installing optional printer software If you connect the network cable to the printer. 1 Look for a new printer object to install the printer on page 19. An easy way to...
...network computer you are working on, and for the address under the "TCP/IP" heading on the printer system board. They can be added to the Lexmark Web site at www.lexmark.com for the printer. Look for a Knowledgebase article about 64 bit support for the latest information. Refer to the... want to enable to print to the printer. If you must manually assign an IP address to the shared printer. If your computer. Installing optional printer software If you connect the network cable to the printer. 1 Look for a new printer object to install the printer on page 19. An easy way to...

User's Guide
Page 23
.... Use rear exit for 20 lb print media, unless otherwise noted. † Grain short is recommended. Tray 1: 89-216 x 210-356 mm (3.5-8.5 x 8.27-14.0 in . Manual feeder: 76-216 x 127-356 mm (3.0-8.5 x 5.0-14.0 in.) (includes 3 x 5 in .) - Source Tray 1 (250-sheet tray) Sizes A4, A5, JIS B5, letter... can be loaded? Tray 2: 148-216 x 210-356 mm (5.83-8.5 x 8.27-14.0 in.) - 4 Print media tasks and tips What types of your printer by properly loading the trays. cards) Capacity* (sheets) • 250 paper • 50 labels • 50 transparencies • 550 paper • 50 labels...
.... Use rear exit for 20 lb print media, unless otherwise noted. † Grain short is recommended. Tray 1: 89-216 x 210-356 mm (3.5-8.5 x 8.27-14.0 in . Manual feeder: 76-216 x 127-356 mm (3.0-8.5 x 5.0-14.0 in.) (includes 3 x 5 in .) - Source Tray 1 (250-sheet tray) Sizes A4, A5, JIS B5, letter... can be loaded? Tray 2: 148-216 x 210-356 mm (5.83-8.5 x 8.27-14.0 in.) - 4 Print media tasks and tips What types of your printer by properly loading the trays. cards) Capacity* (sheets) • 250 paper • 50 labels • 50 transparencies • 550 paper • 50 labels...
User's Guide
Page 24
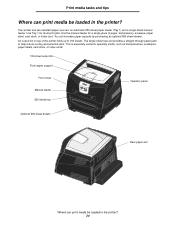
...top of paper, transparency, envelope, paper label, card stock, or index card. Your printer has two standard paper sources: an automatic 250-sheet paper feeder (Tray 1) and a single-sheet manual feeder. Use the manual feeder for most print jobs. Print media tasks and tips Where can print media be ...loaded in the printer? Use Tray 1 for a single piece of the printer holds up to help reduce curling and potential jams. This...
...top of paper, transparency, envelope, paper label, card stock, or index card. Your printer has two standard paper sources: an automatic 250-sheet paper feeder (Tray 1) and a single-sheet manual feeder. Use the manual feeder for most print jobs. Print media tasks and tips Where can print media be ...loaded in the printer? Use Tray 1 for a single piece of the printer holds up to help reduce curling and potential jams. This...
User's Guide
Page 25
... temperatures without melting or releasing hazardous emissions. The ink must be fed through the optional 550-sheet tray or the manual feeder. • The laser printing process heats paper to determine whether the paper you are considering before buying large ... stuck together - Transparencies must withstand temperatures of 170°C (338°F) without melting or releasing hazardous emissions. We recommend Lexmark laser printer transparencies: part number 70X7240 for your paper supplier. Are damaged in xerographic copiers. See the Card Stock & Label Guide available...
... temperatures without melting or releasing hazardous emissions. The ink must be fed through the optional 550-sheet tray or the manual feeder. • The laser printing process heats paper to determine whether the paper you are considering before buying large ... stuck together - Transparencies must withstand temperatures of 170°C (338°F) without melting or releasing hazardous emissions. We recommend Lexmark laser printer transparencies: part number 70X7240 for your paper supplier. Are damaged in xerographic copiers. See the Card Stock & Label Guide available...
User's Guide
Page 33
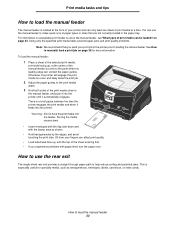
...media can use the rear exit The single-sheet rear exit provides a straight-through paper path to the manual feeder, and push it into the printer until it feeds into the feeder. To load the manual feeder: 1 Place a sheet of the selected print media, print side facing up , with the top...• Hold transparencies by the edges, and avoid touching the print side. Warning: Do not force the print media into the printer. For information on acceptable print media to manually feed a print job on page 23. Forcing the media causes jams. • Insert envelopes with the flap side down and with...
...media can use the rear exit The single-sheet rear exit provides a straight-through paper path to the manual feeder, and push it into the printer until it feeds into the feeder. To load the manual feeder: 1 Place a sheet of the selected print media, print side facing up , with the top...• Hold transparencies by the edges, and avoid touching the print side. Warning: Do not force the print media into the printer. For information on acceptable print media to manually feed a print job on page 23. Forcing the media causes jams. • Insert envelopes with the flap side down and with...
User's Guide
Page 38
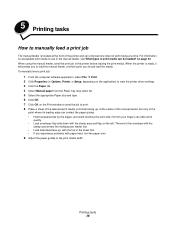
... 1 From the computer software application, select File Æ Print. 2 Click Properties (or Options, Printer, or Setup, depending on the application) to view the printer driver settings. 3 Click the Paper tab. 4 Select Manual paper from your fingers can affect print quality. • Load envelopes flap side down list. 5 ...print side facing up , with the top of the printer and can be loaded? 5 Printing tasks How to manually feed a print job The manual feeder is ready, it will prompt you to load the manual feeder, at a time. When the printer is located at the front of the sheet first....
... 1 From the computer software application, select File Æ Print. 2 Click Properties (or Options, Printer, or Setup, depending on the application) to view the printer driver settings. 3 Click the Paper tab. 4 Select Manual paper from your fingers can affect print quality. • Load envelopes flap side down list. 5 ...print side facing up , with the top of the printer and can be loaded? 5 Printing tasks How to manually feed a print job The manual feeder is ready, it will prompt you to load the manual feeder, at a time. When the printer is located at the front of the sheet first....
User's Guide
Page 39
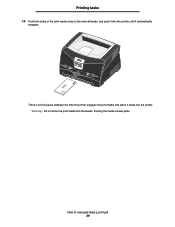
Forcing the media causes jams. How to the manual feeder, and push it into the printer until it feeds into the feeder. Printing tasks 10 Hold both sides of the print media close to manually feed a print job 39 Warning: Do not force the print media into the printer. There is a brief pause between the time the printer engages the print media and when it automatically engages.
Forcing the media causes jams. How to the manual feeder, and push it into the printer until it feeds into the feeder. Printing tasks 10 Hold both sides of the print media close to manually feed a print job 39 Warning: Do not force the print media into the printer. There is a brief pause between the time the printer engages the print media and when it automatically engages.
User's Guide
Page 40
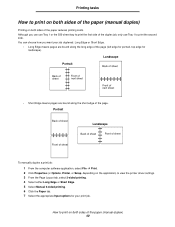
...550-sheet tray to print the first side of sheet To manually duplex a print job: 1 From the computer software application, select File Æ Print. 2 Click Properties (or Options, Printer, or Setup, depending on the application) to view the printer driver settings. 3 From the Page Layout tab, select ...2-sided printing. 4 Select either Long Edge or Short Edge. 5 Select Manual 2-sided printing. 6 Click the Paper tab. 7 Select ...
...550-sheet tray to print the first side of sheet To manually duplex a print job: 1 From the computer software application, select File Æ Print. 2 Click Properties (or Options, Printer, or Setup, depending on the application) to view the printer driver settings. 3 From the Page Layout tab, select ...2-sided printing. 4 Select either Long Edge or Short Edge. 5 Select Manual 2-sided printing. 6 Click the Paper tab. 7 Select ...

User's Guide
Page 41
The printer prints every other page of the tray, and press Go to print on the Print window. How to resume printing. Printing tasks 8 Click OK. 9 Click OK on both sides of the paper (manual duplex) 41 Note: Manual duplex is not available on a Macintosh computer. Once the first side of your job prints, the Load Paper message appears. 10 Load the paper back into the printer with the already-printed side up and the top of the page toward the front of the document first.
The printer prints every other page of the tray, and press Go to print on the Print window. How to resume printing. Printing tasks 8 Click OK. 9 Click OK on both sides of the paper (manual duplex) 41 Note: Manual duplex is not available on a Macintosh computer. Once the first side of your job prints, the Load Paper message appears. 10 Load the paper back into the printer with the already-printed side up and the top of the page toward the front of the document first.
User's Guide
Page 45
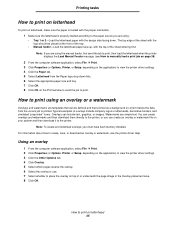
... can include text, graphics, or images. Note: If you are using the manual feeder, first send the job to print, then load the letterhead when the printer displays the Load Manual Feeder message (see the printer driver Help. You can create overlays and watermarks and then download them directly to... the printer, or you can be placed at the front of the tray. • Manual feeder-Load the letterhead paper ...
... can include text, graphics, or images. Note: If you are using the manual feeder, first send the job to print, then load the letterhead when the printer displays the Load Manual Feeder message (see the printer driver Help. You can create overlays and watermarks and then download them directly to... the printer, or you can be placed at the front of the tray. • Manual feeder-Load the letterhead paper ...
User's Guide
Page 53
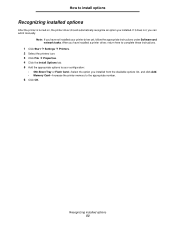
If it does not, you installed. Recognizing installed options 53 How to install options Recognizing installed options After the printer is turned on, the printer driver should automatically recognize an option you can add it manually. Note: If you have not installed your configuration: • 550-Sheet Tray or Flash Card-Select the option...
If it does not, you installed. Recognizing installed options 53 How to install options Recognizing installed options After the printer is turned on, the printer driver should automatically recognize an option you can add it manually. Note: If you have not installed your configuration: • 550-Sheet Tray or Flash Card-Select the option...
User's Guide
Page 59
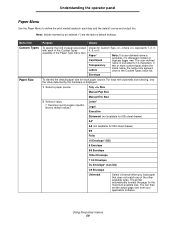
...panel Paper Menu Use the Paper Menu to 14 characters. Envelope To identify the default paper size for the maximum possible size. The printer automatically formats the page for each paper source. Values for 500-sheet drawer) B5 Folio 10 Envelope* (US) 9 Envelope B5 ... Envelope Universal Select Universal when you load paper that does not match any of the other available sizes. Using the printer menus 59 Tray Size Manual Pap Size Manual Env Size 2 Select a value. (* Denotes country/region-specific factory default values) Letter* Legal Executive Statement (not...
...panel Paper Menu Use the Paper Menu to 14 characters. Envelope To identify the default paper size for the maximum possible size. The printer automatically formats the page for each paper source. Values for 500-sheet drawer) B5 Folio 10 Envelope* (US) 9 Envelope B5 ... Envelope Universal Select Universal when you load paper that does not match any of the other available sizes. Using the printer menus 59 Tray Size Manual Pap Size Manual Env Size 2 Select a value. (* Denotes country/region-specific factory default values) Letter* Legal Executive Statement (not...

User's Guide
Page 60
... Bond Texture is available for your specific paper. 1 Select a paper type. If a userdefined name is Rough instead of Custom Texture. Using the printer menus 60 Tray (Tray 1*) Manual Paper Manual Env If you loaded the same size and type of the paper loaded in a specific source and to ensure that characters print clearly...
... Bond Texture is available for your specific paper. 1 Select a paper type. If a userdefined name is Rough instead of Custom Texture. Using the printer menus 60 Tray (Tray 1*) Manual Paper Manual Env If you loaded the same size and type of the paper loaded in a specific source and to ensure that characters print clearly...

User's Guide
Page 61
... identify the type of paper installed in the Paper Type value list. Tray 1-Plain Paper Tray 2-Custom Type 2 Manual Pap Type-Plain Paper Using the printer menus 61 Plain Paper Card Stock Transparency Labels Bond Letterhead Preprinted Custom Type Envelope Colored Paper The Paper Type default for... the specified paper. • Select paper sources through your software application by the printer, if you have set the Paper Size and the Paper Type to : • Optimize print quality for each paper source. Any sources...
... identify the type of paper installed in the Paper Type value list. Tray 1-Plain Paper Tray 2-Custom Type 2 Manual Pap Type-Plain Paper Using the printer menus 61 Plain Paper Card Stock Transparency Labels Bond Letterhead Preprinted Custom Type Envelope Colored Paper The Paper Type default for... the specified paper. • Select paper sources through your software application by the printer, if you have set the Paper Size and the Paper Type to : • Optimize print quality for each paper source. Any sources...
User's Guide
Page 81
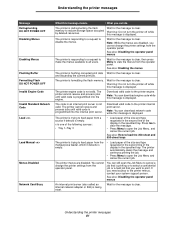
... into the engine. The printer is trying to print. Understanding the printer messages Message Defragmenting DO NOT POWER OFF Disabling Menus Enabling Menus Flushing Buffer Formatting Flash DO NOT POWER OFF Invalid Engine Code Invalid Standard Network Code Load Load Manual Menus Disabled Network Card Busy... What this message means What you can do The printer is displayed. Warning: Do not turn the printer off while this message is not valid. The code in the ...
... into the engine. The printer is trying to print. Understanding the printer messages Message Defragmenting DO NOT POWER OFF Disabling Menus Enabling Menus Flushing Buffer Formatting Flash DO NOT POWER OFF Invalid Engine Code Invalid Standard Network Code Load Load Manual Menus Disabled Network Card Busy... What this message means What you can do The printer is displayed. Warning: Do not turn the printer off while this message is not valid. The code in the ...
User's Guide
Page 86
... Standard Network or Network Opt ). You can disable this setting to set the speed manually. • Auto*-The printer detects current network speed. • 10Mbps†, Half Duplex-Forces the printer to try to connect to the network only at 10Mbps, Half Duplex. • ... Macintosh operating system. Setting Purpose Values NPA Mode Send print jobs to the printer and query • Off printer status information simultaneously. • Auto* Mac Binary PS Configure the printer to change printer settings on jobs sent through a network port (either Windows or Macintosh operating ...
... Standard Network or Network Opt ). You can disable this setting to set the speed manually. • Auto*-The printer detects current network speed. • 10Mbps†, Half Duplex-Forces the printer to try to connect to the network only at 10Mbps, Half Duplex. • ... Macintosh operating system. Setting Purpose Values NPA Mode Send print jobs to the printer and query • Off printer status information simultaneously. • Auto* Mac Binary PS Configure the printer to change printer settings on jobs sent through a network port (either Windows or Macintosh operating ...
User's Guide
Page 90
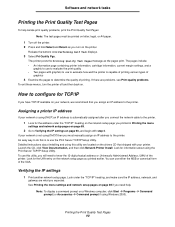
...Printing the menu settings and network setup pages on the network setup page you assign an IP address to the printer. Printing the Print Quality Test Pages 90 Release the buttons once Performing Self Test displays. 3 Select Prt Quality... Pgs. Launch the CD, click View Documentation, and then click Network Printer Install. Look under the "TCP/IP" heading on page 89 if you printed earlier. You can use this ... problems, print the Print Quality Test Pages: Note: The test pages must manually assign an IP address to the printer.
...Printing the menu settings and network setup pages on the network setup page you assign an IP address to the printer. Printing the Print Quality Test Pages 90 Release the buttons once Performing Self Test displays. 3 Select Prt Quality... Pgs. Launch the CD, click View Documentation, and then click Network Printer Install. Look under the "TCP/IP" heading on page 89 if you printed earlier. You can use this ... problems, print the Print Quality Test Pages: Note: The test pages must manually assign an IP address to the printer.


