
User's Guide
Page 2
... that the manufacturer intends to restrictions as set of printer commands (language) and functions included in this statement may be used in various application programs, and that product, program, or service may not apply to be incorporated in which it operates. Lexmark, MarkVision and Optra are the property of Apple Computer, Inc., registered...
... that the manufacturer intends to restrictions as set of printer commands (language) and functions included in this statement may be used in various application programs, and that product, program, or service may not apply to be incorporated in which it operates. Lexmark, MarkVision and Optra are the property of Apple Computer, Inc., registered...

User's Guide
Page 4
Table of contents About your printer v Model specifications vi Performance vii Print quality vii Ease of use vii Other information sources xi 1 The basics 1 What's in the box 1 Installing the print cartridge 2 Connecting the printer to your computer 4 Loading paper 10 Printing a test page 12 Attaching a new operator panel overlay 13 Installing memory 14 2 Printer drivers 21 Printer drivers 21 MarkVision 23 3 Paper handling 25 Paper types and sizes 26 Loading paper, other media in the automatic feeder 30 Table of contents iii
Table of contents About your printer v Model specifications vi Performance vii Print quality vii Ease of use vii Other information sources xi 1 The basics 1 What's in the box 1 Installing the print cartridge 2 Connecting the printer to your computer 4 Loading paper 10 Printing a test page 12 Attaching a new operator panel overlay 13 Installing memory 14 2 Printer drivers 21 Printer drivers 21 MarkVision 23 3 Paper handling 25 Paper types and sizes 26 Loading paper, other media in the automatic feeder 30 Table of contents iii

User's Guide
Page 5
Loading paper, other media in the manual sheet feeder 33 Clearing paper jams 34 4 Troubleshooting 37 Indicator lights 39 5 Supplies 63 Print cartridge maintenance 63 Appendix A: Printer specifications 65 Printer features 65 Printer dimensions 66 Appendix B: Advanced troubleshooting 67 Appendix C: Safety information 79 Appendix D: Notices 87 Statement of Limited Warranty 91 Glossary X-1 Index X-5 iv Table of contents
Loading paper, other media in the manual sheet feeder 33 Clearing paper jams 34 4 Troubleshooting 37 Indicator lights 39 5 Supplies 63 Print cartridge maintenance 63 Appendix A: Printer specifications 65 Printer features 65 Printer dimensions 66 Appendix B: Advanced troubleshooting 67 Appendix C: Safety information 79 Appendix D: Notices 87 Statement of Limited Warranty 91 Glossary X-1 Index X-5 iv Table of contents

User's Guide
Page 6
... available, so be sure to keep you 'll be printing in . About your printer The Optra E312 printer combines the quality of upgrades for a perfect fit. With its easy setup, you informed of a laser printer with a conveniently small footprint for your printer We'd like to fill out the printer registration card and mail it in no time.
... available, so be sure to keep you 'll be printing in . About your printer The Optra E312 printer combines the quality of upgrades for a perfect fit. With its easy setup, you informed of a laser printer with a conveniently small footprint for your printer We'd like to fill out the printer registration card and mail it in no time.
User's Guide
Page 7
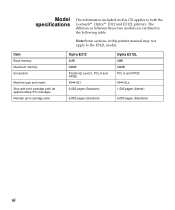
... cartridge yield Optra E312 4MB 68MB PostScript Level 2, PCL 6 and PPDS 4044-201 6,000 pages (Standard) 6,000 pages (Standard) Optra E312L 2MB 66MB PCL 6 and PPDS 4044-2Lx 1,500 pages (Starter) 6,000 pages (Standard) vi Model specifications The information included on this printer manual may not apply to both the Lexmark™ Optra™ E312 and E312L printers.
... cartridge yield Optra E312 4MB 68MB PostScript Level 2, PCL 6 and PPDS 4044-201 6,000 pages (Standard) 6,000 pages (Standard) Optra E312L 2MB 66MB PCL 6 and PPDS 4044-2Lx 1,500 pages (Starter) 6,000 pages (Standard) vi Model specifications The information included on this printer manual may not apply to both the Lexmark™ Optra™ E312 and E312L printers.

User's Guide
Page 8
... images and graphics; 1200 Image Quality to print sharper scanned or bitmapped print images; 300 dpi with 4MB of use online Help vii Performance The Optra E312 printer prints up to print complex jobs quickly. Ease of memory, expandable to 68MB to 10 pages per minute for printing flexibility: 75 PCL scalable...
... images and graphics; 1200 Image Quality to print sharper scanned or bitmapped print images; 300 dpi with 4MB of use online Help vii Performance The Optra E312 printer prints up to print complex jobs quickly. Ease of memory, expandable to 68MB to 10 pages per minute for printing flexibility: 75 PCL scalable...
User's Guide
Page 9
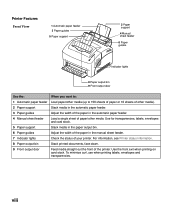
.... 8 Paper output bin Stack printed documents, face down. 9 Front output door Feed media straight out the front of the printer. viii Use for transparencies, labels, envelopes and card stock. 5 Paper support Stack media in the paper output bin. 6 ...the automatic paper feeder. 4 Manual sheet feeder Load a single sheet of paper/other media. To minimize curl, use when printing labels, envelopes and transparencies. Printer Features Front View 1 Automatic paper feeder 3 Paper guides 5 Paper support 2 Paper support 4 Manual sheet feeder 6 Paper guides 7 Indicator lights 8 Paper...
.... 8 Paper output bin Stack printed documents, face down. 9 Front output door Feed media straight out the front of the printer. viii Use for transparencies, labels, envelopes and card stock. 5 Paper support Stack media in the paper output bin. 6 ...the automatic paper feeder. 4 Manual sheet feeder Load a single sheet of paper/other media. To minimize curl, use when printing labels, envelopes and transparencies. Printer Features Front View 1 Automatic paper feeder 3 Paper guides 5 Paper support 2 Paper support 4 Manual sheet feeder 6 Paper guides 7 Indicator lights 8 Paper...
User's Guide
Page 10
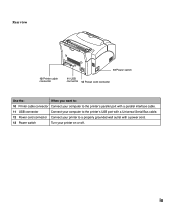
ix Rear view 10 Printer cable connector 13 Power switch 11 USB connector 12 Power cord connector Use the: When you want to: 10 Printer cable connector Connect your computer to the printer's parallel port with a parallel interface cable. 11 USB connector Connect your computer to the printer's USB port with a Universal Serial Bus cable. 12 Power cord connector Connect your printer to a properly grounded wall outlet with a power cord. 13 Power switch Turn your printer on or off.
ix Rear view 10 Printer cable connector 13 Power switch 11 USB connector 12 Power cord connector Use the: When you want to: 10 Printer cable connector Connect your computer to the printer's parallel port with a parallel interface cable. 11 USB connector Connect your computer to the printer's USB port with a Universal Serial Bus cable. 12 Power cord connector Connect your printer to a properly grounded wall outlet with a power cord. 13 Power switch Turn your printer on or off.
User's Guide
Page 11
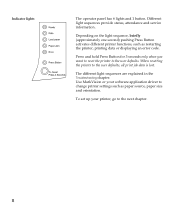
...for 3 seconds only when you want to reset the printer to the user defaults, all print job data is lost. When resetting the printer to the user defaults. Use MarkVision or your printer, go to change printer settings such as restarting the printer, printing data or displaying an error code. x ... The operator panel has 6 lights and 1 button. Depending on the light sequence, briefly (approximately one second) pushing Press Button activates different printer functions, such as paper source, paper size and orientation. To set up your software application driver to the next chapter.
...for 3 seconds only when you want to reset the printer to the user defaults, all print job data is lost. When resetting the printer to the user defaults. Use MarkVision or your printer, go to change printer settings such as restarting the printer, printing data or displaying an error code. x ... The operator panel has 6 lights and 1 button. Depending on the light sequence, briefly (approximately one second) pushing Press Button activates different printer functions, such as paper source, paper size and orientation. To set up your software application driver to the next chapter.

User's Guide
Page 12
...of the most popular MarkVision features. • Card Stock & Label Guide, which provides detailed information about selecting media appropriate for your printer. • A Technical Reference, which provides step-by-step instructions for installing MarkVision for launching instructions. xi All online documents are in... English only. Online documents The Drivers, MarkVision and Utilities CD that came with your printer or about Lexmark products and services. Other information sources In addition to this User's Guide CD, Lexmark offers other sources of information about your...
...of the most popular MarkVision features. • Card Stock & Label Guide, which provides detailed information about selecting media appropriate for your printer. • A Technical Reference, which provides step-by-step instructions for installing MarkVision for launching instructions. xi All online documents are in... English only. Online documents The Drivers, MarkVision and Utilities CD that came with your printer or about Lexmark products and services. Other information sources In addition to this User's Guide CD, Lexmark offers other sources of information about your...

User's Guide
Page 14
...help during setup, or if any items are missing or damaged, refer to the registration card for the designated Lexmark phone number for service or storage. 2 Make sure you need to repack the printer for your workstation. in dusty or dirty environments What's in direct sunlight - in the box 1 power ...cord - User's Guide CD - The basics 1 What's in a well-ventilated area near heat sources or air conditioners - print cartridge - Do not place the printer: - Save the carton and packing materials in case you have the items listed below: - near your country. 3 Place the...
...help during setup, or if any items are missing or damaged, refer to the registration card for the designated Lexmark phone number for service or storage. 2 Make sure you need to repack the printer for your workstation. in dusty or dirty environments What's in direct sunlight - in the box 1 power ...cord - User's Guide CD - The basics 1 What's in a well-ventilated area near heat sources or air conditioners - print cartridge - Do not place the printer: - Save the carton and packing materials in case you have the items listed below: - near your country. 3 Place the...

User's Guide
Page 15
Installing the print cartridge 1 Use the finger tab to pull down the printer cover. 2 Unpack the print cartridge. 3 Holding the cartridge level, pull out the sealing tape. 2 Chapter 1: The basics
Installing the print cartridge 1 Use the finger tab to pull down the printer cover. 2 Unpack the print cartridge. 3 Holding the cartridge level, pull out the sealing tape. 2 Chapter 1: The basics

User's Guide
Page 16
4 Gently shake the cartridge to distribute the toner evenly. 5 Insert the print cartridge: a Slide the print cartridge down on the cartridge until it drops into place. 6 Close the printer cover. Installing the print cartridge 3 b Gently push down between the print cartridge slots.
4 Gently shake the cartridge to distribute the toner evenly. 5 Insert the print cartridge: a Slide the print cartridge down on the cartridge until it drops into place. 6 Close the printer cover. Installing the print cartridge 3 b Gently push down between the print cartridge slots.
User's Guide
Page 17
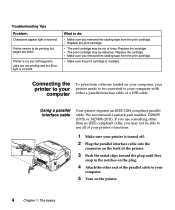
...either a parallel interface cable or a USB cable. Using a parallel interface cable Your printer requires an IEEE-1284 compliant parallel cable. Troubleshooting Tips Problem: Characters appear light or blurred. We recommend Lexmark part number 1329605 (10 ft) or 1427498 (20 ft). Replace the cartridge. ...• The print cartridge may be defective. Printer is on the plug. 4 Attach the other than an IEEE-compliant...
...either a parallel interface cable or a USB cable. Using a parallel interface cable Your printer requires an IEEE-1284 compliant parallel cable. Troubleshooting Tips Problem: Characters appear light or blurred. We recommend Lexmark part number 1329605 (10 ft) or 1427498 (20 ft). Replace the cartridge. ...• The print cartridge may be defective. Printer is on the plug. 4 Attach the other than an IEEE-compliant...
User's Guide
Page 18
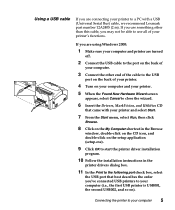
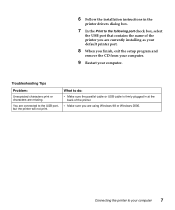
...to a PC with your printer and select Start. 7 From ...printer driver installation program. 10 Follow the installation instructions in the printer...printers to your computer. 3 Connect the other than this cable, you use all of your computer 5 Connecting the printer to your computer (i.e., the first USB printer... is USB001, the second USB002, and so on the back of your printer's functions. If you are using Windows 2000: 1 Make sure your computer and printer are connecting your printer...printer. 4 Turn on your computer and your printer...
...to a PC with your printer and select Start. 7 From ...printer driver installation program. 10 Follow the installation instructions in the printer...printers to your computer. 3 Connect the other than this cable, you use all of your computer 5 Connecting the printer to your computer (i.e., the first USB printer... is USB001, the second USB002, and so on the back of your printer's functions. If you are using Windows 2000: 1 Make sure your computer and printer are connecting your printer...printer. 4 Turn on your computer and your printer...
User's Guide
Page 19
... the Win98USB folder beneath it. i When the hardware is loaded, click Finish. If you finish, exit the setup program and remove the CD from your printer. 5 When the Add New Hardware Wizard screen appears: a Select Next to install USB support for the new drivers. b Select Next to the USB port... on the back of your printer and select Browse. c Make sure the Floppy disk drives, CD-ROM drive and Microsoft Windows Update check boxes are turned off. 2 Connect the USB cable...
... the Win98USB folder beneath it. i When the hardware is loaded, click Finish. If you finish, exit the setup program and remove the CD from your printer. 5 When the Add New Hardware Wizard screen appears: a Select Next to install USB support for the new drivers. b Select Next to the USB port... on the back of your printer and select Browse. c Make sure the Floppy disk drives, CD-ROM drive and Microsoft Windows Update check boxes are turned off. 2 Connect the USB cable...
User's Guide
Page 20
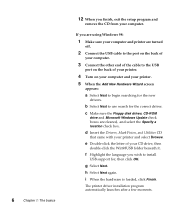
... not print. Troubleshooting Tips Problem: Unexpected characters print or characters are currently installing as your default printer port. 8 When you finish, exit the setup program and remove the CD from your computer. 9 Restart your computer 7 You are connected to do: • ...Make sure the parallel cable or USB cable is firmly plugged in the printer drivers dialog box. 7 In the Print to your computer. Connecting the printer to the following port check box, select the USB port that contains the name of the...
... not print. Troubleshooting Tips Problem: Unexpected characters print or characters are currently installing as your default printer port. 8 When you finish, exit the setup program and remove the CD from your computer. 9 Restart your computer 7 You are connected to do: • ...Make sure the parallel cable or USB cable is firmly plugged in the printer drivers dialog box. 7 In the Print to your computer. Connecting the printer to the following port check box, select the USB port that contains the name of the...

User's Guide
Page 21
The previous screen displays. The USB printer dialog box displays. 14 Select Optra E312 and click OK. Notice the new printer icon. 8 Chapter 1: The basics For Macintosh users: 1 Make sure the printer power is Off (O) and the printer power cord is unplugged from the electrical outlet. 2 Connect the end of the USB ... your computer. 3 Align and plug the other end of the USB cable into the port on the back of your printer as shown. 4 Plug the printer in. 5 Turn the printer on. 6 Launch the Drivers, MarkVision, and Utilities CD to install the necessary items. Instructions to launch the CD are...
The previous screen displays. The USB printer dialog box displays. 14 Select Optra E312 and click OK. Notice the new printer icon. 8 Chapter 1: The basics For Macintosh users: 1 Make sure the printer power is Off (O) and the printer power cord is unplugged from the electrical outlet. 2 Connect the end of the USB ... your computer. 3 Align and plug the other end of the USB cable into the port on the back of your printer as shown. 4 Plug the printer in. 5 Turn the printer on. 6 Launch the Drivers, MarkVision, and Utilities CD to install the necessary items. Instructions to launch the CD are...
User's Guide
Page 22
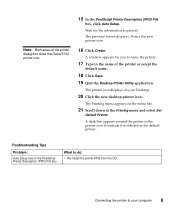
...: Auto Setup fails in the name of the printer dialog box show the Optra E312 printer icon. 15 In the PostScript Printer Description (PPD) File box, click Auto Setup. Connecting the printer to do: • Re-install the printer PPD from the CD. The previous screen displays. The printer icon displays on the menu bar. 21 Scroll...
...: Auto Setup fails in the name of the printer dialog box show the Optra E312 printer icon. 15 In the PostScript Printer Description (PPD) File box, click Auto Setup. Connecting the printer to do: • Re-install the printer PPD from the CD. The previous screen displays. The printer icon displays on the menu bar. 21 Scroll...

User's Guide
Page 25
Paper fails to 150 sheets, depending on the thickness of the paper. Printing a test page To check that your printer is straight and unwrinkled. Paper sticks together/printer feeds multiple sheets of the page. The automatic paper feeder holds up to do: Toner smudges appear on the front or • Make sure the...
Paper fails to 150 sheets, depending on the thickness of the paper. Printing a test page To check that your printer is straight and unwrinkled. Paper sticks together/printer feeds multiple sheets of the page. The automatic paper feeder holds up to do: Toner smudges appear on the front or • Make sure the...

