
User's Guide
Page 5
Loading paper, other media in the manual sheet feeder 33 Clearing paper jams 34 4 Troubleshooting 37 Indicator lights 39 5 Supplies 63 Print cartridge maintenance 63 Appendix A: Printer specifications 65 Printer features 65 Printer dimensions 66 Appendix B: Advanced troubleshooting 67 Appendix C: Safety information 79 Appendix D: Notices 87 Statement of Limited Warranty 91 Glossary X-1 Index X-5 iv Table of contents
Loading paper, other media in the manual sheet feeder 33 Clearing paper jams 34 4 Troubleshooting 37 Indicator lights 39 5 Supplies 63 Print cartridge maintenance 63 Appendix A: Printer specifications 65 Printer features 65 Printer dimensions 66 Appendix B: Advanced troubleshooting 67 Appendix C: Safety information 79 Appendix D: Notices 87 Statement of Limited Warranty 91 Glossary X-1 Index X-5 iv Table of contents
User's Guide
Page 11
x The different light sequences are explained in the Troubleshooting chapter. When resetting the printer to the user defaults. Depending on the light sequence, briefly (approximately one second) pushing Press Button activates different printer functions, such as paper source, paper size and orientation. Indicator lights The ...for 3 seconds only when you want to reset the printer to the user defaults, all print job data is lost. Use MarkVision or your printer, go to change printer settings such as restarting the printer, printing data or displaying an error code. To set...
x The different light sequences are explained in the Troubleshooting chapter. When resetting the printer to the user defaults. Depending on the light sequence, briefly (approximately one second) pushing Press Button activates different printer functions, such as paper source, paper size and orientation. Indicator lights The ...for 3 seconds only when you want to reset the printer to the user defaults, all print job data is lost. Use MarkVision or your printer, go to change printer settings such as restarting the printer, printing data or displaying an error code. To set...
User's Guide
Page 17
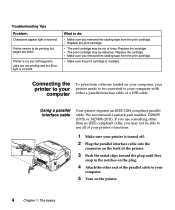
...8226; The print cartridge may be printing, but nothing prints. We recommend Lexmark part number 1329605 (10 ft) or 1427498 (20 ft). Using a parallel interface cable Your printer requires an IEEE-1284 compliant parallel cable. Printer seems to use something other than an IEEE-compliant cable, you removed the... of the parallel cable to your computer. 5 Turn on , but pages are not printing and the Error light is installed. Troubleshooting Tips Problem: Characters appear light or blurred. Printer is turned off. 2 Plug the parallel interface cable into the connector on the back of the...
...8226; The print cartridge may be printing, but nothing prints. We recommend Lexmark part number 1329605 (10 ft) or 1427498 (20 ft). Using a parallel interface cable Your printer requires an IEEE-1284 compliant parallel cable. Printer seems to use something other than an IEEE-compliant cable, you removed the... of the parallel cable to your computer. 5 Turn on , but pages are not printing and the Error light is installed. Troubleshooting Tips Problem: Characters appear light or blurred. Printer is turned off. 2 Plug the parallel interface cable into the connector on the back of the...
User's Guide
Page 20
Troubleshooting Tips Problem: Unexpected characters print or characters are connected to the USB port, but the printer will not print. You are missing. 6 Follow the installation instructions in at the back of the printer you are currently installing as your computer 7 Connecting the printer to the following ...port check box, select the USB port that contains the name of the printer. • Make sure you finish, exit the setup ...
Troubleshooting Tips Problem: Unexpected characters print or characters are connected to the USB port, but the printer will not print. You are missing. 6 Follow the installation instructions in at the back of the printer you are currently installing as your computer 7 Connecting the printer to the following ...port check box, select the USB port that contains the name of the printer. • Make sure you finish, exit the setup ...
User's Guide
Page 22
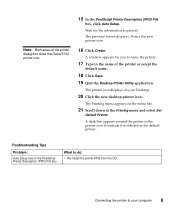
... appears around the printer in the name of the printer dialog box show the Optra E312 printer icon. 15 In the PostScript Printer Description (PPD) File box, click Auto Setup. Note: Both areas of the printer or accept the default name. 18 Click Save. 19 Quit the Desktop Printer Utility application. A... Connecting the printer to indicate it is selected as the default printer. The Printing menu appears on your computer 9 Troubleshooting Tips Problem: Auto Setup fails in the Printing menu and select Set Default Printer. Wait for you to name the printer. 17 Type in the printer icon to...
... appears around the printer in the name of the printer dialog box show the Optra E312 printer icon. 15 In the PostScript Printer Description (PPD) File box, click Auto Setup. Note: Both areas of the printer or accept the default name. 18 Click Save. 19 Quit the Desktop Printer Utility application. A... Connecting the printer to indicate it is selected as the default printer. The Printing menu appears on your computer 9 Troubleshooting Tips Problem: Auto Setup fails in the Printing menu and select Set Default Printer. Wait for you to name the printer. 17 Type in the printer icon to...

User's Guide
Page 25
...paper in the paper feeder. Printing a test page To check that your printer is straight and unwrinkled. back of paper. • Remove the paper from the paper feeder and fan the paper. paper feeder. Troubleshooting Tips Problem: What to do: Toner smudges appear on the front or ...• Make sure the paper is working correctly, print a test page. Paper sticks together/printer feeds multiple sheets of the page.
...paper in the paper feeder. Printing a test page To check that your printer is straight and unwrinkled. back of paper. • Remove the paper from the paper feeder and fan the paper. paper feeder. Troubleshooting Tips Problem: What to do: Toner smudges appear on the front or ...• Make sure the paper is working correctly, print a test page. Paper sticks together/printer feeds multiple sheets of the page.
User's Guide
Page 26
...4 When the Data light stops blinking and Ready is turned on the back of the printer and at the wall outlet. What to use it, peel it off and place it doesn't, check Printing problems. Troubleshooting Tips Problem: The operator panel lights do : • Make sure the power cord is... firmly plugged in your printer box and wish to do not come on when the printer is the only light on the printer. 1 Turn the printer off , starting with Press Button ...
...4 When the Data light stops blinking and Ready is turned on the back of the printer and at the wall outlet. What to use it, peel it off and place it doesn't, check Printing problems. Troubleshooting Tips Problem: The operator panel lights do : • Make sure the power cord is... firmly plugged in your printer box and wish to do not come on when the printer is the only light on the printer. 1 Turn the printer off , starting with Press Button ...
User's Guide
Page 49
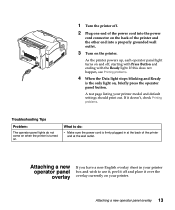
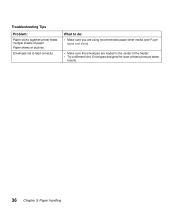
Envelopes designed for laser printers produce better results. 36 Chapter 3: Paper handling Troubleshooting Tips Problem: Paper sticks together/printer feeds multiple sheets of the feeder. • Try a different kind. What to feed correctly. Paper skews or buckles. Envelopes fail to do: • Make sure you are using recommended paper/other media (see Paper types and sizes). • Make sure the envelopes are loaded in the center of paper.
Envelopes designed for laser printers produce better results. 36 Chapter 3: Paper handling Troubleshooting Tips Problem: Paper sticks together/printer feeds multiple sheets of the feeder. • Try a different kind. What to feed correctly. Paper skews or buckles. Envelopes fail to do: • Make sure you are using recommended paper/other media (see Paper types and sizes). • Make sure the envelopes are loaded in the center of paper.
User's Guide
Page 50
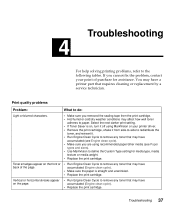
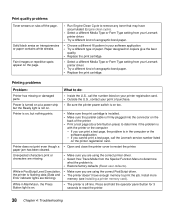
... Make sure you are using recommended paper/other media (see Paper types and sizes). • Use MarkVision to the following tables. Troubleshooting 37 Troubleshooting 4 For help solving printing problems, refer to define the Custom Type setting for assistance. Select the next darker print setting. •.... Print quality problems Problem: What to do: Light or blurred characters. • Make sure you cannot fix the problem, contact your printer driver. • Remove the print cartridge, shake it from the print cartridge. • Hot/humid or cold/dry weather conditions may ...
... Make sure you are using recommended paper/other media (see Paper types and sizes). • Use MarkVision to the following tables. Troubleshooting 37 Troubleshooting 4 For help solving printing problems, refer to define the Custom Type setting for assistance. Select the next darker print setting. •.... Print quality problems Problem: What to do: Light or blurred characters. • Make sure you cannot fix the problem, contact your printer driver. • Remove the print cartridge, shake it from the print cartridge. • Hot/humid or cold/dry weather conditions may ...
User's Guide
Page 51
...copiers give the best quality. • Replace the print cartridge. • Select a different Media Type or Form Type setting from your Lexmark printer driver. • Try a different kind of xerographic bond paper. • Choose a different fill pattern in the computer or the software...cartridge is installed. • Make sure the parallel cable is with the printer or the computer. - Printer does not print even though a • Open and close the printer cover to reset the printer. 38 Chapter 4: Troubleshooting While in PostScript Level 2 emulation, • Make sure you cannot ...
...copiers give the best quality. • Replace the print cartridge. • Select a different Media Type or Form Type setting from your Lexmark printer driver. • Try a different kind of xerographic bond paper. • Choose a different fill pattern in the computer or the software...cartridge is installed. • Make sure the parallel cable is with the printer or the computer. - Printer does not print even though a • Open and close the printer cover to reset the printer. 38 Chapter 4: Troubleshooting While in PostScript Level 2 emulation, • Make sure you cannot ...

User's Guide
Page 53
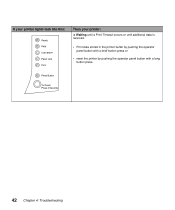
Each time the printer is reset, the print job in process is Ready to receive and process data. • Print a test page by pushing the operator panel button with a brief button press, or • reset the printer by pushing the operator panel button with a long button press. Printer status information If your printer lights look like this: Then your printer: is terminated. 40 Chapter 4: Troubleshooting
Each time the printer is reset, the print job in process is Ready to receive and process data. • Print a test page by pushing the operator panel button with a brief button press, or • reset the printer by pushing the operator panel button with a long button press. Printer status information If your printer lights look like this: Then your printer: is terminated. 40 Chapter 4: Troubleshooting
User's Guide
Page 55
If your printer lights look like this: Then your printer: is Waiting until a Print Timeout occurs or until additional data is received. • Print data stored in the printer buffer by pushing the operator panel button with a brief button press or • reset the printer by pushing the operator panel button with a long button press. 42 Chapter 4: Troubleshooting
If your printer lights look like this: Then your printer: is Waiting until a Print Timeout occurs or until additional data is received. • Print data stored in the printer buffer by pushing the operator panel button with a brief button press or • reset the printer by pushing the operator panel button with a long button press. 42 Chapter 4: Troubleshooting
User's Guide
Page 57
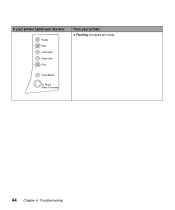
If your printer lights look like this: Then your printer: is Flushing corrupted print data. 44 Chapter 4: Troubleshooting
If your printer lights look like this: Then your printer: is Flushing corrupted print data. 44 Chapter 4: Troubleshooting

User's Guide
Page 59
...button to resume printing or • reset the printer by pushing the operator panel button with a long button press. 46 Chapter 4: Troubleshooting If your printer lights look like this: Then your printer: is out of the printer, into the automatic paper feeder and push the operator... panel button to resume printing, or • reset the printer by pushing the operator panel button with ...
...button to resume printing or • reset the printer by pushing the operator panel button with a long button press. 46 Chapter 4: Troubleshooting If your printer lights look like this: Then your printer: is out of the printer, into the automatic paper feeder and push the operator... panel button to resume printing, or • reset the printer by pushing the operator panel button with ...

User's Guide
Page 61
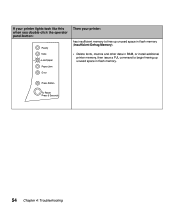
... too complex to defragment flash memory (insufficient defrag memory), or • cannot communicate with the host computer (host interface error). If your printer lights look like this: Then your printer: • memory is full, or • received a page that is in the buffer (resource save off), or • doesn't have enough memory... resolution of the errors described above has a unique, secondary error code. Display the secondary error code by double-clicking the operator panel button. 48 Chapter 4: Troubleshooting
... too complex to defragment flash memory (insufficient defrag memory), or • cannot communicate with the host computer (host interface error). If your printer lights look like this: Then your printer: • memory is full, or • received a page that is in the buffer (resource save off), or • doesn't have enough memory... resolution of the errors described above has a unique, secondary error code. Display the secondary error code by double-clicking the operator panel button. 48 Chapter 4: Troubleshooting

User's Guide
Page 63
If your printer lights look like this when you double-click the operator panel button: Then your printer: has received a page that is too complex to print (Complex Page). • Switch the printing mode to a different printing mode via the Lexmark driver for Windows, or • press the operator panel button with a brief button press to resume printing, or • reset the printer by pushing the operator panel button with a long button press. 50 Chapter 4: Troubleshooting
If your printer lights look like this when you double-click the operator panel button: Then your printer: has received a page that is too complex to print (Complex Page). • Switch the printing mode to a different printing mode via the Lexmark driver for Windows, or • press the operator panel button with a brief button press to resume printing, or • reset the printer by pushing the operator panel button with a long button press. 50 Chapter 4: Troubleshooting

User's Guide
Page 65
If your printer lights look like this when you double-click the operator panel button: Then your printer: has received a request for a PPDS font which is not installed (Font Error). • Reset the front panel by pushing the operator panel button with a long button press. 52 Chapter 4: Troubleshooting
If your printer lights look like this when you double-click the operator panel button: Then your printer: has received a request for a PPDS font which is not installed (Font Error). • Reset the front panel by pushing the operator panel button with a long button press. 52 Chapter 4: Troubleshooting
User's Guide
Page 67
If your printer lights look like this when you double-click the operator panel button: Then your printer: has insufficient memory to free up unused space in flash memory (Insufficient Defrag Memory). • Delete fonts, macros and other data in RAM, or install additional printer memory, then issue a PJL command to begin freeing up unused space in flash memory. 54 Chapter 4: Troubleshooting
If your printer lights look like this when you double-click the operator panel button: Then your printer: has insufficient memory to free up unused space in flash memory (Insufficient Defrag Memory). • Delete fonts, macros and other data in RAM, or install additional printer memory, then issue a PJL command to begin freeing up unused space in flash memory. 54 Chapter 4: Troubleshooting
User's Guide
Page 69
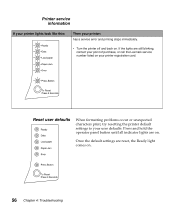
... card. Reset user defaults When formatting problems occur or unexpected characters print, try resetting the printer default settings to your printer: has a service error and printing stops immediately. • Turn the printer off and back on . 56 Chapter 4: Troubleshooting If the lights are reset, the Ready light comes on . Once the default settings are...
... card. Reset user defaults When formatting problems occur or unexpected characters print, try resetting the printer default settings to your printer: has a service error and printing stops immediately. • Turn the printer off and back on . 56 Chapter 4: Troubleshooting If the lights are reset, the Ready light comes on . Once the default settings are...
User's Guide
Page 71
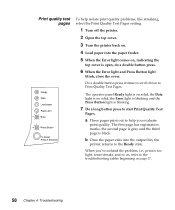
...is blinking and the Press Button light is too light, toner streaks, and so on, refer to the troubleshooting tables beginning on . 4 Load paper into the output bin, the printer returns to start Print Quality Test Pages. Print quality test pages To help you 've isolated the problem,... isolate print quality problems, like streaking, select the Print Quality Test Pages setting. 1 Turn off the printer. 2 Open the top cover. 3 Turn the printer back on page 37. 58 Chapter 4: Troubleshooting a Three pages print out to Print Quality Test Pages. The first page has registration marks, the second...
...is blinking and the Press Button light is too light, toner streaks, and so on, refer to the troubleshooting tables beginning on . 4 Load paper into the output bin, the printer returns to start Print Quality Test Pages. Print quality test pages To help you 've isolated the problem,... isolate print quality problems, like streaking, select the Print Quality Test Pages setting. 1 Turn off the printer. 2 Open the top cover. 3 Turn the printer back on page 37. 58 Chapter 4: Troubleshooting a Three pages print out to Print Quality Test Pages. The first page has registration marks, the second...
