
Service Manual
Page 21
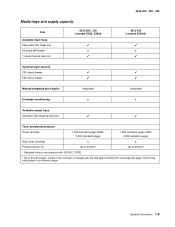
... 4513-200, -220 Lexmark E260, E260d x 4513-200, -220, -230 4513-230 Lexmark E260dn x Optional input sources 250-sheet drawer 550-sheet drawer Manual/integrated print duplex Integrated Integrated Envelope conditioning x x Available output trays Standard 150-sheet sensing bin Toner and photoconductor Toner cartridge 1,000 standard pages...
... 4513-200, -220 Lexmark E260, E260d x 4513-200, -220, -230 4513-230 Lexmark E260dn x Optional input sources 250-sheet drawer 550-sheet drawer Manual/integrated print duplex Integrated Integrated Envelope conditioning x x Available output trays Standard 150-sheet sensing bin Toner and photoconductor Toner cartridge 1,000 standard pages...
Service Manual
Page 30
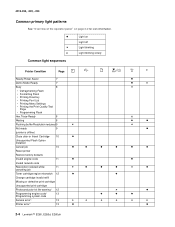
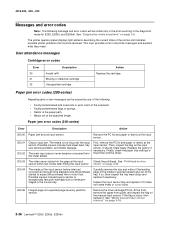
... Toner cartridge region mismatch 12 Change cartridge invalid refill Missing or defective print cartridge Unsupported print cartridge Photoconductor kit life warning¹ 12 Programming engine code/ 13 Programming system code Service error² 13 Printer error³ 13 2-4 Lexmark™ E260, E260d, E260dn
... Toner cartridge region mismatch 12 Change cartridge invalid refill Missing or defective print cartridge Unsupported print cartridge Photoconductor kit life warning¹ 12 Programming engine code/ 13 Programming system code Service error² 13 Printer error³ 13 2-4 Lexmark™ E260, E260d, E260dn
Service Manual
Page 38
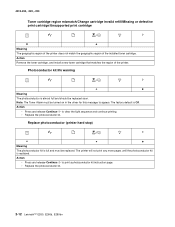
...appear. Action Remove the toner cartridge, and install a new toner cartridge that matches the region of the installed toner cartridge. The printer will not print any more pages until the photoconductor kit is Off. 4513-200, -220, -230 Toner cartridge region mismatch/Change cartridge invalid refill/Missing or defective print cartridge/Unsupported print cartridge ... the photoconductor kit. Action • Press and release Continue to print a photoconductor kit instruction page. • Replace the photoconductor kit. 2-12 Lexmark™ E260, E260d, E260dn
...appear. Action Remove the toner cartridge, and install a new toner cartridge that matches the region of the installed toner cartridge. The printer will not print any more pages until the photoconductor kit is Off. 4513-200, -220, -230 Toner cartridge region mismatch/Change cartridge invalid refill/Missing or defective print cartridge/Unsupported print cartridge ... the photoconductor kit. Action • Press and release Continue to print a photoconductor kit instruction page. • Replace the photoconductor kit. 2-12 Lexmark™ E260, E260d, E260dn
Service Manual
Page 44
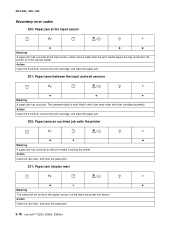
...the tray and enters the printer or in the fuser area under the toner cartridge assembly. Action Open the rear door, and clear the paper jam. 2-18 Lexmark™ E260, E260d, E260dn Action Open the front door, remove the print cartridge, and clear the paper jam. 202: Paper jams as a printed ... rear) Meaning The media did leave the printer exit sensor. Action Open the front door, remove the print cartridge, and clear the paper jam. 201: Paper jams between the input and exit sensors Meaning A paper jam has occurred.
...the tray and enters the printer or in the fuser area under the toner cartridge assembly. Action Open the rear door, and clear the paper jam. 2-18 Lexmark™ E260, E260d, E260dn Action Open the front door, remove the print cartridge, and clear the paper jam. 202: Paper jams as a printed ... rear) Meaning The media did leave the printer exit sensor. Action Open the front door, remove the print cartridge, and clear the paper jam. 201: Paper jams between the input and exit sensors Meaning A paper jam has occurred.

Service Manual
Page 52
...• Press and release Continue to extend the life, or replace the toner cartridge if it with a supported toner cartridge. • Turn the printer on . The option will be ignored. 2-26 Lexmark™ E260, E260d, E260dn Action • Press and release Continue to clear the light sequence and continue... processing the print job. • Turn the printer off. • Remove the toner cartridge, and shake it to clear the light sequence...
...• Press and release Continue to extend the life, or replace the toner cartridge if it with a supported toner cartridge. • Turn the printer on . The option will be ignored. 2-26 Lexmark™ E260, E260d, E260dn Action • Press and release Continue to clear the light sequence and continue... processing the print job. • Turn the printer off. • Remove the toner cartridge, and shake it to clear the light sequence...
Service Manual
Page 62
... include multi-sheet feed, tray size sensing problem, and media slippage. Then, inspect the flag on page 4-39. 2-36 Lexmark™ E260, E260d, E260dn See "Printhead service sensor within two inches after hitting the input sensor check" on the manual input sensor. At the front,...codes Error 30 31 32 Description Invalid refill Missing or defective cartridge Unsupported cartridge Action Replace the cartridge. The media is too loose. 200.06 Imaged page not expected page (bouncy passthru sensor) Remove the toner cartridge/PC kit. The main input sensor never became uncovered from the...
... include multi-sheet feed, tray size sensing problem, and media slippage. Then, inspect the flag on page 4-39. 2-36 Lexmark™ E260, E260d, E260dn See "Printhead service sensor within two inches after hitting the input sensor check" on the manual input sensor. At the front,...codes Error 30 31 32 Description Invalid refill Missing or defective cartridge Unsupported cartridge Action Replace the cartridge. The media is too loose. 200.06 Imaged page not expected page (bouncy passthru sensor) Remove the toner cartridge/PC kit. The main input sensor never became uncovered from the...
Service Manual
Page 78
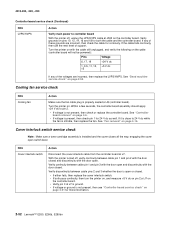
... replace the controller board. Verify grounds on . Turn the printer on pins 10, 12, 14, 16 and 18 for more information. 2-52 Lexmark™ E260, E260d, E260dn If any of these grounds are incorrect, then replace the LVPS/HVPS. See "Dead machine service check" on page 4-6. • If voltage ... is installed and the cover closes all the way, engaging the cover open or closed . Cover interlock switch service check Note: Make sure a toner cartridge assembly is properly seated at J7. With the printer turned off , unplug the LPS/HVPS cable at J7 is ground. • If voltage ...
... replace the controller board. Verify grounds on . Turn the printer on pins 10, 12, 14, 16 and 18 for more information. 2-52 Lexmark™ E260, E260d, E260dn If any of these grounds are incorrect, then replace the LVPS/HVPS. See "Dead machine service check" on page 4-6. • If voltage ... is installed and the cover closes all the way, engaging the cover open or closed . Cover interlock switch service check Note: Make sure a toner cartridge assembly is properly seated at J7. With the printer turned off , unplug the LPS/HVPS cable at J7 is ground. • If voltage ...

Service Manual
Page 84
... by a defective printhead assembly, LVPS/HVPS, or controller board. • Printhead errors typically result in a 'dirty' print. Try a different toner cartridge and PC kit. • If those fail, then replace the LVPS/HVPS, controller board, or the printhead in the opening for repeating defects...symptom table" on the lens. Blank pages can be ground except for cartridge damage. Turn on page 3-62. 2-58 Lexmark™ E260, E260d, E260dn When the light stays on ). 4. Try a different PC kit. • With the cartridge out, check the spring loaded contacts on . 3. Once the media ...
... by a defective printhead assembly, LVPS/HVPS, or controller board. • Printhead errors typically result in a 'dirty' print. Try a different toner cartridge and PC kit. • If those fail, then replace the LVPS/HVPS, controller board, or the printhead in the opening for repeating defects...symptom table" on the lens. Blank pages can be ground except for cartridge damage. Turn on page 3-62. 2-58 Lexmark™ E260, E260d, E260dn When the light stays on ). 4. Try a different PC kit. • With the cartridge out, check the spring loaded contacts on . 3. Once the media ...

Service Manual
Page 86
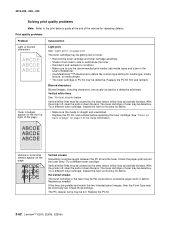
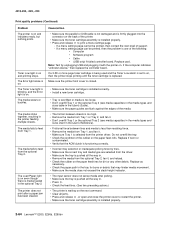
...toner cartridge is not blocked. Variation in the printer driver. Note: Do not touch the transfer roll except at the proper temperature to fuse the toner to make sure that the laser light path is low, then try a new one. Replace as necessary. Check the springs in the printer driver. 2-60 Lexmark™ E260, E260d, E260dn.... 4513-200, -220, -230 Partial blank image/white spots (no repeating pattern) FRU Toner cartridge (not a FRU) Paper (not a FRU) Action Remove the toner cartridge assembly, and gently shake the assembly to heavier paper or even card stock. Inspect the transfer...
...toner cartridge is not blocked. Variation in the printer driver. Note: Do not touch the transfer roll except at the proper temperature to fuse the toner to make sure that the laser light path is low, then try a new one. Replace as necessary. Check the springs in the printer driver. 2-60 Lexmark™ E260, E260d, E260dn.... 4513-200, -220, -230 Partial blank image/white spots (no repeating pattern) FRU Toner cartridge (not a FRU) Paper (not a FRU) Action Remove the toner cartridge assembly, and gently shake the assembly to heavier paper or even card stock. Inspect the transfer...
Service Manual
Page 88
... the lines are usually caused by a defective printhead. Vertical white lines See "Vertical streaks below. See "Toner on page 2-61 for repeating defects. Replace the PC kit. 2-62 Lexmark™ E260, E260d, E260dn Try a different toner cartridge. Inspect the fuser at its entry for debris. Vertical white lines may be caused by the laser beam, which...
... the lines are usually caused by a defective printhead. Vertical white lines See "Vertical streaks below. See "Toner on page 2-61 for repeating defects. Replace the PC kit. 2-62 Lexmark™ E260, E260d, E260dn Try a different toner cartridge. Inspect the fuser at its entry for debris. Vertical white lines may be caused by the laser beam, which...
Service Manual
Page 90
... is installed properly. • Press and release to restart the printer. • Make sure the toner cartridge assembly is selected from the optional Tray 2, fan it . • Make sure Tray 1 is installed properly. 2-64 Lexmark™ E260, E260d, E260dn The printer does not print after picking. • Make sure the tray is pushed all the...
... is installed properly. • Press and release to restart the printer. • Make sure the toner cartridge assembly is selected from the optional Tray 2, fan it . • Make sure Tray 1 is installed properly. 2-64 Lexmark™ E260, E260d, E260dn The printer does not print after picking. • Make sure the tray is pushed all the...

Service Manual
Page 104
4513-200, -220, -230 Removal procedures Note: • Remove the toner cartridge and media tray before proceeding with a removal. 4-2 Lexmark™ E260, E260d, E260dn The toner cartridge should be protected from light while out of the printer. • Disconnect all external cables from the printer to prevent damage during service. • Unless ... reverse order of removal. • When reinstalling a part held with several screws, start all screws before final tightening. • Remove the paper tray and print cartridge before removing other printer parts.
4513-200, -220, -230 Removal procedures Note: • Remove the toner cartridge and media tray before proceeding with a removal. 4-2 Lexmark™ E260, E260d, E260dn The toner cartridge should be protected from light while out of the printer. • Disconnect all external cables from the printer to prevent damage during service. • Unless ... reverse order of removal. • When reinstalling a part held with several screws, start all screws before final tightening. • Remove the paper tray and print cartridge before removing other printer parts.


