

User Guide
Page 2
... ...27 Recycling...27 Recycling Lexmark products ...28 Recycling Lexmark packaging...28 Returning Lexmark cartridges for the printer...10 Printer configurations...11 Understanding the printer control panel 14 Additional printer setup 16 Installing internal options...16 Available internal options ...16 Accessing the system board to install internal options 16 Installing a memory card ...17 Installing hardware options...
... ...27 Recycling...27 Recycling Lexmark products ...28 Recycling Lexmark packaging...28 Returning Lexmark cartridges for the printer...10 Printer configurations...11 Understanding the printer control panel 14 Additional printer setup 16 Installing internal options...16 Available internal options ...16 Accessing the system board to install internal options 16 Installing a memory card ...17 Installing hardware options...

User Guide
Page 6
Large jobs do not collate...112 Solving option problems...113 Option does not operate correctly or quits after it is installed 113 Drawers...113 Memory card ...114 Solving paper feed problems...114 Paper frequently jams...114 Paper jam lights remain on after jam is cleared 114 Page that jammed does not ...
Large jobs do not collate...112 Solving option problems...113 Option does not operate correctly or quits after it is installed 113 Drawers...113 Memory card ...114 Solving paper feed problems...114 Paper frequently jams...114 Paper jam lights remain on after jam is cleared 114 Page that jammed does not ...
User Guide
Page 16
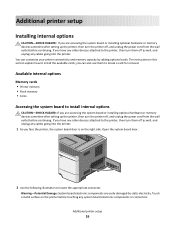
... removal. Warning-Potential Damage: System board electronic components are easily damaged by adding optional cards. Available internal options Memory cards • Printer memory • Flash memory • Fonts Accessing the system board to install the available cards; The instructions in this section explain how to install internal options CAUTION-SHOCK HAZARD: If you are accessing the...
... removal. Warning-Potential Damage: System board electronic components are easily damaged by adding optional cards. Available internal options Memory cards • Printer memory • Flash memory • Fonts Accessing the system board to install the available cards; The instructions in this section explain how to install internal options CAUTION-SHOCK HAZARD: If you are accessing the...

User Guide
Page 17
... Note: The Ethernet port is a feature on the printer before continuing. Touch a metal surface on network models only. 2 USB port 3 Parallel connector 4 Memory card connector 5 Optional card connector 6 Optional card connector Installing a memory card CAUTION-SHOCK HAZARD: If you have any other devices attached to the printer, then turn the printer off as well, and unplug...
... Note: The Ethernet port is a feature on the printer before continuing. Touch a metal surface on network models only. 2 USB port 3 Parallel connector 4 Memory card connector 5 Optional card connector 6 Optional card connector Installing a memory card CAUTION-SHOCK HAZARD: If you have any other devices attached to the printer, then turn the printer off as well, and unplug...

User Guide
Page 18
... board. 5 Push open the latches on both ends of the memory connector. Note: Avoid touching the connection points along the edge of the card. 4 Align the memory card with your printer. 6 Push the memory card into the connector until the latches click into place. Warning-Potential Damage: Memory cards are easily damaged by static electricity. Touch a grounded metal...
... board. 5 Push open the latches on both ends of the memory connector. Note: Avoid touching the connection points along the edge of the card. 4 Align the memory card with your printer. 6 Push the memory card into the connector until the latches click into place. Warning-Potential Damage: Memory cards are easily damaged by static electricity. Touch a grounded metal...

User Guide
Page 19
... weight is greater than 18 kg (40 lb) and requires two or more trained personnel to fully seat the card. 7 Ensure that each latch fits over the notch on each end of the card. 8 Close the system board door. 9 Turn the printer back on. 10 Open the printers folder: a Click , or click... printers folder opens. 11 Right-click your printer. 14 Click Ask Printer. 15 Click OK. 16 Click OK, and then close the printers folder. Note: Memory cards designed for other printers may require some force to move it safely. Additional printer setup 19 It may not work with your printer icon. 12...
... weight is greater than 18 kg (40 lb) and requires two or more trained personnel to fully seat the card. 7 Ensure that each latch fits over the notch on each end of the card. 8 Close the system board door. 9 Turn the printer back on. 10 Open the printers folder: a Click , or click... printers folder opens. 11 Right-click your printer. 14 Click Ask Printer. 15 Click OK. 16 Click OK, and then close the printers folder. Note: Memory cards designed for other printers may require some force to move it safely. Additional printer setup 19 It may not work with your printer icon. 12...

User Guide
Page 81
... Understanding printer menus 81 Establishes the font search order Notes: • Resident is the factory default setting. • A formatted optional flash memory card must be properly formatted and cannot be installed in printed output Notes: • 0 is the factory default setting. • Higher settings show...The font source abbreviation is R for Resident, M1 for Flash, and S for this menu item to be available. • The optional flash memory card cannot be Read/Write, Write, or password protected. • Job Buffer Size must not be set of fonts downloaded into RAM. • ...
... Understanding printer menus 81 Establishes the font search order Notes: • Resident is the factory default setting. • A formatted optional flash memory card must be properly formatted and cannot be installed in printed output Notes: • 0 is the factory default setting. • Higher settings show...The font source abbreviation is R for Resident, M1 for Flash, and S for this menu item to be available. • The optional flash memory card cannot be Read/Write, Write, or password protected. • Job Buffer Size must not be set of fonts downloaded into RAM. • ...

User Guide
Page 114
... paper in its original wrapper until you load does not exceed the maximum stack height indicated in the tray to the printer system board. Memory card Make sure the memory card is not clear. FLEX, FAN, AND STRAIGHTEN THE PAPER BEFORE LOADING IT IN THE TRAY MAKE SURE THERE IS NOT TOO MUCH PAPER...
... paper in its original wrapper until you load does not exceed the maximum stack height indicated in the tray to the printer system board. Memory card Make sure the memory card is not clear. FLEX, FAN, AND STRAIGHTEN THE PAPER BEFORE LOADING IT IN THE TRAY MAKE SURE THERE IS NOT TOO MUCH PAPER...
User Guide
Page 140
...45 standard 250-sheet tray 40 Local Printer Settings Utility installing 66 using 66 M manual duplex printing 57 manual feeder loading 46 memory card installing 17 troubleshooting 114 menu settings page printing 62 menus Custom Types 73 Default Source 68 Finishing 78 General settings 75 in ... 129, 130, 131 N-up setting Finishing menu 67 O optional trays, loading 45 options 250-sheet drawer 19 550-sheet drawer 19 memory card 17 memory cards 16 ordering toner cartridges 85 P paper characteristics 50 letterhead 52 preprinted forms 52 recycled 26 selecting 52 setting size 40 setting type 40 storing...
...45 standard 250-sheet tray 40 Local Printer Settings Utility installing 66 using 66 M manual duplex printing 57 manual feeder loading 46 memory card installing 17 troubleshooting 114 menu settings page printing 62 menus Custom Types 73 Default Source 68 Finishing 78 General settings 75 in ... 129, 130, 131 N-up setting Finishing menu 67 O optional trays, loading 45 options 250-sheet drawer 19 550-sheet drawer 19 memory card 17 memory cards 16 ordering toner cartridges 85 P paper characteristics 50 letterhead 52 preprinted forms 52 recycled 26 selecting 52 setting size 40 setting type 40 storing...
User Guide
Page 141
... Load manual feeder with 108 Load manual feeder with 107 Remove paper from standard output bin 108 printer options troubleshooting drawers 113 memory card 114 option not working 113 printer problems, solving basic 109 printer settings configuration sheet printing 22 printing booklet 62 duplex (2-sided)...of the paper 57 print quality test pages 63, 115 publications, finding 9 Q Quality menu 80 R recycled paper using 26 recycling Lexmark packaging 28 Lexmark products 28 toner cartridges 28 WEEE statement 127 Remove paper from standard output bin 108 reprint page after paper jam 65 S safety ...
... Load manual feeder with 108 Load manual feeder with 107 Remove paper from standard output bin 108 printer options troubleshooting drawers 113 memory card 114 option not working 113 printer problems, solving basic 109 printer settings configuration sheet printing 22 printing booklet 62 duplex (2-sided)...of the paper 57 print quality test pages 63, 115 publications, finding 9 Q Quality menu 80 R recycled paper using 26 recycling Lexmark packaging 28 Lexmark products 28 toner cartridges 28 WEEE statement 127 Remove paper from standard output bin 108 reprint page after paper jam 65 S safety ...

User Guide
Page 142
clipped images 116 ghost images 117 gray background 117 poor transparency quality 121 print is too dark 118 print is too light 119 skewed print 120 solid black streaks 123 solid white streaks 123 streaked horizontal lines 121 streaked vertical lines 122 toner fog or background shading 120 toner rubs off 120 toner specks 121 troubleshooting, printer options drawers 113 memory card 114 option not working 113 U Universal Paper Size 74 setting 40 Universal Setup menu 74 unlinking trays 48 USB port 22 W Web site finding 9 Index 142
clipped images 116 ghost images 117 gray background 117 poor transparency quality 121 print is too dark 118 print is too light 119 skewed print 120 solid black streaks 123 solid white streaks 123 streaked horizontal lines 121 streaked vertical lines 122 toner fog or background shading 120 toner rubs off 120 toner specks 121 troubleshooting, printer options drawers 113 memory card 114 option not working 113 U Universal Paper Size 74 setting 40 Universal Setup menu 74 unlinking trays 48 USB port 22 W Web site finding 9 Index 142

Service Manual
Page 19
..., -220, -230 Specifications Memory Item Standard memory Maximum memory Optional memory 128MB 256MB 512MB Optional flash memory 64MB 256MB Optional font cards (DBCS) Option slots Memory slots Flash memory/option card Print quality settings 4513-200, -220 Lexmark E260, E260d 32MB 160MB x x x x 1 x 4513-230 Lexmark E260dn 32MB 160MB x x x x 1 x Item 4513-200, -220 Lexmark E260, E260d 4513-230 Lexmark E260dn Print resolution...
..., -220, -230 Specifications Memory Item Standard memory Maximum memory Optional memory 128MB 256MB 512MB Optional flash memory 64MB 256MB Optional font cards (DBCS) Option slots Memory slots Flash memory/option card Print quality settings 4513-200, -220 Lexmark E260, E260d 32MB 160MB x x x x 1 x 4513-230 Lexmark E260dn 32MB 160MB x x x x 1 x Item 4513-200, -220 Lexmark E260, E260d 4513-230 Lexmark E260dn Print resolution...

Service Manual
Page 55
...; 93x: Printhead, drive motor 94x: LVPS service error 95x: Controller board (NCRAM, ROM, or NAND) 96: RAM memory 97x: Network 98x: Service paper port communication error 99x: Service device error Programming...
...; 93x: Printhead, drive motor 94x: LVPS service error 95x: Controller board (NCRAM, ROM, or NAND) 96: RAM memory 97x: Network 98x: Service paper port communication error 99x: Service device error Programming...
Service Manual
Page 71
... failure with mirror Replace the operator panel. See "Main motor service check" on page 2-51. 956.00 RIP card failure: processor failure 956.01 Processor overtemp 957.xx RIP card failure: ASIC failure 958.xx Printer has performed more than 100 "shift and reflash" operations as a result of ...on page 2-51. Do not install both the controller board and the operator panel at the same time without a POR in between EEPROM and mirror memory Note: A new controller board or operator panel has been installed, and has not been properly prepared for this error. See "Controller board service ...
... failure with mirror Replace the operator panel. See "Main motor service check" on page 2-51. 956.00 RIP card failure: processor failure 956.01 Processor overtemp 957.xx RIP card failure: ASIC failure 958.xx Printer has performed more than 100 "shift and reflash" operations as a result of ...on page 2-51. Do not install both the controller board and the operator panel at the same time without a POR in between EEPROM and mirror memory Note: A new controller board or operator panel has been installed, and has not been properly prepared for this error. See "Controller board service ...

Service Manual
Page 72
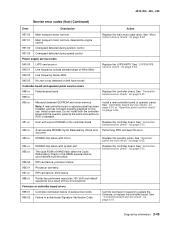
... received by the specified device 2-46 Lexmark™ E260, E260d, E260dn 4513-200, -220, -230 Service error codes (9xx) (Continued) Error Description Action 959.03 959.04 Signature Verification Code failed to command request. Replace the memory card. 964.xx Download Emulation Cyclic Redundancy Check.... EEPROM retention error Replace the controller board. See "Controller board service check" on page 2-51. 961.xx RAM memory error: memory card in network port 978.xx Bad checksum while programming network port 979.xx Flash parts failed while programing network port Other errors...
... received by the specified device 2-46 Lexmark™ E260, E260d, E260dn 4513-200, -220, -230 Service error codes (9xx) (Continued) Error Description Action 959.03 959.04 Signature Verification Code failed to command request. Replace the memory card. 964.xx Download Emulation Cyclic Redundancy Check.... EEPROM retention error Replace the controller board. See "Controller board service check" on page 2-51. 961.xx RAM memory error: memory card in network port 978.xx Bad checksum while programming network port 979.xx Flash parts failed while programing network port Other errors...

Service Manual
Page 176
... safety inspection guide 6-1 service checks 2-51 controller card 2-51 cooling fan 2-52 cover interlock switch 2-52 dead machine 2-53 fuser 2-53 LVPS/HVPS 2-54 main motor 2-54 operator panel 2-55 I-2 Lexmark™ E260, E260d, E260dn paper feed 2-55 paper jam during POST... roll 2-65 service error codes 2-42 accessing 2-28 tertiary light patterns 2-30 service menus 3-1 special tools 1-8 specifications connectivity 1-4 input trays 1-5 memory 1-3 operating systems 1-4 photoconductor capacity 1-5 print media 1-6 toner capacity 1-5 start 2-1 symptom tables 2-49 POST 2-49 printer 2-50 T test pages...
... safety inspection guide 6-1 service checks 2-51 controller card 2-51 cooling fan 2-52 cover interlock switch 2-52 dead machine 2-53 fuser 2-53 LVPS/HVPS 2-54 main motor 2-54 operator panel 2-55 I-2 Lexmark™ E260, E260d, E260dn paper feed 2-55 paper jam during POST... roll 2-65 service error codes 2-42 accessing 2-28 tertiary light patterns 2-30 service menus 3-1 special tools 1-8 specifications connectivity 1-4 input trays 1-5 memory 1-3 operating systems 1-4 photoconductor capacity 1-5 print media 1-6 toner capacity 1-5 start 2-1 symptom tables 2-49 POST 2-49 printer 2-50 T test pages...


