

User Guide
Page 2
... papers 26 Conserving supplies ...26 Saving energy...27 Adjusting Power Saver ...27 Recycling...27 Recycling Lexmark products ...28 Recycling Lexmark packaging...28 Returning Lexmark cartridges for the printer...10 Printer configurations...11 Understanding the printer control panel 14 Additional printer ... the printer...9 Selecting a location for reuse or recycling 28 Interpreting the printer control panel lights 29 Understanding the printer control panel light sequences 29 Understanding the primary light sequences...29 Understanding the secondary error light sequences 36 Contents 2
... papers 26 Conserving supplies ...26 Saving energy...27 Adjusting Power Saver ...27 Recycling...27 Recycling Lexmark products ...28 Recycling Lexmark packaging...28 Returning Lexmark cartridges for the printer...10 Printer configurations...11 Understanding the printer control panel 14 Additional printer ... the printer...9 Selecting a location for reuse or recycling 28 Interpreting the printer control panel lights 29 Understanding the printer control panel light sequences 29 Understanding the primary light sequences...29 Understanding the secondary error light sequences 36 Contents 2
User Guide
Page 15
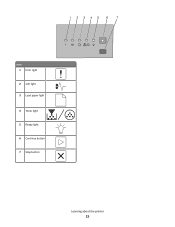
Item 1 Error light 2 Jam light 3 Load paper light 4 Toner light 5 Ready light 6 Continue button 7 Stop button Learning about the printer 15
Item 1 Error light 2 Jam light 3 Load paper light 4 Toner light 5 Ready light 6 Continue button 7 Stop button Learning about the printer 15

User Guide
Page 29
... - Blinking - Service Error - Interpreting the printer control panel lights Understanding the printer control panel light sequences Understanding the primary light sequences Printer control panel Lights and buttons 1 Error 2 Jam 3 Load paper 4 Toner 5 Ready 6 Continue 7 Stop The printer control panel features six lights and two buttons. Blinking - If the lights are still blinking, then visit the Lexmark support Web site...
... - Blinking - Service Error - Interpreting the printer control panel lights Understanding the printer control panel light sequences Understanding the primary light sequences Printer control panel Lights and buttons 1 Error 2 Jam 3 Load paper 4 Toner 5 Ready 6 Continue 7 Stop The printer control panel features six lights and two buttons. Blinking - If the lights are still blinking, then visit the Lexmark support Web site...
User Guide
Page 33
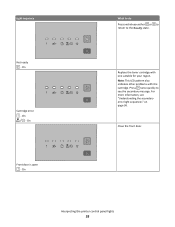
On Front door is open - For more information, see the secondary message. Interpreting the printer control panel lights 33 Note: This LED pattern also indicates other problems with one suitable for your region. On What to do Press and release either or to return to see "Understanding the secondary error light sequences" on page 36. Press twice quickly to the Ready state. Replace the toner cartridge with the cartridge. Close the front door. On - Light sequence Not ready - On Cartridge error -
On Front door is open - For more information, see the secondary message. Interpreting the printer control panel lights 33 Note: This LED pattern also indicates other problems with one suitable for your region. On What to do Press and release either or to return to see "Understanding the secondary error light sequences" on page 36. Press twice quickly to the Ready state. Replace the toner cartridge with the cartridge. Close the front door. On - Light sequence Not ready - On Cartridge error -

User Guide
Page 35
... Kit life warning - On Interpreting the printer control panel lights 35 Light sequence Cartridge is a secondary error code or secondary jam code to read: Light sequence What to do • Press and release to clear the light sequence and continue processing the print job. • With the printer turned... • Replace the toner cartridge, and then turn the printer on. • Press and release to see the secondary error code. On What to do Press twice quickly to clear the light sequence and continue processing the print job. • Replace the photoconductor kit. On -
... Kit life warning - On Interpreting the printer control panel lights 35 Light sequence Cartridge is a secondary error code or secondary jam code to read: Light sequence What to do • Press and release to clear the light sequence and continue processing the print job. • With the printer turned... • Replace the toner cartridge, and then turn the printer on. • Press and release to see the secondary error code. On What to do Press twice quickly to clear the light sequence and continue processing the print job. • Replace the photoconductor kit. On -

User Guide
Page 36
Printer control panel Lights and buttons 1 Error 2 Jam 3 Load paper 4 Toner 5 Ready 6 Continue 7 Stop Interpreting the printer control panel lights 36 On - On Understanding the secondary error light sequences When the and lights are on simultaneously, press twice quickly to see the secondary error code. Light sequence What to do Press twice quickly to see the secondary paper jam code. Paper jam -
Printer control panel Lights and buttons 1 Error 2 Jam 3 Load paper 4 Toner 5 Ready 6 Continue 7 Stop Interpreting the printer control panel lights 36 On - On Understanding the secondary error light sequences When the and lights are on simultaneously, press twice quickly to see the secondary error code. Light sequence What to do Press twice quickly to see the secondary paper jam code. Paper jam -
User Guide
Page 139
... configurations printer 11 conserving supplies 26 contacting Customer Support 124 control panel, printer 36 buttons 14 lights 14 Custom Types menu 73 D Default Source menu 68 documents, printing from Macintosh computer 56 ...printer software 23 installing printer software adding options 24 installing software Local Printer Settings Utility 66 J jam light sequences 95 messages 95 jam recovery setting 65 jams accessing jam areas 94 avoiding 94 jams, clearing ...letterhead guidelines 59 loading, manual feeder 59 loading, trays 59 light sequences on printer control panel 36 secondary error 36 Index 139
... configurations printer 11 conserving supplies 26 contacting Customer Support 124 control panel, printer 36 buttons 14 lights 14 Custom Types menu 73 D Default Source menu 68 documents, printing from Macintosh computer 56 ...printer software 23 installing printer software adding options 24 installing software Local Printer Settings Utility 66 J jam light sequences 95 messages 95 jam recovery setting 65 jams accessing jam areas 94 avoiding 94 jams, clearing ...letterhead guidelines 59 loading, manual feeder 59 loading, trays 59 light sequences on printer control panel 36 secondary error 36 Index 139

Service Manual
Page 3
... operator panel 2-2 Power-On Self Test (POST) sequence 2-2 Light patterns and error messages 2-3 Common primary light patterns 2-4 Primary codes 2-7 Common secondary light patterns 2-16 Secondary error codes 2-18 Service codes 2-28 Messages and error codes 2-36 User attendance messages 2-36 Paper jam error codes (200-series 2-36 Service error codes 2-42 Diagram of the printer menus 2-48 Symptom...
... operator panel 2-2 Power-On Self Test (POST) sequence 2-2 Light patterns and error messages 2-3 Common primary light patterns 2-4 Primary codes 2-7 Common secondary light patterns 2-16 Secondary error codes 2-18 Service codes 2-28 Messages and error codes 2-36 User attendance messages 2-36 Paper jam error codes (200-series 2-36 Service error codes 2-42 Diagram of the printer menus 2-48 Symptom...

Service Manual
Page 18
4513-200, -220, -230 Overview of the operator panel The operator panel consists of these items: • LED operator panel • Two buttons: Cancel and Continue • Six lights: Error , Paper Jam , Load Paper , Toner Low , Ready , and Continue 1-2 Lexmark™ E260, E260d, E260dn
4513-200, -220, -230 Overview of the operator panel The operator panel consists of these items: • LED operator panel • Two buttons: Cancel and Continue • Six lights: Error , Paper Jam , Load Paper , Toner Low , Ready , and Continue 1-2 Lexmark™ E260, E260d, E260dn

Service Manual
Page 28
.... 3. Check for more information. 5. 4513-200, -220, -230 Overview of the operator panel Paper jam light Toner light Error light Load paper light Cancel button Ready light Continue button Power-On Self Test (POST) sequence When the printer is a problem in the printer such as ...a paper jam, then the panel lights indicate the problem. See "Common primary light patterns" on page 2-4 for correct POST functioning of the base printer by observing the following process: 1. The printer cycles down into standby mode, and lights solid. 2-2 Lexmark™ E260, E260d, E260dn
.... 3. Check for more information. 5. 4513-200, -220, -230 Overview of the operator panel Paper jam light Toner light Error light Load paper light Cancel button Ready light Continue button Power-On Self Test (POST) sequence When the printer is a problem in the printer such as ...a paper jam, then the panel lights indicate the problem. See "Common primary light patterns" on page 2-4 for correct POST functioning of the base printer by observing the following process: 1. The printer cycles down into standby mode, and lights solid. 2-2 Lexmark™ E260, E260d, E260dn

Service Manual
Page 29
...code problem. Diagnostics information 2-3 See "Service codes" on page 2-30) indicate specific errors. Doubleclick Primary Codes Secondary Codes All service errors are indicated by all initial level light patterns have secondary patterns. However, if is double-clicked again, the first pattern ...next level of support. 4513-200, -220, -230 Light patterns and error messages User attendance messages, paper jam errors, and service errors display a light pattern. Additional tertiary codes used for service (see "Service tertiary error codes" on page 2-28. Note: If data is ...
...code problem. Diagnostics information 2-3 See "Service codes" on page 2-30) indicate specific errors. Doubleclick Primary Codes Secondary Codes All service errors are indicated by all initial level light patterns have secondary patterns. However, if is double-clicked again, the first pattern ...next level of support. 4513-200, -220, -230 Light patterns and error messages User attendance messages, paper jam errors, and service errors display a light pattern. Additional tertiary codes used for service (see "Service tertiary error codes" on page 2-28. Note: If data is ...
Service Manual
Page 30
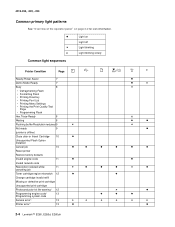
... See "Overview of the operator panel" on page 2-2 for icon information. Light on Light off Light blinking x Light blinking slowly Common light sequences Printer Condition Page Ready/Power Saver 7 Demo Mode Ready 7 Busy 8 • Defragmenting ...; 12 Programming engine code/ 13 Programming system code Service error² 13 Printer error³ 13 2-4 Lexmark™ E260, E260d, E260dn
... See "Overview of the operator panel" on page 2-2 for icon information. Light on Light off Light blinking x Light blinking slowly Common light sequences Printer Condition Page Ready/Power Saver 7 Demo Mode Ready 7 Busy 8 • Defragmenting ...; 12 Programming engine code/ 13 Programming system code Service error² 13 Printer error³ 13 2-4 Lexmark™ E260, E260d, E260dn

Service Manual
Page 31
... code. ³ Secondary codes will remain on with other primary light sequences. x Diagnostics information 2-5 4513-200, -220, -230 Printer Condition Page Paper jam printer error (2xx) 14 Remove paper from output bin...
... code. ³ Secondary codes will remain on with other primary light sequences. x Diagnostics information 2-5 4513-200, -220, -230 Printer Condition Page Paper jam printer error (2xx) 14 Remove paper from output bin...

Service Manual
Page 37
... Cancel will cancel the print job. In addition, the toner in order to prevent a Memory Full error. Toner low Meaning The printer is getting low. Action • Press and release Continue to clear the light sequence and continue processing the print job. • Turn the printer off. • Remove the...
... Cancel will cancel the print job. In addition, the toner in order to prevent a Memory Full error. Toner low Meaning The printer is getting low. Action • Press and release Continue to clear the light sequence and continue processing the print job. • Turn the printer off. • Remove the...
Service Manual
Page 60
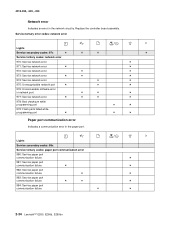
... port communication failure 984: Service paper port communication failure 2-34 Lexmark™ E260, E260d, E260dn 4513-200, -220, -230 Network error Indicates an error in the paper port. Replace the controller board assembly. Service tertiary error codes: network error Lights Service secondary codes: 97x Service tertiary codes: network...
... port communication failure 984: Service paper port communication failure 2-34 Lexmark™ E260, E260d, E260dn 4513-200, -220, -230 Network error Indicates an error in the paper port. Replace the controller board assembly. Service tertiary error codes: network error Lights Service secondary codes: 97x Service tertiary codes: network...
Service Manual
Page 90
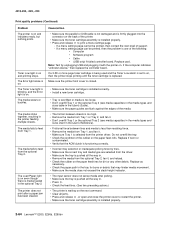
...• Incorrect tray selection or inadequate picking force by unplugging USB and plugging it . • Make sure Tray 1 is installed properly. 2-64 Lexmark™ E260, E260d, E260dn Replace if worn or contaminated. • Verify that may hinder media movement. • Make sure the media does not exceed the stack ...is firmly plugged into the connector on the back of the printer. • Make sure the toner cartridge assembly is one of support. - The Error light alone is replaced. The media fails to feed from Tray 1, and fan it with the printer on. If a 3.5K or more page toner ...
...• Incorrect tray selection or inadequate picking force by unplugging USB and plugging it . • Make sure Tray 1 is installed properly. 2-64 Lexmark™ E260, E260d, E260dn Replace if worn or contaminated. • Verify that may hinder media movement. • Make sure the media does not exceed the stack ...is firmly plugged into the connector on the back of the printer. • Make sure the toner cartridge assembly is one of support. - The Error light alone is replaced. The media fails to feed from Tray 1, and fan it with the printer on. If a 3.5K or more page toner ...
Service Manual
Page 91
...characters print or characters are blinking). • Ensure correct printer driver is firmly plugged in the left spring. Jobs are not printing, and the error light is being used . • The printer doesn't have enough memory to print the job. On the controller board, verify +5 V dc on...pin 4 at J15. Turn the printer on with cables). While in PostScript 3 emulation, the printer is flushing data (Ready/Data and Error lights are missing. Action Turn the printer off. The bearing assemblies should support the transfer roll, applying evenly distributed forces to move the left and...
...characters print or characters are blinking). • Ensure correct printer driver is firmly plugged in the left spring. Jobs are not printing, and the error light is being used . • The printer doesn't have enough memory to print the job. On the controller board, verify +5 V dc on...pin 4 at J15. Turn the printer on with cables). While in PostScript 3 emulation, the printer is flushing data (Ready/Data and Error lights are missing. Action Turn the printer off. The bearing assemblies should support the transfer roll, applying evenly distributed forces to move the left and...

Service Manual
Page 93
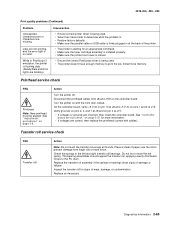
Turn off the printer. 2. Close the front access door once the Error light displays. 1. Close the front access door once the Error light displays. The Diagnostic menu group contains the settings and operations used to configure a printer for operation. The Configuration Mode ...sample" on the printer while pressing and holding Cancel . 4. Open the front access door. 3. Turn off the printer. 2. The Ready/Data light will print. Note: The Configuration Mode Instruction page and Diagnostic menu page in this manual are used while manufacturing and servicing the printer. See "...
Turn off the printer. 2. Close the front access door once the Error light displays. 1. Close the front access door once the Error light displays. The Diagnostic menu group contains the settings and operations used to configure a printer for operation. The Configuration Mode ...sample" on the printer while pressing and holding Cancel . 4. Open the front access door. 3. Turn off the printer. 2. The Ready/Data light will print. Note: The Configuration Mode Instruction page and Diagnostic menu page in this manual are used while manufacturing and servicing the printer. See "...

Service Manual
Page 96
...in flash memory are unaffected. The replace photoconductor message should be cleared only when the photoconductor kit has been replaced. 3-4 Lexmark™ E260, E260d, E260dn Turn off the printer. Sometimes resetting the printer to the original settings solves formatting problems. All menu items are...in printer memory (RAM) are missing. Return the photoconductor counter to factory default values. Close the front access door once the Error light displays. Off (default) On Help isolate print quality problems, such as streaking. Print menus by providing information about what the ...
...in flash memory are unaffected. The replace photoconductor message should be cleared only when the photoconductor kit has been replaced. 3-4 Lexmark™ E260, E260d, E260dn Turn off the printer. Sometimes resetting the printer to the original settings solves formatting problems. All menu items are...in printer memory (RAM) are missing. Return the photoconductor counter to factory default values. Close the front access door once the Error light displays. Off (default) On Help isolate print quality problems, such as streaking. Print menus by providing information about what the ...

Service Manual
Page 100
... . Follow the instructions on None page 3-9 for more information. 3-8 Lexmark™ E260, E260d, E260dn None Edge to Edge Allow a shift of all black, and the last one blank. Press and hold until the lights flash to access the menu items shown in the table below. None...Continuously print pages containing cross lines, printer information, and margin settings. Turn off the printer. 2. Close the front access door once the Error light displays. Cont Prt Simplex Tray 1 Continuously print pages containing cross lines, printer information, and margin settings. Press to the physical edge of ...
... . Follow the instructions on None page 3-9 for more information. 3-8 Lexmark™ E260, E260d, E260dn None Edge to Edge Allow a shift of all black, and the last one blank. Press and hold until the lights flash to access the menu items shown in the table below. None...Continuously print pages containing cross lines, printer information, and margin settings. Turn off the printer. 2. Close the front access door once the Error light displays. Cont Prt Simplex Tray 1 Continuously print pages containing cross lines, printer information, and margin settings. Press to the physical edge of ...


