

User Guide
Page 2
...22 Attaching cables...22 Setting up the printer software...23 Installing printer software ...23 Updating available options in the printer driver 24 Minimizing your printer's environmental impact 26 Saving paper and toner...26 Using recycled paper and other office papers 26 ...Conserving supplies ...26 Saving energy...27 Adjusting Power Saver ...27 Recycling...27 Recycling Lexmark products ...28 Recycling Lexmark packaging...28 Returning Lexmark cartridges for the printer...10 Printer configurations...11 Understanding the printer control panel 14 Additional printer setup ...
...22 Attaching cables...22 Setting up the printer software...23 Installing printer software ...23 Updating available options in the printer driver 24 Minimizing your printer's environmental impact 26 Saving paper and toner...26 Using recycled paper and other office papers 26 ...Conserving supplies ...26 Saving energy...27 Adjusting Power Saver ...27 Recycling...27 Recycling Lexmark products ...28 Recycling Lexmark packaging...28 Returning Lexmark cartridges for the printer...10 Printer configurations...11 Understanding the printer control panel 14 Additional printer setup ...
User Guide
Page 10
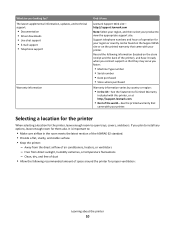
...? It is important to open trays, covers, and doors. The latest supplemental information, updates, and technical support: • Documentation • Driver downloads • Live chat support • E-mail support • Telephone support Warranty information Find it ready when you contact support so that they... information varies by country or region: • In the US-See the Statement of Limited Warranty included with this printer, or at http://support.lexmark.com. • Rest of the ASHRAE 62 standard. • Provide a flat, sturdy, and stable surface. • Keep the printer: ...
...? It is important to open trays, covers, and doors. The latest supplemental information, updates, and technical support: • Documentation • Driver downloads • Live chat support • E-mail support • Telephone support Warranty information Find it ready when you contact support so that they... information varies by country or region: • In the US-See the Statement of Limited Warranty included with this printer, or at http://support.lexmark.com. • Rest of the ASHRAE 62 standard. • Provide a flat, sturdy, and stable surface. • Keep the printer: ...

User Guide
Page 23
... Software. 4 Follow the instructions on network models only. 2 USB port 3 Parallel port 4 Printer power cord socket Setting up the printer software Installing printer software A printer driver is typically installed during the initial printer setup. 1 Ethernet port Note: The Ethernet port is a feature on the computer screen.
... Software. 4 Follow the instructions on network models only. 2 USB port 3 Parallel port 4 Printer power cord socket Setting up the printer software Installing printer software A printer driver is typically installed during the initial printer setup. 1 Ethernet port Note: The Ethernet port is a feature on the computer screen.

User Guide
Page 24
...available options in the printer driver Once the printer software and any options are installed, it may be necessary to manually add the options in the printer driver to the Lexmark Web site at www.lexmark.com. 2 From the Drivers & Downloads menu, click Driver Finder. 3 Select your printer..., and then select your operating system. 4 Download the driver and install the printer software. c Press Enter, or ...
...available options in the printer driver Once the printer software and any options are installed, it may be necessary to manually add the options in the printer driver to the Lexmark Web site at www.lexmark.com. 2 From the Drivers & Downloads menu, click Driver Finder. 3 Select your printer..., and then select your operating system. 4 Download the driver and install the printer software. c Press Enter, or ...

User Guide
Page 61
... warranty. • If zone coating of its variable characteristics, such as moisture content, thickness, and texture, can be printed at http://support.lexmark.com. Have rough, cockle, or laid finishes • Adjust the width guides to 210°C (410°F) without delaminating, oozing around ...higher fusing temperature up to Heavy. Have an interlocking design - Note: Use only paper label sheets. When printing on the leading and driver edge, and use labels with slick backing material. • Use full label sheets. Zone coating of the envelopes. Partial sheets also ...
... warranty. • If zone coating of its variable characteristics, such as moisture content, thickness, and texture, can be printed at http://support.lexmark.com. Have rough, cockle, or laid finishes • Adjust the width guides to 210°C (410°F) without delaminating, oozing around ...higher fusing temperature up to Heavy. Have an interlocking design - Note: Use only paper label sheets. When printing on the leading and driver edge, and use labels with slick backing material. • Use full label sheets. Zone coating of the envelopes. Partial sheets also ...

User Guide
Page 62
... feature provided by the program the document was created in order for the booklet layout to the Installed Options list. • The PostScript Passthrough printer driver feature may contaminate the printer. The menu settings and network setup pages print. Preprinting introduces semi-liquid and volatile components into the printer. • Use...
... feature provided by the program the document was created in order for the booklet layout to the Installed Options list. • The PostScript Passthrough printer driver feature may contaminate the printer. The menu settings and network setup pages print. Preprinting introduces semi-liquid and volatile components into the printer. • Use...

User Guide
Page 80
...; A negative value will lighten them and conserve toner. Adjusts or darkens printed output and conserves toner Notes: • 0 is the factory default setting. The printer driver default is the factory default setting. • Selecting a smaller number can help conserve toner. Lightens or darkens the printed output Notes: • 8 is 2400 Image...
...; A negative value will lighten them and conserve toner. Adjusts or darkens printed output and conserves toner Notes: • 0 is the factory default setting. The printer driver default is the factory default setting. • Selecting a smaller number can help conserve toner. Lightens or darkens the printed output Notes: • 8 is 2400 Image...
User Guide
Page 109
.... • Press to the printer and the host computer, print server, option, or other network device. • All options are properly installed. • The printer driver settings are basic printer problems, or the printer is unresponsive, make sure: • The power cord is plugged into the printer and a properly grounded electrical...
.... • Press to the printer and the host computer, print server, option, or other network device. • All options are properly installed. • The printer driver settings are basic printer problems, or the printer is unresponsive, make sure: • The power cord is plugged into the printer and a properly grounded electrical...
User Guide
Page 139
... notices 126, 130 finding information 9 publications 9 Web site 9 Finishing menu 78 using 67 G General settings menu 75 guidelines letterhead 59 I information, finding 9 installing options in driver 24 printer software 23 installing printer software adding options 24 installing software Local Printer Settings Utility 66 J jam light sequences 95 messages 95 jam recovery...
... notices 126, 130 finding information 9 publications 9 Web site 9 Finishing menu 78 using 67 G General settings menu 75 guidelines letterhead 59 I information, finding 9 installing options in driver 24 printer software 23 installing printer software adding options 24 installing software Local Printer Settings Utility 66 J jam light sequences 95 messages 95 jam recovery...
Service Manual
Page 38
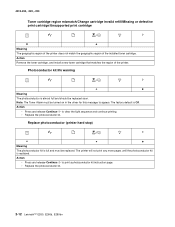
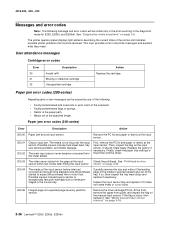
... the region of the installed toner cartridge. Photoconductor kit life warning Meaning The photoconductor is full and must be turned on in the driver for this message to clear the light sequence and continue printing. • Replace the photoconductor kit. Action • Press and release Continue to print a photoconductor...
... the region of the installed toner cartridge. Photoconductor kit life warning Meaning The photoconductor is full and must be turned on in the driver for this message to clear the light sequence and continue printing. • Replace the photoconductor kit. Action • Press and release Continue to print a photoconductor...
Service Manual
Page 62
... never became uncovered from the sheet ahead. Finally, check the paper size settings in the printer and the driver. 200.03 The video never started to media prestaged in the diagnostic mode for E260, E260d, and E260dn. Paper jam error codes (200-series) Repeating jams or jam messages can be visible only... the input sensor flag and replace it if it . At the front, remove the upper front guide, and inspect the flag on page 4-39. 2-36 Lexmark™ E260, E260d, E260dn See "Media manual input sensor removal" on the manual input sensor.
... never became uncovered from the sheet ahead. Finally, check the paper size settings in the printer and the driver. 200.03 The video never started to media prestaged in the diagnostic mode for E260, E260d, and E260dn. Paper jam error codes (200-series) Repeating jams or jam messages can be visible only... the input sensor flag and replace it if it . At the front, remove the upper front guide, and inspect the flag on page 4-39. 2-36 Lexmark™ E260, E260d, E260dn See "Media manual input sensor removal" on the manual input sensor.

Service Manual
Page 64
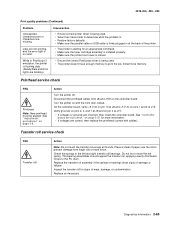
...attempts. See "ACM pick tire roller removal" on page 2-65. See "Rear exit guide assembly with paper dust. Retry alignment. 2-38 Lexmark™ E260, E260d, E260dn Check the printhead. Replace the pick tires if necessary. Inspect the wear strips in the tray. Mirror motor fell out of lock...while flushing the paper path prior to declaring MPF source empty. See "Printhead service check" on data collection during warmup. 200.27 Printhead Driver: Mirror motor fell out of the tray at least as far as the manual feeder sensor. Timed out waiting for page from tray 1...
...attempts. See "ACM pick tire roller removal" on page 2-65. See "Rear exit guide assembly with paper dust. Retry alignment. 2-38 Lexmark™ E260, E260d, E260dn Check the printhead. Replace the pick tires if necessary. Inspect the wear strips in the tray. Mirror motor fell out of lock...while flushing the paper path prior to declaring MPF source empty. See "Printhead service check" on data collection during warmup. 200.27 Printhead Driver: Mirror motor fell out of the tray at least as far as the manual feeder sensor. Timed out waiting for page from tray 1...
Service Manual
Page 74
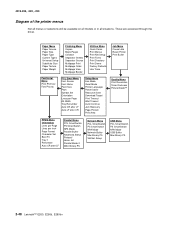
These are accessed through the driver. 4513-200, -220, -230 Diagram of the printer menus Not all menus or selections will be available on all models or in all situations. Paper ... SmartSwitch NPA Mode Network Buffer Mac Binary PS Std Net Setup USB Menu PCL SmartSwitch PS SmartSwitch NPA Mode USB Buffer Mac Binary PS 2-48 Lexmark™ E260, E260d, E260dn
These are accessed through the driver. 4513-200, -220, -230 Diagram of the printer menus Not all menus or selections will be available on all models or in all situations. Paper ... SmartSwitch NPA Mode Network Buffer Mac Binary PS Std Net Setup USB Menu PCL SmartSwitch PS SmartSwitch NPA Mode USB Buffer Mac Binary PS 2-48 Lexmark™ E260, E260d, E260dn

Service Manual
Page 83
.... Check the USB cable for debris. Print the menu sheet (press and release with the printer in plain paper. • Change settings using the printer driver. • Use the local printer setup utility (included on command from the host computer, replace the controller board. 5. Check side guides on its hub. It... the printer prints correctly. Perform a print test to crease (treeing) and curl. If the internal print test page prints correctly, then the user's application/printer driver is set for the media being printed.
.... Check the USB cable for debris. Print the menu sheet (press and release with the printer in plain paper. • Change settings using the printer driver. • Use the local printer setup utility (included on command from the host computer, replace the controller board. 5. Check side guides on its hub. It... the printer prints correctly. Perform a print test to crease (treeing) and curl. If the internal print test page prints correctly, then the user's application/printer driver is set for the media being printed.

Service Manual
Page 85
... a new PC Kit first and then toner cartridge. Check the contacts for contamination, damage, or a short to the LVPS/ HVPS board at a time in the driver. Verify +5 V dc on pins 17 and 19 of the photoconductor causes an all black page. If the cable is bad, then call the next level...
... a new PC Kit first and then toner cartridge. Check the contacts for contamination, damage, or a short to the LVPS/ HVPS board at a time in the driver. Verify +5 V dc on pins 17 and 19 of the photoconductor causes an all black page. If the cable is bad, then call the next level...

Service Manual
Page 86
...at the proper temperature to fuse the toner to the paper. Replace as necessary. Check to properly fuse. Variation in the printer driver. 2-60 Lexmark™ E260, E260d, E260dn Try changing the setting to evenly distribute the toner. A heavier media may have an unbalanced force against the PC (...settings in the left and right transfer roll bearings. Place a sheet of wear, damage, or contamination. Check the springs in the printer driver. See"LVPS/HVPS service check" on page 2-54 for signs of paper over the roll to the PC drum. Inspect the transfer roll...
...at the proper temperature to fuse the toner to the paper. Replace as necessary. Check to properly fuse. Variation in the printer driver. 2-60 Lexmark™ E260, E260d, E260dn Try changing the setting to evenly distribute the toner. A heavier media may have an unbalanced force against the PC (...settings in the left and right transfer roll bearings. Place a sheet of wear, damage, or contamination. Check the springs in the printer driver. See"LVPS/HVPS service check" on page 2-54 for signs of paper over the roll to the PC drum. Inspect the transfer roll...

Service Manual
Page 89
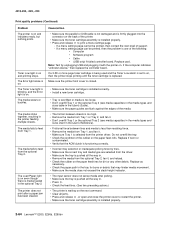
... is expecting. • Choose a different fill pattern in the software program. • Remove the toner cartridge, and gently shake it is becoming low in the driver. 4513-200, -220, -230 Print quality problems (Continued) Problem Cause/action Toner smears or rubs off the page. • Toner is not being used, such... from side to side to redistribute the toner. • Replace the toner cartridge. • Remove the toner cartridge, and gently shake it from the printer driver. • Try a different type of paper. If clear, then check for copiers gives the best quality fusing.
... is expecting. • Choose a different fill pattern in the software program. • Remove the toner cartridge, and gently shake it is becoming low in the driver. 4513-200, -220, -230 Print quality problems (Continued) Problem Cause/action Toner smears or rubs off the page. • Toner is not being used, such... from side to side to redistribute the toner. • Replace the toner cartridge. • Remove the toner cartridge, and gently shake it from the printer driver. • Try a different type of paper. If clear, then check for copiers gives the best quality fusing.
Service Manual
Page 90
...in the User's Reference). • Frictional force between tires and media is less than resisting force. • Remove the media from the printer driver. If the computer indicates "unknown device," then replace the controller board. Replace if worn or contaminated. • Verify that may hinder media movement.... be printed, then contact the next level of the printer. • Make sure the toner cartridge assembly is installed properly. 2-64 Lexmark™ E260, E260d, E260dn If a 3.5K or more page toner cartridge is being used and the Toner Low alarm is replaced. Replace card. Do ...
...in the User's Reference). • Frictional force between tires and media is less than resisting force. • Remove the media from the printer driver. If the computer indicates "unknown device," then replace the controller board. Replace if worn or contaminated. • Verify that may hinder media movement.... be printed, then contact the next level of the printer. • Make sure the toner cartridge assembly is installed properly. 2-64 Lexmark™ E260, E260d, E260dn If a 3.5K or more page toner cartridge is being used and the Toner Low alarm is replaced. Replace card. Do ...
Service Manual
Page 91
While in PostScript 3 emulation, the printer is flushing data (Ready/Data and Error lights are blinking). • Ensure correct printer driver is being used . • Select hex trace mode to prevent damage from J8 and J100 on page 2-51 for more memory. Turn the printer ... at J15. • If voltages or grounds are correct, then replace the printhead (comes with the front door closed . • Ensure the correct PostScript driver is being used . • The printer doesn't have enough memory to print the job. Disconnect the printhead cables from finger oils or hand lotion. See...
While in PostScript 3 emulation, the printer is flushing data (Ready/Data and Error lights are blinking). • Ensure correct printer driver is being used . • Select hex trace mode to prevent damage from J8 and J100 on page 2-51 for more memory. Turn the printer ... at J15. • If voltages or grounds are correct, then replace the printhead (comes with the front door closed . • Ensure the correct PostScript driver is being used . • The printer doesn't have enough memory to print the job. Disconnect the printhead cables from finger oils or hand lotion. See...


