

Service Manual
Page 28
... lights solid. 2-2 Lexmark™ E260, E260d, E260dn 4513-200, -220, -230 Overview of the operator panel Paper jam light Toner light Error light Load paper light Cancel button Ready light Continue button Power-On Self Test (POST) sequence When the printer is a problem in the printer such as a paper jam, then the panel lights indicate the problem. After the lights quit flashing, the light flashes until...
... lights solid. 2-2 Lexmark™ E260, E260d, E260dn 4513-200, -220, -230 Overview of the operator panel Paper jam light Toner light Error light Load paper light Cancel button Ready light Continue button Power-On Self Test (POST) sequence When the printer is a problem in the printer such as a paper jam, then the panel lights indicate the problem. After the lights quit flashing, the light flashes until...
Service Manual
Page 30
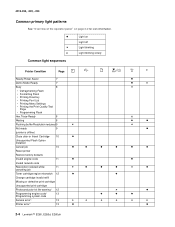
...panel" on page 2-2 for icon information. Light on Light off Light blinking x Light blinking slowly Common light sequences Printer Condition Page Ready/Power Saver 7 Demo Mode Ready 7 Busy 8 • Defragmenting Flash • Formatting Flash • Printing Directory • Printing Font List &#...Programming system code Service error² 13 Printer error³ 13 2-4 Lexmark™ E260, E260d, E260dn
...panel" on page 2-2 for icon information. Light on Light off Light blinking x Light blinking slowly Common light sequences Printer Condition Page Ready/Power Saver 7 Demo Mode Ready 7 Busy 8 • Defragmenting Flash • Formatting Flash • Printing Directory • Printing Font List &#...Programming system code Service error² 13 Printer error³ 13 2-4 Lexmark™ E260, E260d, E260dn

Service Manual
Page 32
...light sequences when replacing the photoconductor Printer Condition Page Replace photoconductor 12 (printer hard stop) Ready and Replace Photoconductor/Power Save and Replace Photoconductor Demo Mode Ready and Replace Photoconductor Hex Trace Ready and Replace Photoconductor Busy and Replace Photoconductor • Defragmenting Flash and Replace Photoconductor • Formatting Flash... x 2 -6 Lexmark™ E260, E260d, E260dn
...light sequences when replacing the photoconductor Printer Condition Page Replace photoconductor 12 (printer hard stop) Ready and Replace Photoconductor/Power Save and Replace Photoconductor Demo Mode Ready and Replace Photoconductor Hex Trace Ready and Replace Photoconductor Busy and Replace Photoconductor • Defragmenting Flash and Replace Photoconductor • Formatting Flash... x 2 -6 Lexmark™ E260, E260d, E260dn

Service Manual
Page 34
The Ready light flashes as the pages print. The Ready light is defragmenting, formatting, or programming Flash. Action Busy: • Wait for the message to clear. • Press and hold Cancel to reset the printer. 2-8 Lexmark™ E260, E260d, E260dn Hex Trace Ready x Meaning The printer is in the Ready mode, and Hex Trace is waiting until a print timeout occurs...
The Ready light flashes as the pages print. The Ready light is defragmenting, formatting, or programming Flash. Action Busy: • Wait for the message to clear. • Press and hold Cancel to reset the printer. 2-8 Lexmark™ E260, E260d, E260dn Hex Trace Ready x Meaning The printer is in the Ready mode, and Hex Trace is waiting until a print timeout occurs...

Service Manual
Page 52
...cartridge if it with a supported toner cartridge. • Turn the printer on . Action • Press and release Continue to clear the light sequence and continue processing the print job. • Turn the printer off . • Remove the toner cartridge, and shake it to...Continue briefly to too many flash options have been attached. Unsupported toner cartridge Meaning The toner cartridge is defective. • Replace the toner cartridge. • Turn the printer on . The option will be ignored. 2-26 Lexmark™ E260, E260d, E260dn 4513-200, -220,...
...cartridge if it with a supported toner cartridge. • Turn the printer on . Action • Press and release Continue to clear the light sequence and continue processing the print job. • Turn the printer off . • Remove the toner cartridge, and shake it to...Continue briefly to too many flash options have been attached. Unsupported toner cartridge Meaning The toner cartridge is defective. • Replace the toner cartridge. • Turn the printer on . The option will be ignored. 2-26 Lexmark™ E260, E260d, E260dn 4513-200, -220,...
Service Manual
Page 54
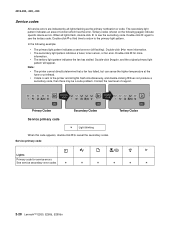
... error codes 2-28 Lexmark™ E260, E260d, E260dn 4513-200, -220, -230 Service codes All service errors are indicated by all lights flash simultaneously, and double-clicking does not produce a secondary code, then there may be a... code problem. When all flashing). Tertiary codes (shown on the following example: • The primary light pattern indicates a service error (all lights flash, double-click to the printer and all lights flashing as the primary notification or code. Double-click a ...
... error codes 2-28 Lexmark™ E260, E260d, E260dn 4513-200, -220, -230 Service codes All service errors are indicated by all lights flash simultaneously, and double-clicking does not produce a secondary code, then there may be a... code problem. When all flashing). Tertiary codes (shown on the following example: • The primary light pattern indicates a service error (all lights flash, double-click to the printer and all lights flashing as the primary notification or code. Double-click a ...

Service Manual
Page 56
... 903: Service engine software error 904: Service engine software error 905: Interface violation by all lights flashing which is performed which allows the printer to perform the task. For the other errors, which can be reviewed through the Diagnostics Menu. Note: All service errors are generally... 906: Service engine software error Service watchdog: 90x 901: Timer service slow 2-30 Lexmark™ E260, E260d, E260dn
... 903: Service engine software error 904: Service engine software error 905: Interface violation by all lights flashing which is performed which allows the printer to perform the task. For the other errors, which can be reviewed through the Diagnostics Menu. Note: All service errors are generally... 906: Service engine software error Service watchdog: 90x 901: Timer service slow 2-30 Lexmark™ E260, E260d, E260dn

Service Manual
Page 84
... the quality test pages. Turn on page 3-62. 2-58 Lexmark™ E260, E260d, E260dn d. Press and release three times until all the lights flash to these problems. To exit print quality test pages, turn the printer off the printer. Once the media exits into the output bin, the printer returns to evenly distribute the toner. Check the lens...
... the quality test pages. Turn on page 3-62. 2-58 Lexmark™ E260, E260d, E260dn d. Press and release three times until all the lights flash to these problems. To exit print quality test pages, turn the printer off the printer. Once the media exits into the output bin, the printer returns to evenly distribute the toner. Check the lens...

Service Manual
Page 96
... when the photoconductor kit has been replaced. 3-4 Lexmark™ E260, E260d, E260dn Close the front access door once the Error light displays. Four pages print to factory default values. Turn on the printer while pressing and holding until all of the lights flash. Utilities Use the Utilities menu to troubleshoot printer problems. Setting Reset Factory Defaults Hex Trace...
... when the photoconductor kit has been replaced. 3-4 Lexmark™ E260, E260d, E260dn Close the front access door once the Error light displays. Four pages print to factory default values. Turn on the printer while pressing and holding until all of the lights flash. Utilities Use the Utilities menu to troubleshoot printer problems. Setting Reset Factory Defaults Hex Trace...

Service Manual
Page 100
... Prt Simplex Tray 1 Continuously print pages containing cross lines, printer information, and margin settings. Turn off the printer. 2. Press and hold until the lights flash to begin . Press to stop . Press to stop . See "Printhead assembly mechanical adjustment" on None page 3-9 for more information. 3-8 Lexmark™ E260, E260d, E260dn Open the front access door. 3. Press and hold...
... Prt Simplex Tray 1 Continuously print pages containing cross lines, printer information, and margin settings. Turn off the printer. 2. Press and hold until the lights flash to begin . Press to stop . Press to stop . See "Printhead assembly mechanical adjustment" on None page 3-9 for more information. 3-8 Lexmark™ E260, E260d, E260dn Open the front access door. 3. Press and hold...


