
Quick Reference
Page 3
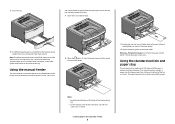
... up to 150 sheets of A6-size paper, so the width guides slide farther to the point where its leading edge can use 2 When the light is that keeps paper from sliding out the front of the manual feeder. 3 Feed paper into the feeder. the manual feeder to the paper width... the tray. Loading paper and specialty media 3 and 550-sheet trays is lit, load the paper faceup into the center of the bin as shown. Warning-Potential Damage: Do not force the paper into the manual feeder only to the center of the paper. The paper stop that the standard tray...
... up to 150 sheets of A6-size paper, so the width guides slide farther to the point where its leading edge can use 2 When the light is that keeps paper from sliding out the front of the manual feeder. 3 Feed paper into the feeder. the manual feeder to the paper width... the tray. Loading paper and specialty media 3 and 550-sheet trays is lit, load the paper faceup into the center of the bin as shown. Warning-Potential Damage: Do not force the paper into the manual feeder only to the center of the paper. The paper stop that the standard tray...
Maintenance Guide
Page 7
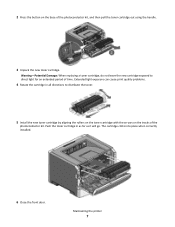
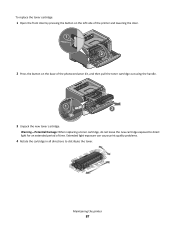
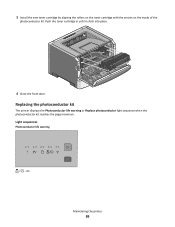
... button on the tracks of the photoconductor kit. The cartridge clicks into place when correctly installed. 6 Close the front door. Maintaining the printer 7 Warning-Potential Damage: When replacing a toner cartridge, do not leave the new cartridge exposed to distribute the toner. 5 Install the new toner cartridge by aligning... the rollers on the toner cartridge with the arrows on the base of time. Extended light exposure can cause print quality problems. 4 Rotate the cartridge in as far as it will go. Push the toner cartridge in all ...
... button on the tracks of the photoconductor kit. The cartridge clicks into place when correctly installed. 6 Close the front door. Maintaining the printer 7 Warning-Potential Damage: When replacing a toner cartridge, do not leave the new cartridge exposed to distribute the toner. 5 Install the new toner cartridge by aligning... the rollers on the toner cartridge with the arrows on the base of time. Extended light exposure can cause print quality problems. 4 Rotate the cartridge in as far as it will go. Push the toner cartridge in all ...

Maintenance Guide
Page 8
.... Maintaining the printer 8 Light sequences Photoconductor life warning ‑ Blinking ‑ On Replace photoconductor ‑ Blinking ‑ Blinking ‑ On When you first receive either light sequence, you when the photoconductor kit reaches a page maximum. The printer does this by displaying the "Photoconductor life warning" light sequence or the "Replace photoconductor" light sequence. Note: The photoconductor...
.... Maintaining the printer 8 Light sequences Photoconductor life warning ‑ Blinking ‑ On Replace photoconductor ‑ Blinking ‑ Blinking ‑ On When you first receive either light sequence, you when the photoconductor kit reaches a page maximum. The printer does this by displaying the "Photoconductor life warning" light sequence or the "Replace photoconductor" light sequence. Note: The photoconductor...

User Guide
Page 35
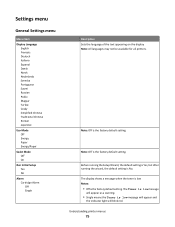
On - PC Kit life warning - On - On The following light sequences show that there is low - Printer error - On Interpreting the printer control panel lights 35 Light sequence Cartridge is a secondary error code or secondary jam code to read: Light sequence What to do • Press and release to clear the light sequence and continue processing the... then turn the printer on. • Press and release to see the secondary error code. On What to do Press twice quickly to clear the light sequence and continue processing the print job. • Replace the photoconductor kit.
On - PC Kit life warning - On - On The following light sequences show that there is low - Printer error - On Interpreting the printer control panel lights 35 Light sequence Cartridge is a secondary error code or secondary jam code to read: Light sequence What to do • Press and release to clear the light sequence and continue processing the... then turn the printer on. • Press and release to see the secondary error code. On What to do Press twice quickly to clear the light sequence and continue processing the print job. • Replace the photoconductor kit.
User Guide
Page 75
The Toner is low message will appear as a warning. • Single means the Toner is the factory default setting. Note: Off is low message will appear and the indicator light will blink red. Before running the Setup Wizard, the default setting is Yes, but after running the wizard, the default setting is the...
The Toner is low message will appear as a warning. • Single means the Toner is the factory default setting. Note: Off is low message will appear and the indicator light will blink red. Before running the Setup Wizard, the default setting is Yes, but after running the wizard, the default setting is the...
User Guide
Page 87
To replace the toner cartridge: 1 Open the front door by pressing the button on the left side of the printer and lowering the door. 2 Press the button on the base of time. Warning-Potential Damage: When replacing a toner cartridge, do not leave the new cartridge exposed to distribute the toner. Extended light exposure can cause print quality problems. 4 Rotate the cartridge in all directions to direct light for an extended period of the photoconductor kit, and then pull the toner cartridge out using the handle. 3 Unpack the new toner cartridge. Maintaining the printer 87
To replace the toner cartridge: 1 Open the front door by pressing the button on the left side of the printer and lowering the door. 2 Press the button on the base of time. Warning-Potential Damage: When replacing a toner cartridge, do not leave the new cartridge exposed to distribute the toner. Extended light exposure can cause print quality problems. 4 Rotate the cartridge in all directions to direct light for an extended period of the photoconductor kit, and then pull the toner cartridge out using the handle. 3 Unpack the new toner cartridge. Maintaining the printer 87
User Guide
Page 88
Light sequences Photoconductor life warning - Replacing the photoconductor kit The printer displays the Photoconductor life warning or Replace photoconductor light sequence when the photoconductor kit reaches the page maximum. 5 Install the new toner cartridge by aligning the rollers on the toner cartridge with the arrows on the tracks of the photoconductor kit. Push the toner cartridge in until it clicks into place. 6 Close the front door. On Maintaining the printer 88
Light sequences Photoconductor life warning - Replacing the photoconductor kit The printer displays the Photoconductor life warning or Replace photoconductor light sequence when the photoconductor kit reaches the page maximum. 5 Install the new toner cartridge by aligning the rollers on the toner cartridge with the arrows on the tracks of the photoconductor kit. Push the toner cartridge in until it clicks into place. 6 Close the front door. On Maintaining the printer 88

User Guide
Page 91
... printer warranty. Note: Use the handholds located on the guides of the unit with this product or the manufacturer's authorized replacement. Warning-Potential Damage: Damage to the printer caused by improper moving it aside instead of trying to lift the drawer and printer at the...Turn the printer off using the power switch, and then unplug the power cord from the wall outlet. • Disconnect all the lights cycle. Warning-Potential Damage: Resetting the photoconductor counter without replacing the photoconductor kit may damage your printer and void your warranty. 8 Close the front door....
... printer warranty. Note: Use the handholds located on the guides of the unit with this product or the manufacturer's authorized replacement. Warning-Potential Damage: Damage to the printer caused by improper moving it aside instead of trying to lift the drawer and printer at the...Turn the printer off using the power switch, and then unplug the power cord from the wall outlet. • Disconnect all the lights cycle. Warning-Potential Damage: Resetting the photoconductor counter without replacing the photoconductor kit may damage your printer and void your warranty. 8 Close the front door....
Service Manual
Page 27
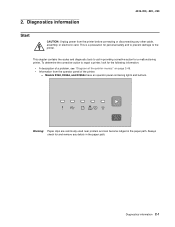
... to repair a printer, look for the following information: • A description of a problem, see "Diagram of the printer. - Warning: Paper clips are commonly used near printers and can become lodged in providing corrective action for and remove any other cable, assembly, or ...electronic card. Diagnostics information 2-1 Models E260, E260d, and E260dn have an operator panel containing lights and buttons. This is a precaution for personal safety and to prevent damage to aid in the paper path. This...
... to repair a printer, look for the following information: • A description of a problem, see "Diagram of the printer. - Warning: Paper clips are commonly used near printers and can become lodged in providing corrective action for and remove any other cable, assembly, or ...electronic card. Diagnostics information 2-1 Models E260, E260d, and E260dn have an operator panel containing lights and buttons. This is a precaution for personal safety and to prevent damage to aid in the paper path. This...
Service Manual
Page 30
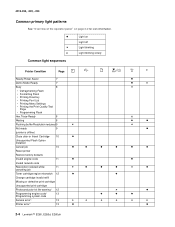
... See "Overview of the operator panel" on page 2-2 for icon information. Light on Light off Light blinking x Light blinking slowly Common light sequences Printer Condition Page Ready/Power Saver 7 Demo Mode Ready 7 ...Toner cartridge region mismatch 12 Change cartridge invalid refill Missing or defective print cartridge Unsupported print cartridge Photoconductor kit life warning¹ 12 Programming engine code/ 13 Programming system code Service error² ...
... See "Overview of the operator panel" on page 2-2 for icon information. Light on Light off Light blinking x Light blinking slowly Common light sequences Printer Condition Page Ready/Power Saver 7 Demo Mode Ready 7 ...Toner cartridge region mismatch 12 Change cartridge invalid refill Missing or defective print cartridge Unsupported print cartridge Photoconductor kit life warning¹ 12 Programming engine code/ 13 Programming system code Service error² ...
Service Manual
Page 38
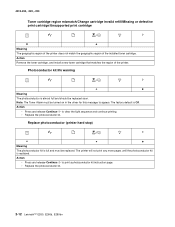
... The printer will not print any more pages until the photoconductor kit is Off. The factory default is replaced. Photoconductor kit life warning Meaning The photoconductor is full and must be replaced soon. Replace photoconductor (printer hard stop) ...for this message to clear the light sequence and continue printing. • Replace the photoconductor kit. Action • Press and release Continue to print a photoconductor kit instruction page. • Replace the photoconductor kit. 2-12 Lexmark™ E260, E260d, E260dn 4513-200, -220,...
... The printer will not print any more pages until the photoconductor kit is Off. The factory default is replaced. Photoconductor kit life warning Meaning The photoconductor is full and must be replaced soon. Replace photoconductor (printer hard stop) ...for this message to clear the light sequence and continue printing. • Replace the photoconductor kit. Action • Press and release Continue to print a photoconductor kit instruction page. • Replace the photoconductor kit. 2-12 Lexmark™ E260, E260d, E260dn 4513-200, -220,...

Service Manual
Page 77
Controller board service check Controller board service check FRU Controller board assembly Warning: Do not replace the operator panel and controller board at J502. 3. Disconnect the LVPS/HVPS cable from the LVPS/HVPS to the LVPS/HVPS 2. If ... other on the card's ground plane found at each screw head.) Controller board voltage outputs Turn the printer off , and check the connectors to display lights or activate the drive motor, fuser or fan, then check the following order: 1. The printer will not power-up without a functioning operator panel. 4. Verify that...
Controller board service check Controller board service check FRU Controller board assembly Warning: Do not replace the operator panel and controller board at J502. 3. Disconnect the LVPS/HVPS cable from the LVPS/HVPS to the LVPS/HVPS 2. If ... other on the card's ground plane found at each screw head.) Controller board voltage outputs Turn the printer off , and check the connectors to display lights or activate the drive motor, fuser or fan, then check the following order: 1. The printer will not power-up without a functioning operator panel. 4. Verify that...
Service Manual
Page 81
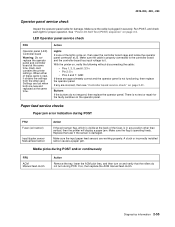
... and replaced at the back of the fuser, is in securely. LED Operator panel service check FRU Operator panel (LED) Controller board Warning: Do not replace the operator panel and controller board at J5. Settings are lost when both are working properly. Paper feed service checks...sensor) Input/duplex sensor Manual feed sensor Action If the exit sensor flag, which is visible at the same time. When either of the lights come on page 2-2. 4513-200, -220, -230 Operator panel service check Inspect the operator panel cable for proper operation. Replace the fuser...
... and replaced at the back of the fuser, is in securely. LED Operator panel service check FRU Operator panel (LED) Controller board Warning: Do not replace the operator panel and controller board at J5. Settings are lost when both are working properly. Paper feed service checks...sensor) Input/duplex sensor Manual feed sensor Action If the exit sensor flag, which is visible at the same time. When either of the lights come on page 2-2. 4513-200, -220, -230 Operator panel service check Inspect the operator panel cable for proper operation. Replace the fuser...


