

Maintenance Guide
Page 10
Warning-Potential Damage: Resetting the photoconductor counter without replacing the photoconductor kit may damage your printer and void your warranty. 8 Close the front door. Push the unit as far as it clicks into place. 6 Install the unit into the photoconductor kit by aligning the arrows on the toner ...cartridge with the arrows in until it will go. 7 After you replace the photoconductor kit, reset the photoconductor counter. Maintaining the printer 10 5 Insert the toner cartridge into the printer by aligning the rollers on the guides of...
Warning-Potential Damage: Resetting the photoconductor counter without replacing the photoconductor kit may damage your printer and void your warranty. 8 Close the front door. Push the unit as far as it clicks into place. 6 Install the unit into the photoconductor kit by aligning the arrows on the toner ...cartridge with the arrows in until it will go. 7 After you replace the photoconductor kit, reset the photoconductor counter. Maintaining the printer 10 5 Insert the toner cartridge into the printer by aligning the rollers on the guides of...

User Guide
Page 91
...an upright position. • Avoid severe jarring movements. Push the unit fully in the printer. Warning-Potential Damage: Resetting the photoconductor counter without replacing the photoconductor kit may damage your printer and void your warranty. 8 Close the front door. 6 Install the unit into the ... or the manufacturer's authorized replacement. Use only the power cord provided with the arrows in . 7 After replacing the photoconductor kit, reset the photoconductor counter: Open the front door and then press and hold until all cords and cables from the printer before moving the...
...an upright position. • Avoid severe jarring movements. Push the unit fully in the printer. Warning-Potential Damage: Resetting the photoconductor counter without replacing the photoconductor kit may damage your printer and void your warranty. 8 Close the front door. 6 Install the unit into the ... or the manufacturer's authorized replacement. Use only the power cord provided with the arrows in . 7 After replacing the photoconductor kit, reset the photoconductor counter: Open the front door and then press and hold until all cords and cables from the printer before moving the...

Service Manual
Page 25
... (or paper feed) Analog-to-digital Converter Application Specific Integrated Circuit Complete Bill Of Material Development Roll (of print cartridge/photoconductor system) Dual In-Line Memory Module External Network Adapter Field Replaceable Unit Host Based Printing High Voltage Power Supply Liquid Crystal ...Diode Light Emitting Diode Laser Scanning Unit Low Voltage Power Supply Nonvolatile Random Access Memory Photoconductor Printer Control Language Power-On Reset Power-On Self Test Personal Printer Data Stream People's Republic of China Toner Add Roll Synchronous Dynamic ...
... (or paper feed) Analog-to-digital Converter Application Specific Integrated Circuit Complete Bill Of Material Development Roll (of print cartridge/photoconductor system) Dual In-Line Memory Module External Network Adapter Field Replaceable Unit Host Based Printing High Voltage Power Supply Liquid Crystal ...Diode Light Emitting Diode Laser Scanning Unit Low Voltage Power Supply Nonvolatile Random Access Memory Photoconductor Printer Control Language Power-On Reset Power-On Self Test Personal Printer Data Stream People's Republic of China Toner Add Roll Synchronous Dynamic ...
Service Manual
Page 30
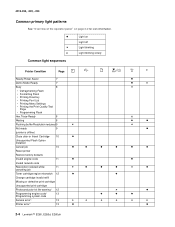
... Cartridge 10 Unsupported Flash Option Installed Cancel job 10 Reset printer Restore factory defaults Invalid engine code 11 Invalid network code Resolution reduced while 11 ... job Toner cartridge region mismatch 12 Change cartridge invalid refill Missing or defective print cartridge Unsupported print cartridge Photoconductor kit life warning¹ 12 Programming engine code/ 13 Programming system code ...
... Cartridge 10 Unsupported Flash Option Installed Cancel job 10 Reset printer Restore factory defaults Invalid engine code 11 Invalid network code Resolution reduced while 11 ... job Toner cartridge region mismatch 12 Change cartridge invalid refill Missing or defective print cartridge Unsupported print cartridge Photoconductor kit life warning¹ 12 Programming engine code/ 13 Programming system code ...

Service Manual
Page 96
... of the lights flash. Utilities Use the Utilities menu to troubleshoot printer problems. Setting Reset Factory Defaults Hex Trace Print Quality Test Pages Reset Photoconductor Maintenance Counter Use setting to Values Return the printer settings to the factory default values except...turn off the printer. 2. Hex Trace helps determine if there is receiving. The replace photoconductor message should be cleared only when the photoconductor kit has been replaced. 3-4 Lexmark™ E260, E260d, E260dn 4513-200, -220, -230 Configuration menu selections To enter the Configuration menu:...
... of the lights flash. Utilities Use the Utilities menu to troubleshoot printer problems. Setting Reset Factory Defaults Hex Trace Print Quality Test Pages Reset Photoconductor Maintenance Counter Use setting to Values Return the printer settings to the factory default values except...turn off the printer. 2. Hex Trace helps determine if there is receiving. The replace photoconductor message should be cleared only when the photoconductor kit has been replaced. 3-4 Lexmark™ E260, E260d, E260dn 4513-200, -220, -230 Configuration menu selections To enter the Configuration menu:...

Service Manual
Page 176
...reset maintenance page counter 3-4 Reset PC Counter 3-4 S safety information xiii safety inspection guide 6-1 service checks 2-51 controller card 2-51 cooling fan 2-52 cover interlock switch 2-52 dead machine 2-53 fuser 2-53 LVPS/HVPS 2-54 main motor 2-54 operator panel 2-55 I-2 Lexmark™ E260, E260d... 2-28 tertiary light patterns 2-30 service menus 3-1 special tools 1-8 specifications connectivity 1-4 input trays 1-5 memory 1-3 operating systems 1-4 photoconductor capacity 1-5 print media 1-6 toner capacity 1-5 start 2-1 symptom tables 2-49 POST 2-49 printer 2-50 T test pages Print Quality...
...reset maintenance page counter 3-4 Reset PC Counter 3-4 S safety information xiii safety inspection guide 6-1 service checks 2-51 controller card 2-51 cooling fan 2-52 cover interlock switch 2-52 dead machine 2-53 fuser 2-53 LVPS/HVPS 2-54 main motor 2-54 operator panel 2-55 I-2 Lexmark™ E260, E260d... 2-28 tertiary light patterns 2-30 service menus 3-1 special tools 1-8 specifications connectivity 1-4 input trays 1-5 memory 1-3 operating systems 1-4 photoconductor capacity 1-5 print media 1-6 toner capacity 1-5 start 2-1 symptom tables 2-49 POST 2-49 printer 2-50 T test pages Print Quality...


