
Quick Reference
Page 7
...go back to sound an alarm when it needs attention). To access the Local Printer Settings Utility from your drivers CD, you want the printer to your printer driver (for instructions on installing and using the Local Printer Settings Utility: Finishing Settings • Copies • ... Settings Utility 7 If you selected the Custom install path from the computer software application, select Start Æ All Programs Æ Lexmark Æ Local Printer Settings Utility. Using the Local Printer Settings Utility The Local Printer Settings Utility lets you change the following settings...
...go back to sound an alarm when it needs attention). To access the Local Printer Settings Utility from your drivers CD, you want the printer to your printer driver (for instructions on installing and using the Local Printer Settings Utility: Finishing Settings • Copies • ... Settings Utility 7 If you selected the Custom install path from the computer software application, select Start Æ All Programs Æ Lexmark Æ Local Printer Settings Utility. Using the Local Printer Settings Utility The Local Printer Settings Utility lets you change the following settings...
Quick Reference
Page 13
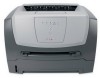
.... • Load letterhead faceup, with the stamp area as shown. • Hold transparencies by the edges, and avoid touching the print side. Oil from your driver CD, or see your fingers can contact the paper guides. You must set the paper size before using the manual feeder. For more information, see...
.... • Load letterhead faceup, with the stamp area as shown. • Hold transparencies by the edges, and avoid touching the print side. Oil from your driver CD, or see your fingers can contact the paper guides. You must set the paper size before using the manual feeder. For more information, see...
User's Guide
Page 54
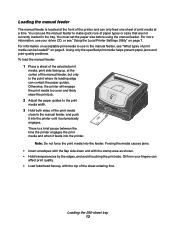
... the media causes jams. • Insert envelopes with the flap side down and with the top of the sheet entering first. 54 Oil from your driver CD, or see Selecting print media on page43. Using only the specified print media helps prevent paper jams and print-quality problems. To load the...
... the media causes jams. • Insert envelopes with the flap side down and with the top of the sheet entering first. 54 Oil from your driver CD, or see Selecting print media on page43. Using only the specified print media helps prevent paper jams and print-quality problems. To load the...
User's Guide
Page 60
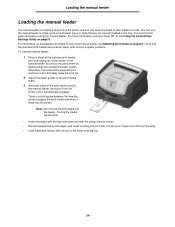
... sequence. 8 Place a sheet of the selected print media, print side facing up, at the center of the manual feeder, but only to view the printer driver settings. 3 Click the Paper tab. 4 Select Manual paper from your fingers can only feed one sheet of print media can contact the paper guides. •...
... sequence. 8 Place a sheet of the selected print media, print side facing up, at the center of the manual feeder, but only to view the printer driver settings. 3 Click the Paper tab. 4 Select Manual paper from your fingers can only feed one sheet of print media can contact the paper guides. •...
User's Guide
Page 63
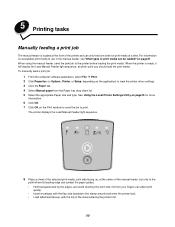
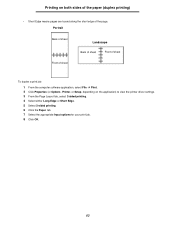
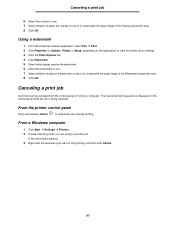
... job: 1 From the computer software application, select File à Print. 2 Click Properties (or Options, Printer, or Setup, depending on the application) to view the printer driver settings. 3 From the Page Layout tab, select 2-sided printing. 4 Select either Long Edge or Short Edge. 5 Select 2-sided printing. 6 Click the Paper tab. 7 Select the...
... job: 1 From the computer software application, select File à Print. 2 Click Properties (or Options, Printer, or Setup, depending on the application) to view the printer driver settings. 3 From the Page Layout tab, select 2-sided printing. 4 Select either Long Edge or Short Edge. 5 Select 2-sided printing. 6 Click the Paper tab. 7 Select the...
User's Guide
Page 64
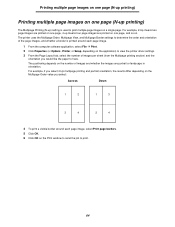
... image. 1 From the computer software application, select File à Print. 2 Click Properties (or Options, Printer, or Setup, depending on the application) to view the printer driver settings. 3 From the Page Layout tab, select the number of the page images, and whether a border is used to print multiple page images on a single...
... image. 1 From the computer software application, select File à Print. 2 Click Properties (or Options, Printer, or Setup, depending on the application) to view the printer driver settings. 3 From the Page Layout tab, select the number of the page images, and whether a border is used to print multiple page images on a single...
User's Guide
Page 65
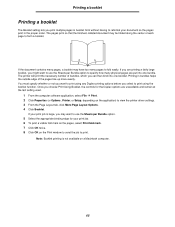
... used. 1 From the computer software application, select File à Print. 2 Click Properties (or Options, Printer, or Setup, depending on the application) to view the printer driver settings. 3 From the Page Layout tab, click More Page Layout Options. 4 Click Booklet. The printer will print the necessary number of each page to print...
... used. 1 From the computer software application, select File à Print. 2 Click Properties (or Options, Printer, or Setup, depending on the application) to view the printer driver settings. 3 From the Page Layout tab, click More Page Layout Options. 4 Click Booklet. The printer will print the necessary number of each page to print...
User's Guide
Page 66
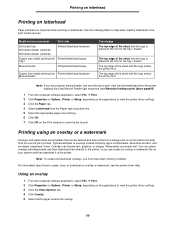
...From the computer software application, select File à Print. 2 Click Properties (or Options, Printer, or Setup, depending on the application) to view the printer driver settings. 3 Click the Paper tab. 4 Select Letterhead from the Paper type drop-down list. 5 Select the appropriate paper size and tray. 6 Click OK...is placed at the front of the tray / drawer. You can create overlays and watermarks and then download them directly to view the printer driver settings. 3 Click the Other Options tab. 4 Click Overlay. 5 Select which pages receive the overlay. 66 Using an overlay 1 From ...
...From the computer software application, select File à Print. 2 Click Properties (or Options, Printer, or Setup, depending on the application) to view the printer driver settings. 3 Click the Paper tab. 4 Select Letterhead from the Paper type drop-down list. 5 Select the appropriate paper size and tray. 6 Click OK...is placed at the front of the tray / drawer. You can create overlays and watermarks and then download them directly to view the printer driver settings. 3 Click the Other Options tab. 4 Click Overlay. 5 Select which pages receive the overlay. 66 Using an overlay 1 From ...
User's Guide
Page 67
... Cancel. 67 A list of print jobs appears. 3 Right-click the document you are using to place the overlay on the application) to view the printer driver settings. 3 Click the Other Options tab. 4 Click Watermark. 5 Select which pages receive the watermark. 6 Select the watermark to use . 7 Select whether to print the job...
... Cancel. 67 A list of print jobs appears. 3 Right-click the document you are using to place the overlay on the application) to view the printer driver settings. 3 Click the Other Options tab. 4 Click Watermark. 5 Select which pages receive the watermark. 6 Select the watermark to use . 7 Select whether to print the job...
User's Guide
Page 73
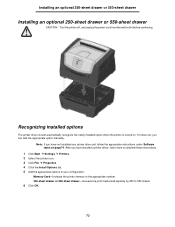
... drawer or 550-sheet drawer-Increase the print media load capacity by 250 to 550 sheets. 6 Click OK. 73 After you have installed a printer driver, return here to complete these instructions. 1 Click Start à Settings à Printers. 2 Select the printer icon. 3 Click File à ...Properties. 4 Click the Install Options tab. 5 Add the appropriate options to your printer driver yet, follow the appropriate instructions under Software tasks on . If it does not, you can add the appropriate option manually. Installing an optional 250-sheet...
... drawer or 550-sheet drawer-Increase the print media load capacity by 250 to 550 sheets. 6 Click OK. 73 After you have installed a printer driver, return here to complete these instructions. 1 Click Start à Settings à Printers. 2 Select the printer icon. 3 Click File à ...Properties. 4 Click the Install Options tab. 5 Add the appropriate options to your printer driver yet, follow the appropriate instructions under Software tasks on . If it does not, you can add the appropriate option manually. Installing an optional 250-sheet...

User's Guide
Page 75
If you selected the Custom install path from your drivers CD, you must go back to sound an alarm when it needs attention). You can change printer settings not available from the computer software application, select Start à All Programs à Lexmark à Local Printer Settings Utility. Using the Local Printer Settings Utility...
If you selected the Custom install path from your drivers CD, you must go back to sound an alarm when it needs attention). You can change printer settings not available from the computer software application, select Start à All Programs à Lexmark à Local Printer Settings Utility. Using the Local Printer Settings Utility...
User's Guide
Page 77
... toner. • Reduce paper consumption by changing the Toner Darkness setting in your printer supplies. Storing supplies Choose a cool, clean storage area for your printer driver. Do not expose supplies to 10 (very dark), with 8 being the default.
... toner. • Reduce paper consumption by changing the Toner Darkness setting in your printer supplies. Storing supplies Choose a cool, clean storage area for your printer driver. Do not expose supplies to 10 (very dark), with 8 being the default.
User's Guide
Page 85
... What do I clear a paper jam? Why am I missing characters when I don't have been reset. If Envelope is on . From your printer driver settings to the original factory default settings solves formatting problems. To reset the factory defaults: 1 Turn off and back on , but I print on page86.... 8 Release the Continue button. 9 Turn the printer off the printer. 2 Open the front door. 3 Press Continue as a xerographic paper for laser printers. • If possible try changing the texture setting to use the remaining toner, then insert it duplex. • When printing on page56 for...
... What do I clear a paper jam? Why am I missing characters when I don't have been reset. If Envelope is on . From your printer driver settings to the original factory default settings solves formatting problems. To reset the factory defaults: 1 Turn off and back on , but I print on page86.... 8 Release the Continue button. 9 Turn the printer off the printer. 2 Open the front door. 3 Press Continue as a xerographic paper for laser printers. • If possible try changing the texture setting to use the remaining toner, then insert it duplex. • When printing on page56 for...
User's Guide
Page 88
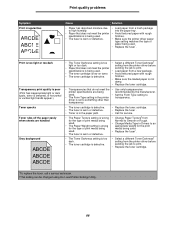
... wrong for the print media being used . finishes. • Make sure the loaded paper is worn or defective. • Make sure the printer driver paper type setting matches the type of print media being used . • Replace the fuser*. • Select a different Toner Darkness† setting... Select a different Toner Darkness† light or too dark. used. • Set the Form Type setting to • The Form Type setting in Drivers to an appropriate weight for the type of paper being used . • Load paper from a fresh package to print. • Replace the toner ...
... wrong for the print media being used . finishes. • Make sure the loaded paper is worn or defective. • Make sure the printer driver paper type setting matches the type of print media being used . • Replace the fuser*. • Select a different Toner Darkness† setting... Select a different Toner Darkness† light or too dark. used. • Set the Form Type setting to • The Form Type setting in Drivers to an appropriate weight for the type of paper being used . • Load paper from a fresh package to print. • Replace the toner ...
User's Guide
Page 89
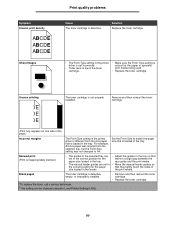
... cartridge is a slight gap between the paper size loaded in the tray. Solution Replace the toner cartridge. • The Form Type setting in the printer driver is set incorrectly. • Toner level is low in the toner cartridge. • Make sure the Form Type setting is correct for the there is... so the correct position for the paper that they lightly touch the sides of the page.) Incorrect margins The Form Size setting in the printer driver is different from the size paper that is loaded in the feeder. rear guide and the print media. • The manual feeder guides are •...
... cartridge is a slight gap between the paper size loaded in the tray. Solution Replace the toner cartridge. • The Form Type setting in the printer driver is set incorrectly. • Toner level is low in the toner cartridge. • Make sure the Form Type setting is correct for the there is... so the correct position for the paper that they lightly touch the sides of the page.) Incorrect margins The Form Size setting in the printer driver is different from the size paper that is loaded in the feeder. rear guide and the print media. • The manual feeder guides are •...
Service Manual
Page 32
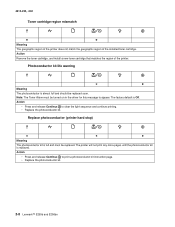
... printing. • Replace the photoconductor kit. Action • Press and release Continue to print a photoconductor kit instruction page. • Replace the photoconductor kit. 2-8 Lexmark™ E250d and E250dn Action Remove the toner cartridge, and install a new toner cartridge that matches the region of the installed toner cartridge. Note: The Toner Alarm must...region of the printer. Replace photoconductor (printer hard stop) ✷ ✷ z Meaning The photoconductor kit is almost full and should be turned on in the driver for this message to appear.
... printing. • Replace the photoconductor kit. Action • Press and release Continue to print a photoconductor kit instruction page. • Replace the photoconductor kit. 2-8 Lexmark™ E250d and E250dn Action Remove the toner cartridge, and install a new toner cartridge that matches the region of the installed toner cartridge. Note: The Toner Alarm must...region of the printer. Replace photoconductor (printer hard stop) ✷ ✷ z Meaning The photoconductor kit is almost full and should be turned on in the driver for this message to appear.
Service Manual
Page 54
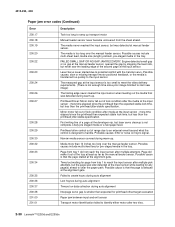
...expected stable lock time, but less than the printhead jitter-stable specification. Laser Servo never started due to ramp up transport motor Manual feeder sensor never became uncovered from the sheet ahead. Printhead Driver: Mirror motor fell out of the second page at the alignment gate...evaluation Paper jam between input and exit sensor Transport motor identification failed to reach the input sensor after two tries. 2-30 Lexmark™ E250d and E250dn Possible causes include multi-sheet feed, media size (length) problem, pre-staged media in the tray. Narrow media sensor covered...
...expected stable lock time, but less than the printhead jitter-stable specification. Laser Servo never started due to ramp up transport motor Manual feeder sensor never became uncovered from the sheet ahead. Printhead Driver: Mirror motor fell out of the second page at the alignment gate...evaluation Paper jam between input and exit sensor Transport motor identification failed to reach the input sensor after two tries. 2-30 Lexmark™ E250d and E250dn Possible causes include multi-sheet feed, media size (length) problem, pre-staged media in the tray. Narrow media sensor covered...
Service Manual
Page 60
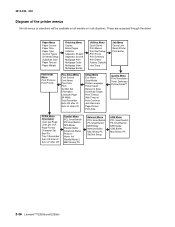
... Buffer Mac Binary PS Std Net Setup USB Menu PCL SmartSwitch PS SmartSwitch NPA Mode USB Buffer Mac Binary PS 2-36 Lexmark™ E250d and E250dn These are accessed through the driver. 4512-220, -230 Diagram of the printer menus Not all menus or selections will be available on all models or in...
... Buffer Mac Binary PS Std Net Setup USB Menu PCL SmartSwitch PS SmartSwitch NPA Mode USB Buffer Mac Binary PS 2-36 Lexmark™ E250d and E250dn These are accessed through the driver. 4512-220, -230 Diagram of the printer menus Not all menus or selections will be available on all models or in...

Service Manual
Page 69
.... Excessive heat can cause media treeing problems, poor stacking, or curl. If the internal print test page prints correctly, the user's application/printer driver is set up correctly. 4. Moist media has a higher tendency to print menu settings. 2. Try a different ream of these problems (except stacking... the NVRAM settings. Print the menu sheet (press and release with the printer in plain paper. • Change settings using the printer driver. • Use the local printer setup utility (included on the CD) to more of paper. Check the USB cable for debris. ...
.... Excessive heat can cause media treeing problems, poor stacking, or curl. If the internal print test page prints correctly, the user's application/printer driver is set up correctly. 4. Moist media has a higher tendency to print menu settings. 2. Try a different ream of these problems (except stacking... the NVRAM settings. Print the menu sheet (press and release with the printer in plain paper. • Change settings using the printer driver. • Use the local printer setup utility (included on the CD) to more of paper. Check the USB cable for debris. ...

Service Manual
Page 71
... Check the toner darkness setting in the cable. If the toner cartridge and PC Kit are incorrect, check ground paths. • Check confinuity in the driver. Turn the printer on, and verify +24 V dc on pins 7, 12, and 14. • If the voltage is correct and the toner electrodes are clean.... 4512-220, -230 Black page Note: Incorrect laser exposure or incorrect charging of the cable. Always verify the same results from J19 on the contact tips below the toner cartridge assembly for pin...
... Check the toner darkness setting in the cable. If the toner cartridge and PC Kit are incorrect, check ground paths. • Check confinuity in the driver. Turn the printer on, and verify +24 V dc on pins 7, 12, and 14. • If the voltage is correct and the toner electrodes are clean.... 4512-220, -230 Black page Note: Incorrect laser exposure or incorrect charging of the cable. Always verify the same results from J19 on the contact tips below the toner cartridge assembly for pin...


