User's Guide
Page 78
... kit. Once the photoconductor kit has been replaced, and the counter has been reset, normal printer operation resumes. To know when to replace the pick rollers, the fuser, and the transfer...
... kit. Once the photoconductor kit has been replaced, and the counter has been reset, normal printer operation resumes. To know when to replace the pick rollers, the fuser, and the transfer...
User's Guide
Page 81
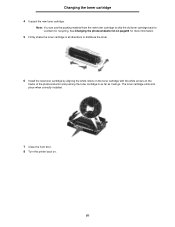
...new toner cartridge to ship the old toner cartridge back to distribute the toner. 6 Install the new toner cartridge by aligning the white rollers on the toner cartridge with the white arrows on . 81 See Changing the photoconductor kit on page82 for more information. 5 Firmly ...shake the toner cartridge in all directions to Lexmark for recycling. Changing the toner cartridge 4 Unpack the new toner cartridge. The toner cartridge clicks into place when correctly installed. 7 Close the front...
...new toner cartridge to ship the old toner cartridge back to distribute the toner. 6 Install the new toner cartridge by aligning the white rollers on the toner cartridge with the white arrows on . 81 See Changing the photoconductor kit on page82 for more information. 5 Firmly ...shake the toner cartridge in all directions to Lexmark for recycling. Changing the toner cartridge 4 Unpack the new toner cartridge. The toner cartridge clicks into place when correctly installed. 7 Close the front...

User's Guide
Page 83
The cartridge clicks into the new print cartridge assembly by aligning the white rollers on the toner cartridge with the white arrows on the base of the photoconductor and pushing the toner cartridge in as far as it will go. Changing the photoconductor kit 3 Remove the toner cartridge: a Press the button on the tracks of the print cartridge assembly. b Grasp the toner cartridge handle, and pull up and out. 4 Unpack the new photoconductor kit. 5 Install the toner cartridge into place when correctly installed. 83
The cartridge clicks into the new print cartridge assembly by aligning the white rollers on the toner cartridge with the white arrows on the base of the photoconductor and pushing the toner cartridge in as far as it will go. Changing the photoconductor kit 3 Remove the toner cartridge: a Press the button on the tracks of the print cartridge assembly. b Grasp the toner cartridge handle, and pull up and out. 4 Unpack the new photoconductor kit. 5 Install the toner cartridge into place when correctly installed. 83

Service Manual
Page 100
... the rollers in the top cover contact the exit guide rollers at the top rear. There are arrows under the top cover to verify the location of the narrow media sensor from J10 on both sides to re-route the cable back through . 10. Disconnect the cable (E) of the rollers. 4-8 Lexmark™ E250d and E250dn
... the rollers in the top cover contact the exit guide rollers at the top rear. There are arrows under the top cover to verify the location of the narrow media sensor from J10 on both sides to re-route the cable back through . 10. Disconnect the cable (E) of the rollers. 4-8 Lexmark™ E250d and E250dn

Service Manual
Page 130
... the orientation of the plastic hub. 7. If the orientation is questionable, run Print Quality sheets, and check for skew. 4-38 Lexmark™ E250d and E250dn Make sure the new paper feed rollers are captured between the rims of the tire relative to remove the hub. 5. Do not attempt to the hub. Lower the...
... the orientation of the plastic hub. 7. If the orientation is questionable, run Print Quality sheets, and check for skew. 4-38 Lexmark™ E250d and E250dn Make sure the new paper feed rollers are captured between the rims of the tire relative to remove the hub. 5. Do not attempt to the hub. Lower the...

Service Manual
Page 158
...assembly 4-16 fan 4-21 fuser 4-22 fuser power cable 4-24 LVPS/HVPS card assembly 4-26 paper exit guide assembly 4-37 I-2 Lexmark™ E250d and E250dn paper feed rollers 4-38 printhead 4-40 procedures 4-1 toner level sensor- 4-41 transfer roll 4-42 Reset Factory Defaults 3-4 reset maintenance page counter 3-4... 2-53 transfer roll 2-53 service error codes accessing 2-23 tertiary light patterns 2-25 service menus 3-1 special tools 1-8 specifications connectivity 1-5 input trays 1-4 memory 1-3 operating systems 1-5 photoconductor capacity 1-4 print media 1-6 print speed 1-3 toner capacity 1-4
...assembly 4-16 fan 4-21 fuser 4-22 fuser power cable 4-24 LVPS/HVPS card assembly 4-26 paper exit guide assembly 4-37 I-2 Lexmark™ E250d and E250dn paper feed rollers 4-38 printhead 4-40 procedures 4-1 toner level sensor- 4-41 transfer roll 4-42 Reset Factory Defaults 3-4 reset maintenance page counter 3-4... 2-53 transfer roll 2-53 service error codes accessing 2-23 tertiary light patterns 2-25 service menus 3-1 special tools 1-8 specifications connectivity 1-5 input trays 1-4 memory 1-3 operating systems 1-5 photoconductor capacity 1-4 print media 1-6 print speed 1-3 toner capacity 1-4
Service Manual
Page 164
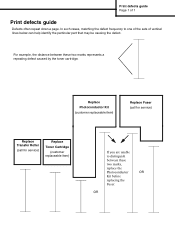
... these two marks represents a repeating defect caused by the toner cartridge. OR Replace Photoconductor Kit (customer replaceable item) Replace Fuser (call for service) Replace Transfer Roller (call for service) Replace Toner Cartridge (customer replaceable item) If you are unable to one of the sets of 1 Print defects guide Defects often repeat...
... these two marks represents a repeating defect caused by the toner cartridge. OR Replace Photoconductor Kit (customer replaceable item) Replace Fuser (call for service) Replace Transfer Roller (call for service) Replace Toner Cartridge (customer replaceable item) If you are unable to one of the sets of 1 Print defects guide Defects often repeat...

