
Quick Reference
Page 4
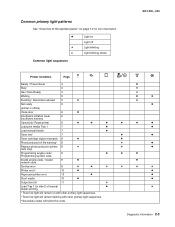
Common light sequences (continued) = On = Blinking = Slow blink Empty = Off Printer Condition Complex page Continue Toner Low / Error Replace PC Kit Load Paper Paper Jam Ready Cancel job/ Reset printer Load print media Load manual feeder Toner low Toner cartridge region mismatch Photoconductor kit life warning Replace photoconductor (printer hard stop) Programming engine code/ Programming system code Understanding the control panel lights 4
Common light sequences (continued) = On = Blinking = Slow blink Empty = Off Printer Condition Complex page Continue Toner Low / Error Replace PC Kit Load Paper Paper Jam Ready Cancel job/ Reset printer Load print media Load manual feeder Toner low Toner cartridge region mismatch Photoconductor kit life warning Replace photoconductor (printer hard stop) Programming engine code/ Programming system code Understanding the control panel lights 4
User's Guide
Page 4
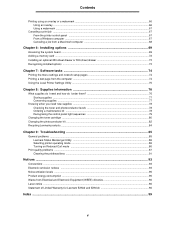
... supplies ...78 Checking the toner and photoconductor levels 78 Ordering a maintenance kit ...78 Recognizing the control panel light sequences 79 Changing the toner cartridge ...80 Changing the photoconductor kit ...82 Recycling Lexmark products ...84 Chapter 9: Troubleshooting 85 General problems ...85 Lexmark Status Messenger Utility ...86 Selecting printer ...93 Noise emission levels ...95 Product energy consumption ...95 Waste from Electrical and Electronic Equipment (WEEE) directive 96 Laser notice ...96 Statement of Limited Warranty for Lexmark E250d and E250dn 96 Index ...99 4
... supplies ...78 Checking the toner and photoconductor levels 78 Ordering a maintenance kit ...78 Recognizing the control panel light sequences 79 Changing the toner cartridge ...80 Changing the photoconductor kit ...82 Recycling Lexmark products ...84 Chapter 9: Troubleshooting 85 General problems ...85 Lexmark Status Messenger Utility ...86 Selecting printer ...93 Noise emission levels ...95 Product energy consumption ...95 Waste from Electrical and Electronic Equipment (WEEE) directive 96 Laser notice ...96 Statement of Limited Warranty for Lexmark E250d and E250dn 96 Index ...99 4

User's Guide
Page 9
Understanding the control panel lights Common light sequences (continued) = On = Blinking = Slow blink Empty = Off Printer Condition Complex page Page Continue 14 Error Toner Low / Replace PC Kit Load Paper Paper Jam Ready Cancel job/ Reset printer 15 Load print media 15 Load manual feeder 16 Toner low 16 Toner cartridge region 17 mismatch Photoconductor kit life 17 warning Replace photoconductor 18 (printer hard stop) Programming engine 18 code/ Programming system code Invalid engine code / 19 Invalid network code 9
Understanding the control panel lights Common light sequences (continued) = On = Blinking = Slow blink Empty = Off Printer Condition Complex page Page Continue 14 Error Toner Low / Replace PC Kit Load Paper Paper Jam Ready Cancel job/ Reset printer 15 Load print media 15 Load manual feeder 16 Toner low 16 Toner cartridge region 17 mismatch Photoconductor kit life 17 warning Replace photoconductor 18 (printer hard stop) Programming engine 18 code/ Programming system code Invalid engine code / 19 Invalid network code 9
User's Guide
Page 17
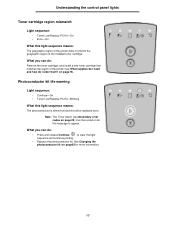
... codes on page25) must be replaced soon. Photoconductor kit life warning Light sequence: • Continue-On • Toner Low/Replace PC Kit-Blinking What this message to clear the light sequence and continue printing. • Replace the photoconductor kit. What you can do I order them? ...on page82 for this light sequence means: The photoconductor is almost full and should be turned on for more information. 17 What you ...
... codes on page25) must be replaced soon. Photoconductor kit life warning Light sequence: • Continue-On • Toner Low/Replace PC Kit-Blinking What this message to clear the light sequence and continue printing. • Replace the photoconductor kit. What you can do I order them? ...on page82 for this light sequence means: The photoconductor is almost full and should be turned on for more information. 17 What you ...
User's Guide
Page 18
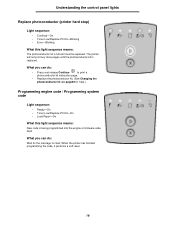
... can do : • Press and release Continue to print a photoconductor kit instruction page. • Replace the photoconductor kit. (See Changing the photoconductor kit on page82 for the message to clear. Understanding the control panel lights Replace photoconductor (printer hard stop) Light sequence: • Continue-On •... code is being programmed into the engine or firmware code flash. The printer will not print any more pages until the photoconductor kit is full and must be replaced. What you can do : Wait for help.) Programming engine code / Programming system code...
... can do : • Press and release Continue to print a photoconductor kit instruction page. • Replace the photoconductor kit. (See Changing the photoconductor kit on page82 for the message to clear. Understanding the control panel lights Replace photoconductor (printer hard stop) Light sequence: • Continue-On •... code is being programmed into the engine or firmware code flash. The printer will not print any more pages until the photoconductor kit is full and must be replaced. What you can do : Wait for help.) Programming engine code / Programming system code...

User's Guide
Page 76
... them? To locate the dealer nearest you can order Lexmark supplies from any authorized Lexmark supplies dealer. The photoconductor kit typically lasts up to be replaced depends on a regular basis: the toner cartridge and the photoconductor kit, which cartridge you purchase and the average amount of ...toner coverage you bought your print jobs. In other countries or regions, visit the Lexmark online store at approximately 5% coverage), whereas the toner...
... them? To locate the dealer nearest you can order Lexmark supplies from any authorized Lexmark supplies dealer. The photoconductor kit typically lasts up to be replaced depends on a regular basis: the toner cartridge and the photoconductor kit, which cartridge you purchase and the average amount of ...toner coverage you bought your print jobs. In other countries or regions, visit the Lexmark online store at approximately 5% coverage), whereas the toner...
User's Guide
Page 78
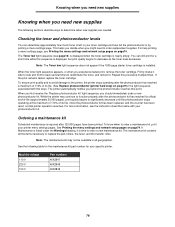
...toner, and reinsert it is by printing a menu settings page. While the printer may not be available in your photoconductor kit. Ordering a maintenance kit Scheduled maintenance is installed. If Maintenance is left in all the items necessary to replace the pick rollers, the fuser,... settings pages. See the following sections describe ways to determine when new supplies are needed. When you first receive the "Replace photoconductor kit" light sequence, you experience faded print, remove the toner cartridge. You can determine approximately how much toner is listed under the...
...toner, and reinsert it is by printing a menu settings page. While the printer may not be available in your photoconductor kit. Ordering a maintenance kit Scheduled maintenance is installed. If Maintenance is left in all the items necessary to replace the pick rollers, the fuser,... settings pages. See the following sections describe ways to determine when new supplies are needed. When you first receive the "Replace photoconductor kit" light sequence, you experience faded print, remove the toner cartridge. You can determine approximately how much toner is listed under the...

User's Guide
Page 79
... toner level is low or when it's time to replace the photoconductor kit. = On = Blinking = Slow blink Empty = Off Printer Condition Toner low Page 16 Continue Error Toner Low / Replace PC Kit Load Paper Paper Jam Ready Photoconductor kit 17 life warning Replace 18 photoconductor (printer hard stop)* * If the control panel lights display this sequence...
... toner level is low or when it's time to replace the photoconductor kit. = On = Blinking = Slow blink Empty = Off Printer Condition Toner low Page 16 Continue Error Toner Low / Replace PC Kit Load Paper Paper Jam Ready Photoconductor kit 17 life warning Replace 18 photoconductor (printer hard stop)* * If the control panel lights display this sequence...
User's Guide
Page 81
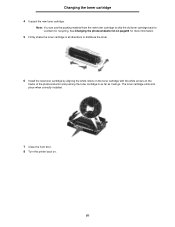
... printer back on the tracks of the photoconductor and pushing the toner cartridge in all directions to Lexmark for more information. 5 Firmly shake the toner cartridge in as far as it will go. Changing the toner cartridge 4 Unpack the new toner cartridge. See Changing the photoconductor kit on page82 for recycling. Note: You can...
... printer back on the tracks of the photoconductor and pushing the toner cartridge in all directions to Lexmark for more information. 5 Firmly shake the toner cartridge in as far as it will go. Changing the toner cartridge 4 Unpack the new toner cartridge. See Changing the photoconductor kit on page82 for recycling. Note: You can...
User's Guide
Page 82
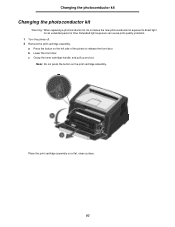
... of the printer to direct light for an extended period of time. Note: Do not press the button on a flat, clean surface. 82 Changing the photoconductor kit Changing the photoconductor kit Warning: When replacing a photoconductor kit, do not leave the new photoconductor kit exposed to release the front door.
... of the printer to direct light for an extended period of time. Note: Do not press the button on a flat, clean surface. 82 Changing the photoconductor kit Changing the photoconductor kit Warning: When replacing a photoconductor kit, do not leave the new photoconductor kit exposed to release the front door.

User's Guide
Page 83
b Grasp the toner cartridge handle, and pull up and out. 4 Unpack the new photoconductor kit. 5 Install the toner cartridge into place when correctly installed. 83 The cartridge clicks into the new print cartridge assembly by aligning the white rollers on the toner cartridge with the white arrows on the base of the photoconductor and pushing the toner cartridge in as far as it will go. Changing the photoconductor kit 3 Remove the toner cartridge: a Press the button on the tracks of the print cartridge assembly.
b Grasp the toner cartridge handle, and pull up and out. 4 Unpack the new photoconductor kit. 5 Install the toner cartridge into place when correctly installed. 83 The cartridge clicks into the new print cartridge assembly by aligning the white rollers on the toner cartridge with the white arrows on the base of the photoconductor and pushing the toner cartridge in as far as it will go. Changing the photoconductor kit 3 Remove the toner cartridge: a Press the button on the tracks of the print cartridge assembly.

User's Guide
Page 84
... on the computer screen. 84 Recycling Lexmark products To return Lexmark products to Lexmark for recycling: 1 Visit our Web site: www.lexmark.com/recycle Note: Follow the instructions on page74. Note: Print your printer menu settings pages. Recycling Lexmark products 6 Install the print cartridge assembly...far as it will go. 7 Close the front door. 8 Turn the printer back on. 9 Reset the photoconductor counter (see the instruction sheet that shipped with the new photoconductor kit). If Photoconductor is listed under Warnings, the photoconductor counter has not been properly reset.
... on the computer screen. 84 Recycling Lexmark products To return Lexmark products to Lexmark for recycling: 1 Visit our Web site: www.lexmark.com/recycle Note: Follow the instructions on page74. Note: Print your printer menu settings pages. Recycling Lexmark products 6 Install the print cartridge assembly...far as it will go. 7 Close the front door. 8 Turn the printer back on. 9 Reset the photoconductor counter (see the instruction sheet that shipped with the new photoconductor kit). If Photoconductor is listed under Warnings, the photoconductor counter has not been properly reset.
User's Guide
Page 99
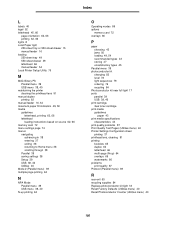
... 39 USB MAC Binary PS 38, 40 NPA Mode 38, 40 Utilities Hex Trace 40 Print Quality Test Pages 40 Reset Factory Defaults 40 Reset Photoconductor Counter 40 control panel light sequences Busy 11 Canceling job 15 Close door 14, 17, 34 Defragment flash 11 Error 14, 15, 17, 18, ... Hex Trace Ready 12 Load manual feeder 16 Load media 15 Not ready 13 Offline 13 Photoconductor kit near full 17 Printer error 20 Programming engine code 18 Programming system code 18 Ready/Power Saver 11 Replace photoconductor kit 18 Resetting printer 15 Restoring factory defaults 15 secondary error codes 25 Service error 19...
... 39 USB MAC Binary PS 38, 40 NPA Mode 38, 40 Utilities Hex Trace 40 Print Quality Test Pages 40 Reset Factory Defaults 40 Reset Photoconductor Counter 40 control panel light sequences Busy 11 Canceling job 15 Close door 14, 17, 34 Defragment flash 11 Error 14, 15, 17, 18, ... Hex Trace Ready 12 Load manual feeder 16 Load media 15 Not ready 13 Offline 13 Photoconductor kit near full 17 Printer error 20 Programming engine code 18 Programming system code 18 Ready/Power Saver 11 Replace photoconductor kit 18 Resetting printer 15 Restoring factory defaults 15 secondary error codes 25 Service error 19...
User's Guide
Page 100
... P paper choosing 43 jams 56 loading 49, 54 recommended types 43 storing 47 unsatisfactory types 45 Parallel menu 39 photoconductor kit changing 82 level 78 light sequences 79 ordering 76 recycling 84 Photoconductor kit near full light 17 ports parallel 39 USB 38, 40 print cartridge See toner cartridge print media guidelines paper 43... letterhead 66 multi-page (N-up) 64 overlays 66 watermarks 66 problems print quality 87 Protocol (Parallel menu) 39 R rear exit 55 recycling supplies 84 Replace photoconductor kit light 18 Reset Factory Defaults (Utilities menu) 40 Reset...
... P paper choosing 43 jams 56 loading 49, 54 recommended types 43 storing 47 unsatisfactory types 45 Parallel menu 39 photoconductor kit changing 82 level 78 light sequences 79 ordering 76 recycling 84 Photoconductor kit near full light 17 ports parallel 39 USB 38, 40 print cartridge See toner cartridge print media guidelines paper 43... letterhead 66 multi-page (N-up) 64 overlays 66 watermarks 66 problems print quality 87 Protocol (Parallel menu) 39 R rear exit 55 recycling supplies 84 Replace photoconductor kit light 18 Reset Factory Defaults (Utilities menu) 40 Reset...

Service Manual
Page 18
... standard pages SWE 3,500 standard pages after market¹ High yield toner cartridge n/a Photoconductor kit Up to 30,000 ² ¹ Declared value in accordance with ISO/IEC 19752 ² Based on approximately 5% coverage, actual yield may vary 4512-230 Lexmark E250dn ✔ ✔ optional optional 1,500 standard pages SWE 3,500 standard pages after...
... standard pages SWE 3,500 standard pages after market¹ High yield toner cartridge n/a Photoconductor kit Up to 30,000 ² ¹ Declared value in accordance with ISO/IEC 19752 ² Based on approximately 5% coverage, actual yield may vary 4512-230 Lexmark E250dn ✔ ✔ optional optional 1,500 standard pages SWE 3,500 standard pages after...
Service Manual
Page 27
... 6 z Insufficient collation area/ 6 Insufficient memory Cancel job/ Reset printer 6 Load print media Tray 1 7 Load manual feeder 7 z z z z z Toner low¹ 7 Toner cartridge region mismatch 8 z Photoconductor kit life warning² 8 Replace photoconductor (printer 8 ✷ hard stop) Programming engine code/ 9 z Programming system code Invalid engine code / Invalid 9 z network code Service error Printer error³ Paper jam...
... 6 z Insufficient collation area/ 6 Insufficient memory Cancel job/ Reset printer 6 Load print media Tray 1 7 Load manual feeder 7 z z z z z Toner low¹ 7 Toner cartridge region mismatch 8 z Photoconductor kit life warning² 8 Replace photoconductor (printer 8 ✷ hard stop) Programming engine code/ 9 z Programming system code Invalid engine code / Invalid 9 z network code Service error Printer error³ Paper jam...
Service Manual
Page 32
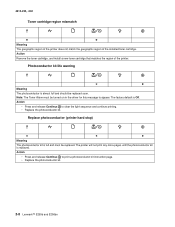
... cartridge, and install a new toner cartridge that matches the region of the installed toner cartridge. The printer will not print any more pages until the photoconductor kit is almost full and should be replaced. Action • Press and release Continue to print a photoconductor kit instruction page. • Replace the photoconductor kit. 2-8 Lexmark™ E250d and E250dn
... cartridge, and install a new toner cartridge that matches the region of the installed toner cartridge. The printer will not print any more pages until the photoconductor kit is almost full and should be replaced. Action • Press and release Continue to print a photoconductor kit instruction page. • Replace the photoconductor kit. 2-8 Lexmark™ E250d and E250dn

Service Manual
Page 70
... above and to initiate printing the quality test pages. Try a different toner cartridge and PC kit. • If those fail, replace the LVPS/HVPS, controller card, or the printhead in... allow light to the home state (four top lights on page 3-50. 2-46 Lexmark™ E250d and E250dn Also, see "Solving print quality problems" on ). 4. Extreme environmental conditions, temperatures, and ...damage. d. Once the media exits into the output bin, the printer returns to expose the photoconductor resulting in printer service errors unless there is blank. A gap in that order. To ...
... above and to initiate printing the quality test pages. Try a different toner cartridge and PC kit. • If those fail, replace the LVPS/HVPS, controller card, or the printhead in... allow light to the home state (four top lights on page 3-50. 2-46 Lexmark™ E250d and E250dn Also, see "Solving print quality problems" on ). 4. Extreme environmental conditions, temperatures, and ...damage. d. Once the media exits into the output bin, the printer returns to expose the photoconductor resulting in printer service errors unless there is blank. A gap in that order. To ...
Service Manual
Page 82
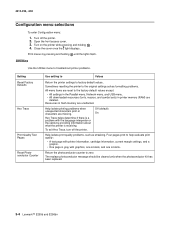
... Values Return the printer settings to zero. To exit Hex Trace, turn off the printer. 2. The replace photoconductor message should be cleared only when the photoconductor kit has been replaced. 3-4 Lexmark™ E250d and E250dn Off (default) On Help isolate print quality problems, such as streaking. Close the cover once the light displays...evaluate print quality: • A text page with printer information, cartridge information, current margin settings, and a graphic. • One page is receiving. Return the photoconductor counter to factory default values.
... Values Return the printer settings to zero. To exit Hex Trace, turn off the printer. 2. The replace photoconductor message should be cleared only when the photoconductor kit has been replaced. 3-4 Lexmark™ E250d and E250dn Off (default) On Help isolate print quality problems, such as streaking. Close the cover once the light displays...evaluate print quality: • A text page with printer information, cartridge information, current margin settings, and a graphic. • One page is receiving. Return the photoconductor counter to factory default values.
Service Manual
Page 164
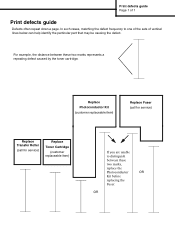
Replace Photoconductor Kit (customer replaceable item) Replace Fuser (call for service) Replace Transfer Roller (call for service) Replace Toner Cartridge (customer replaceable item) If you are unable to ... of 1 Print defects guide Defects often repeat down a page. In such cases, matching the defect frequency to distinguish between these two marks, replace the Photoconductor OR Kit before replacing the Fuser. For example, the distance between these two marks represents a repeating defect caused by the toner cartridge. OR Print defects guide Page...
Replace Photoconductor Kit (customer replaceable item) Replace Fuser (call for service) Replace Transfer Roller (call for service) Replace Toner Cartridge (customer replaceable item) If you are unable to ... of 1 Print defects guide Defects often repeat down a page. In such cases, matching the defect frequency to distinguish between these two marks, replace the Photoconductor OR Kit before replacing the Fuser. For example, the distance between these two marks represents a repeating defect caused by the toner cartridge. OR Print defects guide Page...


