Service Manual
Page 4
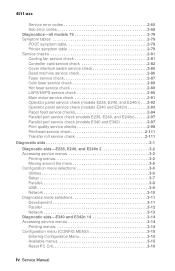
... check (models E340 and E342 2-97 Print quality service checks 2-98 Printhead service check 2-111 Transfer roll service check 2-111 Diagnostic aids 3-1 Diagnostic aids-E238, E240, and E240n 2 3-2 Accessing service menus 3-2 Printing menus 3-2 Moving around the menu 3-5 Configuration menu selections 3-6 Utilities 3-6 Setup 3-7 Parallel 3-8 USB 3-9 Network 3-10 Diagnostics mode selections 3-11 Development 3-... service menus 3-14 Printing menus 3-14 Configuration menu (CONFIG MENU 3-15 Entering Configuration Menu 3-15 Available menus 3-15 Reset PC Cnt 3-16 iv Service Manual
... check (models E340 and E342 2-97 Print quality service checks 2-98 Printhead service check 2-111 Transfer roll service check 2-111 Diagnostic aids 3-1 Diagnostic aids-E238, E240, and E240n 2 3-2 Accessing service menus 3-2 Printing menus 3-2 Moving around the menu 3-5 Configuration menu selections 3-6 Utilities 3-6 Setup 3-7 Parallel 3-8 USB 3-9 Network 3-10 Diagnostics mode selections 3-11 Development 3-... service menus 3-14 Printing menus 3-14 Configuration menu (CONFIG MENU 3-15 Entering Configuration Menu 3-15 Available menus 3-15 Reset PC Cnt 3-16 iv Service Manual
Service Manual
Page 5
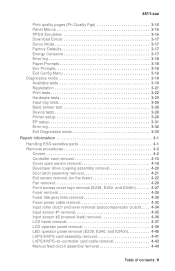
...Door latch assembly removal 4-21 Exit sensor removal (on the fuser 4-22 Fan removal 4-26 Front access cover logo removal (E238, E240, and E240n 4-27 Fuser removal 4-28 Fuser idle gear links removal 4-30 Fuser power cable removal 4-32 Input roller clutch and lever removal (autocompensator... clutch). . . . 4-34 Input sensor #1 removal 4-35 Input sensor #2 (manual feed) removal 4-36 LCD bezel removal 4-37 LCD operator panel removal 4-39 LED operator panel removal (E238, E240, and E240n 4-40 LVPS/HVPS card assembly removal 4-41 LVPS/HVPS-to-controller card cable removal ...
...Door latch assembly removal 4-21 Exit sensor removal (on the fuser 4-22 Fan removal 4-26 Front access cover logo removal (E238, E240, and E240n 4-27 Fuser removal 4-28 Fuser idle gear links removal 4-30 Fuser power cable removal 4-32 Input roller clutch and lever removal (autocompensator... clutch). . . . 4-34 Input sensor #1 removal 4-35 Input sensor #2 (manual feed) removal 4-36 LCD bezel removal 4-37 LCD operator panel removal 4-39 LED operator panel removal (E238, E240, and E240n 4-40 LVPS/HVPS card assembly removal 4-41 LVPS/HVPS-to-controller card cable removal ...
Service Manual
Page 23
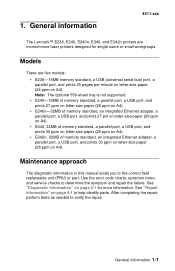
... more information. General information 1-1 Maintenance approach The diagnostic information in this manual leads you to determine the symptom and repair the failure. Note: The optional 550-sheet tray is not supported. • E240-16MB of memory standard, a parallel port, a USB port, and ...correct field replaceable unit (FRU) or part. See "Diagnostic information" on page 4-1 to verify the repair. General information 4511-xxx The Lexmark™ E238, E240, E240n, E340, and E342n printers are five models: • E238-16MB memory standard, a USB (universal serial bus) port, a parallel ...
... more information. General information 1-1 Maintenance approach The diagnostic information in this manual leads you to determine the symptom and repair the failure. Note: The optional 550-sheet tray is not supported. • E240-16MB of memory standard, a parallel port, a USB port, and ...correct field replaceable unit (FRU) or part. See "Diagnostic information" on page 4-1 to verify the repair. General information 4511-xxx The Lexmark™ E238, E240, E240n, E340, and E342n printers are five models: • E238-16MB memory standard, a USB (universal serial bus) port, a parallel ...
Service Manual
Page 24
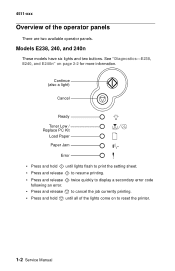
...currently printing. • Press and hold until all of the operator panels There are two available operator panels. See "Diagnostics-E238, E240, and E240n" on to resume printing. • Press and release following an error. Continue (also a light) Cancel Ready Toner Low / ...Replace PC Kit Load Paper Paper Jam Error • Press and hold until lights flash to print the setting sheet. • Press and release to reset the printer. 1-2 Service Manual...
...currently printing. • Press and hold until all of the operator panels There are two available operator panels. See "Diagnostics-E238, E240, and E240n" on to resume printing. • Press and release following an error. Continue (also a light) Cancel Ready Toner Low / ...Replace PC Kit Load Paper Paper Jam Error • Press and hold until lights flash to print the setting sheet. • Press and release to reset the printer. 1-2 Service Manual...
Service Manual
Page 26
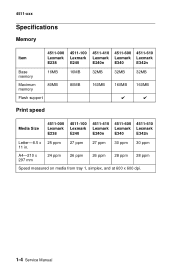
...memory 80MB Flash support 16MB 80MB 32MB 32MB 32MB 160MB 160MB 160MB ✔ ✔ Print speed Media Size 4511-000 Lexmark E238 4511-100 Lexmark E240 4511-410 Lexmark E240n 4511-600 4511-610 Lexmark Lexmark E340 E342n Letter-8.5 x 25 ppm 11 in. 27 ppm 27 ppm 30 ppm 30 ppm A4-210 x 297 ...mm 24 ppm 26 ppm 26 ppm 28 ppm 28 ppm Speed measured on media from tray 1, simplex, and at 600 x 600 dpi. 1-4 Service Manual
...memory 80MB Flash support 16MB 80MB 32MB 32MB 32MB 160MB 160MB 160MB ✔ ✔ Print speed Media Size 4511-000 Lexmark E238 4511-100 Lexmark E240 4511-410 Lexmark E240n 4511-600 4511-610 Lexmark Lexmark E340 E342n Letter-8.5 x 25 ppm 11 in. 27 ppm 27 ppm 30 ppm 30 ppm A4-210 x 297 ...mm 24 ppm 26 ppm 26 ppm 28 ppm 28 ppm Speed measured on media from tray 1, simplex, and at 600 x 600 dpi. 1-4 Service Manual

Service Manual
Page 28
4511-xxx Media trays and supply capacity Item 4511-000 Lexmark E238 4511-100 Lexmark E240 4511-410 Lexmark E240n 4511-600 4511-610 Lexmark Lexmark E340 E342n Available input trays 250-sheet ✔ ✔ ✔ ✔ tray Single-sheet ✔ ✔ ✔ ✔ manual feeder 550-sheet option drawer ✔ ✔ ✔ Toner and photoconductor Toner cartridge yield...
4511-xxx Media trays and supply capacity Item 4511-000 Lexmark E238 4511-100 Lexmark E240 4511-410 Lexmark E240n 4511-600 4511-610 Lexmark Lexmark E340 E342n Available input trays 250-sheet ✔ ✔ ✔ ✔ tray Single-sheet ✔ ✔ ✔ ✔ manual feeder 550-sheet option drawer ✔ ✔ ✔ Toner and photoconductor Toner cartridge yield...
Service Manual
Page 34
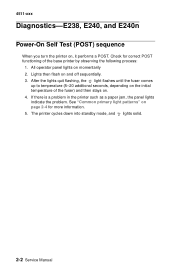
... fuser comes up to temperature (5-20 additional seconds, depending on momentarily 2. The printer cycles down into standby mode, and lights solid. 2-2 Service Manual 4511-xxx Diagnostics-E238, E240, and E240n 2 Power-On Self Test (POST) sequence When you turn the printer on and off sequentially. 3. All operator panel lights on the initial temperature...
... fuser comes up to temperature (5-20 additional seconds, depending on momentarily 2. The printer cycles down into standby mode, and lights solid. 2-2 Service Manual 4511-xxx Diagnostics-E238, E240, and E240n 2 Power-On Self Test (POST) sequence When you turn the printer on and off sequentially. 3. All operator panel lights on the initial temperature...

Service Manual
Page 37
Primary light patterns (continued) Lights z Continue Ready Toner Low/ Replace PC Kit Load Paper Paper Jam z Error z z z ✷ Diagnostics-E238, E240, and E240n 2-5 Not ready (printer offline) (See page 2-16) Close door / Insert cartridge (See page 2-17) Load media (See page 2-17) Load manual feeder (See page 2-18) Print side two of duplex job (See page 2-18) Toner low (See page 2-19) ✷ z 4511-xxx z
Primary light patterns (continued) Lights z Continue Ready Toner Low/ Replace PC Kit Load Paper Paper Jam z Error z z z ✷ Diagnostics-E238, E240, and E240n 2-5 Not ready (printer offline) (See page 2-16) Close door / Insert cartridge (See page 2-17) Load media (See page 2-17) Load manual feeder (See page 2-18) Print side two of duplex job (See page 2-18) Toner low (See page 2-19) ✷ z 4511-xxx z

Service Manual
Page 59
... the printer memory). • Press to on the page and deleting unnecessary downloaded fonts or macros. - Clear the paper jam. Diagnostics-E238, E240, and E240n 2-27 Paper jam in the manual feeder (251 error) 4511-xxx Light pattern Meaning Action A paper jam has occurred in the future: - Complex page Light pattern Meaning Action...
... the printer memory). • Press to on the page and deleting unnecessary downloaded fonts or macros. - Clear the paper jam. Diagnostics-E238, E240, and E240n 2-27 Paper jam in the manual feeder (251 error) 4511-xxx Light pattern Meaning Action A paper jam has occurred in the future: - Complex page Light pattern Meaning Action...

Service Manual
Page 107
... in the paper path during warm-up. The exit sensor at option tray pass thru sensor. • Clear the media or debris from the manual source 251 failed to reach the input sensor. Turn the printer off, enter the diagnostic tests menu, and select the base sensor test. Select... output sensor, and check the sensor for models E238, E240, or E240n or "Accessing service menus" on page 3-28. Diagnostics-E340 and E342n 2-75 Paper originally detected at the fuser is activated by 202 a piece ...
... in the paper path during warm-up. The exit sensor at option tray pass thru sensor. • Clear the media or debris from the manual source 251 failed to reach the input sensor. Turn the printer off, enter the diagnostic tests menu, and select the base sensor test. Select... output sensor, and check the sensor for models E238, E240, or E240n or "Accessing service menus" on page 3-28. Diagnostics-E340 and E342n 2-75 Paper originally detected at the fuser is activated by 202 a piece ...

Service Manual
Page 112
... See"Cooling fan service check" on page 2-89. See "Paper feed service checks" on page 2-82. See "Operator panel service check (models E238, E240, and E240n)" on page 2-92, "Operator panel service check (models E340 and E342n)" on page 2-93, or "Controller card service check" on page 2-94. ... check" on page 2-101. See "Heavy background" on page 2-82. Light print. See "Cooling fan service check" on page 2-104. 2-80 Service Manual See "Toner on back of page. Paper skew. Black page. See "Main motor service check" on page 2-85. See "Cover interlock switch service check...
... See"Cooling fan service check" on page 2-89. See "Paper feed service checks" on page 2-82. See "Operator panel service check (models E238, E240, and E240n)" on page 2-92, "Operator panel service check (models E340 and E342n)" on page 2-93, or "Controller card service check" on page 2-94. ... check" on page 2-101. See "Heavy background" on page 2-82. Light print. See "Cooling fan service check" on page 2-104. 2-80 Service Manual See "Toner on back of page. Paper skew. Black page. See "Main motor service check" on page 2-85. See "Cover interlock switch service check...
Service Manual
Page 114
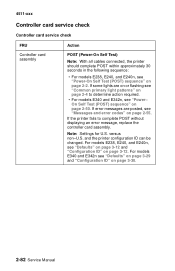
...controller card assembly. On Self Test (POST) sequence" on page 3-30. 2-82 Service Manual For models E340 and E342n see "Defaults" on page 3-29 and "Configuration ID" on page 2-50. For models E238, E240, and E240n, see "Defaults" on page 3-12 and "Configuration ID" on page 2-2. 4511-xxx ...) Note: With all cables connected, the printer should complete POST within approximately 30 seconds in the following sequence: • For models E238, E240, and E240n, see "Power-On Self Test (POST) sequence" on page 3-12. If the printer fails to determine action required. • For models...
...controller card assembly. On Self Test (POST) sequence" on page 3-30. 2-82 Service Manual For models E340 and E342n see "Defaults" on page 3-29 and "Configuration ID" on page 2-50. For models E238, E240, and E240n, see "Defaults" on page 3-12 and "Configuration ID" on page 2-2. 4511-xxx ...) Note: With all cables connected, the printer should complete POST within approximately 30 seconds in the following sequence: • For models E238, E240, and E240n, see "Power-On Self Test (POST) sequence" on page 3-12. If the printer fails to determine action required. • For models...
Service Manual
Page 124
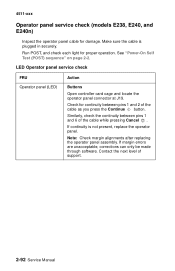
... pressing Cancel . If margin errors are unacceptable, corrections can only be made through software. Similarly, check the continuity between pins 1 and 2 of support. 2-92 Service Manual Contact the next level of the cable as you press the Continue button. See "Power-On Self Test (POST) sequence" on page 2-2. LED Operator panel.... If continuity is plugged in securely. Make sure the cable is not present, replace the operator panel. 4511-xxx Operator panel service check (models E238, E240, and E240n) Inspect the operator panel cable for damage.
... pressing Cancel . If margin errors are unacceptable, corrections can only be made through software. Similarly, check the continuity between pins 1 and 2 of support. 2-92 Service Manual Contact the next level of the cable as you press the Continue button. See "Power-On Self Test (POST) sequence" on page 2-2. LED Operator panel.... If continuity is plugged in securely. Make sure the cable is not present, replace the operator panel. 4511-xxx Operator panel service check (models E238, E240, and E240n) Inspect the operator panel cable for damage.
Service Manual
Page 130
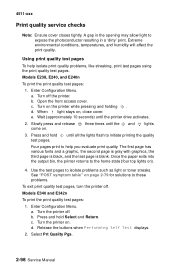
...exit print quality test pages, turn the printer off. Release the buttons when Performing Self Test displays. 2. Models E238, E240, and E240n To print the print quality test pages: 1. Enter Configuration Menu. Press and hold test pages. A gap in a '...dirty' print. a. Turn on . Slowly press and release come on the printer while pressing and holding . See "POST symptom table" on ). 4. a. c. Select Prt Quality Pgs. 2-98 Service Manual...
...exit print quality test pages, turn the printer off. Release the buttons when Performing Self Test displays. 2. Models E238, E240, and E240n To print the print quality test pages: 1. Enter Configuration Menu. Press and hold test pages. A gap in a '...dirty' print. a. Turn on . Slowly press and release come on the printer while pressing and holding . See "POST symptom table" on ). 4. a. c. Select Prt Quality Pgs. 2-98 Service Manual...
Service Manual
Page 138
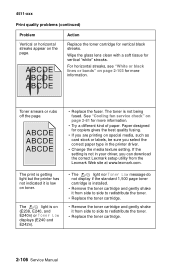
...E240n) or Toner Low displays (E240 and E242n). • The light nor Toner Low message do not display if the standard 1,500 page toner cartridge is installed. • Remove the toner cartridge and gently shake it from side to side to redistribute the toner. • Replace the toner cartridge. 2-106 Service Manual...Action Vertical or horizontal streaks appear on special media, such as card stock or labels, be sure you can download the correct Lexmark setup utility from side to side to redistribute the toner. • Replace the toner cartridge. • Remove the toner cartridge...
...E240n) or Toner Low displays (E240 and E242n). • The light nor Toner Low message do not display if the standard 1,500 page toner cartridge is installed. • Remove the toner cartridge and gently shake it from side to side to redistribute the toner. • Replace the toner cartridge. 2-106 Service Manual...Action Vertical or horizontal streaks appear on special media, such as card stock or labels, be sure you can download the correct Lexmark setup utility from side to side to redistribute the toner. • Replace the toner cartridge. • Remove the toner cartridge...
Service Manual
Page 140
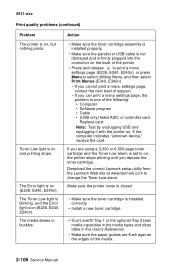
...are using a 3,000 or 6,000 page toner cartridge and the Toner Low alarm is set to on (E238, E240, E240n). Download the correct Lexmark setup utility from the Lexmark Web site at www.lexmark.com to change the Toner Low alarm. Replace card. The Toner Low light is blinking, and the Error light is... on , the printer stops printing until you are flush against the edges of the media. 2-108 Service Manual If ...
...are using a 3,000 or 6,000 page toner cartridge and the Toner Low alarm is set to on (E238, E240, E240n). Download the correct Lexmark setup utility from the Lexmark Web site at www.lexmark.com to change the Toner Low alarm. Replace card. The Toner Low light is blinking, and the Error light is... on , the printer stops printing until you are flush against the edges of the media. 2-108 Service Manual If ...
Service Manual
Page 142
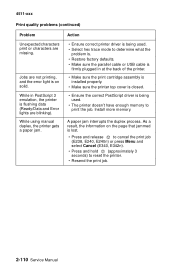
...are not printing, and the error light is on the page that jammed is lost. • Press and release to cancel the print job (E238, E240, E240n) or press Menu and select Cancel (E340, E342n). • Press and hold (approximately 3 seconds) to print the job. While in at the back... correct PostScript driver is flushing data (Ready/Data and Error lights are missing. As a result, the information on solid. Install more memory. While using manual duplex, the printer gets a paper jam. • Ensure correct printer driver is being used. • Select hex trace mode to determine what the ...
...are not printing, and the error light is on the page that jammed is lost. • Press and release to cancel the print job (E238, E240, E240n) or press Menu and select Cancel (E340, E342n). • Press and hold (approximately 3 seconds) to print the job. While in at the back... correct PostScript driver is flushing data (Ready/Data and Error lights are missing. As a result, the information on solid. Install more memory. While using manual duplex, the printer gets a paper jam. • Ensure correct printer driver is being used. • Select hex trace mode to determine what the ...

Service Manual
Page 180
Locate the latches on the inside of the respective hinge. 4-2 Service Manual Open the front access cover. 2. Remove the toner cartridge and paper tray before final tightening. We recommend disconnecting all screws before removing other printer parts. ... from light while out of the extender cover. 2. Unless otherwise stated, reinstall the parts in reverse order of the printer. Front access cover removal (E238, E240, and E240n) 1. The toner cartridge should be protected from the rear of removal. 4. Covers Extender cover removal 1.
Locate the latches on the inside of the respective hinge. 4-2 Service Manual Open the front access cover. 2. Remove the toner cartridge and paper tray before final tightening. We recommend disconnecting all screws before removing other printer parts. ... from light while out of the extender cover. 2. Unless otherwise stated, reinstall the parts in reverse order of the printer. Front access cover removal (E238, E240, and E240n) 1. The toner cartridge should be protected from the rear of removal. 4. Covers Extender cover removal 1.

Service Manual
Page 182
Reinstallation note: If the front access cover is being replaced, remove the logo plate, and install it on page 4-27. 4-4 Service Manual See "Front access cover logo removal (E238, E240, and E240n)" on the new cover. Use your left hand to hold the fuser link at the cover joint while rotating the right side of the cover slightly away from the printer to disengage the link. 7. 4511-xxx 6. Remove the front access cover.
Reinstallation note: If the front access cover is being replaced, remove the logo plate, and install it on page 4-27. 4-4 Service Manual See "Front access cover logo removal (E238, E240, and E240n)" on the new cover. Use your left hand to hold the fuser link at the cover joint while rotating the right side of the cover slightly away from the printer to disengage the link. 7. 4511-xxx 6. Remove the front access cover.

Service Manual
Page 208
... covering the gear train. Gently pull enough slack in the cable to remove the cover without disconnecting the cable, then follow the instructions for E238, E240, and E240n models. 2. 4511-xxx Fuser idle gear links removal 1. For models E340 and E342n, first perform steps 1 and 2 of "Front access cover removal (E340 and... E342n)" on page 4-2. Protect the cover from being marred. 4. Remove the left side cover. For models E238, E240, and E240n, see "Front access cover removal (E238, E240, and E240n)" on page 4-5. A 4-30 Service Manual
... covering the gear train. Gently pull enough slack in the cable to remove the cover without disconnecting the cable, then follow the instructions for E238, E240, and E240n models. 2. 4511-xxx Fuser idle gear links removal 1. For models E340 and E342n, first perform steps 1 and 2 of "Front access cover removal (E340 and... E342n)" on page 4-2. Protect the cover from being marred. 4. Remove the left side cover. For models E238, E240, and E240n, see "Front access cover removal (E238, E240, and E240n)" on page 4-5. A 4-30 Service Manual

