
Service Manual
Page 28
... supply capacity Item 4511-000 Lexmark E238 4511-100 Lexmark E240 4511-410 Lexmark E240n 4511-600 4511-610 Lexmark Lexmark E340 E342n Available input trays 250-sheet ✔ ✔ ✔ ✔ tray Single-sheet ✔ ✔ ✔ ✔ manual feeder 550-sheet option drawer ✔ ✔ ✔ Toner and photoconductor Toner cartridge yield 1,500 pages* (starter toner...
... supply capacity Item 4511-000 Lexmark E238 4511-100 Lexmark E240 4511-410 Lexmark E240n 4511-600 4511-610 Lexmark Lexmark E340 E342n Available input trays 250-sheet ✔ ✔ ✔ ✔ tray Single-sheet ✔ ✔ ✔ ✔ manual feeder 550-sheet option drawer ✔ ✔ ✔ Toner and photoconductor Toner cartridge yield 1,500 pages* (starter toner...

Service Manual
Page 37
Primary light patterns (continued) Lights z Continue Ready Toner Low/ Replace PC Kit Load Paper Paper Jam z Error z z z ✷ Diagnostics-E238, E240, and E240n 2-5 Not ready (printer offline) (See page 2-16) Close door / Insert cartridge (See page 2-17) Load media (See page 2-17) Load manual feeder (See page 2-18) Print side two of duplex job (See page 2-18) Toner low (See page 2-19) ✷ z 4511-xxx z
Primary light patterns (continued) Lights z Continue Ready Toner Low/ Replace PC Kit Load Paper Paper Jam z Error z z z ✷ Diagnostics-E238, E240, and E240n 2-5 Not ready (printer offline) (See page 2-16) Close door / Insert cartridge (See page 2-17) Load media (See page 2-17) Load manual feeder (See page 2-18) Print side two of duplex job (See page 2-18) Toner low (See page 2-19) ✷ z 4511-xxx z

Service Manual
Page 43
Secondary errors (continued) Secondary error codes 4511-xxx Print cartridge mismatch (See page 2-28) Print cartridge has invalid refill (See page 2-28) Missing or defective print cartridge (See page 2-28) Unsupported print cartridge (See page 2-29) Lights z z z z Continue z z z Ready z z Toner Low/ Replace PC Kit z Load Paper z z Paper Jam z z z z Error Diagnostics-E238, E240, and E240n 2-11
Secondary errors (continued) Secondary error codes 4511-xxx Print cartridge mismatch (See page 2-28) Print cartridge has invalid refill (See page 2-28) Missing or defective print cartridge (See page 2-28) Unsupported print cartridge (See page 2-29) Lights z z z z Continue z z z Ready z z Toner Low/ Replace PC Kit z Load Paper z z Paper Jam z z z z Error Diagnostics-E238, E240, and E240n 2-11

Service Manual
Page 49
Diagnostics-E238, E240, and E240n 2-17 Close door / Insert cartridge Light pattern Meaning The printer door is loaded correctly in the allotted time. • Load media into tray 1 or the optional 550-sheet tray, and press to resume printing. • Check that the media is open. 4511-xxx Action Close the door. Load media Light pattern Meaning Action The printer is out of media, or the media did not feed properly, thereby not making the input sensor in tray 1 or the optional 550-sheet tray. • Press to cancel the print job.
Diagnostics-E238, E240, and E240n 2-17 Close door / Insert cartridge Light pattern Meaning The printer door is loaded correctly in the allotted time. • Load media into tray 1 or the optional 550-sheet tray, and press to resume printing. • Check that the media is open. 4511-xxx Action Close the door. Load media Light pattern Meaning Action The printer is out of media, or the media did not feed properly, thereby not making the input sensor in tray 1 or the optional 550-sheet tray. • Press to cancel the print job.

Service Manual
Page 51
...Press to print the menu settings page for a list of current settings. • Remove the print cartridge, and shake it to extend the life of the cartridge. • Replace the print cartridge. • Press and hold to resume printing. • Replace the photoconductor kit. Note: The ...light may not come on if the starter print cartridge is full and needs replacing. • Press to reset printer. Diagnostics-E238, E240, and E240n 2-19...
...Press to print the menu settings page for a list of current settings. • Remove the print cartridge, and shake it to extend the life of the cartridge. • Replace the print cartridge. • Press and hold to resume printing. • Replace the photoconductor kit. Note: The ...light may not come on if the starter print cartridge is full and needs replacing. • Press to reset printer. Diagnostics-E238, E240, and E240n 2-19...
Service Manual
Page 61
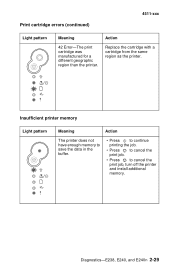
Diagnostics-E238, E240, and E240n 2-29 Action Replace the cartridge with a cartridge from the same region as the printer. Print cartridge errors (continued) 4511-xxx Light pattern Meaning 42 Error-The print cartridge was manufactured for a different geographic region than the printer. Insufficient printer memory Light pattern Meaning Action The printer does not have enough memory to...
Diagnostics-E238, E240, and E240n 2-29 Action Replace the cartridge with a cartridge from the same region as the printer. Print cartridge errors (continued) 4511-xxx Light pattern Meaning 42 Error-The print cartridge was manufactured for a different geographic region than the printer. Insufficient printer memory Light pattern Meaning Action The printer does not have enough memory to...
Service Manual
Page 75
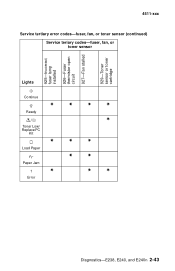
4511-xxx Service tertiary error codes-fuser, fan, or toner sensor (continued) Service teriary codes-fuser, fan, or toner sensor 925-Incorrect fuser lamp installed 926-Fuser thermistor open circuit 927-Fan stalled 929-Toner sensor or toner cartridge Lights Continue ✷ ✷ ✷ ✷ Ready ✷ Toner Low/ Replace PC Kit ✷ ✷ ✷ Load Paper ✷ ✷ Paper Jam ✷ ✷ ✷ Error Diagnostics-E238, E240, and E240n 2-43
4511-xxx Service tertiary error codes-fuser, fan, or toner sensor (continued) Service teriary codes-fuser, fan, or toner sensor 925-Incorrect fuser lamp installed 926-Fuser thermistor open circuit 927-Fan stalled 929-Toner sensor or toner cartridge Lights Continue ✷ ✷ ✷ ✷ Ready ✷ Toner Low/ Replace PC Kit ✷ ✷ ✷ Load Paper ✷ ✷ Paper Jam ✷ ✷ ✷ Error Diagnostics-E238, E240, and E240n 2-43
Service Manual
Page 138
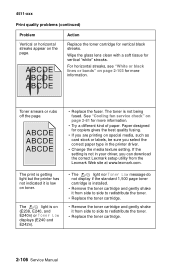
... gently shake it is installed. • Remove the toner cartridge and gently shake it from the Lexmark Web site at www.lexmark.com. For horizontal streaks, see "White or black lines or bands" on (E238, E240, and E240n) or Toner Low displays (E240 and E242n). • The light nor Toner Low message do not display if...
... gently shake it is installed. • Remove the toner cartridge and gently shake it from the Lexmark Web site at www.lexmark.com. For horizontal streaks, see "White or black lines or bands" on (E238, E240, and E240n) or Toner Low displays (E240 and E242n). • The light nor Toner Low message do not display if...
Service Manual
Page 140
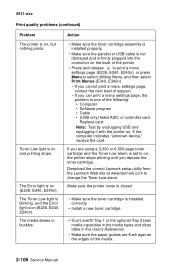
... Low light is blinking, and the Error light is set to on (E238, E240, E240n). If you replace the toner cartridge. If you can print a menu settings page, the problem is installed correctly. • Install a new toner cartridge. • Don't overfill Tray 1 or the optional Tray 2 (see media capacities... stops. Action • Make sure the toner cartridge assembly is installed properly. • Make sure the parallel or USB cable is not damaged and is on . Download the correct Lexmark setup utility from the Lexmark Web site at www.lexmark.com to change the Toner Low alarm. Toner ...
... Low light is blinking, and the Error light is set to on (E238, E240, E240n). If you replace the toner cartridge. If you can print a menu settings page, the problem is installed correctly. • Install a new toner cartridge. • Don't overfill Tray 1 or the optional Tray 2 (see media capacities... stops. Action • Make sure the toner cartridge assembly is installed properly. • Make sure the parallel or USB cable is not damaged and is on . Download the correct Lexmark setup utility from the Lexmark Web site at www.lexmark.com to change the Toner Low alarm. Toner ...

Service Manual
Page 141
Diagnostics-all jams. • Press and release (E238, E240, E240n) or Go (E340, E342n), or open and close the printer cover to restart the printer. • Make sure the print cartridge assembly is installed properly. The paper fails to feed from Tray 1. The paper fails to feed from the optional Tray 2. For E340/E342n...
Diagnostics-all jams. • Press and release (E238, E240, E240n) or Go (E340, E342n), or open and close the printer cover to restart the printer. • Make sure the print cartridge assembly is installed properly. The paper fails to feed from Tray 1. The paper fails to feed from the optional Tray 2. For E340/E342n...
Service Manual
Page 142
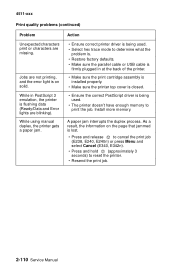
... the back of the printer. • Make sure the print cartridge assembly is installed properly. • Make sure the printer top cover is closed. • Ensure the correct PostScript driver is lost. • Press and release to cancel the print job (E238, E240, E240n) or press Menu and select Cancel (E340, E342n). •...
... the back of the printer. • Make sure the print cartridge assembly is installed properly. • Make sure the printer top cover is closed. • Ensure the correct PostScript driver is lost. • Press and release to cancel the print job (E238, E240, E240n) or press Menu and select Cancel (E340, E342n). •...

Service Manual
Page 151
Four pages print to configure how the printer formats the end of . Off (default) On Diagnostic aids-E238, E240, and E240n 3-7 Setup Use the Setup menu to help evaluate print quality: • A text page with printer information, cartridge information, current margin settings, and a graphic. • One page is blank. To deactivate, turn the printer...
Four pages print to configure how the printer formats the end of . Off (default) On Diagnostic aids-E238, E240, and E240n 3-7 Setup Use the Setup menu to help evaluate print quality: • A text page with printer information, cartridge information, current margin settings, and a graphic. • One page is blank. To deactivate, turn the printer...
Service Manual
Page 155
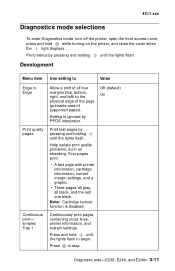
... pages Continuous print- Diagnostic aids-E238, E240, and E240n 3-11 Development Menu item Use setting to Value Edge to Edge Allow a shift of all black, and the last one blank. Four pages print: • A text page with printer information, cartridge information, current margin settings, and a .... Help isolate print quality problems, such as streaking. Print menus by pressing and holding until the lights flash. Note: Cartridge lockout function is ignored by pressing and holding until the lights flash. Continuously print pages containing cross lines, printer information, ...
... pages Continuous print- Diagnostic aids-E238, E240, and E240n 3-11 Development Menu item Use setting to Value Edge to Edge Allow a shift of all black, and the last one blank. Four pages print: • A text page with printer information, cartridge information, current margin settings, and a .... Help isolate print quality problems, such as streaking. Print menus by pressing and holding until the lights flash. Note: Cartridge lockout function is ignored by pressing and holding until the lights flash. Continuously print pages containing cross lines, printer information, ...

Service Manual
Page 180
... screws, start all external cables from the rear of the printer. Front access cover removal (E238, E240, and E240n) 1. The toner cartridge should be protected from light while out of the respective hinge. 4-2 Service Manual Remove the toner cartridge and paper tray before final tightening. Covers Extender cover removal 1. Unless otherwise stated, reinstall the...
... screws, start all external cables from the rear of the printer. Front access cover removal (E238, E240, and E240n) 1. The toner cartridge should be protected from light while out of the respective hinge. 4-2 Service Manual Remove the toner cartridge and paper tray before final tightening. Covers Extender cover removal 1. Unless otherwise stated, reinstall the...


