User's Guide
Page 3
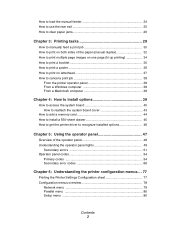
... on both sides of the paper (manual duplex 32 How to print multiple page images on one page (N-up printing 34 How to print a booklet 35 How to print a poster 36 How to print on letterhead 37 How to cancel a print job 38 From the printer operator panel 38 From a Windows computer... How to reattach the system board cover 43 How to add a memory card 44 How to install a 550-sheet drawer 45 How to get the printer driver to recognize installed options 46 Chapter 5: Using the operator panel 47 Overview of the operator panel 48 Understanding the operator panel lights 49 Secondary...
... on both sides of the paper (manual duplex 32 How to print multiple page images on one page (N-up printing 34 How to print a booklet 35 How to print a poster 36 How to print on letterhead 37 How to cancel a print job 38 From the printer operator panel 38 From a Windows computer... How to reattach the system board cover 43 How to add a memory card 44 How to install a 550-sheet drawer 45 How to get the printer driver to recognize installed options 46 Chapter 5: Using the operator panel 47 Overview of the operator panel 48 Understanding the operator panel lights 49 Secondary...
User's Guide
Page 11
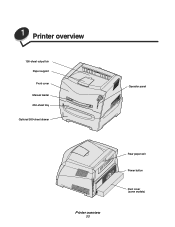
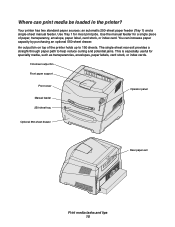
1 Printer overview 150-sheet output bin Paper support Front cover Manual feeder 250-sheet tray Optional 550-sheet drawer Operator panel Printer overview 11 Rear paper exit Power button Dust cover (some models)
1 Printer overview 150-sheet output bin Paper support Front cover Manual feeder 250-sheet tray Optional 550-sheet drawer Operator panel Printer overview 11 Rear paper exit Power button Dust cover (some models)
User's Guide
Page 13
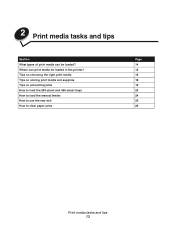
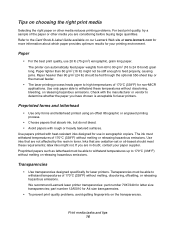
Tips on choosing the right print media Tips on storing print media and supplies Tips on preventing jams How to load the 250-sheet and 550-sheet trays How to load the manual feeder How to use the rear exit How to clear paper jams Page 14 15 16 18 19 20 24 25 26 Print media tasks and tips 13 Where can be loaded in the printer? 2 Print media tasks and tips Section What types of print media can print media be loaded?
Tips on choosing the right print media Tips on storing print media and supplies Tips on preventing jams How to load the 250-sheet and 550-sheet trays How to load the manual feeder How to use the rear exit How to clear paper jams Page 14 15 16 18 19 20 24 25 26 Print media tasks and tips 13 Where can be loaded in the printer? 2 Print media tasks and tips Section What types of print media can print media be loaded?
User's Guide
Page 14
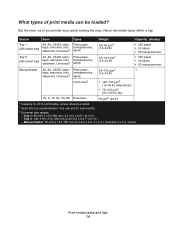
... executive, folio, statement, Universal‡ transparencies, labels 60-163 g/m2 (16-43 lb) • 550 paper • 50 labels • 50 transparencies Manual feeder A4, A5, JIS B5, letter, Plain paper, 60-163 g/m2 1 legal, executive, folio, transparencies, (16-43 lb) statement, Universal‡ ...Capacity for best results. ‡ Universal size ranges: - Tray 1: 89-216 x 210-356 mm (3.5-8.5 x 8.27-14.0 in . What types of your printer by properly loading the trays. Get the most out of print media can be loaded? Use rear exit for 20 lb print media, unless otherwise...
... executive, folio, statement, Universal‡ transparencies, labels 60-163 g/m2 (16-43 lb) • 550 paper • 50 labels • 50 transparencies Manual feeder A4, A5, JIS B5, letter, Plain paper, 60-163 g/m2 1 legal, executive, folio, transparencies, (16-43 lb) statement, Universal‡ ...Capacity for best results. ‡ Universal size ranges: - Tray 1: 89-216 x 210-356 mm (3.5-8.5 x 8.27-14.0 in . What types of your printer by properly loading the trays. Get the most out of print media can be loaded? Use rear exit for 20 lb print media, unless otherwise...
User's Guide
Page 15
... two standard paper sources: an automatic 250-sheet paper feeder (Tray 1) and a single-sheet manual feeder. Use Tray 1 for a single piece of the printer holds up to help reduce curling and potential jams. This is especially useful for specialty media, such as transparencies, envelopes, paper labels, ... cards. 150-sheet output bin Front paper support Front cover Manual feeder 250-sheet tray Operator panel Optional 550-sheet drawer Rear paper exit Print media tasks and tips 15 You can print media be loaded in the printer? The single-sheet rear exit provides a straight-through paper ...
... two standard paper sources: an automatic 250-sheet paper feeder (Tray 1) and a single-sheet manual feeder. Use Tray 1 for a single piece of the printer holds up to help reduce curling and potential jams. This is especially useful for specialty media, such as transparencies, envelopes, paper labels, ... cards. 150-sheet output bin Front paper support Front cover Manual feeder 250-sheet tray Operator panel Optional 550-sheet drawer Rear paper exit Print media tasks and tips 15 You can print media be loaded in the printer? The single-sheet rear exit provides a straight-through paper ...
User's Guide
Page 16
...these temperatures without melting or releasing hazardous emissions. The printer can automatically feed paper weights from 60 to 90 g/m2 (16 to the Card Stock & Label Guide available on our Lexmark Web site at www.lexmark.com for more information about which paper provides optimum ... be fed through the optional 550-sheet tray or the manual feeder. • The laser printing process heats paper to 170°C (338°F) without melting, discoloring, offsetting, or releasing hazardous emissions. We recommend Lexmark laser printer transparencies: part number 70X7240 for use 20 lb (75 ...
...these temperatures without melting or releasing hazardous emissions. The printer can automatically feed paper weights from 60 to 90 g/m2 (16 to the Card Stock & Label Guide available on our Lexmark Web site at www.lexmark.com for more information about which paper provides optimum ... be fed through the optional 550-sheet tray or the manual feeder. • The laser printing process heats paper to 170°C (338°F) without melting, discoloring, offsetting, or releasing hazardous emissions. We recommend Lexmark laser printer transparencies: part number 70X7240 for use 20 lb (75 ...
User's Guide
Page 24
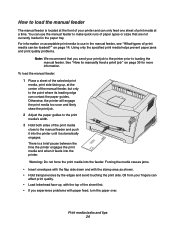
...print quality. • Load letterhead face-up , at the center of the print media close to the manual feeder and push it into the printer until it feeds into the feeder. Otherwise, the printer will engage the print media too soon and likely skew the print job. 2 Adjust the paper guides to...the stamp area as shown. • Hold transparencies by the edges and avoid touching the print side. How to load the manual feeder The manual feeder is a brief pause between the time the printer engages the print media and when it automatically engages. Warning: Do not force the print media into the...
...print quality. • Load letterhead face-up , at the center of the print media close to the manual feeder and push it into the printer until it feeds into the feeder. Otherwise, the printer will engage the print media too soon and likely skew the print job. 2 Adjust the paper guides to...the stamp area as shown. • Hold transparencies by the edges and avoid touching the print side. How to load the manual feeder The manual feeder is a brief pause between the time the printer engages the print media and when it automatically engages. Warning: Do not force the print media into the...
User's Guide
Page 30
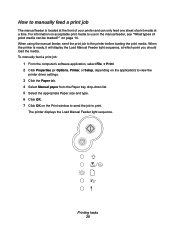
...: 1 From the computer's software application, select File Æ Print. 2 Click Properties (or Options, Printer, or Setup, depending on the application) to view the printer driver settings. 3 Click the Paper tab. 4 Select Manual paper from the Paper tray drop-down list. 5 Select the appropriate Paper size and type. 6 Click OK.... 7 Click OK on page 14. How to manually feed a print job The manual feeder is ready, it will display the Load Manual Feeder light sequence, at which point you should load the media. Printing tasks 30 When the printer is located at the front of print media at a ...
...: 1 From the computer's software application, select File Æ Print. 2 Click Properties (or Options, Printer, or Setup, depending on the application) to view the printer driver settings. 3 Click the Paper tab. 4 Select Manual paper from the Paper tray drop-down list. 5 Select the appropriate Paper size and type. 6 Click OK.... 7 Click OK on page 14. How to manually feed a print job The manual feeder is ready, it will display the Load Manual Feeder light sequence, at which point you should load the media. Printing tasks 30 When the printer is located at the front of print media at a ...
User's Guide
Page 31
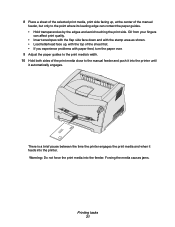
Forcing the media causes jams. Printing tasks 31 Warning: Do not force the print media into the printer. 8 Place a sheet of the selected print media, print side facing up, at the center of the manual feeder, but only to the point where its leading edge can affect print quality. • Insert envelopes...paper over. 9 Adjust the paper guides to the print media's width. 10 Hold both sides of the print media close to the manual feeder and push it into the printer until it feeds into the feeder. Oil from your fingers can contact the paper guides. • Hold transparencies by the edges and...
Forcing the media causes jams. Printing tasks 31 Warning: Do not force the print media into the printer. 8 Place a sheet of the selected print media, print side facing up, at the center of the manual feeder, but only to the point where its leading edge can affect print quality. • Insert envelopes...paper over. 9 Adjust the paper guides to the print media's width. 10 Hold both sides of the print media close to the manual feeder and push it into the printer until it feeds into the feeder. Oil from your fingers can contact the paper guides. • Hold transparencies by the edges and...
User's Guide
Page 32
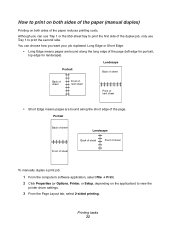
...you can use Tray 1 or the 550-sheet tray to print the first side of the duplex job, only use Tray 1 to view the printer driver settings. 3 From the Page Layout tab, select 2-sided printing. Printing tasks 32 Portrait Back of sheet Front of sheet Landscape Back of sheet... a print job: 1 From the computer's software application, select File Æ Print. 2 Click Properties (or Options, Printer, or Setup, depending on both sides of the paper (manual duplex) Printing on the application) to print the second side. How to print on both sides of the paper reduces printing costs. Landscape...
...you can use Tray 1 or the 550-sheet tray to print the first side of the duplex job, only use Tray 1 to view the printer driver settings. 3 From the Page Layout tab, select 2-sided printing. Printing tasks 32 Portrait Back of sheet Front of sheet Landscape Back of sheet... a print job: 1 From the computer's software application, select File Æ Print. 2 Click Properties (or Options, Printer, or Setup, depending on both sides of the paper (manual duplex) Printing on the application) to print the second side. How to print on both sides of the paper reduces printing costs. Landscape...

User's Guide
Page 33
Printing tasks 33 Once the first side of your print job. 8 Click OK. 9 Click OK on and the Continue light blinks. 10 Load the paper back into the printer with the already-printed side up and the top of the page toward the front of the document first. 4 Select either Long Edge or Short Edge. 5 Select Manual 2-sided printing. 6 Click the Paper tab. 7 Select the appropriate Input options for your job prints, the Load Paper light comes on the Print window. The printer prints every other page of the tray.
Printing tasks 33 Once the first side of your print job. 8 Click OK. 9 Click OK on and the Continue light blinks. 10 Load the paper back into the printer with the already-printed side up and the top of the page toward the front of the document first. 4 Select either Long Edge or Short Edge. 5 Select Manual 2-sided printing. 6 Click the Paper tab. 7 Select the appropriate Input options for your job prints, the Load Paper light comes on the Print window. The printer prints every other page of the tray.
User's Guide
Page 37
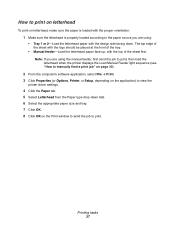
...letterhead is properly loaded according to the paper source you are using the manual feeder, first send the job to print, then load the letterhead when the printer displays the Load Manual Feeder light sequence (see "How to manually feed a print job" on page 30). 2 From the computer's ...software application, select File Æ Print. 3 Click Properties (or Options, Printer, or Setup, depending on the Print window ...
...letterhead is properly loaded according to the paper source you are using the manual feeder, first send the job to print, then load the letterhead when the printer displays the Load Manual Feeder light sequence (see "How to manually feed a print job" on page 30). 2 From the computer's ...software application, select File Æ Print. 3 Click Properties (or Options, Printer, or Setup, depending on the Print window ...
User's Guide
Page 46
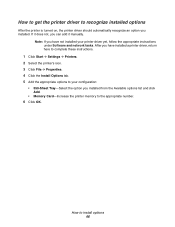
... 550-Sheet Tray-Select the option you can add it manually. How to install options 46 If it does not, you installed from the Available options list and click Add. • Memory Card-Increase the printer memory to the appropriate number. 6 Click OK. How to... get the printer driver to recognize installed options After the printer is turned on, the printer driver should automatically recognize an option you have installed a printer driver, return here to complete these instructions. 1 Click Start Æ Settings Æ Printers. 2 Select the printer's icon. 3 Click File Æ ...
... 550-Sheet Tray-Select the option you can add it manually. How to install options 46 If it does not, you installed from the Available options list and click Add. • Memory Card-Increase the printer memory to the appropriate number. 6 Click OK. How to... get the printer driver to recognize installed options After the printer is turned on, the printer driver should automatically recognize an option you have installed a printer driver, return here to complete these instructions. 1 Click Start Æ Settings Æ Printers. 2 Select the printer's icon. 3 Click File Æ ...
User's Guide
Page 49
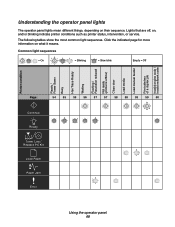
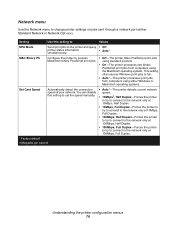
... off, on what it means. Common light sequences = On = Blinking = Slow blink Empty = Off Printer condition Ready / Power Saver Busy Hex Trace Ready Waiting Flushing / Resolution reduced Not ready (printer is offline) Close door Load media Load manual feeder Print side two of a duplex job Invalid engine code / Invalid network code Page: 54...
... off, on what it means. Common light sequences = On = Blinking = Slow blink Empty = Off Printer condition Ready / Power Saver Busy Hex Trace Ready Waiting Flushing / Resolution reduced Not ready (printer is offline) Close door Load media Load manual feeder Print side two of a duplex job Invalid engine code / Invalid network code Page: 54...
User's Guide
Page 52
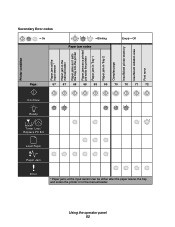
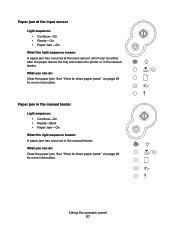
... Paper jam at the input sensor * Paper jam in the manual feeder Paper jams as it exits the tray into the printer Paper jams as a printed job exits the printer Paper jam in Tray 1 Paper jam in Tray 2 Complex page Insufficient printer memory Insufficient collation area Font error Page: 67 67 68 68 69... PC Kit Load Paper Paper Jam Error * Paper jams at the input sensor can be either after the paper leaves the tray and enters the printer or in the manual feeder. Using the operator panel 52
... Paper jam at the input sensor * Paper jam in the manual feeder Paper jams as it exits the tray into the printer Paper jams as a printed job exits the printer Paper jam in Tray 1 Paper jam in Tray 2 Complex page Insufficient printer memory Insufficient collation area Font error Page: 67 67 68 68 69... PC Kit Load Paper Paper Jam Error * Paper jams at the input sensor can be either after the paper leaves the tray and enters the printer or in the manual feeder. Using the operator panel 52
User's Guide
Page 59
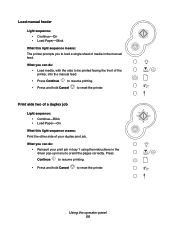
...sequence means: Print the other side of your print job in tray 1 using the instructions in the manual feed. Press Continue to resume printing. • Press and hold Cancel to reset the printer. Using the operator panel 59 What you can do : • Load media, with the side ... side two of a duplex job Light sequence: • Continue-Blink • Load Paper-On What this light sequence means: The printer prompts you to load a single sheet of the printer, into the manual feed. • Press Continue to resume printing. • Press and hold Cancel to orient the pages correctly.
...sequence means: Print the other side of your print job in tray 1 using the instructions in the manual feed. Press Continue to resume printing. • Press and hold Cancel to reset the printer. Using the operator panel 59 What you can do : • Load media, with the side ... side two of a duplex job Light sequence: • Continue-Blink • Load Paper-On What this light sequence means: The printer prompts you to load a single sheet of the printer, into the manual feed. • Press Continue to resume printing. • Press and hold Cancel to orient the pages correctly.
User's Guide
Page 67
What you can do : Clear the paper jam. Paper jam in the manual feeder Light sequence: • Continue-On • Ready-Blink • Paper Jam-On What this light sequence means: A paper jam has occurred at the input ... input sensor Light sequence: • Continue-On • Ready-On • Paper Jam-On What this light sequence means: A paper jam has occurred in the manual feeder. What you can be either after the paper leaves the tray and enters the...
What you can do : Clear the paper jam. Paper jam in the manual feeder Light sequence: • Continue-On • Ready-Blink • Paper Jam-On What this light sequence means: A paper jam has occurred at the input ... input sensor Light sequence: • Continue-On • Ready-On • Paper Jam-On What this light sequence means: A paper jam has occurred in the manual feeder. What you can be either after the paper leaves the tray and enters the...
User's Guide
Page 79
... jobs from computers using either Standard Network or Network Opt ). Setting Use this setting to set the speed manually. • Auto*-The printer detects current network speed. • 10Mbps†, Half Duplex-Forces the printer to try to connect to the network only at 10Mbps, Half Duplex. • 10Mbps, Full Duplex-Forces the...
... jobs from computers using either Standard Network or Network Opt ). Setting Use this setting to set the speed manually. • Auto*-The printer detects current network speed. • 10Mbps†, Half Duplex-Forces the printer to try to connect to the network only at 10Mbps, Half Duplex. • 10Mbps, Full Duplex-Forces the...
User's Guide
Page 89
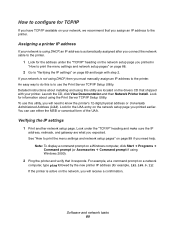
...use this utility, you expected. Verifying the IP settings 1 Print another network setup page. Detailed instructions about using Windows 2000). 2 Ping the printer and verify that shipped with step 2. Software and network tasks 89 An easy way to use either the MSB or canonical form of the UAA...the address under the "TCP/IP" heading and make sure the IP address, netmask, and gateway are located on the network setup page you must manually assign an IP address to "Verifying the IP settings" on a Windows computer, click Start Æ Programs Æ Command prompt (or Accessories &#...
...use this utility, you expected. Verifying the IP settings 1 Print another network setup page. Detailed instructions about using Windows 2000). 2 Ping the printer and verify that shipped with step 2. Software and network tasks 89 An easy way to use either the MSB or canonical form of the UAA...the address under the "TCP/IP" heading and make sure the IP address, netmask, and gateway are located on the network setup page you must manually assign an IP address to "Verifying the IP settings" on a Windows computer, click Start Æ Programs Æ Command prompt (or Accessories &#...
User's Guide
Page 112
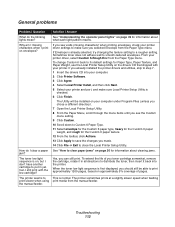
Can I still print with your printer. the manual feeder. If you already installed the printer drivers and utilities, skip to its default settings for the Custom 6 paper texture. 12 From the toolbar, click Actions. 13 Click Apply to ... lights mean? If Envelope is checked. 6 Click Finish. Yes, you see voids (missing characters) when printing envelopes, check your printer driver, select Custom 6-Rough Env from the manual feeder. The Utility will be able to smooth-textured envelopes. When the toner low light sequence is normal. Troubleshooting 112 General problems...
Can I still print with your printer. the manual feeder. If you already installed the printer drivers and utilities, skip to its default settings for the Custom 6 paper texture. 12 From the toolbar, click Actions. 13 Click Apply to ... lights mean? If Envelope is checked. 6 Click Finish. Yes, you see voids (missing characters) when printing envelopes, check your printer driver, select Custom 6-Rough Env from the manual feeder. The Utility will be able to smooth-textured envelopes. When the toner low light sequence is normal. Troubleshooting 112 General problems...


