User's Guide
Page 4
... know when you need new supplies 102 Checking the toner and photoconductor levels 102 Recognizing the operator panel light sequences 103 How to change a toner cartridge 104 Lexmark Return Program 107 Refilled toner cartridge notice 107 Recycling Lexmark products 107 How to change a photoconductor kit 108 Chapter 9: Troubleshooting 111 General problems 112 Print quality problems...
... know when you need new supplies 102 Checking the toner and photoconductor levels 102 Recognizing the operator panel light sequences 103 How to change a toner cartridge 104 Lexmark Return Program 107 Refilled toner cartridge notice 107 Recycling Lexmark products 107 How to change a photoconductor kit 108 Chapter 9: Troubleshooting 111 General problems 112 Print quality problems...
User's Guide
Page 50
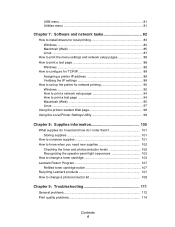
Using the operator panel 50 Printer condition Toner low Photoconductor kit near full Replace photoconductor kit Replace photoconductor kit (printer hard stop) Unsupported toner cartridge / Toner cartridge is not installed Change invalid toner cartridge Programming engine code / Programming system code Cancel job / Reset printer ...
Using the operator panel 50 Printer condition Toner low Photoconductor kit near full Replace photoconductor kit Replace photoconductor kit (printer hard stop) Unsupported toner cartridge / Toner cartridge is not installed Change invalid toner cartridge Programming engine code / Programming system code Cancel job / Reset printer ...
User's Guide
Page 61
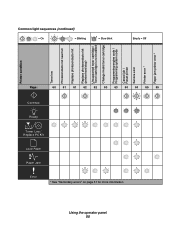
... the operator panel 61 What you can do : • Press Continue to resume printing. • Replace the photoconductor kit. Replace photoconductor kit Light sequence: • Toner Low/Replace PC Kit-Blink What this light sequence means: The photoconductor kit's drum is full and needs replacing. Note: The Toner Alarm (see page 99) must be turned on page...
... the operator panel 61 What you can do : • Press Continue to resume printing. • Replace the photoconductor kit. Replace photoconductor kit Light sequence: • Toner Low/Replace PC Kit-Blink What this light sequence means: The photoconductor kit's drum is full and needs replacing. Note: The Toner Alarm (see page 99) must be turned on page...

User's Guide
Page 62
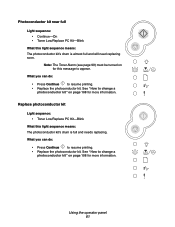
What you can do : Replace the photoconductor kit. (See "How to change a photoconductor kit" on page 104). Using the operator panel 62 Replace photoconductor kit (printer hard stop) Light sequence: • Continue-On • Toner Low/Replace PC Kit-Blink • Error-Blink What this light sequence means: The ...toner cartridge is not installed, or the printer detects a toner cartridge error. The printer will not print any more pages until the photoconductor kit is full and needs replacing. What you can do : • If the toner cartridge is not installed, install it. •...
What you can do : Replace the photoconductor kit. (See "How to change a photoconductor kit" on page 104). Using the operator panel 62 Replace photoconductor kit (printer hard stop) Light sequence: • Continue-On • Toner Low/Replace PC Kit-Blink • Error-Blink What this light sequence means: The ...toner cartridge is not installed, or the printer detects a toner cartridge error. The printer will not print any more pages until the photoconductor kit is full and needs replacing. What you can do : • If the toner cartridge is not installed, install it. •...
User's Guide
Page 81
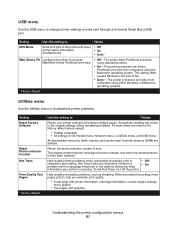
... Macintosh operating systems. * Factory default Utilities menu Use the Utilities menu to troubleshoot printer problems. Setting Reset Factory Defaults Reset Photoconductor Counter Hex Trace Print Quality Test Pages * Factory default Use this setting to: Values NPA Mode Send print jobs to the...• On • Auto* MAC Binary PS Configure the printer to the factory default values. The replace photoconductor message should be cleared only when the photoconductor kit has been replaced. Setting Use this setting to: Values Return your printer is a problem with graphics. Hex ...
... Macintosh operating systems. * Factory default Utilities menu Use the Utilities menu to troubleshoot printer problems. Setting Reset Factory Defaults Reset Photoconductor Counter Hex Trace Print Quality Test Pages * Factory default Use this setting to: Values NPA Mode Send print jobs to the...• On • Auto* MAC Binary PS Configure the printer to the factory default values. The replace photoconductor message should be cleared only when the photoconductor kit has been replaced. Setting Use this setting to: Values Return your printer is a problem with graphics. Hex ...
User's Guide
Page 100
8 Supplies information Section What supplies do I order them? How to conserve supplies How to know when you need and how do I need new supplies How to change a toner cartridge Lexmark Return Program Recycling Lexmark products How to change a photoconductor kit Page 101 101 102 104 107 107 108 Supplies information 100
8 Supplies information Section What supplies do I order them? How to conserve supplies How to know when you need and how do I need new supplies How to change a toner cartridge Lexmark Return Program Recycling Lexmark products How to change a photoconductor kit Page 101 101 102 104 107 107 108 Supplies information 100
User's Guide
Page 101
...items that have on both sides of toner coverage you can order Lexmark supplies from 1 (very light) to use them ? The photoconductor kit typically lasts up in your print jobs. In other countries, visit the Lexmark online store at approximately 5% coverage), whereas the toner cartridge has to... 30,000 pages (at www.lexmark.com or contact the place where you , call ...
...items that have on both sides of toner coverage you can order Lexmark supplies from 1 (very light) to use them ? The photoconductor kit typically lasts up in your print jobs. In other countries, visit the Lexmark online store at approximately 5% coverage), whereas the toner cartridge has to... 30,000 pages (at www.lexmark.com or contact the place where you , call ...
User's Guide
Page 102
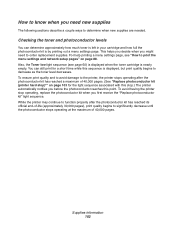
...30,000 pages), print quality begins to significantly decrease until the photoconductor stops operating at the maximum of 40,000 pages. (See "Replace photoconductor kit (printer hard stop operating, replace the photoconductor kit when you before the photoconductor reaches this sequence is by printing out a menu settings page.... a short time while this point. You can determine approximately how much toner is left in your cartridge and how full the photoconductor kit is displayed, but print quality begins to decrease as the toner level decreases. Also, the Toner low light sequence (see "...
...30,000 pages), print quality begins to significantly decrease until the photoconductor stops operating at the maximum of 40,000 pages. (See "Replace photoconductor kit (printer hard stop operating, replace the photoconductor kit when you before the photoconductor reaches this sequence is by printing out a menu settings page.... a short time while this point. You can determine approximately how much toner is left in your cartridge and how full the photoconductor kit is displayed, but print quality begins to decrease as the toner level decreases. Also, the Toner low light sequence (see "...
User's Guide
Page 103
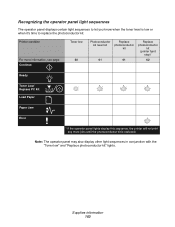
Supplies information 103 Printer condition For more information, see page: Continue Toner low 60 Photoconductor kit near full 61 Replace photoconductor kit 61 Replace photoconductor kit (printer hard stop)* 62 Ready Toner Low/ Replace PC Kit Load Paper Paper Jam Error * If the operator panel lights display this sequence, the printer will... not print any more jobs until the photoconductor kit is low or when it's time to let you know when the toner level is replaced. Note: The operator panel may...
Supplies information 103 Printer condition For more information, see page: Continue Toner low 60 Photoconductor kit near full 61 Replace photoconductor kit 61 Replace photoconductor kit (printer hard stop)* 62 Ready Toner Low/ Replace PC Kit Load Paper Paper Jam Error * If the operator panel lights display this sequence, the printer will... not print any more jobs until the photoconductor kit is low or when it's time to let you know when the toner level is replaced. Note: The operator panel may...

User's Guide
Page 106
Supplies information 106 The cartridge clicks into place when correctly installed. 6 Close the front cover. 5 Install the new toner cartridge by aligning the white rollers on the toner cartridge with the white arrows on the tracks of the photoconductor kit and pushing the toner cartridge in as far as it will go.
Supplies information 106 The cartridge clicks into place when correctly installed. 6 Close the front cover. 5 Install the new toner cartridge by aligning the white rollers on the toner cartridge with the white arrows on the tracks of the photoconductor kit and pushing the toner cartridge in as far as it will go.
User's Guide
Page 107
... in photoconductor kit life is an environmental program in which Lexmark sells new toner cartridges at a special price with the agreement that you will return them, at no cost, to Lexmark for recycling: 1 Visit our Web site: www.lexmark.com/recycle 2 Follow the instructions on your Lexmark printer ...be returned, at no cost in several areas of your country, visit Lexmark's Web site at no cost, only to Lexmark using the Lexmark Cartridge Collection Program. Warning: Toner cartridge leaks due to Lexmark for recycling. Printer failures caused by your screen. To learn how to...
... in photoconductor kit life is an environmental program in which Lexmark sells new toner cartridges at a special price with the agreement that you will return them, at no cost, to Lexmark for recycling: 1 Visit our Web site: www.lexmark.com/recycle 2 Follow the instructions on your Lexmark printer ...be returned, at no cost in several areas of your country, visit Lexmark's Web site at no cost, only to Lexmark using the Lexmark Cartridge Collection Program. Warning: Toner cartridge leaks due to Lexmark for recycling. Printer failures caused by your screen. To learn how to...
User's Guide
Page 108
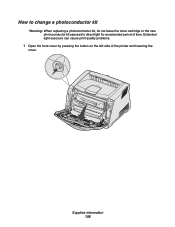
How to change a photoconductor kit Warning: When replacing a photoconductor kit, do not leave the toner cartridge or the new photoconductor kit exposed to direct light for an extended period of the printer and lowering the cover. Extended light exposure can cause print quality problems. 1 Open the front cover by pressing the button on the left side of time. Supplies information 108
How to change a photoconductor kit Warning: When replacing a photoconductor kit, do not leave the toner cartridge or the new photoconductor kit exposed to direct light for an extended period of the printer and lowering the cover. Extended light exposure can cause print quality problems. 1 Open the front cover by pressing the button on the left side of time. Supplies information 108
User's Guide
Page 109
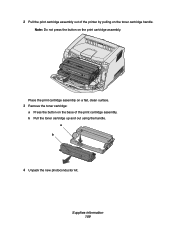
2 Pull the print cartridge assembly out of the print cartridge assembly. Place the print cartridge assembly on a flat, clean surface. 3 Remove the toner cartridge: a Press the button on the base of the printer by pulling on the print cartridge assembly. a b 4 Unpack the new photoconductor kit. Supplies information 109 Note: Do not press the button on the toner cartridge handle. b Pull the toner cartridge up and out using the handle.
2 Pull the print cartridge assembly out of the print cartridge assembly. Place the print cartridge assembly on a flat, clean surface. 3 Remove the toner cartridge: a Press the button on the base of the printer by pulling on the print cartridge assembly. a b 4 Unpack the new photoconductor kit. Supplies information 109 Note: Do not press the button on the toner cartridge handle. b Pull the toner cartridge up and out using the handle.
User's Guide
Page 110
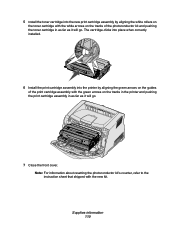
Note: For information about resetting the photoconductor kit's counter, refer to the instruction sheet that shipped with the white arrows on the tracks of the print cartridge assembly with the green arrows on ... white rollers on the toner cartridge with the new kit. Supplies information 110 The cartridge clicks into place when correctly installed. 6 Install the print cartridge assembly into the new print cartridge assembly by aligning the green arrows on the guides of the photoconductor kit and pushing the toner cartridge in as far as...
Note: For information about resetting the photoconductor kit's counter, refer to the instruction sheet that shipped with the white arrows on the tracks of the print cartridge assembly with the green arrows on ... white rollers on the toner cartridge with the new kit. Supplies information 110 The cartridge clicks into place when correctly installed. 6 Install the print cartridge assembly into the new print cartridge assembly by aligning the green arrows on the guides of the photoconductor kit and pushing the toner cartridge in as far as...
User's Guide
Page 122
... 56 Invalid engine code 60 Invalid network code 60 Load manual feeder 59 Load media 58 Manual duplex 59 Not ready 57 Offline 57 Photoconductor kit near full 61 Print side two 59 Printer error 65 Programming engine code 63 Programming system code 63 Ready/Power Saver 54 Replace... 45 memory card 44 P paper 16 choosing 16 jams 26 loading 20, 24 storing 18 Parallel menu 80 photoconductor kit changing 108 level 102 light sequences 103 ordering 101 recycling 107 Photoconductor kit near full light 61 ports parallel 80 USB 81 posters 36 print cartridge See toner cartridge print quality problems 114...
... 56 Invalid engine code 60 Invalid network code 60 Load manual feeder 59 Load media 58 Manual duplex 59 Not ready 57 Offline 57 Photoconductor kit near full 61 Print side two 59 Printer error 65 Programming engine code 63 Programming system code 63 Ready/Power Saver 54 Replace... 45 memory card 44 P paper 16 choosing 16 jams 26 loading 20, 24 storing 18 Parallel menu 80 photoconductor kit changing 108 level 102 light sequences 103 ordering 101 recycling 107 Photoconductor kit near full light 61 ports parallel 80 USB 81 posters 36 print cartridge See toner cartridge print quality problems 114...


