User's Guide
Page 2
... Licensing notice 7 Safety information 7 Laser notice...7 The United Kingdom Telecommunications Act 1984 7 Conventions 7 Electronic emission notices 7 Printer energy consumption 9 Statement of Limited Warranty 9 Chapter 1: Printer overview 11 Chapter 2: Print media tasks and tips 13 What types of print media can be loaded 14 Where can print... media be loaded in the printer 15 Tips on choosing the right print media 16 Paper ...16 Preprinted forms and letterhead 16 Transparencies 16 Envelopes 17 Labels...
... Licensing notice 7 Safety information 7 Laser notice...7 The United Kingdom Telecommunications Act 1984 7 Conventions 7 Electronic emission notices 7 Printer energy consumption 9 Statement of Limited Warranty 9 Chapter 1: Printer overview 11 Chapter 2: Print media tasks and tips 13 What types of print media can be loaded 14 Where can print... media be loaded in the printer 15 Tips on choosing the right print media 16 Paper ...16 Preprinted forms and letterhead 16 Transparencies 16 Envelopes 17 Labels...
User's Guide
Page 3
... 34 How to print a booklet 35 How to print a poster 36 How to print on letterhead 37 How to cancel a print job 38 From the printer operator panel 38 From a Windows computer 38 From a Macintosh computer 38 Chapter 4: How to install options 39 How to access the system board 40 How... to reattach the system board cover 43 How to add a memory card 44 How to install a 550-sheet drawer 45 How to get the printer driver to recognize installed options 46 Chapter 5: Using the operator panel 47 Overview of the operator panel 48 Understanding the operator panel lights 49 Secondary...
... 34 How to print a booklet 35 How to print a poster 36 How to print on letterhead 37 How to cancel a print job 38 From the printer operator panel 38 From a Windows computer 38 From a Macintosh computer 38 Chapter 4: How to install options 39 How to access the system board 40 How... to reattach the system board cover 43 How to add a memory card 44 How to install a 550-sheet drawer 45 How to get the printer driver to recognize installed options 46 Chapter 5: Using the operator panel 47 Overview of the operator panel 48 Understanding the operator panel lights 49 Secondary...
User's Guide
Page 4
...print a network setup page 94 How to print a test page 94 Macintosh (Web 95 Linux ...97 Using the printer resident Web page 98 Using the Local Printer Settings Utility 99 Chapter 8: Supplies information 100 What supplies do I need and how do I order them 101 ...toner and photoconductor levels 102 Recognizing the operator panel light sequences 103 How to change a toner cartridge 104 Lexmark Return Program 107 Refilled toner cartridge notice 107 Recycling Lexmark products 107 How to change a photoconductor kit 108 Chapter 9: Troubleshooting 111 General problems 112 Print quality ...
...print a network setup page 94 How to print a test page 94 Macintosh (Web 95 Linux ...97 Using the printer resident Web page 98 Using the Local Printer Settings Utility 99 Chapter 8: Supplies information 100 What supplies do I need and how do I order them 101 ...toner and photoconductor levels 102 Recognizing the operator panel light sequences 103 How to change a toner cartridge 104 Lexmark Return Program 107 Refilled toner cartridge notice 107 Recycling Lexmark products 107 How to change a photoconductor kit 108 Chapter 9: Troubleshooting 111 General problems 112 Print quality ...

User's Guide
Page 6
...OF MERCHANTABILITY OR FITNESS FOR A PARTICULAR PURPOSE. Trademarks Lexmark and Lexmark with the PCL language. This means the printer recognizes PCL commands used instead. In other countries, contact your point of Lexmark International, Inc., registered in certain transactions; Any ...Hewlett-Packard Company's designation of a set of printer commands (language) and functions included in this agreement are the property of Lexmark International, Inc. This printer is Adobe Systems' designation of a set of printer commands (language) and functions included in the ...
...OF MERCHANTABILITY OR FITNESS FOR A PARTICULAR PURPOSE. Trademarks Lexmark and Lexmark with the PCL language. This means the printer recognizes PCL commands used instead. In other countries, contact your point of Lexmark International, Inc., registered in certain transactions; Any ...Hewlett-Packard Company's designation of a set of printer commands (language) and functions included in this agreement are the property of Lexmark International, Inc. This printer is Adobe Systems' designation of a set of printer commands (language) and functions included in the ...

User's Guide
Page 7
... that shipped with the instructions, may not cause harmful interference, and (2) this printer. The safety features of some parts may cause undesired operation. Electronic emission notices Federal Communications Commission (FCC) compliance information statement The Lexmark E234, Machine Type 4505-420 and Lexmark E234n, Machine Type 4505-410, have been tested and found to comply...
... that shipped with the instructions, may not cause harmful interference, and (2) this printer. The safety features of some parts may cause undesired operation. Electronic emission notices Federal Communications Commission (FCC) compliance information statement The Lexmark E234, Machine Type 4505-420 and Lexmark E234n, Machine Type 4505-410, have been tested and found to comply...
User's Guide
Page 9
... be disabled from the printer's resident Web page (see page 98). When warranty service involves the exchange of a product or part, the item replaced becomes the property of Limited Warranty applies to this mode can be a new or repaired item. Lexmark E234, E234n This Statement of... the Remarketer or Lexmark. For customers outside the U.S. Also, such product must be free of this printer, this product if it prepaid and suitably packaged to present the feature ...
... be disabled from the printer's resident Web page (see page 98). When warranty service involves the exchange of a product or part, the item replaced becomes the property of Limited Warranty applies to this mode can be a new or repaired item. Lexmark E234, E234n This Statement of... the Remarketer or Lexmark. For customers outside the U.S. Also, such product must be free of this printer, this product if it prepaid and suitably packaged to present the feature ...
User's Guide
Page 11
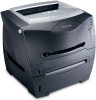
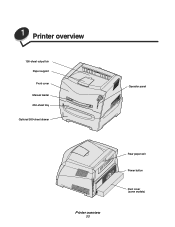
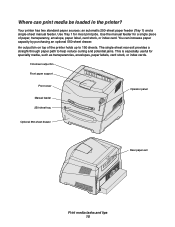
1 Printer overview 150-sheet output bin Paper support Front cover Manual feeder 250-sheet tray Optional 550-sheet drawer Operator panel Printer overview 11 Rear paper exit Power button Dust cover (some models)
1 Printer overview 150-sheet output bin Paper support Front cover Manual feeder 250-sheet tray Optional 550-sheet drawer Operator panel Printer overview 11 Rear paper exit Power button Dust cover (some models)
User's Guide
Page 12
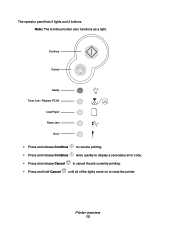
The operator panel has 5 lights and 2 buttons. Note: The Continue button also functions as a light. Continue Cancel Ready Toner Low / Replace PC Kit Load Paper Paper Jam Error • Press and release Continue to resume printing. • Press and release Continue twice quickly to display a secondary error code. • Press and release Cancel to cancel the job currently printing. • Press and hold Cancel until all of the lights come on to reset the printer. Printer overview 12
The operator panel has 5 lights and 2 buttons. Note: The Continue button also functions as a light. Continue Cancel Ready Toner Low / Replace PC Kit Load Paper Paper Jam Error • Press and release Continue to resume printing. • Press and release Continue twice quickly to display a secondary error code. • Press and release Cancel to cancel the job currently printing. • Press and hold Cancel until all of the lights come on to reset the printer. Printer overview 12
User's Guide
Page 13
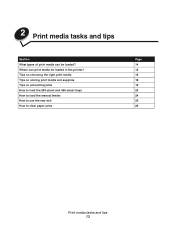
Tips on choosing the right print media Tips on storing print media and supplies Tips on preventing jams How to load the 250-sheet and 550-sheet trays How to load the manual feeder How to use the rear exit How to clear paper jams Page 14 15 16 18 19 20 24 25 26 Print media tasks and tips 13 Where can be loaded in the printer? 2 Print media tasks and tips Section What types of print media can print media be loaded?
Tips on choosing the right print media Tips on storing print media and supplies Tips on preventing jams How to load the 250-sheet and 550-sheet trays How to load the manual feeder How to use the rear exit How to clear paper jams Page 14 15 16 18 19 20 24 25 26 Print media tasks and tips 13 Where can be loaded in the printer? 2 Print media tasks and tips Section What types of print media can print media be loaded?
User's Guide
Page 14
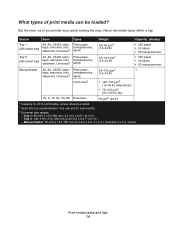
Tray 2: 148-216 x 210-356 mm (5.83-8.5 x 8.27-14.0 in . What types of your printer by properly loading the trays. Never mix media types within a tray. Source Sizes Types Weight Capacity* (sheets) Tray 1 A4, A5, JIS B5, letter, Plain paper, (...
Tray 2: 148-216 x 210-356 mm (5.83-8.5 x 8.27-14.0 in . What types of your printer by properly loading the trays. Never mix media types within a tray. Source Sizes Types Weight Capacity* (sheets) Tray 1 A4, A5, JIS B5, letter, Plain paper, (...
User's Guide
Page 15
...can increase paper capacity by purchasing an optional 550-sheet drawer. The single-sheet rear exit provides a straight-through paper path to 150 sheets. Your printer has two standard paper sources: an automatic 250-sheet paper feeder (Tray 1) and a single-sheet manual feeder. An output bin on top of paper..., transparency, envelope, paper label, card stock, or index card. Use the manual feeder for a single piece of the printer holds up to help reduce curling and potential jams. This is especially useful for most print jobs. You can print media be loaded in the...
...can increase paper capacity by purchasing an optional 550-sheet drawer. The single-sheet rear exit provides a straight-through paper path to 150 sheets. Your printer has two standard paper sources: an automatic 250-sheet paper feeder (Tray 1) and a single-sheet manual feeder. An output bin on top of paper..., transparency, envelope, paper label, card stock, or index card. Use the manual feeder for a single piece of the printer holds up to help reduce curling and potential jams. This is especially useful for most print jobs. You can print media be loaded in the...
User's Guide
Page 16
... to withstand temperatures up to high temperatures of 170°C (338°F) for non-MICR applications. part number 12A5010 for laser printers. Refer to withstand temperatures of 170°C (338°F) without discoloring, bleeding, or releasing hazardous emissions. Paper lighter than 90...do not bleed. • Avoid papers with the manufacturer or vendor to withstand these requirements; We recommend Lexmark laser printer transparencies: part number 70X7240 for laser printers. The printer can automatically feed paper weights from 60 to 90 g/m2 (16 to feed properly, causing jams. ...
... to withstand temperatures up to high temperatures of 170°C (338°F) for non-MICR applications. part number 12A5010 for laser printers. Refer to withstand temperatures of 170°C (338°F) without discoloring, bleeding, or releasing hazardous emissions. Paper lighter than 90...do not bleed. • Avoid papers with the manufacturer or vendor to withstand these requirements; We recommend Lexmark laser printer transparencies: part number 70X7240 for laser printers. The printer can automatically feed paper weights from 60 to 90 g/m2 (16 to feed properly, causing jams. ...

User's Guide
Page 18
Storing supplies Choose a cool, clean storage area for your printer supplies. Preprinting introduces semi-liquid and volatile components into the printer. • Use card stock with chemicals that may release hazardous emissions when heated. • Do not use them. Do not expose supplies to avoid paper ..., perforation, and creasing can significantly affect the print quality and cause media handling or jamming problems. • Avoid using card stock that may contaminate the printer.
Storing supplies Choose a cool, clean storage area for your printer supplies. Preprinting introduces semi-liquid and volatile components into the printer. • Use card stock with chemicals that may release hazardous emissions when heated. • Do not use them. Do not expose supplies to avoid paper ..., perforation, and creasing can significantly affect the print quality and cause media handling or jamming problems. • Avoid using card stock that may contaminate the printer.
User's Guide
Page 19
...and tips 19 Have metal clasps, string ties, or metal folding bars - Refer to the Card Stock & Label Guide available on our Lexmark Web site at www.lexmark.com for more information about which paper provides optimum results for a Load Paper (see "Load media" on preventing jams You can help ...you load it. • Do not exceed the maximum stack height. • Push all trays firmly into the printer after loading them. • Make ...
...and tips 19 Have metal clasps, string ties, or metal folding bars - Refer to the Card Stock & Label Guide available on our Lexmark Web site at www.lexmark.com for more information about which paper provides optimum results for a Load Paper (see "Load media" on preventing jams You can help ...you load it. • Do not exceed the maximum stack height. • Push all trays firmly into the printer after loading them. • Make ...
User's Guide
Page 23
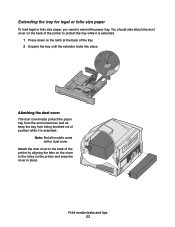
... size paper To load legal or folio size paper, you need to the holes on the printer and snap the cover in place. You should also attach the dust cover on the back of the printer to protect the tray while it is extended. 1 Press down on the latch at the back...
... size paper To load legal or folio size paper, you need to the holes on the printer and snap the cover in place. You should also attach the dust cover on the back of the printer to protect the tray while it is extended. 1 Press down on the latch at the back...
User's Guide
Page 24
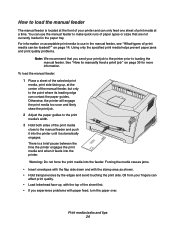
... manual feeder, but only to the point where its leading edge can affect print quality. • Load letterhead face-up , at the front of your printer and can only feed one sheet of paper types or sizes that you experience problems with paper feed, turn the paper over. Using only the... guides. Print media tasks and tips 24 on page 30 for more information. Oil from your print job to the printer prior to the manual feeder and push it into the printer until it feeds into the feeder. For information on acceptable print media to manually feed a print job" on page 14...
... manual feeder, but only to the point where its leading edge can affect print quality. • Load letterhead face-up , at the front of your printer and can only feed one sheet of paper types or sizes that you experience problems with paper feed, turn the paper over. Using only the... guides. Print media tasks and tips 24 on page 30 for more information. Oil from your print job to the printer prior to the manual feeder and push it into the printer until it feeds into the feeder. For information on acceptable print media to manually feed a print job" on page 14...
User's Guide
Page 25
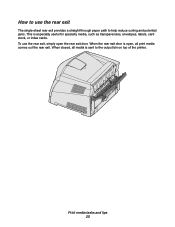
When the rear exit door is especially useful for specialty media, such as transparencies, envelopes, labels, card stock, or index cards. To use the rear exit The single-sheet rear exit provides a straight-through paper path to the output bin on top of the printer. Print media tasks and tips 25 How to use the rear exit, simply open , all media is sent to help reduce curling and potential jams. This is open the rear exit door. When closed, all print media comes out the rear exit.
When the rear exit door is especially useful for specialty media, such as transparencies, envelopes, labels, card stock, or index cards. To use the rear exit The single-sheet rear exit provides a straight-through paper path to the output bin on top of the printer. Print media tasks and tips 25 How to use the rear exit, simply open , all media is sent to help reduce curling and potential jams. This is open the rear exit door. When closed, all print media comes out the rear exit.
User's Guide
Page 26
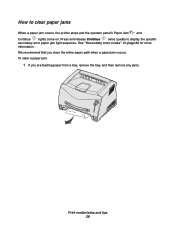
We recommend that you are feeding paper from a tray, remove the tray, and then remove any jams. Print media tasks and tips 26 To clear a paper jam: 1 If you clear the entire paper path when a paper jam occurs. See "Secondary error codes" on . Press and release Continue twice quickly to clear paper jams When a paper jam occurs, the printer stops and the operator panel's Paper Jam and Continue lights come on page 66 for more information. How to display the specific secondary error paper jam light sequence.
We recommend that you are feeding paper from a tray, remove the tray, and then remove any jams. Print media tasks and tips 26 To clear a paper jam: 1 If you clear the entire paper path when a paper jam occurs. See "Secondary error codes" on . Press and release Continue twice quickly to clear paper jams When a paper jam occurs, the printer stops and the operator panel's Paper Jam and Continue lights come on page 66 for more information. How to display the specific secondary error paper jam light sequence.
User's Guide
Page 28
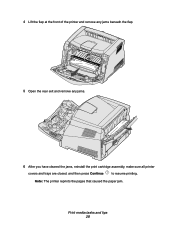
Print media tasks and tips 28 Note: The printer reprints the pages that caused the paper jam. 4 Lift the flap at the front of the printer and remove any jams beneath the flap. 5 Open the rear exit and remove any jams. 6 After you have cleared the jams, reinstall the print cartridge assembly, make sure all printer covers and trays are closed, and then press Continue to resume printing.
Print media tasks and tips 28 Note: The printer reprints the pages that caused the paper jam. 4 Lift the flap at the front of the printer and remove any jams beneath the flap. 5 Open the rear exit and remove any jams. 6 After you have cleared the jams, reinstall the print cartridge assembly, make sure all printer covers and trays are closed, and then press Continue to resume printing.
User's Guide
Page 30
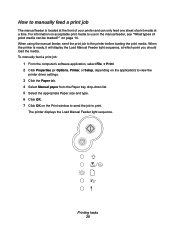
...To manually feed a print job: 1 From the computer's software application, select File Æ Print. 2 Click Properties (or Options, Printer, or Setup, depending on the application) to view the printer driver settings. 3 Click the Paper tab. 4 Select Manual paper from the Paper tray drop-down list. 5 Select the appropriate Paper... OK. 7 Click OK on the Print window to send the job to the printer before loading the print media. When the printer is located at the front of print media at a time. The printer displays the Load Manual Feeder light sequence. When using the manual feeder, send the...
...To manually feed a print job: 1 From the computer's software application, select File Æ Print. 2 Click Properties (or Options, Printer, or Setup, depending on the application) to view the printer driver settings. 3 Click the Paper tab. 4 Select Manual paper from the Paper tray drop-down list. 5 Select the appropriate Paper... OK. 7 Click OK on the Print window to send the job to the printer before loading the print media. When the printer is located at the front of print media at a time. The printer displays the Load Manual Feeder light sequence. When using the manual feeder, send the...


