User's Guide
Page 4
... Storing supplies 105 How to conserve supplies 105 How to know when you need new supplies 106 Checking the toner and photoconductor levels 106 Recognizing the operator panel light sequences 107 How to change a toner cartridge 108 Lexmark Return Program 111 Refilled toner cartridge notice 111 Recycling Lexmark products 111 How to change a photoconductor kit 112 Contents 4
... Storing supplies 105 How to conserve supplies 105 How to know when you need new supplies 106 Checking the toner and photoconductor levels 106 Recognizing the operator panel light sequences 107 How to change a toner cartridge 108 Lexmark Return Program 111 Refilled toner cartridge notice 111 Recycling Lexmark products 111 How to change a photoconductor kit 112 Contents 4
User's Guide
Page 10
... warranty period. This limitation of remedies also applies to state. Such developer is provided for any claim by anyone other than Lexmark product or component ALL EXPRESS AND IMPLIED WARRANTIES, INCLUDING THE IMPLIED WARRANTIES OF MERCHANTABILITY AND FITNESS FOR A PARTICULAR PURPOSE, ARE ...no longer covered by you may recover actual damages up to Lexmark. You may also have installed a maintenance kit as toner cartridges, inkjet cartridges, and ribbons) • Use of liability will not apply to claims by a Lexmark warranty, technical support may not apply to real property or ...
... warranty period. This limitation of remedies also applies to state. Such developer is provided for any claim by anyone other than Lexmark product or component ALL EXPRESS AND IMPLIED WARRANTIES, INCLUDING THE IMPLIED WARRANTIES OF MERCHANTABILITY AND FITNESS FOR A PARTICULAR PURPOSE, ARE ...no longer covered by you may recover actual damages up to Lexmark. You may also have installed a maintenance kit as toner cartridges, inkjet cartridges, and ribbons) • Use of liability will not apply to claims by a Lexmark warranty, technical support may not apply to real property or ...
User's Guide
Page 53
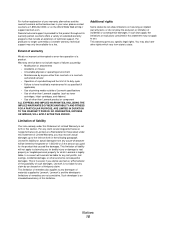
... photoconductor kit Replace photoconductor kit (printer hard stop) Unsupported toner cartridge / Toner cartridge is not installed Change invalid toner cartridge Programming engine code / Programming system code Cancel job / Reset printer Service error Printer error * Paper jam printer error * Empty = Off Common light sequences (continued) Page: Continue Ready Toner Low / Replace PC Kit Load Paper Paper Jam Error...
... photoconductor kit Replace photoconductor kit (printer hard stop) Unsupported toner cartridge / Toner cartridge is not installed Change invalid toner cartridge Programming engine code / Programming system code Cancel job / Reset printer Service error Printer error * Paper jam printer error * Empty = Off Common light sequences (continued) Page: Continue Ready Toner Low / Replace PC Kit Load Paper Paper Jam Error...
User's Guide
Page 63
... a list of current printer settings. • Remove the toner cartridge and shake it to extend the life of the cartridge. • Replace the toner cartridge. (See "How to change a toner cartridge" on page 108 for more information. See "Secondary error codes" on if the starter toner cartridge is installed in the toner cartridge is getting low. Using the operator panel 63...
... a list of current printer settings. • Remove the toner cartridge and shake it to extend the life of the cartridge. • Replace the toner cartridge. (See "How to change a toner cartridge" on page 108 for more information. See "Secondary error codes" on if the starter toner cartridge is installed in the toner cartridge is getting low. Using the operator panel 63...
User's Guide
Page 65
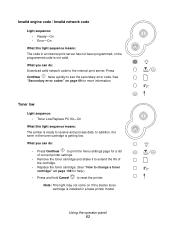
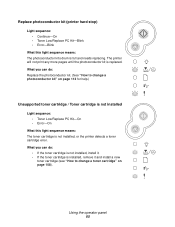
Using the operator panel 65 What you can do : • If the toner cartridge is not installed, install it and install a new toner cartridge (see "How to change a toner cartridge" on page 112 for help.) Unsupported toner cartridge / Toner cartridge is not installed Light sequence: • Toner Low/Replace PC Kit-On • Error-On What this light sequence means: The photoconductor...
Using the operator panel 65 What you can do : • If the toner cartridge is not installed, install it and install a new toner cartridge (see "How to change a toner cartridge" on page 112 for help.) Unsupported toner cartridge / Toner cartridge is not installed Light sequence: • Toner Low/Replace PC Kit-On • Error-On What this light sequence means: The photoconductor...
User's Guide
Page 66
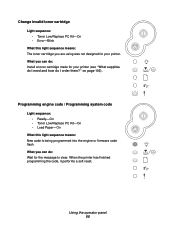
...the operator panel 66 Programming engine code / Programming system code Light sequence: • Ready-On • Toner Low/Replace PC Kit-On • Load Paper-On What this light sequence means: The toner cartridge you are using was not designed for your printer (see "What supplies do I need and how do ... for the message to clear. When the printer has finished programming the code, it performs a soft reset. Change invalid toner cartridge Light sequence: • Toner Low/Replace PC Kit-On • Error-Blink What this light sequence means: New code is being programmed into the engine or ...
...the operator panel 66 Programming engine code / Programming system code Light sequence: • Ready-On • Toner Low/Replace PC Kit-On • Load Paper-On What this light sequence means: The toner cartridge you are using was not designed for your printer (see "What supplies do I need and how do ... for the message to clear. When the printer has finished programming the code, it performs a soft reset. Change invalid toner cartridge Light sequence: • Toner Low/Replace PC Kit-On • Error-Blink What this light sequence means: New code is being programmed into the engine or ...
User's Guide
Page 104
How to conserve supplies How to change a photoconductor kit Page 105 105 106 108 111 111 112 Supplies information 104 8 Supplies information Section What supplies do I need new supplies How to change a toner cartridge Lexmark Return Program Recycling Lexmark products How to know when you need and how do I order them?
How to conserve supplies How to change a photoconductor kit Page 105 105 106 108 111 111 112 Supplies information 104 8 Supplies information Section What supplies do I need new supplies How to change a toner cartridge Lexmark Return Program Recycling Lexmark products How to know when you need and how do I order them?
User's Guide
Page 105
... to 10 (very dark), with 8 being the default. How often the toner cartridge needs replacing depends on your printer. The photoconductor kit typically lasts up in your printer supplies. In other countries, visit the Lexmark online store at approximately 5% coverage), whereas the toner cartridge has to be replaced more frequently. Storing supplies Choose a cool, clean...
... to 10 (very dark), with 8 being the default. How often the toner cartridge needs replacing depends on your printer. The photoconductor kit typically lasts up in your printer supplies. In other countries, visit the Lexmark online store at approximately 5% coverage), whereas the toner cartridge has to be replaced more frequently. Storing supplies Choose a cool, clean...
User's Guide
Page 106
...short time while this point. For help printing a menu settings page, see page 63) is displayed when the toner cartridge is displayed, but print quality begins to decrease as the toner level decreases. To avoid having the printer stop )*" on page 94. Supplies information 106 How to know when... you need to order replacement supplies. You can determine approximately how much toner is left in your cartridge and how full the photoconductor kit is by printing out a menu settings page. While the printer may continue to function ...
...short time while this point. For help printing a menu settings page, see page 63) is displayed when the toner cartridge is displayed, but print quality begins to decrease as the toner level decreases. To avoid having the printer stop )*" on page 94. Supplies information 106 How to know when... you need to order replacement supplies. You can determine approximately how much toner is left in your cartridge and how full the photoconductor kit is by printing out a menu settings page. While the printer may continue to function ...
User's Guide
Page 108
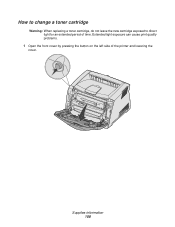
Supplies information 108 Extended light exposure can cause print quality problems. 1 Open the front cover by pressing the button on the left side of time. How to change a toner cartridge Warning: When replacing a toner cartridge, do not leave the new cartridge exposed to direct light for an extended period of the printer and lowering the cover.
Supplies information 108 Extended light exposure can cause print quality problems. 1 Open the front cover by pressing the button on the left side of time. How to change a toner cartridge Warning: When replacing a toner cartridge, do not leave the new cartridge exposed to direct light for an extended period of the printer and lowering the cover.
User's Guide
Page 109
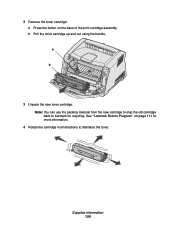
b Pull the toner cartridge up and out using the handle. See "Lexmark Return Program" on the base of the print cartridge assembly. Note: You can use the packing material from the new cartridge to ship the old cartridge back to distribute the toner. a b 3 Unpack the new toner cartridge. Supplies information 109 2 Remove the toner cartridge: a Press the button on page 111 for more information. 4 Rotate the cartridge in all directions to Lexmark for recycling.
b Pull the toner cartridge up and out using the handle. See "Lexmark Return Program" on the base of the print cartridge assembly. Note: You can use the packing material from the new cartridge to ship the old cartridge back to distribute the toner. a b 3 Unpack the new toner cartridge. Supplies information 109 2 Remove the toner cartridge: a Press the button on page 111 for more information. 4 Rotate the cartridge in all directions to Lexmark for recycling.
User's Guide
Page 110
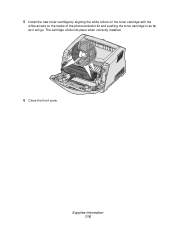
The cartridge clicks into place when correctly installed. 6 Close the front cover. Supplies information 110 5 Install the new toner cartridge by aligning the white rollers on the toner cartridge with the white arrows on the tracks of the photoconductor kit and pushing the toner cartridge in as far as it will go.
The cartridge clicks into place when correctly installed. 6 Close the front cover. Supplies information 110 5 Install the new toner cartridge by aligning the white rollers on the toner cartridge with the white arrows on the tracks of the photoconductor kit and pushing the toner cartridge in as far as it will go.
User's Guide
Page 111
.../recycle. To learn how to Lexmark using the Lexmark Cartridge Collection Program. Warning: Toner cartridge leaks due to Lexmark for recycling. Regular toner cartridges without this agreement are also available. Lexmark cannot assure the excellent print quality and reliability of third-party remanufactured cartridges. Lexmark does not recommend the use of its toner cartridges after a toner cartridge has been refilled. Recycling Lexmark products To return your...
.../recycle. To learn how to Lexmark using the Lexmark Cartridge Collection Program. Warning: Toner cartridge leaks due to Lexmark for recycling. Regular toner cartridges without this agreement are also available. Lexmark cannot assure the excellent print quality and reliability of third-party remanufactured cartridges. Lexmark does not recommend the use of its toner cartridges after a toner cartridge has been refilled. Recycling Lexmark products To return your...
User's Guide
Page 112
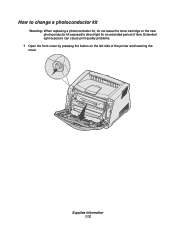
How to change a photoconductor kit Warning: When replacing a photoconductor kit, do not leave the toner cartridge or the new photoconductor kit exposed to direct light for an extended period of the printer and lowering the cover. Extended light exposure can cause print quality problems. 1 Open the front cover by pressing the button on the left side of time. Supplies information 112
How to change a photoconductor kit Warning: When replacing a photoconductor kit, do not leave the toner cartridge or the new photoconductor kit exposed to direct light for an extended period of the printer and lowering the cover. Extended light exposure can cause print quality problems. 1 Open the front cover by pressing the button on the left side of time. Supplies information 112
User's Guide
Page 113
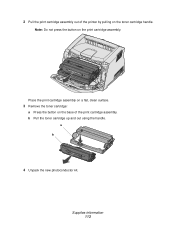
a b 4 Unpack the new photoconductor kit. b Pull the toner cartridge up and out using the handle. Supplies information 113 2 Pull the print cartridge assembly out of the print cartridge assembly. Place the print cartridge assembly on a flat, clean surface. 3 Remove the toner cartridge: a Press the button on the base of the printer by pulling on the print cartridge assembly. Note: Do not press the button on the toner cartridge handle.
a b 4 Unpack the new photoconductor kit. b Pull the toner cartridge up and out using the handle. Supplies information 113 2 Pull the print cartridge assembly out of the print cartridge assembly. Place the print cartridge assembly on a flat, clean surface. 3 Remove the toner cartridge: a Press the button on the base of the printer by pulling on the print cartridge assembly. Note: Do not press the button on the toner cartridge handle.

User's Guide
Page 114
... by aligning the green arrows on the guides of the photoconductor kit and pushing the toner cartridge in as far as it will go . 7 Close the front cover. Note: For information about resetting the photoconductor kit's counter, refer to the instruction sheet ...that shipped with the green arrows on the tracks in the printer and pushing the print cartridge assembly in as far as it will go . Supplies information 114 5 Install the toner cartridge into the printer by aligning the white rollers on the toner cartridge with the white arrows on the tracks of the print...
... by aligning the green arrows on the guides of the photoconductor kit and pushing the toner cartridge in as far as it will go . 7 Close the front cover. Note: For information about resetting the photoconductor kit's counter, refer to the instruction sheet ...that shipped with the green arrows on the tracks in the printer and pushing the print cartridge assembly in as far as it will go . Supplies information 114 5 Install the toner cartridge into the printer by aligning the white rollers on the toner cartridge with the white arrows on the tracks of the print...
User's Guide
Page 116
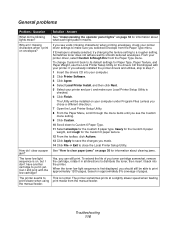
... I still print with your printer. The Utility will be able to print approximately 1200 pages, based on approximately 5% coverage of you toner cartridge somewhat, remove the cartridge, rotate it back into your computer. 2 Click Printer Software. 3 Click Agree. 4 Select Local Printer Install, and then click Next... 7. 1 Insert the drivers CD into the printer. General problems Problem / Question What do I don't have another cartridge to put in all directions to distribute the toner, then insert it in yet. How do the blinking lights mean? This is checked. 6 Click Finish.
... I still print with your printer. The Utility will be able to print approximately 1200 pages, based on approximately 5% coverage of you toner cartridge somewhat, remove the cartridge, rotate it back into your computer. 2 Click Printer Software. 3 Click Agree. 4 Select Local Printer Install, and then click Next... 7. 1 Insert the drivers CD into the printer. General problems Problem / Question What do I don't have another cartridge to put in all directions to distribute the toner, then insert it in yet. How do the blinking lights mean? This is checked. 6 Click Finish.
User's Guide
Page 118
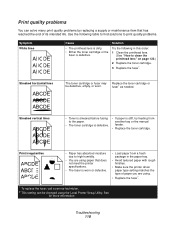
... • Load paper from another tray or the manual feeder. • Replace the toner cartridge. Print irregularities ABCDE ABCDE ABCDE • Paper has absorbed moisture due to the paper. • The toner cartridge is defective. • If paper is defective. See "Using the Local Printer Setup ..."How to print quality problems. Symptom White lines ABCDE ABCDE ABCDE Cause Solution • The printhead lens is dirty. • Either the toner cartridge or the fuser is stiff, try feeding from a fresh package in the paper tray. • Avoid textured paper with rough finishes. &#...
... • Load paper from another tray or the manual feeder. • Replace the toner cartridge. Print irregularities ABCDE ABCDE ABCDE • Paper has absorbed moisture due to the paper. • The toner cartridge is defective. • If paper is defective. See "Using the Local Printer Setup ..."How to print quality problems. Symptom White lines ABCDE ABCDE ABCDE Cause Solution • The printhead lens is dirty. • Either the toner cartridge or the fuser is stiff, try feeding from a fresh package in the paper tray. • Avoid textured paper with rough finishes. &#...

User's Guide
Page 119
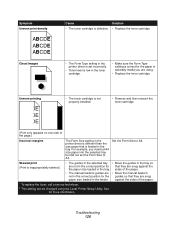
... sure the paper you load in the trays is not damp. • Replace the toner cartridge. • The Toner Darkness setting is too dark. • The toner cartridge is defective. • Select a different Toner Darkness† setting from the printer driver before sending the job to print. •... only transparencies recommended by the printer's manufacturer. • Make sure the Form Type setting is set to print. • Replace the toner cartridge. * To replace the fuser, call a service technician. † This setting can be changed using . • The Paper Weight setting is...
... sure the paper you load in the trays is not damp. • Replace the toner cartridge. • The Toner Darkness setting is too dark. • The toner cartridge is defective. • Select a different Toner Darkness† setting from the printer driver before sending the job to print. •... only transparencies recommended by the printer's manufacturer. • Make sure the Form Type setting is set to print. • Replace the toner cartridge. * To replace the fuser, call a service technician. † This setting can be changed using . • The Paper Weight setting is...
User's Guide
Page 120
...one side of the paper. * To replace the fuser, call a service technician. † This setting can be changed using . • Replace the toner cartridge. sides of the paper. • The manual feeder's guides are snug against the sides of the page.) Incorrect margins The Form Size setting in the... printer driver is not properly installed. • Remove and then reinsert the toner cartridge. (Print only appears on page 103 for the paper or specialty media you inserted A4 size paper into the selected tray but did ...
...one side of the paper. * To replace the fuser, call a service technician. † This setting can be changed using . • Replace the toner cartridge. sides of the paper. • The manual feeder's guides are snug against the sides of the page.) Incorrect margins The Form Size setting in the... printer driver is not properly installed. • Remove and then reinsert the toner cartridge. (Print only appears on page 103 for the paper or specialty media you inserted A4 size paper into the selected tray but did ...


