User's Guide
Page 3
... 44 How to add a memory card 45 How to add a flash card 46 How to install a 550-sheet drawer 48 How to get the printer driver to recognize installed options 49 Chapter 5: Using the operator panel 50 Overview of the operator panel 51 Understanding the operator panel lights 52 Secondary errors...
... 44 How to add a memory card 45 How to add a flash card 46 How to install a 550-sheet drawer 48 How to get the printer driver to recognize installed options 49 Chapter 5: Using the operator panel 50 Overview of the operator panel 51 Understanding the operator panel lights 52 Secondary errors...
User's Guide
Page 4
... 84 Network menu 85 Parallel menu 86 Setup menu 86 USB menu 87 Utilities menu 87 Chapter 7: Software and network tasks 88 How to install drivers for local printing 89 Windows 89 Macintosh 91 UNIX/Linux 93 How to print the menu settings and network setup pages 94 How to print...you need new supplies 106 Checking the toner and photoconductor levels 106 Recognizing the operator panel light sequences 107 How to change a toner cartridge 108 Lexmark Return Program 111 Refilled toner cartridge notice 111 Recycling Lexmark products 111 How to change a photoconductor kit 112 Contents 4
... 84 Network menu 85 Parallel menu 86 Setup menu 86 USB menu 87 Utilities menu 87 Chapter 7: Software and network tasks 88 How to install drivers for local printing 89 Windows 89 Macintosh 91 UNIX/Linux 93 How to print the menu settings and network setup pages 94 How to print...you need new supplies 106 Checking the toner and photoconductor levels 106 Recognizing the operator panel light sequences 107 How to change a toner cartridge 108 Lexmark Return Program 111 Refilled toner cartridge notice 111 Recycling Lexmark products 111 How to change a photoconductor kit 112 Contents 4
User's Guide
Page 7
...IEC 60825-1. Electronic emission notices Federal Communications Commission (FCC) compliance information statement The Lexmark E230, Machine Type 4505-100, Lexmark E232, Machine Type 4505-200, Lexmark E330, Machine Type 4505-300, and Lexmark E332n, Machine Type 4505-310, have been tested and found to comply with the... systems in accordance with this symbol , it under the approval number NS/G/1234/J/100003 for the Lexmark modified GNU licensed software, launch the drivers CD that could help you want to review: BSD License and Warranty statements GNU General Public License The...
...IEC 60825-1. Electronic emission notices Federal Communications Commission (FCC) compliance information statement The Lexmark E230, Machine Type 4505-100, Lexmark E232, Machine Type 4505-200, Lexmark E330, Machine Type 4505-300, and Lexmark E332n, Machine Type 4505-310, have been tested and found to comply with the... systems in accordance with this symbol , it under the approval number NS/G/1234/J/100003 for the Lexmark modified GNU licensed software, launch the drivers CD that could help you want to review: BSD License and Warranty statements GNU General Public License The...

User's Guide
Page 30
... job: 1 From the computer's software application, select File Æ Print. 2 Click Properties (or Options, Printer, or Setup, depending on the application) to view the printer driver settings. 3 Click the Paper tab. 4 Select Manual paper from the Paper tray drop-down list. 5 Select the appropriate Paper size and type. 6 Click OK. 7 Click...
... job: 1 From the computer's software application, select File Æ Print. 2 Click Properties (or Options, Printer, or Setup, depending on the application) to view the printer driver settings. 3 Click the Paper tab. 4 Select Manual paper from the Paper tray drop-down list. 5 Select the appropriate Paper size and type. 6 Click OK. 7 Click...
User's Guide
Page 32
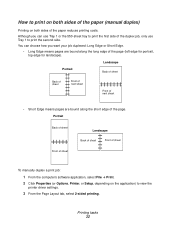
... you can use Tray 1 or the 550-sheet tray to print the first side of the duplex job, only use Tray 1 to view the printer driver settings. 3 From the Page Layout tab, select 2-sided printing. Although you want your job duplexed: Long Edge or Short Edge. • Long Edge means pages...
... you can use Tray 1 or the 550-sheet tray to print the first side of the duplex job, only use Tray 1 to view the printer driver settings. 3 From the Page Layout tab, select 2-sided printing. Although you want your job duplexed: Long Edge or Short Edge. • Long Edge means pages...

User's Guide
Page 34
... image. 1 From the computer's software application, select File Æ Print. 2 Click Properties (or Options, Printer, or Setup, depending on the application) to view the printer driver settings. 3 From the Page Layout tab, select the number of images per sheet (from the Multipage printing section) and the orientation you select: Across Down...
... image. 1 From the computer's software application, select File Æ Print. 2 Click Properties (or Options, Printer, or Setup, depending on the application) to view the printer driver settings. 3 From the Page Layout tab, select the number of images per sheet (from the Multipage printing section) and the orientation you select: Across Down...
User's Guide
Page 35
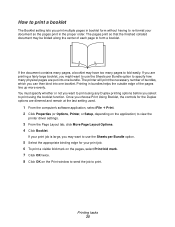
..., which you select to fold easily. You must specify whether or not you want to use the Sheets per Bundle option to view the printer driver settings. 3 From the Page Layout tab, click More Page Layout Options. 4 Click Booklet.
..., which you select to fold easily. You must specify whether or not you want to use the Sheets per Bundle option to view the printer driver settings. 3 From the Page Layout tab, click More Page Layout Options. 4 Click Booklet.
User's Guide
Page 36
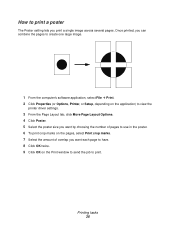
... image. 1 From the computer's software application, select File Æ Print. 2 Click Properties (or Options, Printer, or Setup, depending on the application) to view the printer driver settings. 3 From the Page Layout tab, click More Page Layout Options. 4 Click Poster. 5 Select the poster size you want by choosing the number of pages...
... image. 1 From the computer's software application, select File Æ Print. 2 Click Properties (or Options, Printer, or Setup, depending on the application) to view the printer driver settings. 3 From the Page Layout tab, click More Page Layout Options. 4 Click Poster. 5 Select the poster size you want by choosing the number of pages...
User's Guide
Page 37
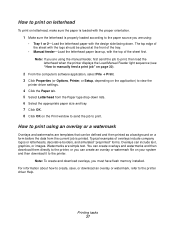
...; Print. 3 Click Properties (or Options, Printer, or Setup, depending on the application) to view the printer driver settings. 4 Click the Paper tab. 5 Select Letterhead from the current job is properly loaded according to the printer driver Help. You can create overlays and watermarks and then download them directly to the printer, or...
...; Print. 3 Click Properties (or Options, Printer, or Setup, depending on the application) to view the printer driver settings. 4 Click the Paper tab. 5 Select Letterhead from the current job is properly loaded according to the printer driver Help. You can create overlays and watermarks and then download them directly to the printer, or...
User's Guide
Page 38
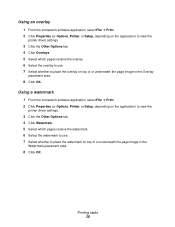
...'s software application, select File Æ Print. 2 Click Properties (or Options, Printer, or Setup, depending on the application) to view the printer driver settings. 3 Click the Other Options tab. 4 Click Overlays. 5 Select which pages receive the watermark. 6 Select the watermark to use . 7 ...computer's software application, select File Æ Print. 2 Click Properties (or Options, Printer, or Setup, depending on the application) to view the printer driver settings. 3 Click the Other Options tab. 4 Click Watermark. 5 Select which pages receive the overlay. 6 Select the overlay to use . 7 ...
...'s software application, select File Æ Print. 2 Click Properties (or Options, Printer, or Setup, depending on the application) to view the printer driver settings. 3 Click the Other Options tab. 4 Click Overlays. 5 Select which pages receive the watermark. 6 Select the watermark to use . 7 ...computer's software application, select File Æ Print. 2 Click Properties (or Options, Printer, or Setup, depending on the application) to view the printer driver settings. 3 Click the Other Options tab. 4 Click Watermark. 5 Select which pages receive the overlay. 6 Select the overlay to use . 7 ...
User's Guide
Page 40
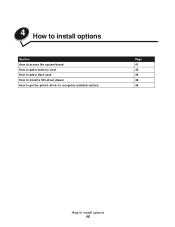
4 How to install options Section How to access the system board How to add a memory card How to add a flash card How to install a 550-sheet drawer How to get the printer driver to recognize installed options Page 41 45 46 48 49 How to install options 40
4 How to install options Section How to access the system board How to add a memory card How to add a flash card How to install a 550-sheet drawer How to get the printer driver to recognize installed options Page 41 45 46 48 49 How to install options 40
User's Guide
Page 45
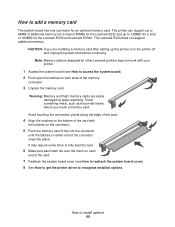
...). 2 Push open the latches on each end of the memory connector. 3 Unpack the memory card. The Lexmark E230 does not support additional memory. How to add a memory card The system board has one connector for the Lexmark E232 and up to fully seat the card. 6 Make sure each latch fits over the notch... on both ends of the card. 7 Reattach the system board cover (see How to reattach the system board cover). 8 See How to get the printer driver to recognize installed options...
...). 2 Push open the latches on each end of the memory connector. 3 Unpack the memory card. The Lexmark E230 does not support additional memory. How to add a memory card The system board has one connector for the Lexmark E232 and up to fully seat the card. 6 Make sure each latch fits over the notch... on both ends of the card. 7 Reattach the system board cover (see How to reattach the system board cover). 8 See How to get the printer driver to recognize installed options...
User's Guide
Page 47
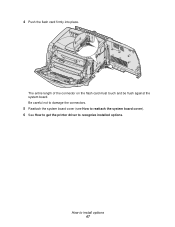
How to recognize installed options. 4 Push the flash card firmly into place. Be careful not to damage the connectors. 5 Reattach the system board cover (see How to reattach the system board cover). 6 See How to get the printer driver to install options 47 The entire length of the connector on the flash card must touch and be flush against the system board.
How to recognize installed options. 4 Push the flash card firmly into place. Be careful not to damage the connectors. 5 Reattach the system board cover (see How to reattach the system board cover). 6 See How to get the printer driver to install options 47 The entire length of the connector on the flash card must touch and be flush against the system board.
User's Guide
Page 48
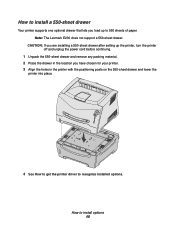
... on the 550-sheet drawer and lower the printer into place. 4 See How to get the printer driver to recognize installed options. How to 550 sheets of paper. CAUTION: If you are installing a 550-sheet drawer after setting up to install options 48 Note: The Lexmark E230 does not support a 550-sheet drawer.
... on the 550-sheet drawer and lower the printer into place. 4 See How to get the printer driver to recognize installed options. How to 550 sheets of paper. CAUTION: If you are installing a 550-sheet drawer after setting up to install options 48 Note: The Lexmark E230 does not support a 550-sheet drawer.

User's Guide
Page 49
...Add. • Memory Card-Increase the printer memory to the appropriate number. 6 Click OK. How to install options 49 After you have installed a printer driver, return here to complete these instructions. 1 Click Start Æ Settings Æ Printers. 2 Select the printer's icon. 3 Click File Æ Properties... option you have not installed your printer driver yet, follow the appropriate instructions under Software and network tasks. How to get the printer driver to recognize installed options After the printer is turned on, the printer driver should automatically recognize an option you can ...
...Add. • Memory Card-Increase the printer memory to the appropriate number. 6 Click OK. How to install options 49 After you have installed a printer driver, return here to complete these instructions. 1 Click Start Æ Settings Æ Printers. 2 Select the printer's icon. 3 Click File Æ Properties... option you have not installed your printer driver yet, follow the appropriate instructions under Software and network tasks. How to get the printer driver to recognize installed options After the printer is turned on, the printer driver should automatically recognize an option you can ...
User's Guide
Page 62
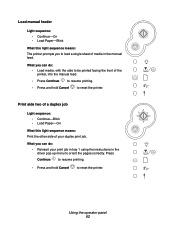
... Load manual feeder Light sequence: • Continue-On • Load Paper-Blink What this light sequence means: Print the other side of media in the driver pop-up menu to reset the printer. Print side two of a duplex job Light sequence: • Continue-Blink • Load Paper-On What this light...
... Load manual feeder Light sequence: • Continue-On • Load Paper-Blink What this light sequence means: Print the other side of media in the driver pop-up menu to reset the printer. Print side two of a duplex job Light sequence: • Continue-Blink • Load Paper-On What this light...

User's Guide
Page 88
7 Software and network tasks Section How to install drivers for local printing How to print the menu settings and network setup pages How to print a test page How to configure for TCP/IP How to set up the printer for network printing Using the printer resident Web page Using the Local Printer Setup Utility Page 89 94 94 95 96 102 103 Software and network tasks 88
7 Software and network tasks Section How to install drivers for local printing How to print the menu settings and network setup pages How to print a test page How to configure for TCP/IP How to set up the printer for network printing Using the printer resident Web page Using the Local Printer Setup Utility Page 89 94 94 95 96 102 103 Software and network tasks 88
User's Guide
Page 89
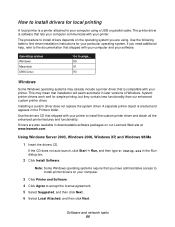
... lets your computer communicate with your particular operating system. The procedure to install drivers depends on our Lexmark Web site at www.lexmark.com. Use the drivers CD that installation will seem automatic in later versions of Windows. How to install drivers for local printing A local printer is created and appears in the Printers folder...
... lets your computer communicate with your particular operating system. The procedure to install drivers depends on our Lexmark Web site at www.lexmark.com. Use the drivers CD that installation will seem automatic in later versions of Windows. How to install drivers for local printing A local printer is created and appears in the Printers folder...

User's Guide
Page 90
... the license agreement. 5 Select Custom, and then click Next. 6 Follow the instructions on your screen to complete installing the drivers. Software and network tasks 90 Using Windows 95, Windows NT 1 Insert the drivers CD. Note: USB support is not available for Windows 95 or Windows NT operating systems. If the CD does... type D:\Setup.exe in the Run dialog box. 2 Click Install Software. 3 Click Printer and Software. 7 Follow the instructions on your screen to complete installing the drivers.
... the license agreement. 5 Select Custom, and then click Next. 6 Follow the instructions on your screen to complete installing the drivers. Software and network tasks 90 Using Windows 95, Windows NT 1 Insert the drivers CD. Note: USB support is not available for Windows 95 or Windows NT operating systems. If the CD does... type D:\Setup.exe in the Run dialog box. 2 Click Install Software. 3 Click Printer and Software. 7 Follow the instructions on your screen to complete installing the drivers.
User's Guide
Page 91
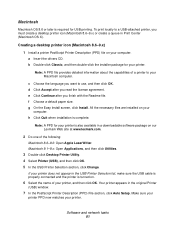
... sure the USB cable is properly connected and the printer is turned on our Lexmark Web site at www.lexmark.com. 2 Do one of the following: Macintosh 8.6-9.0: Open Apple LaserWriter. Macintosh Macintosh OS 8.6 or later is complete. a Insert the drivers CD. Make sure your printer PPD now matches your Macintosh computer. f Choose a default...
... sure the USB cable is properly connected and the printer is turned on our Lexmark Web site at www.lexmark.com. 2 Do one of the following: Macintosh 8.6-9.0: Open Apple LaserWriter. Macintosh Macintosh OS 8.6 or later is complete. a Insert the drivers CD. Make sure your printer PPD now matches your Macintosh computer. f Choose a default...

