Setup Guide
Page 3
Table of Contents 1 Introducing Your Printer Special Features 1.2 Printer Components 1.4 2 Setting Up Your Printer STEP 1: Unpacking Your Printer 2.2 STEP 2: Installing the Toner Cartridge 2.3 STEP 3: Loading Print Media 2.5 STEP 4: Connecting to the Computer with a Parallel Cable 2.7 STEP 5: Turning on the Printer 2.8 STEP 6: Printing a Demo Page 2.8 STEP 7: Installing the Printer Software 2.9 Installing Software from Diskette 2.15 3 Using the Control Panel Control Panel Buttons 3.2 Control Panel Lights 3.4 iii
Table of Contents 1 Introducing Your Printer Special Features 1.2 Printer Components 1.4 2 Setting Up Your Printer STEP 1: Unpacking Your Printer 2.2 STEP 2: Installing the Toner Cartridge 2.3 STEP 3: Loading Print Media 2.5 STEP 4: Connecting to the Computer with a Parallel Cable 2.7 STEP 5: Turning on the Printer 2.8 STEP 6: Printing a Demo Page 2.8 STEP 7: Installing the Printer Software 2.9 Installing Software from Diskette 2.15 3 Using the Control Panel Control Panel Buttons 3.2 Control Panel Lights 3.4 iii

Setup Guide
Page 9
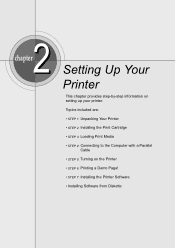
Topics included are: • STEP 1: Unpacking Your Printer • STEP 2: Installing the Print Cartridge • STEP 3: Loading Print Media • STEP 4: Connecting to the Computer with a Parallel Cable • STEP 5: Turning on setting up your printer. 2chapter Setting Up Your Printer This chapter provides step-by-step information on the Printer • STEP 6: Printing a Demo Page! • STEP 7: Installing the Printer Software • Installing Software from Diskette
Topics included are: • STEP 1: Unpacking Your Printer • STEP 2: Installing the Print Cartridge • STEP 3: Loading Print Media • STEP 4: Connecting to the Computer with a Parallel Cable • STEP 5: Turning on setting up your printer. 2chapter Setting Up Your Printer This chapter provides step-by-step information on the Printer • STEP 6: Printing a Demo Page! • STEP 7: Installing the Printer Software • Installing Software from Diskette

Setup Guide
Page 10
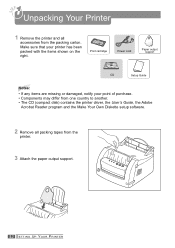
Print cartridge Power cord Paper output support CD Setup Guide Notes: • If any items are missing or damaged, notify your printer has been packed with the items shown on the right. Unpacking Your Printer 1 Remove the printer and all packing tapes from the packing carton. Make sure that your point ...of purchase. • Components may differ from one country to another. • The CD (compact disk) contains the printer driver, the User's Guide, the Adobe Acrobat Reader program and the Make Your Own Diskette setup software. 2 Remove all accessories from the...
Print cartridge Power cord Paper output support CD Setup Guide Notes: • If any items are missing or damaged, notify your printer has been packed with the items shown on the right. Unpacking Your Printer 1 Remove the printer and all packing tapes from the packing carton. Make sure that your point ...of purchase. • Components may differ from one country to another. • The CD (compact disk) contains the printer driver, the User's Guide, the Adobe Acrobat Reader program and the Make Your Own Diskette setup software. 2 Remove all accessories from the...

Setup Guide
Page 11
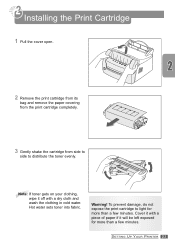
...cold water. Hot water sets toner into fabric. Installing the Print Cartridge 1 Pull the cover open. 2 Remove the print cartridge from its bag and remove the paper covering from the print cartridge completely. 3 Gently shake the cartridge from side to side to light for more than a few minutes.... To prevent damage, do not expose the print cartridge to distribute the toner evenly. Warning! SETTING UP YOUR PRINTER 2.3 Cover it will be left ...
...cold water. Hot water sets toner into fabric. Installing the Print Cartridge 1 Pull the cover open. 2 Remove the print cartridge from its bag and remove the paper covering from the print cartridge completely. 3 Gently shake the cartridge from side to side to light for more than a few minutes.... To prevent damage, do not expose the print cartridge to distribute the toner evenly. Warning! SETTING UP YOUR PRINTER 2.3 Cover it will be left ...

Setup Guide
Page 12
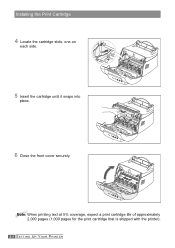
Note: When printing text at 5% coverage, expect a print cartridge life of approximately 2,000 pages (1,000 pages for the print cartridge that is shipped with the printer). 2.4 SETTING UP YOUR PRINTER Installing the Print Cartridge 4 Locate the cartridge slots, one on each side. 5 Insert the cartridge until it snaps into place. 6 Close the front cover securely.
Note: When printing text at 5% coverage, expect a print cartridge life of approximately 2,000 pages (1,000 pages for the print cartridge that is shipped with the printer). 2.4 SETTING UP YOUR PRINTER Installing the Print Cartridge 4 Locate the cartridge slots, one on each side. 5 Insert the cartridge until it snaps into place. 6 Close the front cover securely.

Online Information
Page 3
Table of Contents 1 Introducing Your Printer Special Features 1.2 Printer Components 1.4 2 Setting Up Your Printer STEP 1: Unpacking Your Printer 2.2 STEP 2: Installing the Toner Cartridge 2.3 STEP 3: Loading Print Media 2.5 STEP 4: Connecting to the Computer with a Parallel Cable 2.7 STEP 5: Turning on the Printer 2.8 STEP 6: Printing a Demo Page 2.8 STEP 7: Installing the Printer Software 2.9 Installing Software from Diskette 2.15 3 Using the Control Panel Control Panel Buttons 3.2 Control Panel Lights 3.4 iii
Table of Contents 1 Introducing Your Printer Special Features 1.2 Printer Components 1.4 2 Setting Up Your Printer STEP 1: Unpacking Your Printer 2.2 STEP 2: Installing the Toner Cartridge 2.3 STEP 3: Loading Print Media 2.5 STEP 4: Connecting to the Computer with a Parallel Cable 2.7 STEP 5: Turning on the Printer 2.8 STEP 6: Printing a Demo Page 2.8 STEP 7: Installing the Printer Software 2.9 Installing Software from Diskette 2.15 3 Using the Control Panel Control Panel Buttons 3.2 Control Panel Lights 3.4 iii
Online Information
Page 4
... to a selected Paper Size 5.9 Printing Posters 5.10 Setting Graphic Properties 5.12 Printing Watermarks 5.14 Using Page Overlay 5.17 Printing on a Network Environment 5.22 6 Maintaining Your Printer Maintaining the Print Cartridge 6.2 Cleaning the Printer 6.6 iv
... to a selected Paper Size 5.9 Printing Posters 5.10 Setting Graphic Properties 5.12 Printing Watermarks 5.14 Using Page Overlay 5.17 Printing on a Network Environment 5.22 6 Maintaining Your Printer Maintaining the Print Cartridge 6.2 Cleaning the Printer 6.6 iv
Online Information
Page 11
Topics included are: • STEP 1: Unpacking Your Printer • STEP 2: Installing the Print Cartridge • STEP 3: Loading Print Media • STEP 4: Connecting to the Computer with a Parallel Cable • STEP 5: Turning on setting up your printer. 2chapter Setting Up Your Printer This chapter provides step-by-step information on the Printer • STEP 6: Printing a Demo Page! • STEP 7: Installing the Printer Software • Installing Software from Diskette
Topics included are: • STEP 1: Unpacking Your Printer • STEP 2: Installing the Print Cartridge • STEP 3: Loading Print Media • STEP 4: Connecting to the Computer with a Parallel Cable • STEP 5: Turning on setting up your printer. 2chapter Setting Up Your Printer This chapter provides step-by-step information on the Printer • STEP 6: Printing a Demo Page! • STEP 7: Installing the Printer Software • Installing Software from Diskette
Online Information
Page 12
... (compact disk) contains the printer driver, the User's Guide, the Adobe Acrobat Reader program and the Make Your Own Diskette setup software. 2 Remove all accessories from the printer. 3 Attach the paper output support. 2.2 SETTING UP YOUR PRINTER Print cartridge Power cord Paper output support CD... Setup Guide Notes: • If any items are missing or damaged, notify your printer has been packed with the items shown...
... (compact disk) contains the printer driver, the User's Guide, the Adobe Acrobat Reader program and the Make Your Own Diskette setup software. 2 Remove all accessories from the printer. 3 Attach the paper output support. 2.2 SETTING UP YOUR PRINTER Print cartridge Power cord Paper output support CD... Setup Guide Notes: • If any items are missing or damaged, notify your printer has been packed with the items shown...
Online Information
Page 13
SETTING UP YOUR PRINTER 2.3 Cover it will be left exposed for more than a few minutes. To prevent damage, do not expose the print cartridge to distribute the toner evenly. Warning! Hot water sets toner into fabric. Note: If toner gets on your clothing, wipe it off ... with a dry cloth and wash the clothing in cold water. Installing the Print Cartridge 1 Pull the cover open. 2 Remove the print cartridge from its bag and remove the paper covering from the print cartridge completely. 3 Gently shake the cartridge from side to side to light for more than a few minutes.
SETTING UP YOUR PRINTER 2.3 Cover it will be left exposed for more than a few minutes. To prevent damage, do not expose the print cartridge to distribute the toner evenly. Warning! Hot water sets toner into fabric. Note: If toner gets on your clothing, wipe it off ... with a dry cloth and wash the clothing in cold water. Installing the Print Cartridge 1 Pull the cover open. 2 Remove the print cartridge from its bag and remove the paper covering from the print cartridge completely. 3 Gently shake the cartridge from side to side to light for more than a few minutes.
Online Information
Page 14
Installing the Print Cartridge 4 Locate the cartridge slots, one on each side. 5 Insert the cartridge until it snaps into place. 6 Close the front cover securely. Note: When printing text at 5% coverage, expect a print cartridge life of approximately 2,000 pages (1,000 pages for the print cartridge that is shipped with the printer). 2.4 SETTING UP YOUR PRINTER
Installing the Print Cartridge 4 Locate the cartridge slots, one on each side. 5 Insert the cartridge until it snaps into place. 6 Close the front cover securely. Note: When printing text at 5% coverage, expect a print cartridge life of approximately 2,000 pages (1,000 pages for the print cartridge that is shipped with the printer). 2.4 SETTING UP YOUR PRINTER
Online Information
Page 78
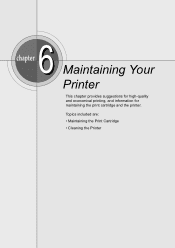
6chapter Maintaining Your Printer This chapter provides suggestions for high-quality and economical printing, and information for maintaining the print cartridge and the printer. Topics included are: • Maintaining the Print Cartridge • Cleaning the Printer
6chapter Maintaining Your Printer This chapter provides suggestions for high-quality and economical printing, and information for maintaining the print cartridge and the printer. Topics included are: • Maintaining the Print Cartridge • Cleaning the Printer

Online Information
Page 79
...: • Do not remove the print cartridge from the printer except to recycle the used cartridge. 6.2 MAINTAINING YOUR PRINTER When printing text at www.lexmark.com. Note: The print cartridge supplied with your area, or visit the Lexmark Web site at 5% coverage, a new print cartridge lasts an average of 2,000 pages. The printer warranty does not cover damage caused...
...: • Do not remove the print cartridge from the printer except to recycle the used cartridge. 6.2 MAINTAINING YOUR PRINTER When printing text at www.lexmark.com. Note: The print cartridge supplied with your area, or visit the Lexmark Web site at 5% coverage, a new print cartridge lasts an average of 2,000 pages. The printer warranty does not cover damage caused...
Online Information
Page 80
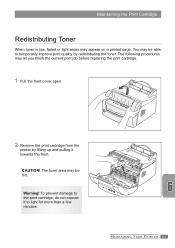
...pulling it towards the front. CAUTION! The fuser area may be hot. MAINTAINING YOUR PRINTER 6.3 You may be able to light for more than a few minutes. Warning! Maintaining the Print Cartridge Redistributing Toner When toner is low, faded or light areas may let you finish ...the current print job before replacing the print cartridge. 1 Pull the front cover open. 2 Remove the print cartridge from the printer by redistributing the toner. The following ...
...pulling it towards the front. CAUTION! The fuser area may be hot. MAINTAINING YOUR PRINTER 6.3 You may be able to light for more than a few minutes. Warning! Maintaining the Print Cartridge Redistributing Toner When toner is low, faded or light areas may let you finish ...the current print job before replacing the print cartridge. 1 Pull the front cover open. 2 Remove the print cartridge from the printer by redistributing the toner. The following ...
Online Information
Page 81
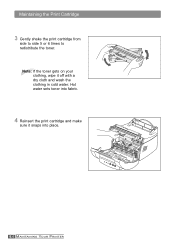
Note: If the toner gets on your clothing, wipe it snaps into place. 6.4 MAINTAINING YOUR PRINTER Hot water sets toner into fabric. 4 Reinsert the print cartridge and make sure it off with a dry cloth and wash the clothing in cold water. Maintaining the Print Cartridge 3 Gently shake the print cartridge from side to side 5 or 6 times to redistribute the toner.
Note: If the toner gets on your clothing, wipe it snaps into place. 6.4 MAINTAINING YOUR PRINTER Hot water sets toner into fabric. 4 Reinsert the print cartridge and make sure it off with a dry cloth and wash the clothing in cold water. Maintaining the Print Cartridge 3 Gently shake the print cartridge from side to side 5 or 6 times to redistribute the toner.
Online Information
Page 82
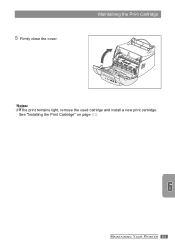
See "Installing the Print Cartridge" on page 2.3. MAINTAINING YOUR PRINTER 6.5 Maintaining the Print Cartridge Notes: • If the print remains light, remove the used catridge and install a new print cartridge. 5 Firmly close the cover.
See "Installing the Print Cartridge" on page 2.3. MAINTAINING YOUR PRINTER 6.5 Maintaining the Print Cartridge Notes: • If the print remains light, remove the used catridge and install a new print cartridge. 5 Firmly close the cover.
Online Information
Page 83
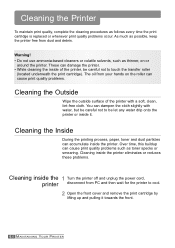
...• Do not use ammonia-based cleaners or volatile solvents, such as possible, keep the printer free from PC and then wait for the printer to touch the transfer roller (located underneath the print cartridge). Cleaning the Inside During the printing process, paper, toner and dust particles can cause print ... be careful not to be let any water drip onto the printer or inside of the printer, be careful not to cool. 2 Open the front cover and remove the print cartridge by lifting up and pulling it . You can damage the printer. • While cleaning the inside it towards the front. ...
...• Do not use ammonia-based cleaners or volatile solvents, such as possible, keep the printer free from PC and then wait for the printer to touch the transfer roller (located underneath the print cartridge). Cleaning the Inside During the printing process, paper, toner and dust particles can cause print ... be careful not to be let any water drip onto the printer or inside of the printer, be careful not to cool. 2 Open the front cover and remove the print cartridge by lifting up and pulling it . You can damage the printer. • While cleaning the inside it towards the front. ...

Online Information
Page 84
Also, do not expose it with a piece of paper, if necessary. To prevent damage to light for more than a few minutes. Doing so can damage your printer. 4 Reinsert the print cartridge and close the cover. 5 Plug in the power cord and turn the printer on. Warning! MAINTAINING YOUR PRINTER 6.7 Cover it to the print cartridge, do not touch the black transfer roller inside the printer. Cleaning the Printer 3 With a dry, lint-free cloth, wipe away any dust and spilled toner from the print cartridge area and the print cartridge cavity.
Also, do not expose it with a piece of paper, if necessary. To prevent damage to light for more than a few minutes. Doing so can damage your printer. 4 Reinsert the print cartridge and close the cover. 5 Plug in the power cord and turn the printer on. Warning! MAINTAINING YOUR PRINTER 6.7 Cover it to the print cartridge, do not touch the black transfer roller inside the printer. Cleaning the Printer 3 With a dry, lint-free cloth, wipe away any dust and spilled toner from the print cartridge area and the print cartridge cavity.
Online Information
Page 85
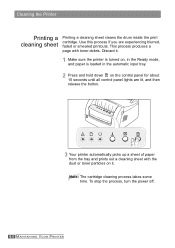
... a cleaning sheet Printing a cleaning sheet cleans the drum inside the print cartridge. This process produces a page with the dust or toner particles on it . 1 Make sure the printer is turned on, in the Ready mode, and paper is loaded in the automatic input tray. 2 Press and hold down on the ...until all control panel lights are experiencing blurred, faded or smeared printouts. Discard it . To stop the process, turn the power off. 6.8 MAINTAINING YOUR PRINTER Note: The cartridge cleaning process takes some time. Use this process if you are lit, and then release the button. 3 Your...
... a cleaning sheet Printing a cleaning sheet cleans the drum inside the print cartridge. This process produces a page with the dust or toner particles on it . 1 Make sure the printer is turned on, in the Ready mode, and paper is loaded in the automatic input tray. 2 Press and hold down on the ...until all control panel lights are experiencing blurred, faded or smeared printouts. Discard it . To stop the process, turn the power off. 6.8 MAINTAINING YOUR PRINTER Note: The cartridge cleaning process takes some time. Use this process if you are lit, and then release the button. 3 Your...
Online Information
Page 88
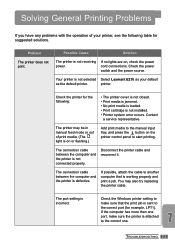
... cable between the computer and the printer is not connected properly. TROUBLESHOOTING 7.3 Your printer is not selected Select Lexmark E210 as your printer, see the following : • The printer cover is not closed. • Print media is jammed. • No print media is loaded. • Print cartridge is not installed. • Printer system error occurs. If possible, attach...
... cable between the computer and the printer is not connected properly. TROUBLESHOOTING 7.3 Your printer is not selected Select Lexmark E210 as your printer, see the following : • The printer cover is not closed. • Print media is jammed. • No print media is loaded. • Print cartridge is not installed. • Printer system error occurs. If possible, attach...


