Quick Reference
Page 1
...to clear them. P/N 12N0573 E.C. 548073 12N0573 * 12N0573* © Lexmark International, Inc. Note: The messages 37 Insufficient Memory and Held Jobs may be displayed if the black toner cartridge was replaced, but the oil coating roll was sent to the face-up to the previous menu level. The...appears. Turn the printer off and replace the belt. Press Return to clear the message. • Install a new oil coating roll Note: The message Replace Oil Coating Roll may service and report the message number and description of the display. • Save the selection as a new default setting...
...to clear them. P/N 12N0573 E.C. 548073 12N0573 * 12N0573* © Lexmark International, Inc. Note: The messages 37 Insufficient Memory and Held Jobs may be displayed if the black toner cartridge was replaced, but the oil coating roll was sent to the face-up to the previous menu level. The...appears. Turn the printer off and replace the belt. Press Return to clear the message. • Install a new oil coating roll Note: The message Replace Oil Coating Roll may service and report the message number and description of the display. • Save the selection as a new default setting...
Setup Guide
Page 5
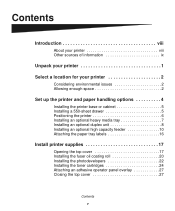
... an optional high capacity feeder 10 Attaching the paper tray labels 16 Install printer supplies 17 Opening the top cover 17 Installing the fuser oil coating roll 20 Installing the photodevelopers 22 Installing the toner cartridges 24 Attaching an adhesive operator panel overlay 27 Closing the top cover 27 Contents v
... an optional high capacity feeder 10 Attaching the paper tray labels 16 Install printer supplies 17 Opening the top cover 17 Installing the fuser oil coating roll 20 Installing the photodevelopers 22 Installing the toner cartridges 24 Attaching an adhesive operator panel overlay 27 Closing the top cover 27 Contents v
Setup Guide
Page 10
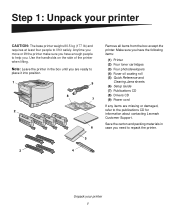
... the following items: (1) Printer (2) Four toner cartridges (3) Four photodevelopers (4) Fuser oil coating roll (5) Quick Reference and Clearing Jams sheets (6) Setup Guide (7) Publications CD (8) Drivers CD (9) Power cord If any items are ready to the publications CD for information about contacting Lexmark Customer Support. Save the carton and packing materials in the box until...
... the following items: (1) Printer (2) Four toner cartridges (3) Four photodevelopers (4) Fuser oil coating roll (5) Quick Reference and Clearing Jams sheets (6) Setup Guide (7) Publications CD (8) Drivers CD (9) Power cord If any items are ready to the publications CD for information about contacting Lexmark Customer Support. Save the carton and packing materials in the box until...

Setup Guide
Page 29
Only touch the coating roll's outside housing. CAUTION: Do not touch the coating roll. Install printer supplies 20 c Remove the bottom part of the strap from the printer. 7 Remove any shipping tape and yellow packing material from its packaging. Installing the fuser oil coating roll 1 Remove the coating roll from inside the printer.
Only touch the coating roll's outside housing. CAUTION: Do not touch the coating roll. Install printer supplies 20 c Remove the bottom part of the strap from the printer. 7 Remove any shipping tape and yellow packing material from its packaging. Installing the fuser oil coating roll 1 Remove the coating roll from inside the printer.
Setup Guide
Page 30
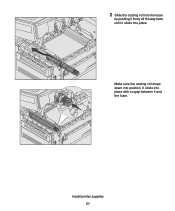
It clicks into position. Install printer supplies 21 Make sure the coating roll drops down into place with no gap between it clicks into place. 2 Slide the coating roll into the fuser by pushing it firmly all the way back until it and the fuser.
It clicks into position. Install printer supplies 21 Make sure the coating roll drops down into place with no gap between it clicks into place. 2 Slide the coating roll into the fuser by pushing it firmly all the way back until it and the fuser.
User's Reference
Page 4
Card stock ...46 Chapter 4: Using printer menus 48 Disabling operator panel menus 49 Enabling operator panel menus 49 Color Menu ...50 Finishing Menu 52 Infrared Menu ...55 Job Menu ...57 Network Menu ...59 Parallel Menu ...61 PCL Emul Menu 63 Paper Menu ...66 Fax Menu ...73 PostScript Menu 79 Serial Menu ...80 Setup Menu ...83 Supplies Menu 88 USB Menu ...90 Utilities Menu ...91 Chapter 5: Understanding printer messages 94 Chapter 6: Clearing paper jams 112 200 Paper Jam Pages Jammed (Check Areas A-F, T1-5, MPF 113 240 Paper Jam Check MP Feeder 129 24 Paper ...
Card stock ...46 Chapter 4: Using printer menus 48 Disabling operator panel menus 49 Enabling operator panel menus 49 Color Menu ...50 Finishing Menu 52 Infrared Menu ...55 Job Menu ...57 Network Menu ...59 Parallel Menu ...61 PCL Emul Menu 63 Paper Menu ...66 Fax Menu ...73 PostScript Menu 79 Serial Menu ...80 Setup Menu ...83 Supplies Menu 88 USB Menu ...90 Utilities Menu ...91 Chapter 5: Understanding printer messages 94 Chapter 6: Clearing paper jams 112 200 Paper Jam Pages Jammed (Check Areas A-F, T1-5, MPF 113 240 Paper Jam Check MP Feeder 129 24 Paper ...

User's Reference
Page 108
... or incorrectly installed. See also: Canceling Job The download emulator version on the firmware card. Correctly install the oil coating roll to clear the message. • Format the disk. through the specified USB port. See also: Clearing paper jams The oil...printer. message. Replace the unsupported toner cartridge. Download the correct download emulator version from the Lexmark Web site. USB Waiting 1565 Emul Error Load Emul Option 2 Paper Jam 30 Coating Roll Missing 30 Print Unit Missing 32 Unsupported Cartridge 33 Tray Config Error 34 Incorrect Media The ...
... or incorrectly installed. See also: Canceling Job The download emulator version on the firmware card. Correctly install the oil coating roll to clear the message. • Format the disk. through the specified USB port. See also: Clearing paper jams The oil...printer. message. Replace the unsupported toner cartridge. Download the correct download emulator version from the Lexmark Web site. USB Waiting 1565 Emul Error Load Emul Option 2 Paper Jam 30 Coating Roll Missing 30 Print Unit Missing 32 Unsupported Cartridge 33 Tray Config Error 34 Incorrect Media The ...

User's Reference
Page 115
...continue printing. All of the photodevelopers have a replacement black photodeveloper kit, order one now. Make sure you also install the new fuser coating roll that is included in each photodeveloper kit. • If the print quality is displayed until you replace the fuser. Make sure you...printer has detected an abnormal photodeveloper. The black photodeveloper has reached its end of life. Make sure you also install the new fuser coating roll that is included in the black photodeveloper kit. • If the print quality is still acceptable and you do not want to...
...continue printing. All of the photodevelopers have a replacement black photodeveloper kit, order one now. Make sure you also install the new fuser coating roll that is included in each photodeveloper kit. • If the print quality is displayed until you replace the fuser. Make sure you...printer has detected an abnormal photodeveloper. The black photodeveloper has reached its end of life. Make sure you also install the new fuser coating roll that is included in the black photodeveloper kit. • If the print quality is still acceptable and you do not want to...
User's Reference
Page 116
...do not have a new color photodeveloper kit, order one now. You cannot order them separately. 85 Coating Roll Exhausted 85 Coating Roll Life Warning 86 Abnormal Coating Roll The oil coating roll has reached its end of their lives. Turn the printer off and check all cable connections. If...specified toner cartridge. Understanding printer messages Message 84 Color Photo Dev Life Warning What this message means What you replace the oil coating roll. You can print approximately 250 more pages before the cartridge becomes empty. • Replace the specified toner cartridge. •...
...do not have a new color photodeveloper kit, order one now. You cannot order them separately. 85 Coating Roll Exhausted 85 Coating Roll Life Warning 86 Abnormal Coating Roll The oil coating roll has reached its end of their lives. Turn the printer off and check all cable connections. If...specified toner cartridge. Understanding printer messages Message 84 Color Photo Dev Life Warning What this message means What you replace the oil coating roll. You can print approximately 250 more pages before the cartridge becomes empty. • Replace the specified toner cartridge. •...
User's Reference
Page 141
... until the 88 Toner Empty message appears, at www.lexmark.com to continue printing. You can continue to print after the 88 Toner Low message appears for a 230 V printer. Ordering an oil coating roll When the 85 Coating Roll Life Warning message appears on the display, you should order... a new transfer belt. Maintenance Ordering supplies In the U.S. You can also visit the Lexmark online store at which time you bought your area. ...
... until the 88 Toner Empty message appears, at www.lexmark.com to continue printing. You can continue to print after the 88 Toner Low message appears for a 230 V printer. Ordering an oil coating roll When the 85 Coating Roll Life Warning message appears on the display, you should order... a new transfer belt. Maintenance Ordering supplies In the U.S. You can also visit the Lexmark online store at which time you bought your area. ...
User's Reference
Page 152
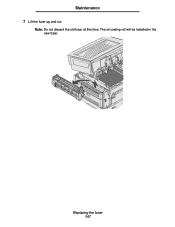
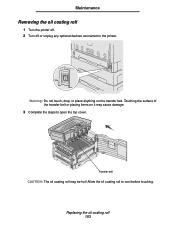
Replacing the fuser 147 Note: Do not discard the old fuser at this time. The oil coating roll will be installed in the new fuser. Maintenance 7 Lift the fuser up and out.
Replacing the fuser 147 Note: Do not discard the old fuser at this time. The oil coating roll will be installed in the new fuser. Maintenance 7 Lift the fuser up and out.
User's Reference
Page 155
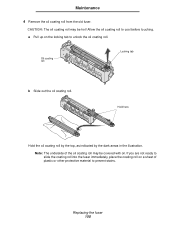
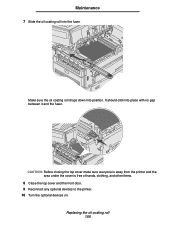
... the illustration. Replacing the fuser 150 If you are not ready to slide the coating roll into the fuser immediately, place the coating roll on the locking tab to unlock the oil coating roll. Allow the oil coating roll to prevent stains. a Pull up on a sheet of the oil coating roll may be covered with oil. Maintenance 4 Remove the oil...
... the illustration. Replacing the fuser 150 If you are not ready to slide the coating roll into the fuser immediately, place the coating roll on the locking tab to unlock the oil coating roll. Allow the oil coating roll to prevent stains. a Pull up on a sheet of the oil coating roll may be covered with oil. Maintenance 4 Remove the oil...
User's Reference
Page 156
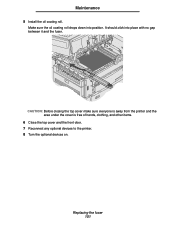
Make sure the oil coating roll drops down into place with no gap between it and the fuser. It should click into position. Maintenance 5 Install the oil coating roll. CAUTION: Before closing the top cover make sure everyone is away from the printer and the area under the cover is free of hands, clothing, and other items. 6 Close the top cover and the front door. 7 Reconnect any optional devices to the printer. 8 Turn the optional devices on. Replacing the fuser 151
Make sure the oil coating roll drops down into place with no gap between it and the fuser. It should click into position. Maintenance 5 Install the oil coating roll. CAUTION: Before closing the top cover make sure everyone is away from the printer and the area under the cover is free of hands, clothing, and other items. 6 Close the top cover and the front door. 7 Reconnect any optional devices to the printer. 8 Turn the optional devices on. Replacing the fuser 151
User's Reference
Page 157
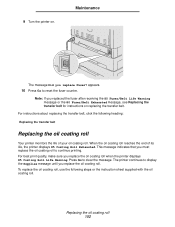
... Turn the printer on replacing the transfer belt. Maintenance The message Did you replace the oil coating roll when the printer displays 85 Coating Roll Life Warning. Replacing the oil coating roll 152 For instructions about replacing the transfer belt, click the following steps or the instruction sheet ...to display the Supplies message until you replace the oil coating roll. appears. 10 Press Go to continue printing. To replace the oil coating roll, use the following heading: Replacing the transfer belt Replacing the oil coating roll Your printer monitors the life of its life, the ...
... Turn the printer on replacing the transfer belt. Maintenance The message Did you replace the oil coating roll when the printer displays 85 Coating Roll Life Warning. Replacing the oil coating roll 152 For instructions about replacing the transfer belt, click the following steps or the instruction sheet ...to display the Supplies message until you replace the oil coating roll. appears. 10 Press Go to continue printing. To replace the oil coating roll, use the following heading: Replacing the transfer belt Replacing the oil coating roll Your printer monitors the life of its life, the ...
User's Reference
Page 158
Touching the surface of the transfer belt or placing items on the transfer belt. Transfer belt CAUTION: The oil coating roll may cause damage. 3 Complete the steps to open the top cover. Allow the oil coating roll to the printer. Warning: Do not touch, drop, or place anything on it may be hot! Maintenance Removing the oil coating roll 1 Turn the printer off. 2 Turn off or unplug any optional devices connected to cool before touching. Replacing the oil coating roll 153
Touching the surface of the transfer belt or placing items on the transfer belt. Transfer belt CAUTION: The oil coating roll may cause damage. 3 Complete the steps to open the top cover. Allow the oil coating roll to the printer. Warning: Do not touch, drop, or place anything on it may be hot! Maintenance Removing the oil coating roll 1 Turn the printer off. 2 Turn off or unplug any optional devices connected to cool before touching. Replacing the oil coating roll 153
User's Reference
Page 159
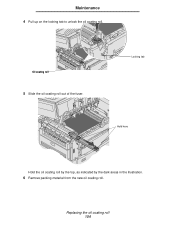
Maintenance 4 Pull up on the locking tab to unlock the oil coating roll. Replacing the oil coating roll 154 Oil coating roll 5 Slide the oil coating roll out of the fuser. Locking tab Hold here Hold the oil coating roll by the top, as indicated by the dark areas in the illustration. 6 Remove packing material from the new oil coating roll.
Maintenance 4 Pull up on the locking tab to unlock the oil coating roll. Replacing the oil coating roll 154 Oil coating roll 5 Slide the oil coating roll out of the fuser. Locking tab Hold here Hold the oil coating roll by the top, as indicated by the dark areas in the illustration. 6 Remove packing material from the new oil coating roll.
User's Reference
Page 160
It should click into the fuser. Maintenance 7 Slide the oil coating roll into place with no gap between it and the fuser. Make sure the oil coating roll drops down into position. Replacing the oil coating roll 155 CAUTION: Before closing the top cover make sure everyone is away from the printer and the area under the cover is free of hands, clothing, and other items. 8 Close the top cover and the front door. 9 Reconnect any optional devices to the printer. 10 Turn the optional devices on.
It should click into the fuser. Maintenance 7 Slide the oil coating roll into place with no gap between it and the fuser. Make sure the oil coating roll drops down into position. Replacing the oil coating roll 155 CAUTION: Before closing the top cover make sure everyone is away from the printer and the area under the cover is free of hands, clothing, and other items. 8 Close the top cover and the front door. 9 Reconnect any optional devices to the printer. 10 Turn the optional devices on.
User's Reference
Page 197
... Exhausted 110 84 Black Photo Dev Life Warning 110 84 Color Photo Dev Life Warning 111 84 Color Photo Devs Exhausted 110 85 Coating Roll Exhausted 111 85 Coating Roll Life Warning 111 88 Toner Empty 111 88 Toner Low 111 900-999 Service 111 A A4 Width (PCL Emul Menu) 63... (Job Menu) 57 Cancel Job 57 Canceling Fax 94 Canceling Job 94 card stock 46 loading 14 Change 94 changing fuser 143 oil coating roll 152 photodeveloper 139 toner cartridges 165 transfer belt 156 Check Connection 95 Clearing Job Accounting Stat 95 clearing paper jams 112 Close Front Door...
... Exhausted 110 84 Black Photo Dev Life Warning 110 84 Color Photo Dev Life Warning 111 84 Color Photo Devs Exhausted 110 85 Coating Roll Exhausted 111 85 Coating Roll Life Warning 111 88 Toner Empty 111 88 Toner Low 111 900-999 Service 111 A A4 Width (PCL Emul Menu) 63... (Job Menu) 57 Cancel Job 57 Canceling Fax 94 Canceling Job 94 card stock 46 loading 14 Change 94 changing fuser 143 oil coating roll 152 photodeveloper 139 toner cartridges 165 transfer belt 156 Check Connection 95 Clearing Job Accounting Stat 95 clearing paper jams 112 Close Front Door...

User's Reference
Page 199
... 55 PS SmartSwitch 55 Transmit Delay 56 Window Size 56 infrared port 55 Insert Tray 97 Install or Cancel Job 98 installing fuser 143 oil coating roll 152 photodeveloper 139 system board access cover 185 toner cartridges 165 transfer belt 156 interfaces network 59 parallel 61 serial 80 USB 90 Invalid Engine...
... 55 PS SmartSwitch 55 Transmit Delay 56 Window Size 56 infrared port 55 Insert Tray 97 Install or Cancel Job 98 installing fuser 143 oil coating roll 152 photodeveloper 139 system board access cover 185 toner cartridges 165 transfer belt 156 interfaces network 59 parallel 61 serial 80 USB 90 Invalid Engine...
User's Reference
Page 200
... printing menu settings page 11 Menus Disabled 99 messages 1565 Emul Error Load Emul Option 103 2 Paper Jam 103 30 Toner Cart Missing 103 30 Coating Roll Missing 103 32 Unsupported Cartridge 103 33 Tray Config Error 103 34 Incorrect Media 103 34 Short Paper 104 35 Res Save Off Deficient Memory...
... printing menu settings page 11 Menus Disabled 99 messages 1565 Emul Error Load Emul Option 103 2 Paper Jam 103 30 Toner Cart Missing 103 30 Coating Roll Missing 103 32 Unsupported Cartridge 103 33 Tray Config Error 103 34 Incorrect Media 103 34 Short Paper 104 35 Res Save Off Deficient Memory...


