Wireless Setup Guide
Page 8
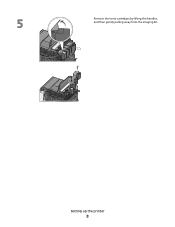
Y C M K Y C M Remove the toner cartridges by lifting the handles, and then gently pulling away from the imaging kit. K M C Y K M C Y Setting up the printer 8
Y C M K Y C M Remove the toner cartridges by lifting the handles, and then gently pulling away from the imaging kit. K M C Y K M C Y Setting up the printer 8
Wireless Setup Guide
Page 10
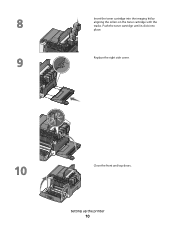
Y C M K K M C Y Close the front and top doors. Replace the right side cover. Setting up the printer 10 Push the toner cartridge until it clicks into the imaging kit by aligning the rollers on the toner cartridge with the tracks. Y C M K K M C Y Insert the toner cartridge into place.
Y C M K K M C Y Close the front and top doors. Replace the right side cover. Setting up the printer 10 Push the toner cartridge until it clicks into the imaging kit by aligning the rollers on the toner cartridge with the tracks. Y C M K K M C Y Insert the toner cartridge into place.

User Guide
Page 64
...Cyan, Magenta, Yellow, or Black Toner Cartridges Early Warning Low Invalid Replace Missing or Defective OK Unsupported Imaging Kit OK Replace Black Imaging Kit Replace Color Imaging Kit Defective Waste Toner Box Near Full Replace Missing OK Description Shows the status of the waste toner box ...Understanding printer menus 64 Understanding printer menus Menus list Supplies Menu Cyan Cartridge Magenta Cartridge Yellow Cartridge Black Cartridge Imaging Kit Waste Toner Box Paper Menu Default Source Size/Type Paper Texture Paper Weight Paper Loading Custom Types Universal Setup Reports...
...Cyan, Magenta, Yellow, or Black Toner Cartridges Early Warning Low Invalid Replace Missing or Defective OK Unsupported Imaging Kit OK Replace Black Imaging Kit Replace Color Imaging Kit Defective Waste Toner Box Near Full Replace Missing OK Description Shows the status of the waste toner box ...Understanding printer menus 64 Understanding printer menus Menus list Supplies Menu Cyan Cartridge Magenta Cartridge Yellow Cartridge Black Cartridge Imaging Kit Waste Toner Box Paper Menu Default Source Size/Type Paper Texture Paper Weight Paper Loading Custom Types Universal Setup Reports...

User Guide
Page 97
... Program Toner Cartridge Black Extra High Yield Toner Cartridge Part number C544X1KG C544X1CG C544X1MG C544X1YG C544X2KG C544X2CG C544X2MG C544X2YG C546U1KG C546U2KG C540 and C543 X X X X X X X X X X C544 X X C546 X X Ordering imaging kits When Replace black and color imaging kit or Replace black imaging kit appears, order a replacement imaging kit.
... Program Toner Cartridge Black Extra High Yield Toner Cartridge Part number C544X1KG C544X1CG C544X1MG C544X1YG C544X2KG C544X2CG C544X2MG C544X2YG C546U1KG C546U2KG C540 and C543 X X X X X X X X X X C544 X X C546 X X Ordering imaging kits When Replace black and color imaging kit or Replace black imaging kit appears, order a replacement imaging kit.

User Guide
Page 101
Maintaining the printer 101 To reduce the risk of the printer might be hot. 9 Close the top door. 10 Close the front door. Replacing a black and color imaging kit Replace the black and color imaging kit when 31.yy Defective Imaging Kit appears. 1 Grasp the front door at the sides, and then pull it toward you. CAUTION-HOT SURFACE: The inside of injury from a hot component, allow the surface to cool before touching.
Maintaining the printer 101 To reduce the risk of the printer might be hot. 9 Close the top door. 10 Close the front door. Replacing a black and color imaging kit Replace the black and color imaging kit when 31.yy Defective Imaging Kit appears. 1 Grasp the front door at the sides, and then pull it toward you. CAUTION-HOT SURFACE: The inside of injury from a hot component, allow the surface to cool before touching.

User Guide
Page 102
Maintaining the printer 102 2 Open the top door by sliding the button forward. 3 Remove the toner cartridges by lifting the handles, and then gently pulling them away from the imaging kit. 4 Remove the right side cover.
Maintaining the printer 102 2 Open the top door by sliding the button forward. 3 Remove the toner cartridges by lifting the handles, and then gently pulling them away from the imaging kit. 4 Remove the right side cover.

User Guide
Page 103
This could damage the imaging kit. Maintaining the printer 103 Warning-Potential Damage: Do not touch the underside of the waste toner box, and then remove it. 6 Lift the blue levers on the imaging kit, and then pull it toward you. 7 Press down on the blue levers, grasp the green handles on the sides, and then pull the imaging kit out. 5 Press the green levers on each side of the imaging kit.
This could damage the imaging kit. Maintaining the printer 103 Warning-Potential Damage: Do not touch the underside of the waste toner box, and then remove it. 6 Lift the blue levers on the imaging kit, and then pull it toward you. 7 Press down on the blue levers, grasp the green handles on the sides, and then pull the imaging kit out. 5 Press the green levers on each side of the imaging kit.

User Guide
Page 104
... printer 104 Note: Make sure each developer unit is inserted into a matching color slot. 13 Place the used black and color imaging kit in the enclosed package. For more information, see "Recycling Lexmark products" on the developer units. 10 Gently shake the yellow, cyan, magenta, and black developer units side to side. 11...
... printer 104 Note: Make sure each developer unit is inserted into a matching color slot. 13 Place the used black and color imaging kit in the enclosed package. For more information, see "Recycling Lexmark products" on the developer units. 10 Gently shake the yellow, cyan, magenta, and black developer units side to side. 11...

User Guide
Page 105
Maintaining the printer 105 14 Align and insert the imaging kit. 15 Gently, but firmly push the blue levers down until the imaging kit drops into place. 16 Replace the waste toner box.
Maintaining the printer 105 14 Align and insert the imaging kit. 15 Gently, but firmly push the blue levers down until the imaging kit drops into place. 16 Replace the waste toner box.

User Guide
Page 108
Y K M C Maintaining the printer 108 Y C M K Y K M C 5 Align the new toner cartridge, and then press down until it away from the imaging kit. Y C M K 4 Remove the toner cartridge by lifting the handle, and then gently pulling it clicks into place.
Y K M C Maintaining the printer 108 Y C M K Y K M C 5 Align the new toner cartridge, and then press down until it away from the imaging kit. Y C M K 4 Remove the toner cartridge by lifting the handle, and then gently pulling it clicks into place.

User Guide
Page 110
3 Remove the toner cartridges by lifting the handles and then gently pulling them away from the imaging kit. 4 Remove the right side cover. 5 Press the green levers on each side of the waste toner bottle, and then remove it. Maintaining the printer 110
3 Remove the toner cartridges by lifting the handles and then gently pulling them away from the imaging kit. 4 Remove the right side cover. 5 Press the green levers on each side of the waste toner bottle, and then remove it. Maintaining the printer 110

User Guide
Page 111
6 Lift the blue levers on the imaging kit, and then pull it toward you. 7 Press down on the blue levers, grasp the handles on . 11 Gently shake the developer unit from side to side. This could damage the imaging kit. 8 Remove the used developer unit. 9 Place the used developer unit in the enclosed package. Maintaining the printer 111 For more information, see "Recycling Lexmark products" on page 38. 10 Unpack the replacement developer unit, and leave the packaging on the sides, and then pull the imaging kit out. Warning-Potential Damage: Do not touch the underside of the imaging kit.
6 Lift the blue levers on the imaging kit, and then pull it toward you. 7 Press down on the blue levers, grasp the handles on . 11 Gently shake the developer unit from side to side. This could damage the imaging kit. 8 Remove the used developer unit. 9 Place the used developer unit in the enclosed package. Maintaining the printer 111 For more information, see "Recycling Lexmark products" on page 38. 10 Unpack the replacement developer unit, and leave the packaging on the sides, and then pull the imaging kit out. Warning-Potential Damage: Do not touch the underside of the imaging kit.

User Guide
Page 112
12 Remove the red shipping cover from the developer unit. 13 Insert the developer unit. 14 Align and insert the imaging kit. Maintaining the printer 112
12 Remove the red shipping cover from the developer unit. 13 Insert the developer unit. 14 Align and insert the imaging kit. Maintaining the printer 112

User Guide
Page 113
15 Gently, but firmly push the blue levers down until the imaging kit drops into place. 16 Replace the waste toner box. 17 Replace the right side cover. Maintaining the printer 113
15 Gently, but firmly push the blue levers down until the imaging kit drops into place. 16 Replace the waste toner box. 17 Replace the right side cover. Maintaining the printer 113

User Guide
Page 127
... off, wait ten seconds, and then turn the printer on. • Replace the specified toner cartridge with a new one. 31.yy Defective Imaging Kit Try one or more of paper from the toner cartridges. Unsupported USB hub, please remove Remove the unrecognized USB hub. Troubleshooting 127 Unsupported USB device...USB device. Remove paper from standard output bin Remove the stack of the following: • Open and close the top cover. • Remove the imaging kit, and then insert it until it clicks into place. • Turn the printer off, wait ten seconds, and then turn the printer on. &#...
... off, wait ten seconds, and then turn the printer on. • Replace the specified toner cartridge with a new one. 31.yy Defective Imaging Kit Try one or more of paper from the toner cartridges. Unsupported USB hub, please remove Remove the unrecognized USB hub. Troubleshooting 127 Unsupported USB device...USB device. Remove paper from standard output bin Remove the stack of the following: • Open and close the top cover. • Remove the imaging kit, and then insert it until it clicks into place. • Turn the printer off, wait ten seconds, and then turn the printer on. &#...

User Guide
Page 140
... correct size setting: • For Windows users, specify the size from Print Properties. • For Macintosh users, specify the size from the Print dialog. The imaging kit may be defective. Try one or more of the following: CHECK THE PAPER GUIDES Move the guides in the tray: 1 From the printer control panel.... 2 Before sending the job to the correct positions for the paper size loaded. Troubleshooting 140 Incorrect margins These are possible solutions. If Black and color imaging kit life warning orBlack imaging kit life warning appears, replace the...
... correct size setting: • For Windows users, specify the size from Print Properties. • For Macintosh users, specify the size from the Print dialog. The imaging kit may be defective. Try one or more of the following: CHECK THE PAPER GUIDES Move the guides in the tray: 1 From the printer control panel.... 2 Before sending the job to the correct positions for the paper size loaded. Troubleshooting 140 Incorrect margins These are possible solutions. If Black and color imaging kit life warning orBlack imaging kit life warning appears, replace the...

User Guide
Page 141
... Paper curl These are possible solutions. Try one or more of imaging kits: a black and color imaging kit, and a black imaging kit. Note: The printer has two types of the following : A TONER CARTRIDGE MAY BE DEFECTIVE Replace the defective toner cartridge. The black and color imaging kit contains cyan, magenta, yellow, and black. Try one or more of... incorrectly colored line These are possible solutions. THE PAPER HAS ABSORBED MOISTURE DUE TO HIGH HUMIDITY • Load paper from the Print dialog. The black imaging kit contains black only.
... Paper curl These are possible solutions. Try one or more of imaging kits: a black and color imaging kit, and a black imaging kit. Note: The printer has two types of the following : A TONER CARTRIDGE MAY BE DEFECTIVE Replace the defective toner cartridge. The black and color imaging kit contains cyan, magenta, yellow, and black. Try one or more of... incorrectly colored line These are possible solutions. THE PAPER HAS ABSORBED MOISTURE DUE TO HIGH HUMIDITY • Load paper from the Print dialog. The black imaging kit contains black only.

User Guide
Page 142
... dark These are possible solutions. Troubleshooting 142 Try one or more of the following : CALIBRATE THE COLOR The printer automatically calibrates the colors whenever a new imaging kit is replaced, then you use it. THE TONER MAY BE LOW When 88 cartridge low appears or when the print becomes faded, replace the toner...
... dark These are possible solutions. Troubleshooting 142 Try one or more of the following : CALIBRATE THE COLOR The printer automatically calibrates the colors whenever a new imaging kit is replaced, then you use it. THE TONER MAY BE LOW When 88 cartridge low appears or when the print becomes faded, replace the toner...

User Guide
Page 143
... THE PAPER Avoid textured paper with rough finishes. Note: The printer has two types of imaging kits: a black and color imaging kit, and a black imaging kit. Troubleshooting 143 CHECK THE PAPER TYPE SETTING Make sure the paper type setting matches the paper loaded in its original ..., and then press . THE PAPER HAS ABSORBED MOISTURE DUE TO HIGH HUMIDITY • Load paper from the Print dialog. The black and color imaging kit contains cyan, magenta, yellow, and black. Calibrating appears. CHECK THE DARKNESS, BRIGHTNESS, AND CONTRAST SETTINGS The Toner Darkness setting is too dark,...
... THE PAPER Avoid textured paper with rough finishes. Note: The printer has two types of imaging kits: a black and color imaging kit, and a black imaging kit. Troubleshooting 143 CHECK THE PAPER TYPE SETTING Make sure the paper type setting matches the paper loaded in its original ..., and then press . THE PAPER HAS ABSORBED MOISTURE DUE TO HIGH HUMIDITY • Load paper from the Print dialog. The black and color imaging kit contains cyan, magenta, yellow, and black. Calibrating appears. CHECK THE DARKNESS, BRIGHTNESS, AND CONTRAST SETTINGS The Toner Darkness setting is too dark,...

User Guide
Page 144
... PAPER Avoid textured paper with rough finishes. Try one or more of the following: CALIBRATE THE COLOR The printer automatically calibrates the colors whenever a new imaging kit is too light These are possible solutions. Troubleshooting 144 Print is detected. If a cartridge is too low. • For Windows users: from a fresh package. •...
... PAPER Avoid textured paper with rough finishes. Try one or more of the following: CALIBRATE THE COLOR The printer automatically calibrates the colors whenever a new imaging kit is too light These are possible solutions. Troubleshooting 144 Print is detected. If a cartridge is too low. • For Windows users: from a fresh package. •...


