
User Manual
Page 4
...document...54 Printing specialty documents...55 Tips on using letterhead...55 Tips on using transparencies...56 Tips on using envelopes...57 Tips on using paper labels...57 Tips on using card stock ...58 Printing from a flash drive...59 Printing information pages...60 Printing a font sample list...... ...60 Canceling a print job from the printer control panel ...60 Canceling a print job from the computer ...61 Clearing jams 63 Avoiding jams...63 Understanding jam numbers and locations...64 200 paper jam...65 201 paper jam...65 202 paper jam...66 230 paper jam...68 235 paper jam...68 Contents 4
...document...54 Printing specialty documents...55 Tips on using letterhead...55 Tips on using transparencies...56 Tips on using envelopes...57 Tips on using paper labels...57 Tips on using card stock ...58 Printing from a flash drive...59 Printing information pages...60 Printing a font sample list...... ...60 Canceling a print job from the printer control panel ...60 Canceling a print job from the computer ...61 Clearing jams 63 Avoiding jams...63 Understanding jam numbers and locations...64 200 paper jam...65 201 paper jam...65 202 paper jam...66 230 paper jam...68 235 paper jam...68 Contents 4
User Manual
Page 5
242 paper jam...68 250 paper jam...69 Understanding printer menus 70 Menus list...70 Supplies menu...71 Paper menu...71 Default Source menu...71 Paper Size/Type menu ...72 Paper Texture menu ...75 Paper Weight menu...76 Paper Loading menu ...78 Custom Types menu...79 Universal Setup menu...80 Reports...81 Menu Settings Page menu ...81 Device Statistics menu...
242 paper jam...68 250 paper jam...69 Understanding printer menus 70 Menus list...70 Supplies menu...71 Paper menu...71 Default Source menu...71 Paper Size/Type menu ...72 Paper Texture menu ...75 Paper Weight menu...76 Paper Loading menu ...78 Custom Types menu...79 Universal Setup menu...80 Reports...81 Menu Settings Page menu ...81 Device Statistics menu...
User Manual
Page 7
... installed 143 Drawers...143 Flash memory card...143 Multipurpose feeder...144 Memory card ...144 Solving paper feed problems...144 Paper frequently jams ...144 Paper jam message remains after jam is cleared ...145 Page that jammed does not reprint after you clear the jam 145 Solving print quality problems...145 Isolating print quality problems...145 Blank pages...146 Characters...
... installed 143 Drawers...143 Flash memory card...143 Multipurpose feeder...144 Memory card ...144 Solving paper feed problems...144 Paper frequently jams ...144 Paper jam message remains after jam is cleared ...145 Page that jammed does not reprint after you clear the jam 145 Solving print quality problems...145 Isolating print quality problems...145 Blank pages...146 Characters...
User Manual
Page 64
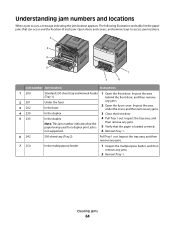
... 5 235 Standard 250-sheet tray and manual feeder (Tray 1) Under the fuser In the fuser In the duplex In the duplex Note: This jam number indicates that the paper being used for a duplex print job is loaded correctly. 6 Reinsert Tray 1. 6 242 550-sheet tray (Tray 2) Pull Tray 1 out. Inspect the area under...
... 5 235 Standard 250-sheet tray and manual feeder (Tray 1) Under the fuser In the fuser In the duplex In the duplex Note: This jam number indicates that the paper being used for a duplex print job is loaded correctly. 6 Reinsert Tray 1. 6 242 550-sheet tray (Tray 2) Pull Tray 1 out. Inspect the area under...
User Manual
Page 65
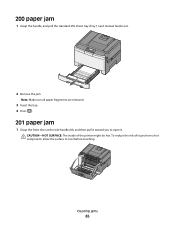
To reduce the risk of the printer might be hot. Clearing jams 65 CAUTION-HOT SURFACE: The inside of injury from a hot component, allow the surface to open it toward you to cool before touching. Note: Make sure all paper fragments are removed. 3 Insert the tray. 4 Press . 201 paper jam 1 Grasp the front door at the side handholds, and then pull it . 200 paper jam 1 Grasp the handle, and pull the standard 250-sheet tray (Tray 1) and manual feeder out. 2 Remove the jam.
To reduce the risk of the printer might be hot. Clearing jams 65 CAUTION-HOT SURFACE: The inside of injury from a hot component, allow the surface to open it toward you to cool before touching. Note: Make sure all paper fragments are removed. 3 Insert the tray. 4 Press . 201 paper jam 1 Grasp the front door at the side handholds, and then pull it . 200 paper jam 1 Grasp the handle, and pull the standard 250-sheet tray (Tray 1) and manual feeder out. 2 Remove the jam.
User Manual
Page 66
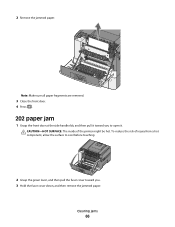
To reduce the risk of the printer might be hot. CAUTION-HOT SURFACE: The inside of injury from a hot component, allow the surface to open it toward you to cool before touching. 2 Grasp the green lever, and then pull the fuser cover toward you. 3 Hold the fuser cover down, and then remove the jammed paper. Note: Make sure all paper fragments are removed. 3 Close the front door. 4 Press . 202 paper jam 1 Grasp the front door at the side handholds, and then pull it . Clearing jams 66 2 Remove the jammed paper.
To reduce the risk of the printer might be hot. CAUTION-HOT SURFACE: The inside of injury from a hot component, allow the surface to open it toward you to cool before touching. 2 Grasp the green lever, and then pull the fuser cover toward you. 3 Hold the fuser cover down, and then remove the jammed paper. Note: Make sure all paper fragments are removed. 3 Close the front door. 4 Press . 202 paper jam 1 Grasp the front door at the side handholds, and then pull it . Clearing jams 66 2 Remove the jammed paper.

User Manual
Page 68
...handholds, and then pull it toward you to open it. 2 Remove the jam. 3 Press . 235 paper jam 1 Grasp the front door at the side handholds, and then pull it toward you to open it. 2 Remove the jam. 3 Load the tray with the correct paper size. 4 Insert the tray. 5 Close the front door. 6 Press .... 242 paper jam 1 Grasp the handle, and pull the optional 650-sheet duo drawer out. 2 If a paper jam is in the multipurpose feeder, push the lever. 3 Remove ...
...handholds, and then pull it toward you to open it. 2 Remove the jam. 3 Press . 235 paper jam 1 Grasp the front door at the side handholds, and then pull it toward you to open it. 2 Remove the jam. 3 Load the tray with the correct paper size. 4 Insert the tray. 5 Close the front door. 6 Press .... 242 paper jam 1 Grasp the handle, and pull the optional 650-sheet duo drawer out. 2 If a paper jam is in the multipurpose feeder, push the lever. 3 Remove ...

User Manual
Page 69
Clearing jams 69 250 paper jam 1 Push the lever in the multipurpose feeder to access the paper jammed. 2 Remove the jam. Note: Make sure all paper fragments are removed. 3 Insert the tray. 4 Press .
Clearing jams 69 250 paper jam 1 Push the lever in the multipurpose feeder to access the paper jammed. 2 Remove the jam. Note: Make sure all paper fragments are removed. 3 Insert the tray. 4 Press .
User Manual
Page 108
... printing. 88.yy Cartridge is low Press to clear the message and continue printing. 88.yy Replace Cartridge Replace the toner cartridge. 200.yy Paper jam 1 Clear the paper path. 2 Press to a properly grounded outlet. 5 Turn the printer back on . 58 Too many trays attached 1 Turn the printer off . 2 Unplug the power cord...
... printing. 88.yy Cartridge is low Press to clear the message and continue printing. 88.yy Replace Cartridge Replace the toner cartridge. 200.yy Paper jam 1 Clear the paper path. 2 Press to a properly grounded outlet. 5 Turn the printer back on . 58 Too many trays attached 1 Turn the printer off . 2 Unplug the power cord...
User Manual
Page 109
... message and continue printing. 201.yy Paper jam 1 Clear the paper path. 2 Remove the jammed paper below the fuser. 3 Press to clear the message and continue printing. 202.yy Paper jam 1 Clear the paper path. 2 Remove the jammed paper from the fuser. 3 Press to clear the message and continue printing. 230.yy Paper jam 1 Clear the paper path. 2 Open the front door, and...
... message and continue printing. 201.yy Paper jam 1 Clear the paper path. 2 Remove the jammed paper below the fuser. 3 Press to clear the message and continue printing. 202.yy Paper jam 1 Clear the paper path. 2 Remove the jammed paper from the fuser. 3 Press to clear the message and continue printing. 230.yy Paper jam 1 Clear the paper path. 2 Open the front door, and...
User Manual
Page 110
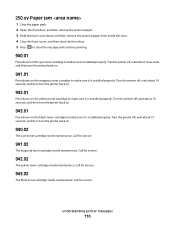
... installed properly. Call for service. 941.02 The magenta toner cartridge needs maintenance. 250.yy Paper jam 1 Clear the paper path. 2 Open the front door, and then remove the jammed paper. 3 Hold the fuser cover down, and then remove the jammed paper from inside the fuser. 4 Close the fuser cover, and then close the front door. 5 Press...
... installed properly. Call for service. 941.02 The magenta toner cartridge needs maintenance. 250.yy Paper jam 1 Clear the paper path. 2 Open the front door, and then remove the jammed paper. 3 Hold the fuser cover down, and then remove the jammed paper from inside the fuser. 4 Close the fuser cover, and then close the front door. 5 Press...
User Manual
Page 143
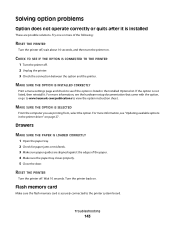
...to www.lexmark.com/publications to view the option instruction sheet. MAKE SURE THE OPTION IS INSTALLED CORRECTLY Print a menu settings page and check to the printer system board. Drawers MAKE SURE THE PAPER IS LOADED CORRECTLY 1 Open the paper tray. 2 Check for paper jams or misfeeds. 3 Make sure paper guides are...connected to see "Updating available options in the Installed Options list. Turn the printer back on page 27. For more of the paper. 4 Make sure the paper tray closes properly. 5 Close the door. CHECK TO SEE IF THE OPTION IS CONNECTED TO THE PRINTER 1 Turn the printer off...
...to www.lexmark.com/publications to view the option instruction sheet. MAKE SURE THE OPTION IS INSTALLED CORRECTLY Print a menu settings page and check to the printer system board. Drawers MAKE SURE THE PAPER IS LOADED CORRECTLY 1 Open the paper tray. 2 Check for paper jams or misfeeds. 3 Make sure paper guides are...connected to see "Updating available options in the Installed Options list. Turn the printer back on page 27. For more of the paper. 4 Make sure the paper tray closes properly. 5 Close the door. CHECK TO SEE IF THE OPTION IS CONNECTED TO THE PRINTER 1 Turn the printer off...
User Manual
Page 145
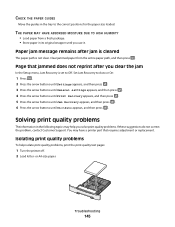
... . You may help isolate print quality problems, print the print quality test pages: 1 Turn the printer off. 2 Load letter- Paper jam message remains after you use it. Page that requires adjustment or replacement. Solving print quality problems The information in its original wrapper until ...On or Auto appears, and then press . CHECK THE PAPER GUIDES Move the guides in the tray to Off. Set Jam Recovery to Auto or On: 1 Press . 2 Press the arrow buttons until Settings appears, and then press . ...
... . You may help isolate print quality problems, print the print quality test pages: 1 Turn the printer off. 2 Load letter- Paper jam message remains after you use it. Page that requires adjustment or replacement. Solving print quality problems The information in its original wrapper until ...On or Auto appears, and then press . CHECK THE PAPER GUIDES Move the guides in the tray to Off. Set Jam Recovery to Auto or On: 1 Press . 2 Press the arrow buttons until Settings appears, and then press . ...

User Manual
Page 176
Index Numerics 200 Paper jam 108 201.yy Paper jam 109 202.yy Paper jam 109 230.yy Paper jam 109 235.yy Paper jam 109 24x.yy Paper jam 109 250.yy Paper jam 110 250-sheet tray (standard) loading 38 30.yy cartridge missing 105 31.yy Defective Imaging Kit 105 34 Short paper 105 35 Insufficient memory to support Resource Save feature 106...
Index Numerics 200 Paper jam 108 201.yy Paper jam 109 202.yy Paper jam 109 230.yy Paper jam 109 235.yy Paper jam 109 24x.yy Paper jam 109 250.yy Paper jam 110 250-sheet tray (standard) loading 38 30.yy cartridge missing 105 31.yy Defective Imaging Kit 105 34 Short paper 105 35 Insufficient memory to support Resource Save feature 106...
User Manual
Page 177
e-mail notice of low supply level 138 notice of paper jam 138 notice of paper needed 138 notice that different paper is needed 138 F FAQ about color printing 156 FCC notices 162, 163 fiber optic network setup 33 finding information customer support 10 publications 10 Finishing ... software adding options 27 Invalid Engine Code 102 Invalid Network Code 102 J jams avoiding 63 locating doors and trays 64 locations 64 numbers 64 jams, clearing 200 65 201 65 202 66 230 68 235 68 242 68 250 69 L labels, paper tips on using 57 letterhead loading, manual feeder 55 loading, trays...
e-mail notice of low supply level 138 notice of paper jam 138 notice of paper needed 138 notice that different paper is needed 138 F FAQ about color printing 156 FCC notices 162, 163 fiber optic network setup 33 finding information customer support 10 publications 10 Finishing ... software adding options 27 Invalid Engine Code 102 Invalid Network Code 102 J jams avoiding 63 locating doors and trays 64 locations 64 numbers 64 jams, clearing 200 65 201 65 202 66 230 68 235 68 242 68 250 69 L labels, paper tips on using 57 letterhead loading, manual feeder 55 loading, trays...
User Manual
Page 178
...storing 48 unacceptable 47 Universal Paper Size 80 Universal size setting 37 paper feed troubleshooting message remains after jam is cleared 145 paper jams avoiding 63 Paper Loading menu 78 Paper Size/Type menu 72 paper sizes supported by the printer 48 Paper Texture menu 75 paper types duplex support 50 supported... a location 12 shipping 136 printer control panel 14 printer messages 200 Paper jam 108 201.yy Paper jam 109 202.yy Paper jam 109 230.yy Paper jam 109 235.yy Paper jam 109 24x.yy Paper jam 109 250.yy Paper jam 110 30.yy cartridge missing 105 31.yy Defective Imaging Kit 105 ...
...storing 48 unacceptable 47 Universal Paper Size 80 Universal size setting 37 paper feed troubleshooting message remains after jam is cleared 145 paper jams avoiding 63 Paper Loading menu 78 Paper Size/Type menu 72 paper sizes supported by the printer 48 Paper Texture menu 75 paper types duplex support 50 supported... a location 12 shipping 136 printer control panel 14 printer messages 200 Paper jam 108 201.yy Paper jam 109 202.yy Paper jam 109 230.yy Paper jam 109 235.yy Paper jam 109 24x.yy Paper jam 109 250.yy Paper jam 110 30.yy cartridge missing 105 31.yy Defective Imaging Kit 105 ...
Service Manual
Page 3
... Media output size and type 1-11 Media guidelines 1-12 Paper characteristics 1-12 Unacceptable paper 1-12 Selecting paper 1-13 Selecting preprinted forms and letterhead 1-13 Storing paper 1-13 Using recycled paper and other office papers 1-13 Tools required for service 1-14 Acronyms 1-15 Diagnostic...tables 2-3 Printer symptom table 2-3 Print quality symptom table 2-4 Error codes and messages 2-5 User status and customer attendance messages 2-5 Paper Jam messages 2-11 Service error messages 2-12 Service checks 2-24 122.xx-Fuser temperature incorrect 2-24 90x.xx error 2-24 925...
... Media output size and type 1-11 Media guidelines 1-12 Paper characteristics 1-12 Unacceptable paper 1-12 Selecting paper 1-13 Selecting preprinted forms and letterhead 1-13 Storing paper 1-13 Using recycled paper and other office papers 1-13 Tools required for service 1-14 Acronyms 1-15 Diagnostic...tables 2-3 Printer symptom table 2-3 Print quality symptom table 2-4 Error codes and messages 2-5 User status and customer attendance messages 2-5 Paper Jam messages 2-11 Service error messages 2-12 Service checks 2-24 122.xx-Fuser temperature incorrect 2-24 90x.xx error 2-24 925...
Service Manual
Page 5
... Panel Menus 3-25 PPDS Emulation 3-25 Demo Mode 3-25 Factory Defaults 3-26 Energy Conserve 3-26 Auto Color Adj 3-27 Font Sharpening 3-27 Exit Config 3-27 Paper jams 3-28 Avoiding jams 3-28 Understanding jam numbers and locations 3-29 200 paper jams 3-30 201 paper jam 3-30 202 paper jam 3-31 230 paper jam 3-32 235 paper jam 3-32 Table of contents v
... Panel Menus 3-25 PPDS Emulation 3-25 Demo Mode 3-25 Factory Defaults 3-26 Energy Conserve 3-26 Auto Color Adj 3-27 Font Sharpening 3-27 Exit Config 3-27 Paper jams 3-28 Avoiding jams 3-28 Understanding jam numbers and locations 3-29 200 paper jams 3-30 201 paper jam 3-30 202 paper jam 3-31 230 paper jam 3-32 235 paper jam 3-32 Table of contents v
Service Manual
Page 6
... Is there anything I can do to print 3-45 Should I see on the computer screen 3-45 The printed page appears tinted. 5025-2xx, 4xx 24x paper jam 3-32 250 paper jam 3-32 Theory of operation 3-33 Print engine theory 3-33 Electrophotographic process (EP process 3-33 Electrophotographic process basics 3-33 Step 1: Charge 3-34 Step 2: Expose 3-35...
... Is there anything I can do to print 3-45 Should I see on the computer screen 3-45 The printed page appears tinted. 5025-2xx, 4xx 24x paper jam 3-32 250 paper jam 3-32 Theory of operation 3-33 Print engine theory 3-33 Electrophotographic process (EP process 3-33 Electrophotographic process basics 3-33 Step 1: Charge 3-34 Step 2: Expose 3-35...

Service Manual
Page 35
...? They will lead you connect or disconnect any connections between the printer and PCs/peripherals. "Printer symptom table" on page 3-28 - "Paper jams" on page 2-3 - "Service error messages" on page 2-11 - "Paper Jam messages" on page 2-12 - Locate your symptom and take the appropriate action: - "Theory of various tests. • Does the POR stop...
...? They will lead you connect or disconnect any connections between the printer and PCs/peripherals. "Printer symptom table" on page 3-28 - "Paper jams" on page 2-3 - "Service error messages" on page 2-11 - "Paper Jam messages" on page 2-12 - Locate your symptom and take the appropriate action: - "Theory of various tests. • Does the POR stop...


