User's Guide
Page 5
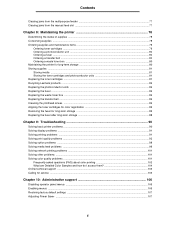
... printer for long-term storage 80 Storing supplies ...81 Storing media ...81 Storing the toner cartridges and photoconductor units 81 Replacing the toner cartridges ...81 Recycling Lexmark products ...83 Replacing the photoconductor units ...83 Replacing the fuser ...83 Replacing the waste toner box ...83 Replacing the transfer belt ...83 Cleaning the printhead lenses ...84 Aligning the...
... printer for long-term storage 80 Storing supplies ...81 Storing media ...81 Storing the toner cartridges and photoconductor units 81 Replacing the toner cartridges ...81 Recycling Lexmark products ...83 Replacing the photoconductor units ...83 Replacing the fuser ...83 Replacing the waste toner box ...83 Replacing the transfer belt ...83 Cleaning the printhead lenses ...84 Aligning the...
User's Guide
Page 29
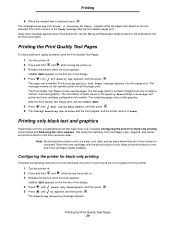
...appears on . 3 Release the buttons when the clock appears. Printing the Print Quality Test Pages 29 Keep the photoconductor units and toner cartridges readily available. Printing the Print Quality Test Pages To help isolate print quality problems, print the Print Quality Test Pages. 1 Turn ... until Black Only Mode appears, and then press . 5 Press until Prt Quality Pgs appears, and then press . Store the toner cartridges with black toner only, complete Configuring the printer for more information. CONFIG MENU appears on the first line of the Quality Menu settings in a ...
...appears on . 3 Release the buttons when the clock appears. Printing the Print Quality Test Pages 29 Keep the photoconductor units and toner cartridges readily available. Printing the Print Quality Test Pages To help isolate print quality problems, print the Print Quality Test Pages. 1 Turn ... until Black Only Mode appears, and then press . 5 Press until Prt Quality Pgs appears, and then press . Store the toner cartridges with black toner only, complete Configuring the printer for more information. CONFIG MENU appears on the first line of the Quality Menu settings in a ...
User's Guide
Page 32
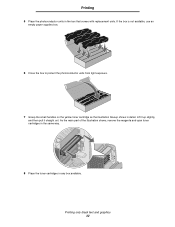
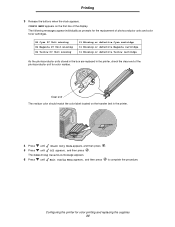
Printing only black text and graphics 32 As the main part of the illustration shows, remove the magenta and cyan toner cartridges in the same way. 8 Place the toner cartridges in the box that comes with replacement units. Lift it up slightly, and then pull it straight out. Printing 5 Place the photoconductor units in any box available. If the box is not available, use an empty paper supplies box. 6 Close the box to protect the photoconductor units from light exposure. 7 Grasp the small handles on the yellow toner cartridge as the illustration blowup shows in detail.
Printing only black text and graphics 32 As the main part of the illustration shows, remove the magenta and cyan toner cartridges in the same way. 8 Place the toner cartridges in the box that comes with replacement units. Lift it up slightly, and then pull it straight out. Printing 5 Place the photoconductor units in any box available. If the box is not available, use an empty paper supplies box. 6 Close the box to protect the photoconductor units from light exposure. 7 Grasp the small handles on the yellow toner cartridge as the illustration blowup shows in detail.
User's Guide
Page 34
...The Submitting Selection message appears. 6 Press until Off appears, and then press . Configuring the printer for the replacement of photoconductor units and color toner cartridges. 84 Cyan PC Unit missing 84 Magenta PC Unit missing 84 Yellow PC Unit missing 31 Missing or defective Cyan... cartridge 31 Missing or defective Magenta cartridge 31 Missing or defective Yellow cartridge As the photoconductor units stored in the box are replaced in the printer. 4 Press until Black Only Mode ...
...The Submitting Selection message appears. 6 Press until Off appears, and then press . Configuring the printer for the replacement of photoconductor units and color toner cartridges. 84 Cyan PC Unit missing 84 Magenta PC Unit missing 84 Yellow PC Unit missing 31 Missing or defective Cyan... cartridge 31 Missing or defective Magenta cartridge 31 Missing or defective Yellow cartridge As the photoconductor units stored in the box are replaced in the printer. 4 Press until Black Only Mode ...

User's Guide
Page 78
...to print the two or more pages print, depending on a sheet of menu settings the printer has. In the U.S., contact Lexmark at www.lexmark.com or contact the place where you bought your area. One or more page images on Duplex in the Menus and both ...send a Verify Print job. Conserving supplies Several settings in the application software or on the display conserve toner and paper: Supply Setting What the setting does Other resources Toner cartridge Toner Darkness in the Quality Menu in charge of the printer. Combined with topics for detailed instructions. Allows time...
...to print the two or more pages print, depending on a sheet of menu settings the printer has. In the U.S., contact Lexmark at www.lexmark.com or contact the place where you bought your area. One or more page images on Duplex in the Menus and both ...send a Verify Print job. Conserving supplies Several settings in the application software or on the display conserve toner and paper: Supply Setting What the setting does Other resources Toner cartridge Toner Darkness in the Quality Menu in charge of the printer. Combined with topics for detailed instructions. Allows time...
User's Guide
Page 79
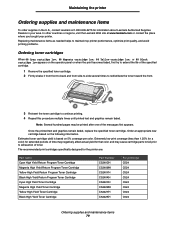
... regions, visit the Lexmark Web site at 1-800-539-6275 for the printer are: Part name Cyan High Yield Return Program Toner Cartridge Magenta High Yield Return Program Toner Cartridge Yellow High Yield Return Program Toner Cartridge Black High Yield Return Program Toner Cartridge Cyan High Yield Toner Cartridge Magenta High Yield Toner Cartridge Yellow High Yield Toner Cartridge Black High Yield Toner Cartridge Part Number C5240CH...
... regions, visit the Lexmark Web site at 1-800-539-6275 for the printer are: Part name Cyan High Yield Return Program Toner Cartridge Magenta High Yield Return Program Toner Cartridge Yellow High Yield Return Program Toner Cartridge Black High Yield Return Program Toner Cartridge Cyan High Yield Toner Cartridge Magenta High Yield Toner Cartridge Yellow High Yield Toner Cartridge Black High Yield Toner Cartridge Part Number C5240CH...
User's Guide
Page 80
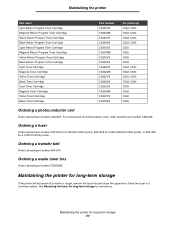
... Program Toner Cartridge Cyan Toner Cartridge Magenta Toner Cartridge Yellow Toner Cartridge Black Toner Cartridge Cyan Toner Cartridge Magenta Toner Cartridge Yellow Toner Cartridge Black Toner Cartridge Part Number C5220CS C5220MS C5220YS C5220KS C5200CS C5200MS C5200YS C5200KS C5222CS C5222MS C5222YS C5222KS C5202CS C5202MS C5202YS C5202KS For printer(s) C522, C524 C522, C524 C522, C524 C522, C524 C520 C520 C520 C520 C522, C524 C522, C524 C522, C524 C522, C524 C520 C520 C520 C520 Ordering a photoconductor unit Order Lexmark part...
... Program Toner Cartridge Cyan Toner Cartridge Magenta Toner Cartridge Yellow Toner Cartridge Black Toner Cartridge Cyan Toner Cartridge Magenta Toner Cartridge Yellow Toner Cartridge Black Toner Cartridge Part Number C5220CS C5220MS C5220YS C5220KS C5200CS C5200MS C5200YS C5200KS C5222CS C5222MS C5222YS C5222KS C5202CS C5202MS C5202YS C5202KS For printer(s) C522, C524 C522, C524 C522, C524 C522, C524 C520 C520 C520 C520 C522, C524 C522, C524 C522, C524 C522, C524 C520 C520 C520 C520 Ordering a photoconductor unit Order Lexmark part...
User's Guide
Page 81
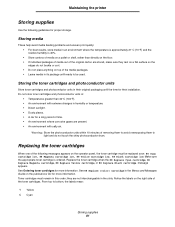
...appears on the operator panel, the toner cartridge must remain in the slots. Replace the toner cartridge when the 88 Replace Cyan cartridge, 88 Replace Magenta cartridge, 88 Replace Yellow cartridge, or 88 Replace Black cartridge message appears. See Ordering toner cartridges for more information. Warning: Store...buckle or curl. • Do not place anything on the publications CD for more information. Storing the toner cartridges and photoconductor units Store toner cartridges and photoconductor units in their original packaging until ready to bottom, the labels mean: Y Yellow C ...
...appears on the operator panel, the toner cartridge must remain in the slots. Replace the toner cartridge when the 88 Replace Cyan cartridge, 88 Replace Magenta cartridge, 88 Replace Yellow cartridge, or 88 Replace Black cartridge message appears. See Ordering toner cartridges for more information. Warning: Store...buckle or curl. • Do not place anything on the publications CD for more information. Storing the toner cartridges and photoconductor units Store toner cartridges and photoconductor units in their original packaging until ready to bottom, the labels mean: Y Yellow C ...
User's Guide
Page 82
... use Lexmark supplies with a replacement cartridge. Replacing the toner cartridges 82 When you return a used toner cartridge. Maintaining the printer M Magenta K Black To replace a toner cartridge, see the Replacing a toner cartridge sheet that comes with the printer. For best results, use of third-party supplies is replaced, follow the instructions located in the new toner cartridge box to recycle the used toner cartridge, you...
... use Lexmark supplies with a replacement cartridge. Replacing the toner cartridges 82 When you return a used toner cartridge. Maintaining the printer M Magenta K Black To replace a toner cartridge, see the Replacing a toner cartridge sheet that comes with the printer. For best results, use of third-party supplies is replaced, follow the instructions located in the new toner cartridge box to recycle the used toner cartridge, you...

User's Guide
Page 84
If help is needed, see the Replacing the transfer belt sheet that comes with the inner door. 3 Remove all four toner cartridges. The lower door comes open longer than 10 minutes. 1 Turn the printer off. 2 Open the upper door and the inner door. Cleaning the printhead... lenses 84 Warning: Do not touch the printhead lenses or they may be damaged. 6 Install the four toner cartridges. 7 Close the doors. 8 Turn the printer on page 32. 4 Locate the four printhead lenses as mentioned in Solving print quality problems in the ...
If help is needed, see the Replacing the transfer belt sheet that comes with the inner door. 3 Remove all four toner cartridges. The lower door comes open longer than 10 minutes. 1 Turn the printer off. 2 Open the upper door and the inner door. Cleaning the printhead... lenses 84 Warning: Do not touch the printhead lenses or they may be damaged. 6 Install the four toner cartridges. 7 Close the doors. 8 Turn the printer on page 32. 4 Locate the four printhead lenses as mentioned in Solving print quality problems in the ...

User's Guide
Page 85
... this procedure. Examine each page for the letters A through L. 10 Press . 11 Press until Set A appears, and then press . Aligning the toner cartridges for color registration: 1 Turn the printer off. 2 Press and hold and while turning the printer on the first line, so press . Wait as...quality, complete the following steps for color registration 85 to increase the number shown in the box. Maintaining the printer Aligning the toner cartridges for color registration When the new transfer belt was installed and all the photoconductor units were moved from the used transfer belt to ...
... this procedure. Examine each page for the letters A through L. 10 Press . 11 Press until Set A appears, and then press . Aligning the toner cartridges for color registration: 1 Turn the printer off. 2 Press and hold and while turning the printer on the first line, so press . Wait as...quality, complete the following steps for color registration 85 to increase the number shown in the box. Maintaining the printer Aligning the toner cartridges for color registration When the new transfer belt was installed and all the photoconductor units were moved from the used transfer belt to ...
User's Guide
Page 93
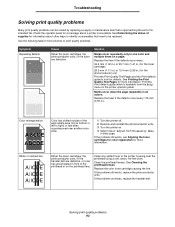
...times on a page: Replace the item if the defects occur every: 33.5 mm (1.32 in.) or 35.7 mm (1.41 in.) for the toner cartridges 28.3 mm (1.11 in.) or 72.4 mm (2.85 in Settings. Use the following table to find solutions to print quality problems. Symptom Repeating defects... AABBCCDDEE ABCDE Color has shifted outside of the printhead or on the printer operator panel. White or colored line ABCDE ABCDE ABCDE Either the toner cartridges, the photoconductor units, or the transfer belt are defective. If the problem still exists, replace the photoconductor units. If the problem continues,...
...times on a page: Replace the item if the defects occur every: 33.5 mm (1.32 in.) or 35.7 mm (1.41 in.) for the toner cartridges 28.3 mm (1.11 in.) or 72.4 mm (2.85 in Settings. Use the following table to find solutions to print quality problems. Symptom Repeating defects... AABBCCDDEE ABCDE Color has shifted outside of the printhead or on the printer operator panel. White or colored line ABCDE ABCDE ABCDE Either the toner cartridges, the photoconductor units, or the transfer belt are defective. If the problem still exists, replace the photoconductor units. If the problem continues,...

User's Guide
Page 94
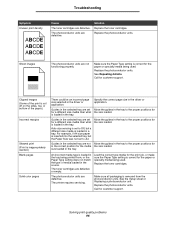
...textured media with rough finishes. The fuser may be empty. Replace the needed . The toner cartridges are defective. The media being used does not meet the printer specifications. The toner cartridges may be defective, empty, or worn. Solving print quality problems 94 The transfer belt... is worn or defective. Streaked vertical lines ABCDE ABCDE ABCDE Toner is smeared before fusing to high humidity. Replace the color toner cartridge causing the streaks. due to the media. Replace the fuser. Make sure the printer ...
...textured media with rough finishes. The fuser may be empty. Replace the needed . The toner cartridges are defective. The media being used does not meet the printer specifications. The toner cartridges may be defective, empty, or worn. Solving print quality problems 94 The transfer belt... is worn or defective. Streaked vertical lines ABCDE ABCDE ABCDE Toner is smeared before fusing to high humidity. Replace the color toner cartridge causing the streaks. due to the media. Replace the fuser. Make sure the printer ...

User's Guide
Page 95
...print, or return the color settings to Heavy. Make sure the correct Media Type is too low. Replace the toner cartridges. Replace the toner cartridges. Print too dark The Toner Darkness setting in the Quality Menu in Settings is too dark, the RGB Brightness setting is too dark, or ...the RGB Contrast is selected. Replace the toner cartridges. The toner cartridges are low on the transparencies. The Paper Type setting for the tray being used is being used . A specialty media is set to...
...print, or return the color settings to Heavy. Make sure the correct Media Type is too low. Replace the toner cartridges. Replace the toner cartridges. Print too dark The Toner Darkness setting in the Quality Menu in Settings is too dark, the RGB Brightness setting is too dark, or ...the RGB Contrast is selected. Replace the toner cartridges. The toner cartridges are low on the transparencies. The Paper Type setting for the tray being used is being used . A specialty media is set to...
User's Guide
Page 96
...the paper or specialty media being used . Guides in the source. The toner cartridges are defective. Replace the toner cartridges. The printer requires servicing. Replace the photoconductor units. Solution Replace the toner cartridges. Clipped images (Some of the print is cut off on the sides, ...Move the guides in the tray. Call for customer support. Troubleshooting Symptom Uneven print density ABCDE ABCDE ABCDE Cause The toner cartridges are defective or empty. The photoconductor units are defective. Replace the photoconductor units. Make sure the Paper Type setting is...
...the paper or specialty media being used . Guides in the source. The toner cartridges are defective. Replace the toner cartridges. The printer requires servicing. Replace the photoconductor units. Solution Replace the toner cartridges. Clipped images (Some of the print is cut off on the sides, ...Move the guides in the tray. Call for customer support. Troubleshooting Symptom Uneven print density ABCDE ABCDE ABCDE Cause The toner cartridges are defective or empty. The photoconductor units are defective. Replace the photoconductor units. Make sure the Paper Type setting is...

User's Guide
Page 143
... labels guidelines 39 loading 55 printer maintenance 39 letterhead 37 guidelines 37 loading in multipurpose feeder 55 page orientation 37 printing 37 Lexmark Authorized Supplies Dealers 78 linking, trays 45 Linux 15, 23 loading card stock 55 envelopes 56 letterhead 55 standard tray letterhead ...55 M Macintosh 13 sending a print job 25 Index to print to a network printer 21 USB printing 13 maintaining the printer 78 toner cartridges, storing 81 manual feed slot guidelines 58 location 50 media guidelines 35 letterhead 37 letterhead, printing 37 loading multipurpose feeder 53 letterhead guidelines...
... labels guidelines 39 loading 55 printer maintenance 39 letterhead 37 guidelines 37 loading in multipurpose feeder 55 page orientation 37 printing 37 Lexmark Authorized Supplies Dealers 78 linking, trays 45 Linux 15, 23 loading card stock 55 envelopes 56 letterhead 55 standard tray letterhead ...55 M Macintosh 13 sending a print job 25 Index to print to a network printer 21 USB printing 13 maintaining the printer 78 toner cartridges, storing 81 manual feed slot guidelines 58 location 50 media guidelines 35 letterhead 37 letterhead, printing 37 loading multipurpose feeder 53 letterhead guidelines...
User's Guide
Page 144
... verifying installation with menu settings page 28 ordering maintenance items 79 fuser 80 photoconductor units 80 toner cartridges 79 transfer belt 80 waste toner box 80 supplies 79 fuser 80 photoconductor units 80 toner cartridges 79 transfer belt 80 waste toner box 80 P paper letterhead 37 loading manual feed slot 58 multipurpose feeder 53, 55 optional...
... verifying installation with menu settings page 28 ordering maintenance items 79 fuser 80 photoconductor units 80 toner cartridges 79 transfer belt 80 waste toner box 80 supplies 79 fuser 80 photoconductor units 80 toner cartridges 79 transfer belt 80 waste toner box 80 P paper letterhead 37 loading manual feed slot 58 multipurpose feeder 53, 55 optional...
User's Guide
Page 145
... 92 unresponsive printer 90 R recycling products 83 used supplies 82 repeat print 111 replacing fuser 83 photoconductor units 83 toner cartridges 81 transfer belt 83 waste toner box 83 reserve print 111 restoring factory default settings 107 S safety information 2 Secure mode 116 security 802.1x ... defaults 107 Setup Menu using Alarm Control 109 Toner Alarm 109 Simple Network Management Protocol, security 116 sizes, media 40, 41 status of supplies, determining 78 storing media 40, 81 photoconductor units 81 supplies 81 toner cartridges 81 supplies conserving 78 ordering 79 fuser 80 ...
... 92 unresponsive printer 90 R recycling products 83 used supplies 82 repeat print 111 replacing fuser 83 photoconductor units 83 toner cartridges 81 transfer belt 83 waste toner box 83 reserve print 111 restoring factory default settings 107 S safety information 2 Secure mode 116 security 802.1x ... defaults 107 Setup Menu using Alarm Control 109 Toner Alarm 109 Simple Network Management Protocol, security 116 sizes, media 40, 41 status of supplies, determining 78 storing media 40, 81 photoconductor units 81 supplies 81 toner cartridges 81 supplies conserving 78 ordering 79 fuser 80 ...

User's Guide
Page 146
... 80 paper 78 recycling 82 specialty media 78 status 78 storing 81 toner 78 supplies, determining status 78 system board accessing 120 covering with metal plate 123 T toner cartridges recycling 82 replacing 81 storing 81 transparencies, loading 55 tray linking 45 troubleshooting basic printer problems 90 calling for service ...too light 95 repeating defects 93 skewed print 96 solid color pages 96 streaked horizontal lines 94 streaked vertical lines 94 toner rubs off paper easily 95 toner specks 95 uneven print density 96 white or colored lines 93 printing problems 91 held jobs do not print 92 ...
... 80 paper 78 recycling 82 specialty media 78 status 78 storing 81 toner 78 supplies, determining status 78 system board accessing 120 covering with metal plate 123 T toner cartridges recycling 82 replacing 81 storing 81 transparencies, loading 55 tray linking 45 troubleshooting basic printer problems 90 calling for service ...too light 95 repeating defects 93 skewed print 96 solid color pages 96 streaked horizontal lines 94 streaked vertical lines 94 toner rubs off paper easily 95 toner specks 95 uneven print density 96 white or colored lines 93 printing problems 91 held jobs do not print 92 ...

Menus and Messages Guide
Page 7
... To select the supply item just replaced. Low Invalid Replace Missing or Defective OK Uncalibrated Unsupported Yellow Cartridge To view the status of the cyan toner cartridge. Replace indicates end-of -life for the item is near and print quality problems may occur. Replace... indicates end-of the magenta toner cartridge. Menu Groups 7 Low Invalid Replace Missing or Defective OK Uncalibrated Unsupported Magenta Cartridge To view the status of -life for the Replace Supply menu item. A supply counter...
... To select the supply item just replaced. Low Invalid Replace Missing or Defective OK Uncalibrated Unsupported Yellow Cartridge To view the status of the cyan toner cartridge. Replace indicates end-of -life for the item is near and print quality problems may occur. Replace... indicates end-of the magenta toner cartridge. Menu Groups 7 Low Invalid Replace Missing or Defective OK Uncalibrated Unsupported Magenta Cartridge To view the status of -life for the Replace Supply menu item. A supply counter...


