Clearing Jams Guide
Page 1
...; Store the paper in the control panel menu. • Make sure all paper from the accumulator. Lexmark™ X94x Clearing Jams Guide Clearing jams Avoiding jams The following illustration and table list the paper jams... latch and lowering the door. For more information, see the Card Stock & Label Guide available on the Lexmark Web site at www.lexmark.com/publications. • Do not load too much paper. Jam numbers 1 200-203 2 230-231 ... between the finisher output bins. Remove the staple cartridge, and then clear the staple jam. Open Door H, and then remove the jam.
...; Store the paper in the control panel menu. • Make sure all paper from the accumulator. Lexmark™ X94x Clearing Jams Guide Clearing jams Avoiding jams The following illustration and table list the paper jams... latch and lowering the door. For more information, see the Card Stock & Label Guide available on the Lexmark Web site at www.lexmark.com/publications. • Do not load too much paper. Jam numbers 1 200-203 2 230-231 ... between the finisher output bins. Remove the staple cartridge, and then clear the staple jam. Open Door H, and then remove the jam.
Clearing Jams Guide
Page 6
7 Lift the inside cover. If the paper is jammed in the rollers, rotate Knob G8 clockwise, and then remove the jammed paper. 2 Remove the jammed paper. 8 Close Door G. 9 Touch Continue. 284-286 paper jams 1 Open Door H. 3 Close Door H. 4 Touch Continue. 289 staple jam 1 Open Door G. 2 Slide the G5 stapler toward the front of the finisher. 3 Lift the lever, and then remove the staple cartridge. 6
7 Lift the inside cover. If the paper is jammed in the rollers, rotate Knob G8 clockwise, and then remove the jammed paper. 2 Remove the jammed paper. 8 Close Door G. 9 Touch Continue. 284-286 paper jams 1 Open Door H. 3 Close Door H. 4 Touch Continue. 289 staple jam 1 Open Door G. 2 Slide the G5 stapler toward the front of the finisher. 3 Lift the lever, and then remove the staple cartridge. 6
Clearing Jams Guide
Page 7
4 Open the staple cover. 6 Place the staple cartridge into the upper stapler. 8 Remove the staple cartridge identified on the display. 5 Remove the jammed staple, and then close the cover. 7 Open the lower staple drawer. 9 Remove the jammed staples, and then place the staple cartridge into the stapler. 7
4 Open the staple cover. 6 Place the staple cartridge into the upper stapler. 8 Remove the staple cartridge identified on the display. 5 Remove the jammed staple, and then close the cover. 7 Open the lower staple drawer. 9 Remove the jammed staples, and then place the staple cartridge into the stapler. 7

Troubleshooting Guide
Page 3
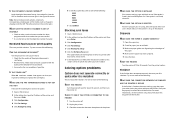
... Print Properties, set the size from the Paper Size/Type menu. When 88 Toner Low appears or when the print becomes faded, replace the toner cartridge(s). Try one or more of the following : ARE THERE ANY ERROR MESSAGES ON THE DISPLAY? Solving copy problems Copier does not respond These are possible...
... Print Properties, set the size from the Paper Size/Type menu. When 88 Toner Low appears or when the print becomes faded, replace the toner cartridge(s). Try one or more of the following : ARE THERE ANY ERROR MESSAGES ON THE DISPLAY? Solving copy problems Copier does not respond These are possible...
Troubleshooting Guide
Page 6
... the printer and enters the finisher, it . Ask the person who sent you the fax to: • Check that you experience faded print, replace the cartridge(s). Solving option problems Option does not operate correctly or quits after it is satisfactory. • Resend the fax. MAKE SURE THE SHORTCUT NUMBER IS SET...
... the printer and enters the finisher, it . Ask the person who sent you the fax to: • Check that you experience faded print, replace the cartridge(s). Solving option problems Option does not operate correctly or quits after it is satisfactory. • Resend the fax. MAKE SURE THE SHORTCUT NUMBER IS SET...

Troubleshooting Guide
Page 9
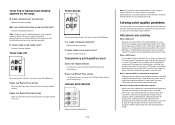
..., white line, or incorrectly colored line IS A TONER CARTRIDGE DEFECTIVE? Replace the transfer belt. CHECK THE PAPER TYPE SETTING...IS THE TONER LOW? Replace the fuser. Try one or more of the toner cartridge: 1 Remove the toner cartridge. 2 Firmly shake the cartridge side-to-side and front-to-back several times to extend the life of the... fresh package. • Store paper in its original wrapper until the print remains faded, and then replace the toner cartridge. Print irregularities HAS PAPER ABSORBED MOISTURE DUE TO HIGH HUMIDITY? • Load paper from a fresh package. •...
..., white line, or incorrectly colored line IS A TONER CARTRIDGE DEFECTIVE? Replace the transfer belt. CHECK THE PAPER TYPE SETTING...IS THE TONER LOW? Replace the fuser. Try one or more of the toner cartridge: 1 Remove the toner cartridge. 2 Firmly shake the cartridge side-to-side and front-to-back several times to extend the life of the... fresh package. • Store paper in its original wrapper until the print remains faded, and then replace the toner cartridge. Print irregularities HAS PAPER ABSORBED MOISTURE DUE TO HIGH HUMIDITY? • Load paper from a fresh package. •...

Troubleshooting Guide
Page 10
...to the correct positions for the paper size loaded. The cyan, magenta, and yellow photoconductors must all be replaced separately. IS THE TONER CARTRIDGE DEFECTIVE? CHECK THE PAPER Avoid textured paper with rough finishes. CHECK THE PAPER TYPE SETTING Make sure the Paper Type setting matches the ...the tray to Windows users only. • From the Quality menu, change these settings. Solid color pages The printer may be set to be serviced. MAKE SURE COLOR SAVER IS SET TO OFF Color Saver may need to On. Print is too dark CHECK THE DARKNESS, BRIGHTNESS, AND CONTRAST ...
...to the correct positions for the paper size loaded. The cyan, magenta, and yellow photoconductors must all be replaced separately. IS THE TONER CARTRIDGE DEFECTIVE? CHECK THE PAPER Avoid textured paper with rough finishes. CHECK THE PAPER TYPE SETTING Make sure the Paper Type setting matches the ...the tray to Windows users only. • From the Quality menu, change these settings. Solid color pages The printer may be set to be serviced. MAKE SURE COLOR SAVER IS SET TO OFF Color Saver may need to On. Print is too dark CHECK THE DARKNESS, BRIGHTNESS, AND CONTRAST ...
Troubleshooting Guide
Page 11
..., green, and blue light can be replaced at the same time. Printing presses, inkjet printers, and color laser printers create colors in nature. CMYK color is RGB color? The object information determines the application of cyan, magenta, yellow, and black needed to photographic images. ARE THE... in the Quality menu can be replaced separately. Toner fog or background shading appears on the page A TONER CARTRIDGE MAY BE DEFECTIVE Replace the toner cartridge. The cyan, magenta, and yellow photoconductors must all be added together in various amounts to the printer. For...
..., green, and blue light can be replaced at the same time. Printing presses, inkjet printers, and color laser printers create colors in nature. CMYK color is RGB color? The object information determines the application of cyan, magenta, yellow, and black needed to photographic images. ARE THE... in the Quality menu can be replaced separately. Toner fog or background shading appears on the page A TONER CARTRIDGE MAY BE DEFECTIVE Replace the toner cartridge. The cyan, magenta, and yellow photoconductors must all be added together in various amounts to the printer. For...
User's Guide
Page 10
...203 Checking the status of supplies from a network computer 203 Conserving supplies...204 Ordering supplies...204 Ordering toner cartridges...204 Ordering photoconductors ...204 Ordering staple cartridges ...204 Ordering a waste toner box ...205 Replacing supplies...205 Replacing the waste toner box ...205 Cleaning... the printhead lenses ...210 Replacing a photoconductor...214 Replacing a toner cartridge ...217 Cleaning the exterior of the printer 219 Cleaning the scanner glass...220 Recycling Lexmark products...220 Moving the printer...220 Before moving the printer ...220 Moving the...
...203 Checking the status of supplies from a network computer 203 Conserving supplies...204 Ordering supplies...204 Ordering toner cartridges...204 Ordering photoconductors ...204 Ordering staple cartridges ...204 Ordering a waste toner box ...205 Replacing supplies...205 Replacing the waste toner box ...205 Cleaning... the printhead lenses ...210 Replacing a photoconductor...214 Replacing a toner cartridge ...217 Cleaning the exterior of the printer 219 Cleaning the scanner glass...220 Recycling Lexmark products...220 Moving the printer...220 Before moving the printer ...220 Moving the...

User's Guide
Page 21
... faxes with a scheduled hold time previously set. Touching this button is not empty. Tips is set up , it appears as Close door or Insert print cartridge. 5 Status/Supplies Appears on what the user should do so the printer can continue processing, such as a display item. 8 Fax Access the Fax menus. Note...
... faxes with a scheduled hold time previously set. Touching this button is not empty. Tips is set up , it appears as Close door or Insert print cartridge. 5 Status/Supplies Appears on what the user should do so the printer can continue processing, such as a display item. 8 Fax Access the Fax menus. Note...

User's Guide
Page 48
...without releasing hazardous emissions. • Do not use before buying large quantities. Adhesive material contaminates the printer and could void the printer and cartridge warranties. • Do not use a non-oozing adhesive. • Portrait orientation works best, especially when printing bar codes. Most label... with chemicals that may contaminate the printer. • Use full label sheets. Partial sheets also contaminate the printer and the cartridge with adhesive, and could void the warranty. • If zone coating of paper they support. When printing on standard and...
...without releasing hazardous emissions. • Do not use before buying large quantities. Adhesive material contaminates the printer and could void the printer and cartridge warranties. • Do not use a non-oozing adhesive. • Portrait orientation works best, especially when printing bar codes. Most label... with chemicals that may contaminate the printer. • Use full label sheets. Partial sheets also contaminate the printer and the cartridge with adhesive, and could void the warranty. • If zone coating of paper they support. When printing on standard and...

User's Guide
Page 105
.... 4 Click Print Settings. 5 Click Setup Menu. 6 From the Printer Usage list, select Max Speed or Max Yield. 7 Click Submit. 105 Frequent color mode switching can result in slower printing if the content of overriding this setting. 1 Make sure the printer is mixed. Note: The printer driver is.... Printing in black and white To print all text and graphics using only the black toner cartridge, set the printer to color mode based on the color content found on and Ready appears. 2 On the home screen, touch . 3 Touch Settings. 4 Touch repeatedly until Quality Menu appears. 5 Touch repeatedly ...
.... 4 Click Print Settings. 5 Click Setup Menu. 6 From the Printer Usage list, select Max Speed or Max Yield. 7 Click Submit. 105 Frequent color mode switching can result in slower printing if the content of overriding this setting. 1 Make sure the printer is mixed. Note: The printer driver is.... Printing in black and white To print all text and graphics using only the black toner cartridge, set the printer to color mode based on the color content found on and Ready appears. 2 On the home screen, touch . 3 Touch Settings. 4 Touch repeatedly until Quality Menu appears. 5 Touch repeatedly ...
User's Guide
Page 107
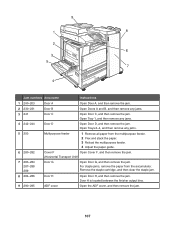
... jam. 2 230-231 Door B Open Doors A and B, and then remove any jams. 4 242-244 Door D Open Door D, and then remove the jam. Remove the staple cartridge, and then clear the staple jam. 8 284-286 Door H Open Door H, and then remove the jam. For staple jams, remove the paper from the multipurpose...
... jam. 2 230-231 Door B Open Doors A and B, and then remove any jams. 4 242-244 Door D Open Door D, and then remove the jam. Remove the staple cartridge, and then clear the staple jam. 8 284-286 Door H Open Door H, and then remove the jam. For staple jams, remove the paper from the multipurpose...

User's Guide
Page 119
289 staple jam 1 Open Door G. 2 Slide the G5 stapler toward the front of the finisher. 3 Lift the lever, and then remove the staple cartridge. 119
289 staple jam 1 Open Door G. 2 Slide the G5 stapler toward the front of the finisher. 3 Lift the lever, and then remove the staple cartridge. 119

User's Guide
Page 120
4 Open the staple cover. 5 Remove the jammed staple, and then close the cover. 6 Place the staple cartridge into the upper stapler. 120
4 Open the staple cover. 5 Remove the jammed staple, and then close the cover. 6 Place the staple cartridge into the upper stapler. 120

User's Guide
Page 121
7 Open the lower staple drawer. 8 Remove the staple cartridge identified on the display. 9 Remove the jammed staples, and then place the staple cartridge into the stapler. 121
7 Open the lower staple drawer. 8 Remove the staple cartridge identified on the display. 9 Remove the jammed staples, and then place the staple cartridge into the stapler. 121
User's Guide
Page 125
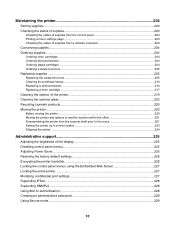
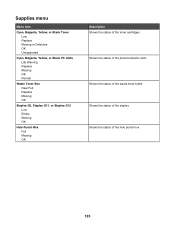
Supplies menu Menu item Cyan, Magenta, Yellow, or Black Toner Low Replace Missing or Defective OK Unsupported Cyan, Magenta, Yellow, or Black PC Units Life Warning Replace Missing OK Normal Waste Toner Box Near Full Replace Missing OK Staples G5, Staples G11, or Staples G12 Low Empty Missing OK Hole Punch Box Full Missing OK Description Shows the status of the toner cartridges Shows the status of the photoconductor units Shows the status of the waste toner bottle Shows the status of the staples Shows the status of the hole punch box 125
Supplies menu Menu item Cyan, Magenta, Yellow, or Black Toner Low Replace Missing or Defective OK Unsupported Cyan, Magenta, Yellow, or Black PC Units Life Warning Replace Missing OK Normal Waste Toner Box Near Full Replace Missing OK Staples G5, Staples G11, or Staples G12 Low Empty Missing OK Hole Punch Box Full Missing OK Description Shows the status of the toner cartridges Shows the status of the photoconductor units Shows the status of the waste toner bottle Shows the status of the staples Shows the status of the hole punch box 125

User's Guide
Page 168
... Job Accounting Off On Print Area Normal Whole Page Description Prints all text and graphics using only the black toner cartridge Specifies how the printer processes jobs with black and white and color information Notes: • Max Speed prints in a black only mode until it receives a page with errors, ...does not switch to black only until it receives ten consecutive black-and-white pages. • Max Yield switches from black to color mode based on the color content found on a printer hard disk places them in the non-printable area defined by the Normal setting, the printer clips the...
... Job Accounting Off On Print Area Normal Whole Page Description Prints all text and graphics using only the black toner cartridge Specifies how the printer processes jobs with black and white and color information Notes: • Max Speed prints in a black only mode until it receives a page with errors, ...does not switch to black only until it receives ten consecutive black-and-white pages. • Max Yield switches from black to color mode based on the color content found on a printer hard disk places them in the non-printable area defined by the Normal setting, the printer clips the...
User's Guide
Page 193
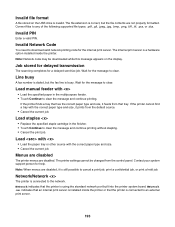
.... If the printer cannot find a tray with the correct paper type and size. • Cancel the current job. Load staples • Replace the specified staple cartridge in the multipurpose feeder. • Touch Continue to clear the message and continue printing. Load with • Load the paper tray or other source with...
.... If the printer cannot find a tray with the correct paper type and size. • Cancel the current job. Load staples • Replace the specified staple cartridge in the multipurpose feeder. • Touch Continue to clear the message and continue printing. Load with • Load the paper tray or other source with...

User's Guide
Page 196
.... Sending page The printer sends page of the page sent. Some held jobs are deleted. Staples low or missing Load the specified staple cartridge in the printer memory are not restored. When factory default settings are inaccessible. y represents the total number of pages. Note: Serial The...x represents the number of paper from the standard exit bin to clear the message. 196 Staples empty or misfed Load the specified staple cartridge into the finisher to the factory defaults except the Display Language setting in the Setup menu and the custom settings in the Serial , ...
.... Sending page The printer sends page of the page sent. Some held jobs are deleted. Staples low or missing Load the specified staple cartridge in the printer memory are not restored. When factory default settings are inaccessible. y represents the total number of pages. Note: Serial The...x represents the number of paper from the standard exit bin to clear the message. 196 Staples empty or misfed Load the specified staple cartridge into the finisher to the factory defaults except the Display Language setting in the Setup menu and the custom settings in the Serial , ...

