
User's Guide
Page 2
...power supply and power supply cord. Safety information Use only the power supply and power supply cord provided with the use of specific Lexmark components. SAVE THESE INSTRUCTIONS. This product is near the product and easily accessible. CAUTION: Do not twist, bind, crush, or place heavy objects on the power cord. Inspect the power cord... regularly for the use the fax feature during a lightning storm. Refer service or repairs, other replacement parts. Lexmark is misused, a risk of fire or electrical...
...power supply and power supply cord. Safety information Use only the power supply and power supply cord provided with the use of specific Lexmark components. SAVE THESE INSTRUCTIONS. This product is near the product and easily accessible. CAUTION: Do not twist, bind, crush, or place heavy objects on the power cord. Inspect the power cord... regularly for the use the fax feature during a lightning storm. Refer service or repairs, other replacement parts. Lexmark is misused, a risk of fire or electrical...
User's Guide
Page 17
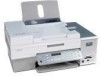
... look different from the one shown. 4 Power cord Attaches to the power supply port located at the back of installation. 6 Quick Setup sheet Initial setup directions 7 User's Guide Printed booklet that serves as a ...the box contents 1 2 3 4 1 2 3 5 8 7 6 Name Description 1 Black print cartridge 2 Color print cartridge Cartridges to be found on the installation software CD. 8 Installation software CD for Windows and Mac • Installation software for faxing. Note: Your power cord may look different from the one shown. 5 Installation cable Connects the printer to...
... look different from the one shown. 4 Power cord Attaches to the power supply port located at the back of installation. 6 Quick Setup sheet Initial setup directions 7 User's Guide Printed booklet that serves as a ...the box contents 1 2 3 4 1 2 3 5 8 7 6 Name Description 1 Black print cartridge 2 Color print cartridge Cartridges to be found on the installation software CD. 8 Installation software CD for Windows and Mac • Installation software for faxing. Note: Your power cord may look different from the one shown. 5 Installation cable Connects the printer to...
User's Guide
Page 19
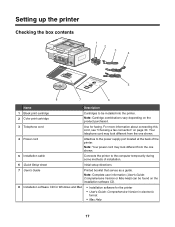
..., see "Ordering paper and other supplies" on both sides of a sheet of paper. • Remove paper jams. 5 Lexmark N2050 (internal wireless print server) Connect the printer to send and receive faxes. Note: Do not connect additional devices to the LINE port, and do... 87 65 43 Use the To 1 Scanner unit Access the print cartridges. 2 Print cartridge carrier Install, replace, or remove a print cartridge. 3 Power supply with port Plug the power cord into the power supply at the back of the printer and then into the wall outlet. 4 Duplex cover • Print on page 136. 6 LINE port...
..., see "Ordering paper and other supplies" on both sides of a sheet of paper. • Remove paper jams. 5 Lexmark N2050 (internal wireless print server) Connect the printer to send and receive faxes. Note: Do not connect additional devices to the LINE port, and do... 87 65 43 Use the To 1 Scanner unit Access the print cartridges. 2 Print cartridge carrier Install, replace, or remove a print cartridge. 3 Power supply with port Plug the power cord into the power supply at the back of the printer and then into the wall outlet. 4 Duplex cover • Print on page 136. 6 LINE port...
User's Guide
Page 22
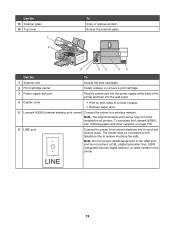
6 Extend the paper guides. 7 Load paper. 8 Connect the power cord. 9 Make sure the power is on. 2 1 22
6 Extend the paper guides. 7 Load paper. 8 Connect the power cord. 9 Make sure the power is on. 2 1 22
User's Guide
Page 47
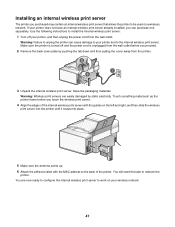
... an internal wireless print server that allows the printer to install the internal wireless print server: 1 Turn off and the power cord is turned off your printer, and then unplug the power cord from the wall outlet. Make sure the printer is unplugged from the wall outlet before you touch the wireless print server...
... an internal wireless print server that allows the printer to install the internal wireless print server: 1 Turn off and the power cord is turned off your printer, and then unplug the power cord from the wall outlet. Make sure the printer is unplugged from the wall outlet before you touch the wireless print server...

User's Guide
Page 113
... an outside line or get through an automated answering system. b Repeat entering fax numbers, using the software You can include a calling card number as the power supply cord or telephone, during a lightning storm. Sending a fax Entering a fax number 1 From the control panel, press Fax Mode. 2 Enter a fax number using: The text box...
... an outside line or get through an automated answering system. b Repeat entering fax numbers, using the software You can include a calling card number as the power supply cord or telephone, during a lightning storm. Sending a fax Entering a fax number 1 From the control panel, press Fax Mode. 2 Enter a fax number using: The text box...
User's Guide
Page 135
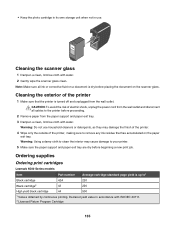
.... 5 Make sure the paper support and paper exit tray are dry before placing the document on the paper exit tray. Ordering supplies Ordering print cartridges Lexmark 6500 Series models Item Part number Average cartridge standard page yield is dry before beginning a new print job. Cleaning the scanner glass 1 Dampen a clean, lint... in its own storage unit when not in accordance with water. 2 Gently wipe the scanner glass clean. Cleaning the exterior of electric shock, unplug the power cord from the wall outlet.
.... 5 Make sure the paper support and paper exit tray are dry before placing the document on the paper exit tray. Ordering supplies Ordering print cartridges Lexmark 6500 Series models Item Part number Average cartridge standard page yield is dry before beginning a new print job. Cleaning the scanner glass 1 Dampen a clean, lint... in its own storage unit when not in accordance with water. 2 Gently wipe the scanner glass clean. Cleaning the exterior of electric shock, unplug the power cord from the wall outlet.
User's Guide
Page 138
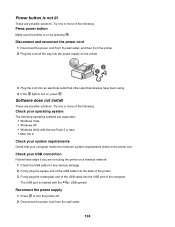
... If the light is on by pressing . Reconnect the power supply 1 Press to turn the printer off. 2 Disconnect the power cord from the printer. 2 Plug the cord all the way into the power supply on the printer. 2 1 3 Plug the cord into an electrical outlet that your computer meets the minimum system.... Check your USB connection Follow these steps if you are possible solutions. Disconnect and reconnect the power cord 1 Disconnect the power cord from the wall outlet, and then from the wall outlet. 138 Power button is marked with Service Pack 3 or later • Mac OS X Check your system...
... If the light is on by pressing . Reconnect the power supply 1 Press to turn the printer off. 2 Disconnect the power cord from the printer. 2 Plug the cord all the way into the power supply on the printer. 2 1 3 Plug the cord into an electrical outlet that your computer meets the minimum system.... Check your USB connection Follow these steps if you are possible solutions. Disconnect and reconnect the power cord 1 Disconnect the power cord from the wall outlet, and then from the wall outlet. 138 Power button is marked with Service Pack 3 or later • Mac OS X Check your system...
User's Guide
Page 139
... from the printer. 4 Reconnect the power supply to the printer. 5 Plug the power cord into the wall outlet. 6 Press to turn the printer on page 138. Uninstall and reinstall software Uninstall the printer software, and then reinstall it. Check power If the light is not on, see "Power button is displayed, see "Removing and reinstalling...
... from the printer. 4 Reconnect the power supply to the printer. 5 Plug the power cord into the wall outlet. 6 Press to turn the printer on page 138. Uninstall and reinstall software Uninstall the printer software, and then reinstall it. Check power If the light is not on, see "Power button is displayed, see "Removing and reinstalling...

User's Guide
Page 140
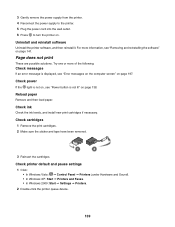
...the camera. Installation will work, but you want to turn the printer on. Reconnect power supply 1 Press to turn the printer off. 2 Disconnect the power cord from the wall outlet. 3 Gently remove the power supply from camera Enable PictBridge printing on page 197. 3 Click Printer. • ...requirements were not met. Try one or more of the following: Enable PictBridge printing from the printer. 4 Reconnect the power supply to the printer. 5 Plug the power cord into the wall outlet. 6 Press to print. Removing and reinstalling the software Uninstall the printer software, and then ...
...the camera. Installation will work, but you want to turn the printer on. Reconnect power supply 1 Press to turn the printer off. 2 Disconnect the power cord from the wall outlet. 3 Gently remove the power supply from camera Enable PictBridge printing on page 197. 3 Click Printer. • ...requirements were not met. Try one or more of the following: Enable PictBridge printing from the printer. 4 Reconnect the power supply to the printer. 5 Plug the power cord into the wall outlet. 6 Press to print. Removing and reinstalling the software Uninstall the printer software, and then ...

User's Guide
Page 178
Check memory card type Make sure that your printer and your computer are in the JPEG format. Make sure the power cord is plugged into the correct slot. Check to see if your camera. Note: If your wireless connection is connected and active. The printer reads photos ... no obvious damage to the memory card. Scanner unit does not close 1 Lift the scanner unit. 2 Remove any obstruction keeping the scanner unit open . Check power If the light is not on, make sure the printer is properly connected to the printer. Remove memory cards properly from the printer to avoid...
Check memory card type Make sure that your printer and your computer are in the JPEG format. Make sure the power cord is plugged into the correct slot. Check to see if your camera. Note: If your wireless connection is connected and active. The printer reads photos ... no obvious damage to the memory card. Scanner unit does not close 1 Lift the scanner unit. 2 Remove any obstruction keeping the scanner unit open . Check power If the light is not on, make sure the printer is properly connected to the printer. Remove memory cards properly from the printer to avoid...
User's Guide
Page 180
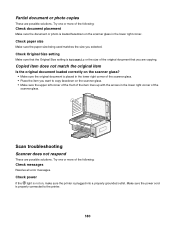
...8226; Make sure the original document is placed in the lower right corner of the following : Check messages Resolve all error messages. Make sure the power cord is plugged into a properly grounded outlet. Try one or more of the scanner glass. • Place the item you are copying. Check Original ...Size setting Make sure that you want to the printer. 180 Partial document or photo copies These are possible solutions. Check power If the light is not on, make sure the printer is properly connected to copy facedown on the scanner glass in the lower right...
...8226; Make sure the original document is placed in the lower right corner of the following : Check messages Resolve all error messages. Make sure the power cord is plugged into a properly grounded outlet. Try one or more of the scanner glass. • Place the item you are copying. Check Original ...Size setting Make sure that you want to the printer. 180 Partial document or photo copies These are possible solutions. Check power If the light is not on, make sure the printer is properly connected to copy facedown on the scanner glass in the lower right...
User's Guide
Page 187
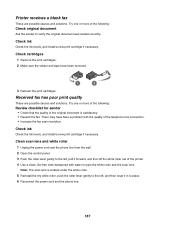
... causes and solutions. Check cartridges 1 Remove the print cartridges. 2 Make sure the sticker and tape have been a problem with water to place. 6 Reconnect the power cord and the phone line. 187 Try one or more of the following : Review checklist for sender • Check that the quality of the telephone line... lever gently to the left , pull it in to wipe the white roller and the scan lens. Clean scan lens and white roller 1 Unplug the power cord and the phone line from the wall. 2 Open the control panel. 3 Push the roller lever gently to the left , and then snap it forward,...
... causes and solutions. Check cartridges 1 Remove the print cartridges. 2 Make sure the sticker and tape have been a problem with water to place. 6 Reconnect the power cord and the phone line. 187 Try one or more of the following : Review checklist for sender • Check that the quality of the telephone line... lever gently to the left , pull it in to wipe the white roller and the scan lens. Clean scan lens and white roller 1 Unplug the power cord and the phone line from the wall. 2 Open the control panel. 3 Push the roller lever gently to the left , and then snap it forward,...
User's Guide
Page 192
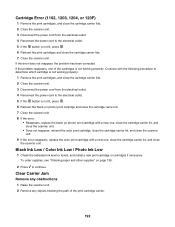
..., and close the cartridge carrier lids. 2 Close the scanner unit. 3 Disconnect the power cord from the electrical outlet. 4 Reconnect the power cord to the electrical outlet. 5 If the button is not working properly. Clear Carrier Jam...Color Ink Low / Photo Ink Low 1 Check the indicated ink level or levels, and install a new print cartridge or cartridges if necessary. Cartridge Error (1102, 1203, 1204, or 120F) 1 Remove the print cartridges, and close the cartridge carrier lids. 2 Close the scanner unit. 3 Disconnect the power cord from the electrical outlet. 4 Reconnect the power cord...
..., and close the cartridge carrier lids. 2 Close the scanner unit. 3 Disconnect the power cord from the electrical outlet. 4 Reconnect the power cord to the electrical outlet. 5 If the button is not working properly. Clear Carrier Jam...Color Ink Low / Photo Ink Low 1 Check the indicated ink level or levels, and install a new print cartridge or cartridges if necessary. Cartridge Error (1102, 1203, 1204, or 120F) 1 Remove the print cartridges, and close the cartridge carrier lids. 2 Close the scanner unit. 3 Disconnect the power cord from the electrical outlet. 4 Reconnect the power cord...

User's Guide
Page 193
... 1104 1 Remove the print cartridges. 2 Reinstall the black cartridge or the photo cartridge in the left carrier. 3 Reinstall the color cartridge in the right carrier. Left Cartridge Error / Right Cartridge Error This message may also appear as Error 1205 (Left Cartridge)... Right Cartridge Incorrect 1 Remove the indicated print cartridge and close the cartridge carrier lid. 2 Close the scanner unit. 3 Disconnect the power cord from the electrical outlet. 4 Reconnect the power cord to the electrical outlet. 5 If the button is closed . 4 Close the scanner unit. 5 Press . Cover Open Make sure that...
... 1104 1 Remove the print cartridges. 2 Reinstall the black cartridge or the photo cartridge in the left carrier. 3 Reinstall the color cartridge in the right carrier. Left Cartridge Error / Right Cartridge Error This message may also appear as Error 1205 (Left Cartridge)... Right Cartridge Incorrect 1 Remove the indicated print cartridge and close the cartridge carrier lid. 2 Close the scanner unit. 3 Disconnect the power cord from the electrical outlet. 4 Reconnect the power cord to the electrical outlet. 5 If the button is closed . 4 Close the scanner unit. 5 Press . Cover Open Make sure that...
User's Guide
Page 194
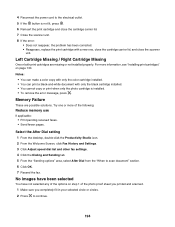
... You have not selected any of the options on page 130. 4 Reconnect the power cord to the electrical outlet. 5 If the button is installed. • To remove the error message, press . Notes: • You can make a color copy with only the color cartridge installed. • You can print a black-and-white document with a new...
... You have not selected any of the options on page 130. 4 Reconnect the power cord to the electrical outlet. 5 If the button is installed. • To remove the error message, press . Notes: • You can make a color copy with only the color cartridge installed. • You can print a black-and-white document with a new...
User's Guide
Page 208
...to the United States. Limited warranty Lexmark warrants that user for this product throughout its warranty period. You should be required to in power units of power, then to that this product: -Is manufactured from Lexmark or a Lexmark remarketer, referred to present the ... which it was designed. Remote technical support is available to completely stop product power consumption, disconnect the power supply cord from defects in your warranty alternatives and the nearest Lexmark authorized servicer in material and workmanship If this product does not function as "Remarketer...
...to the United States. Limited warranty Lexmark warrants that user for this product throughout its warranty period. You should be required to in power units of power, then to that this product: -Is manufactured from Lexmark or a Lexmark remarketer, referred to present the ... which it was designed. Remote technical support is available to completely stop product power consumption, disconnect the power supply cord from defects in your warranty alternatives and the nearest Lexmark authorized servicer in material and workmanship If this product does not function as "Remarketer...

