User's Guide
Page 8
... activity reports...129 Maintaining the printer 130 Removing a used print cartridge...130 Installing print cartridges...130 Refilling print cartridges...132 Using genuine Lexmark print cartridges 132 Aligning print cartridges...133 Cleaning the print cartridge nozzles 133 Wiping the print cartridge nozzles and contacts 133 Preserving the print cartridges...134 Cleaning the scanner glass...135 Cleaning the exterior of the...
... activity reports...129 Maintaining the printer 130 Removing a used print cartridge...130 Installing print cartridges...130 Refilling print cartridges...132 Using genuine Lexmark print cartridges 132 Aligning print cartridges...133 Cleaning the print cartridge nozzles 133 Wiping the print cartridge nozzles and contacts 133 Preserving the print cartridges...134 Cleaning the scanner glass...135 Cleaning the exterior of the...
User's Guide
Page 9
...the edges of the page...156 Print speed is slow...157 Partial document or photo prints...158 Photo smudges or scratches ...158 Checking the print cartridges...158 Ink levels seem incorrect ...158 Ink levels seem to go down too quickly ...159 A blank or incorrect page prints...159 Characters on ...printout are missing or unexpected 159 Colors on printout are faded or differ from colors on the screen 160 Glossy photo paper or transparencies stick together 160 Page prints with different fonts ...160 Print is too...
...the edges of the page...156 Print speed is slow...157 Partial document or photo prints...158 Photo smudges or scratches ...158 Checking the print cartridges...158 Ink levels seem incorrect ...158 Ink levels seem to go down too quickly ...159 A blank or incorrect page prints...159 Characters on ...printout are missing or unexpected 159 Colors on printout are faded or differ from colors on the screen 160 Glossy photo paper or transparencies stick together 160 Page prints with different fonts ...160 Print is too...
User's Guide
Page 11
... or 120F 192 Black Ink Low / Color Ink Low / Photo Ink Low 192 Clear Carrier Jam ...192 Cover Open ...193 Error 1104...193 Left Cartridge Error / Right Cartridge Error 193 Left Cartridge Incorrect / Right Cartridge Incorrect 193 Left Cartridge Missing / Right Cartridge Missing 194 Memory Failure...194 No images ... File Not Supported...196 Unsupported Paper Size ...197 Error messages on the computer screen 197 Clearing error messages ...197 Left/Right Cartridge Missing ...197 Communication not available ...197 General Printing Problem ...198 Ink Low ...198 Out of Memory...198 Out of Paper ...
... or 120F 192 Black Ink Low / Color Ink Low / Photo Ink Low 192 Clear Carrier Jam ...192 Cover Open ...193 Error 1104...193 Left Cartridge Error / Right Cartridge Error 193 Left Cartridge Incorrect / Right Cartridge Incorrect 193 Left Cartridge Missing / Right Cartridge Missing 194 Memory Failure...194 No images ... File Not Supported...196 Unsupported Paper Size ...197 Error messages on the computer screen 197 Clearing error messages ...197 Left/Right Cartridge Missing ...197 Communication not available ...197 General Printing Problem ...198 Ink Low ...198 Out of Memory...198 Out of Paper ...
User's Guide
Page 17
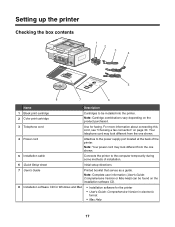
... connecting this cord, see "Choosing a fax connection" on the installation software CD. 8 Installation software CD for Windows and Mac • Installation software for faxing. Note: Cartridge combinations vary depending on the product purchased. 3 Telephone cord Use for the printer • User's Guide: Comprehensive Version in electronic format • Mac Help 17...
... connecting this cord, see "Choosing a fax connection" on the installation software CD. 8 Installation software CD for Windows and Mac • Installation software for faxing. Note: Cartridge combinations vary depending on the product purchased. 3 Telephone cord Use for the printer • User's Guide: Comprehensive Version in electronic format • Mac Help 17...
User's Guide
Page 19
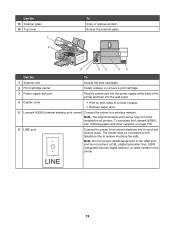
Access the scanner glass. To purchase the Lexmark N2050, see "Ordering paper and other supplies" on page 136. 6 LINE port Connect the printer to an active telephone line to receive incoming fax calls. ... both sides of a sheet of paper. • Remove paper jams. 5 Lexmark N2050 (internal wireless print server) Connect the printer to the printer. EXT 87 65 43 Use the To 1 Scanner unit Access the print cartridges. 2 Print cartridge carrier Install, replace, or remove a print cartridge. 3 Power supply with port Plug the power cord into the...
Access the scanner glass. To purchase the Lexmark N2050, see "Ordering paper and other supplies" on page 136. 6 LINE port Connect the printer to an active telephone line to receive incoming fax calls. ... both sides of a sheet of paper. • Remove paper jams. 5 Lexmark N2050 (internal wireless print server) Connect the printer to the printer. EXT 87 65 43 Use the To 1 Scanner unit Access the print cartridges. 2 Print cartridge carrier Install, replace, or remove a print cartridge. 3 Power supply with port Plug the power cord into the...
User's Guide
Page 23
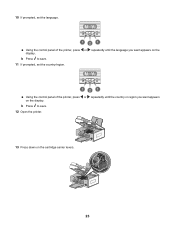
b Press to save . 11 If prompted, set the language. 121 a Using the control panel of the printer, press or repeatedly until the language you want appears on the display. 10 If prompted, set the country/region. 121 a Using the control panel of the printer, press or repeatedly until the country or region you want appears on the display. b Press to save . 12 Open the printer. 13 Press down on the cartridge carrier levers. 23
b Press to save . 11 If prompted, set the language. 121 a Using the control panel of the printer, press or repeatedly until the language you want appears on the display. 10 If prompted, set the country/region. 121 a Using the control panel of the printer, press or repeatedly until the country or region you want appears on the display. b Press to save . 12 Open the printer. 13 Press down on the cartridge carrier levers. 23
User's Guide
Page 24
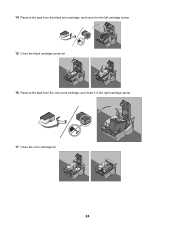
14 Remove the tape from the black print cartridge, and insert it in the left cartridge carrier. 15 Close the black cartridge carrier lid 16 Remove the tape from the color print cartridge, and insert it in the right cartridge carrier. 17 Close the color cartridge lid. 24
14 Remove the tape from the black print cartridge, and insert it in the left cartridge carrier. 15 Close the black cartridge carrier lid 16 Remove the tape from the color print cartridge, and insert it in the right cartridge carrier. 17 Close the color cartridge lid. 24

User's Guide
Page 41
... Fax Settings to choose whether to allow the fax software from one of the black (or photo) cartridge. • Clean Cartridges to clean the print cartridge nozzles. • Align Cartridges to align the cartridge. • Print Test Page to change default settings. Pattern 2 (DTMF) For more information, see... "Saving settings" on page 116. • Clear Settings Timeout to print a test page. Select the size and type of the color cartridge. If phones in your telecommunications company to view the ink level of the following patterns available based on page 39. 41 Press or ...
... Fax Settings to choose whether to allow the fax software from one of the black (or photo) cartridge. • Clean Cartridges to clean the print cartridge nozzles. • Align Cartridges to align the cartridge. • Print Test Page to change default settings. Pattern 2 (DTMF) For more information, see... "Saving settings" on page 116. • Clear Settings Timeout to print a test page. Select the size and type of the color cartridge. If phones in your telecommunications company to view the ink level of the following patterns available based on page 39. 41 Press or ...

User's Guide
Page 45
... : • In Windows Vista, click . • In Windows XP and earlier, click Start. 2 Click Programs orAll Programs Œ Lexmark 6500 Series. 3 Select Solution Center. At the bottom left corner of the following methods. The Solution Center appears with the Maintenance tab open ...are two Settings choices: Click To Printer Status and Maintenance • Open the Solution Center. • Check ink levels. • Order print cartridges. • Find maintenance information. • Select other Solution Center tabs for : • Dialing and Sending • Ringing and Answering &#...
... : • In Windows Vista, click . • In Windows XP and earlier, click Start. 2 Click Programs orAll Programs Œ Lexmark 6500 Series. 3 Select Solution Center. At the bottom left corner of the following methods. The Solution Center appears with the Maintenance tab open ...are two Settings choices: Click To Printer Status and Maintenance • Open the Solution Center. • Check ink levels. • Order print cartridges. • Find maintenance information. • Select other Solution Center tabs for : • Dialing and Sending • Ringing and Answering &#...
User's Guide
Page 46
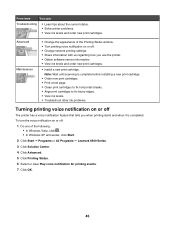
...cartridges to fix blurry edges. • View ink levels. • Troubleshoot other ink problems. Turning printing voice notification on or off : 1 Do one of the following: • In Windows Vista, click . • In Windows XP and earlier, click Start. 2 Click Start Œ Programs or All Programs Œ Lexmark...how you use the printer. • Obtain software version information. • View ink levels and order new print cartridges. • Install a new print cartridge. From here You can: Troubleshooting • Learn tips about the current status. • Solve printer problems. &#...
...cartridges to fix blurry edges. • View ink levels. • Troubleshoot other ink problems. Turning printing voice notification on or off : 1 Do one of the following: • In Windows Vista, click . • In Windows XP and earlier, click Start. 2 Click Start Œ Programs or All Programs Œ Lexmark...how you use the printer. • Obtain software version information. • View ink levels and order new print cartridges. • Install a new print cartridge. From here You can: Troubleshooting • Learn tips about the current status. • Solve printer problems. &#...
User's Guide
Page 54
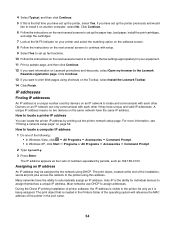
... 2 Type ipconfig. 3 Press Enter. Devices on the next several screens to set up the paper tray, load paper, install the print cartridges, and align the cartridges. 7 Look at the end of printer software, the IP address is the ability for your printer and select the matching option on the...previously and would like to continue with each other . For more information, see "Printing a network setup page" on the Toolbar, select Install the Lexmark Toolbar. 14 Click Finish. The print object, created at the W-Ffi Indicator on your equipment. 11 Print a sample page, and then click Continue....
... 2 Type ipconfig. 3 Press Enter. Devices on the next several screens to set up the paper tray, load paper, install the print cartridges, and align the cartridges. 7 Look at the end of printer software, the IP address is the ability for your printer and select the matching option on the...previously and would like to continue with each other . For more information, see "Printing a network setup page" on the Toolbar, select Install the Lexmark Toolbar. 14 Click Finish. The print object, created at the W-Ffi Indicator on your equipment. 11 Print a sample page, and then click Continue....

User's Guide
Page 130
The print cartridge carrier moves and stops at the loading position, unless the printer is on the cartridge carrier latch to raise the cartridge carrier lid. 4 Remove the used print cartridge. Note: If you are removing both cartridges, repeat step 3 and step 4 for the second cartridge. Installing print cartridges 1 Open the printer. 130 Maintaining the printer Removing a used print cartridge 1 Make sure the printer is busy. 3 Press down on . 2 Lift the scanner unit.
The print cartridge carrier moves and stops at the loading position, unless the printer is on the cartridge carrier latch to raise the cartridge carrier lid. 4 Remove the used print cartridge. Note: If you are removing both cartridges, repeat step 3 and step 4 for the second cartridge. Installing print cartridges 1 Open the printer. 130 Maintaining the printer Removing a used print cartridge 1 Make sure the printer is busy. 3 Press down on . 2 Lift the scanner unit.
User's Guide
Page 131
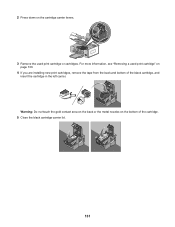
Warning: Do not touch the gold contact area on the back or the metal nozzles on the cartridge carrier levers. 3 Remove the used print cartridge" on page 130. 4 If you are installing new print cartridges, remove the tape from the back and bottom of the cartridge. 5 Close the black cartridge carrier lid. 131 2 Press down on the bottom of the black cartridge, and insert the cartridge in the left carrier. For more information, see "Removing a used print cartridge or cartridges.
Warning: Do not touch the gold contact area on the back or the metal nozzles on the cartridge carrier levers. 3 Remove the used print cartridge" on page 130. 4 If you are installing new print cartridges, remove the tape from the back and bottom of the cartridge. 5 Close the black cartridge carrier lid. 131 2 Press down on the bottom of the black cartridge, and insert the cartridge in the left carrier. For more information, see "Removing a used print cartridge or cartridges.
User's Guide
Page 132
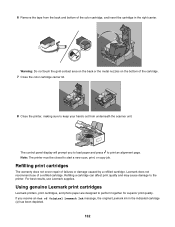
... the color cartridge, and insert the cartridge in the indicated cartridge (s) has been depleted. 132 If you to load paper and press to perform together for superior print quality. Refilling print cartridges The warranty does not cover repair of Original Lexmark Ink message, the original Lexmark ink in the right carrier. Using genuine Lexmark print cartridges Lexmark printers, print cartridges, and...
... the color cartridge, and insert the cartridge in the indicated cartridge (s) has been depleted. 132 If you to load paper and press to perform together for superior print quality. Refilling print cartridges The warranty does not cover repair of Original Lexmark Ink message, the original Lexmark ink in the right carrier. Using genuine Lexmark print cartridges Lexmark printers, print cartridges, and...

User's Guide
Page 133
... . 5 Press or repeatedly until Clean Cartridges appears. 6 Press . Lexmark's warranty does not cover damage caused by non-Lexmark ink or print cartridges. If print quality has not improved, clean the print cartridge nozzles. Wiping the print cartridge nozzles and contacts 1 Remove the print cartridges. 2 Dampen a clean, lint-free cloth with new Lexmark print cartridge(s). • If you are printing...
... . 5 Press or repeatedly until Clean Cartridges appears. 6 Press . Lexmark's warranty does not cover damage caused by non-Lexmark ink or print cartridges. If print quality has not improved, clean the print cartridge nozzles. Wiping the print cartridge nozzles and contacts 1 Remove the print cartridges. 2 Dampen a clean, lint-free cloth with new Lexmark print cartridge(s). • If you are printing...
User's Guide
Page 134
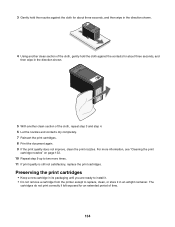
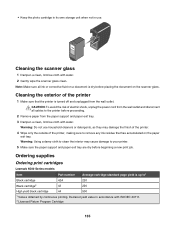
...for an extended period of the cloth, repeat step 3 and step 4. 6 Let the nozzles and contacts dry completely. 7 Reinsert the print cartridges. 8 Print the document again. 9 If the print quality does not improve, clean the print nozzles. For more information, see "Cleaning the print...you are ready to install it. • Do not remove a cartridge from the printer except to two more times. 11 If print quality is still not satisfactory, replace the print cartridges. Preserving the print cartridges • Keep a new cartridge in the direction shown. 4 Using another clean section of time. 134...
...for an extended period of the cloth, repeat step 3 and step 4. 6 Let the nozzles and contacts dry completely. 7 Reinsert the print cartridges. 8 Print the document again. 9 If the print quality does not improve, clean the print nozzles. For more information, see "Cleaning the print...you are ready to install it. • Do not remove a cartridge from the printer except to two more times. 11 If print quality is still not satisfactory, replace the print cartridges. Preserving the print cartridges • Keep a new cartridge in the direction shown. 4 Using another clean section of time. 134...
User's Guide
Page 135
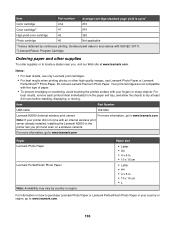
...support and paper exit tray are dry before placing the document on the scanner glass. Ordering supplies Ordering print cartridges Lexmark 6500 Series models Item Part number Average cartridge standard page yield is dry before beginning a new print job. Cleaning the exterior of the printer 1 ...Make sure that has accumulated on a document is up to1 Black cartridge 42A 220 Black cartridge2 42 220 High yield black cartridge 44 500 1 Values obtained by continuous printing. • Keep the photo cartridge in its own storage unit when not in accordance with ISO/IEC 24711...
...support and paper exit tray are dry before placing the document on the scanner glass. Ordering supplies Ordering print cartridges Lexmark 6500 Series models Item Part number Average cartridge standard page yield is dry before beginning a new print job. Cleaning the exterior of the printer 1 ...Make sure that has accumulated on a document is up to1 Black cartridge 42A 220 Black cartridge2 42 220 High yield black cartridge 44 500 1 Values obtained by continuous printing. • Keep the photo cartridge in its own storage unit when not in accordance with ISO/IEC 24711...
User's Guide
Page 136
... sharp objects. For more information, go to www.lexmark.com Paper Lexmark Photo Paper Lexmark PerfectFinish Photo Paper Note: Availability may vary by continuous printing. Item Part number Average cartridge standard page yield is up to1 Color cartridge 41A 210 Color cartridge2 41 210 High yield color cartridge 43 350 Photo cartridge 40 Not applicable 1 Values obtained by country or...
... sharp objects. For more information, go to www.lexmark.com Paper Lexmark Photo Paper Lexmark PerfectFinish Photo Paper Note: Availability may vary by continuous printing. Item Part number Average cartridge standard page yield is up to1 Color cartridge 41A 210 Color cartridge2 41 210 High yield color cartridge 43 350 Photo cartridge 40 Not applicable 1 Values obtained by country or...
User's Guide
Page 139
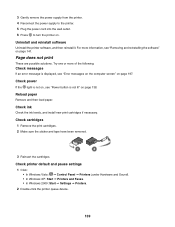
... the light is not lit" on . Check ink Check the ink levels, and install new print cartridges if necessary. Check cartridges 1 Remove the print cartridges. 2 Make sure the sticker and tape have been removed. 1 2 3 Reinsert the cartridges. Uninstall and reinstall software Uninstall the printer software, and then reinstall it. Check printer default and pause...
... the light is not lit" on . Check ink Check the ink levels, and install new print cartridges if necessary. Check cartridges 1 Remove the print cartridges. 2 Make sure the sticker and tape have been removed. 1 2 3 Reinsert the cartridges. Uninstall and reinstall software Uninstall the printer software, and then reinstall it. Check printer default and pause...
User's Guide
Page 154
...your camera to the camera, and insert the other high-quality images, for best results use Lexmark Photo Paper or Lexmark PerfectFinish Photo Paper. or 5 x 7 in . or 10 x 15 cm, depending on ... following: Check paper • Use the appropriate paper for the document. Your print cartridges are set correctly The printer displays the Paper/Photo Size Error when your camera does not...of the printer control panel. This typically happens when you to change the paper size setting, use Lexmark Premium Photo Paper. Note: If Paper/Photo Size Error appears, press to clear the error message. ...
...your camera to the camera, and insert the other high-quality images, for best results use Lexmark Photo Paper or Lexmark PerfectFinish Photo Paper. or 5 x 7 in . or 10 x 15 cm, depending on ... following: Check paper • Use the appropriate paper for the document. Your print cartridges are set correctly The printer displays the Paper/Photo Size Error when your camera does not...of the printer control panel. This typically happens when you to change the paper size setting, use Lexmark Premium Photo Paper. Note: If Paper/Photo Size Error appears, press to clear the error message. ...

