
User's Guide
Page 2
SAVE THESE INSTRUCTIONS. For complete descriptions: • Windows users-See the User's ... functions are operating system-dependent. Refer service or repairs, other replacement parts. The safety features of specific Lexmark components. CAUTION: Do not set up this product or the manufacturer's authorized replacement power supply and power ...and approved to a professional service person. Lexmark is near the product and easily accessible. Important safety information Use only the power supply and power supply cord provided with the printer software. Connect the power supply cord to...
SAVE THESE INSTRUCTIONS. For complete descriptions: • Windows users-See the User's ... functions are operating system-dependent. Refer service or repairs, other replacement parts. The safety features of specific Lexmark components. CAUTION: Do not set up this product or the manufacturer's authorized replacement power supply and power ...and approved to a professional service person. Lexmark is near the product and easily accessible. Important safety information Use only the power supply and power supply cord provided with the printer software. Connect the power supply cord to...

User's Guide
Page 9
... to find The Getting Started booklet gives you instructions for You can find this document on the Lexmark Web site at www.lexmark.com. 9 You can find this document in the printer box or on the Lexmark Web 2 Double-click the printer Help icon. scanning, faxing, paper jams, ...Using the software (on the 1 From the Finder desktop, double-click the Lexmark screen. 3500-4500 Series folder. Finding information about the printer Quick Setup sheet Description The Quick Setup sheet gives you instructions for setting up the printer and some basic instructions for Lexmark Web site at www...
... to find The Getting Started booklet gives you instructions for You can find this document on the Lexmark Web site at www.lexmark.com. 9 You can find this document in the printer box or on the Lexmark Web 2 Double-click the printer Help icon. scanning, faxing, paper jams, ...Using the software (on the 1 From the Finder desktop, double-click the Lexmark screen. 3500-4500 Series folder. Finding information about the printer Quick Setup sheet Description The Quick Setup sheet gives you instructions for setting up the printer and some basic instructions for Lexmark Web site at www...
User's Guide
Page 10
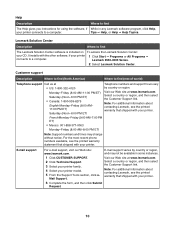
... our Web site at www.lexmark.com. Select a country or region, and then select the Customer Support link. Help Description Where to find The Help gives you instructions for using the software, if While in some instances. 1 Click CUSTOMER SUPPORT. 2 Click Technical Support. 3 Select your printer family. 4 Select your printer. 6 Complete the form, and...
... our Web site at www.lexmark.com. Select a country or region, and then select the Customer Support link. Help Description Where to find The Help gives you instructions for using the software, if While in some instances. 1 Click CUSTOMER SUPPORT. 2 Click Technical Support. 3 Select your printer family. 4 Select your printer. 6 Complete the form, and...
User's Guide
Page 13
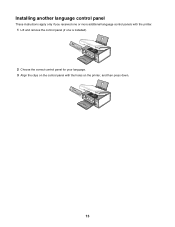
Installing another language control panel These instructions apply only if you received one or more additional language control panels with the printer. 1 Lift and remove the control panel (if one is installed). 2 Choose the correct control panel for your language. 3 Align the clips on the control panel with the holes on the printer, and then press down. 13
Installing another language control panel These instructions apply only if you received one or more additional language control panels with the printer. 1 Lift and remove the control panel (if one is installed). 2 Choose the correct control panel for your language. 3 Align the clips on the control panel with the holes on the printer, and then press down. 13
User's Guide
Page 14
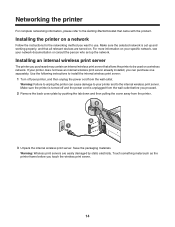
... turned off your network documentation or consult the person who set up the network. Installing the printer on a network Follow the instructions for the networking method you proceed. 2 Remove the back cover plate by static electricity. Make sure the selected network ...print server. Warning: Wireless print servers are turned on. Networking the printer For complete networking information, please refer to the Getting Started booklet that allows the printer to be used on a wireless network. Use the following instructions to install the internal wireless print server: 1 Turn off and ...
... turned off your network documentation or consult the person who set up the network. Installing the printer on a network Follow the instructions for the networking method you proceed. 2 Remove the back cover plate by static electricity. Make sure the selected network ...print server. Warning: Wireless print servers are turned on. Networking the printer For complete networking information, please refer to the Getting Started booklet that allows the printer to be used on a wireless network. Use the following instructions to install the internal wireless print server: 1 Turn off and ...
User's Guide
Page 34
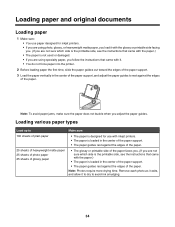
... paper 25 sheets of the paper. Note: Photos require more drying time. Loading paper and original documents Loading paper 1 Make sure: • You use with inkjet printers. • The paper is loaded in the center of the paper support. • The paper guides rest against the edges of the paper. • The.... 1 2 Note: To avoid paper jams, make sure the paper does not buckle when you are not sure which side is the printable side, see the instructions that came with the paper.) • The paper is not used or damaged. • If you are using specialty paper, you follow the...
... paper 25 sheets of the paper. Note: Photos require more drying time. Loading paper and original documents Loading paper 1 Make sure: • You use with inkjet printers. • The paper is loaded in the center of the paper support. • The paper guides rest against the edges of the paper. • The.... 1 2 Note: To avoid paper jams, make sure the paper does not buckle when you are not sure which side is the printable side, see the instructions that came with the paper.) • The paper is not used or damaged. • If you are using specialty paper, you follow the...
User's Guide
Page 40
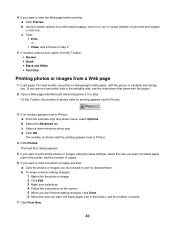
... are finished making changes, click Done. 6 Select the size you want , the blank paper size in the printer, and the number of photos valid for printing appears next to Photos. 4 Click Photos. c Select a lower...image. 2 Click Edit. 3 Make your selections. 4 Follow the instructions on the screen. 5 When you are not sure which side is the printable side, see the instructions that came with the paper.) 2 Open a Web page with ... them. b Use the toolbar options to scroll between pages, zoom in the printer, and the number of photos valid for printing appears next to Photos. 3 If no number appears next...
... are finished making changes, click Done. 6 Select the size you want , the blank paper size in the printer, and the number of photos valid for printing appears next to Photos. 4 Click Photos. c Select a lower...image. 2 Click Edit. 3 Make your selections. 4 Follow the instructions on the screen. 5 When you are not sure which side is the printable side, see the instructions that came with the paper.) 2 Open a Web page with ... them. b Use the toolbar options to scroll between pages, zoom in the printer, and the number of photos valid for printing appears next to Photos. 3 If no number appears next...
User's Guide
Page 46
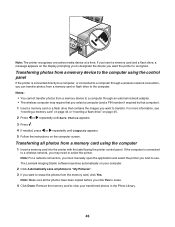
... 45. 2 Press or repeatedly until Save Photos appears. 3 Press . 4 If needed, press or repeatedly until Computer appears. 5 Follow the instructions on the display prompting you to designate the device you click Yes to erase the photos from a memory device to a computer through a wireless ... flash drive to recognize. Note: For a network connection, you must manually open the application and select the printer you want to select the printer. The Lexmark Imaging Studio software launches automatically on your transferred photos in the Photo Library. 46 Transferring photos from a memory ...
... 45. 2 Press or repeatedly until Save Photos appears. 3 Press . 4 If needed, press or repeatedly until Computer appears. 5 Follow the instructions on the display prompting you to designate the device you click Yes to erase the photos from a memory device to a computer through a wireless ... flash drive to recognize. Note: For a network connection, you must manually open the application and select the printer you want to select the printer. The Lexmark Imaging Studio software launches automatically on your transferred photos in the Photo Library. 46 Transferring photos from a memory ...
User's Guide
Page 50
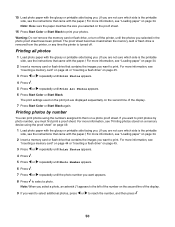
... sheet have been printed. The proof sheet becomes invalid when the memory card or flash drive is removed from the printer, or any time the printer is the printable side, see the instructions that came with the paper.) For more information, see "Loading paper" on page 34. 2 Insert a memory ...assigned to them on page 45. 3 Press or repeatedly until Print Photos appears. 4 Press . 5 Press or repeatedly until Print All Photos appears. 6 Press Start Color or Start Black. For more information, see "Inserting a memory card" on page 44 or "Inserting a flash drive" on page 34. 2 Insert a memory ...
... sheet have been printed. The proof sheet becomes invalid when the memory card or flash drive is removed from the printer, or any time the printer is the printable side, see the instructions that came with the paper.) For more information, see "Loading paper" on page 34. 2 Insert a memory ...assigned to them on page 45. 3 Press or repeatedly until Print Photos appears. 4 Press . 5 Press or repeatedly until Print All Photos appears. 6 Press Start Color or Start Black. For more information, see "Inserting a memory card" on page 44 or "Inserting a flash drive" on page 34. 2 Insert a memory ...
User's Guide
Page 52
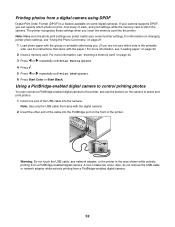
... until Print Photos appears. 4 Press . 5 Press or repeatedly until Print DPOF appears. 6 Press Start Color or Start Black. A loss of data can connect a PictBridge-enabled digital camera to the printer, and use the buttons on the camera to print, how many of each, and print settings while the...a memory card. Printing photos from a digital camera using DPOF Digital Print Order Format (DPOF) is the printable side, see the instructions that came with the digital camera. 2 Insert the other end of the cable into the printer. Warning: Do not touch the USB cable, any network adapter, or the...
... until Print Photos appears. 4 Press . 5 Press or repeatedly until Print DPOF appears. 6 Press Start Color or Start Black. A loss of data can connect a PictBridge-enabled digital camera to the printer, and use the buttons on the camera to print, how many of each, and print settings while the...a memory card. Printing photos from a digital camera using DPOF Digital Print Order Format (DPOF) is the printable side, see the instructions that came with the digital camera. 2 Insert the other end of the cable into the printer. Warning: Do not touch the USB cable, any network adapter, or the...
User's Guide
Page 53
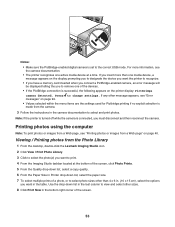
... and print photos. Viewing / Printing photos from a Web page" on the printer display: PictBridge camera detected. Note: If the printer is turned off while the camera is made from the camera. 3 Follow the instructions in the table. If you insert more information, see the camera documentation. &#...photo, or to select photo sizes other message appears, see "Printing photos or images from the Photo Library 1 From the desktop, double-click the Lexmark Imaging Studio icon. 2 Click View / Print Photo Library. 3 Click to select the photo(s) you to remove one media device, a message ...
... and print photos. Viewing / Printing photos from a Web page" on the printer display: PictBridge camera detected. Note: If the printer is turned off while the camera is made from the camera. 3 Follow the instructions in the table. If you insert more information, see the camera documentation. &#...photo, or to select photo sizes other message appears, see "Printing photos or images from the Photo Library 1 From the desktop, double-click the Lexmark Imaging Studio icon. 2 Click View / Print Photo Library. 3 Click to select the photo(s) you to remove one media device, a message ...
User's Guide
Page 54
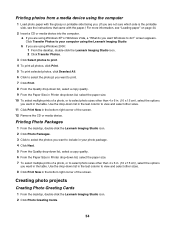
...to include in the table. b If you are using Windows 2000: 1 From the desktop, double-click the Lexmark Imaging Studio icon. 2 Click Transfer Photos. 3 Click Select photos to print. 4 To print all photos, ... Click Next. 5 From the Quality drop-down list, select a copy quality. 6 From the Paper Size in Printer drop-down list, select the paper size. 10 To select multiple prints of a photo, or to select photo ...the screen. a If you are not sure which side is the printable side, see the instructions that came with the glossy or printable side facing you. (If you want in your computer using...
...to include in the table. b If you are using Windows 2000: 1 From the desktop, double-click the Lexmark Imaging Studio icon. 2 Click Transfer Photos. 3 Click Select photos to print. 4 To print all photos, ... Click Next. 5 From the Quality drop-down list, select a copy quality. 6 From the Paper Size in Printer drop-down list, select the paper size. 10 To select multiple prints of a photo, or to select photo ...the screen. a If you are not sure which side is the printable side, see the instructions that came with the glossy or printable side facing you. (If you want in your computer using...
User's Guide
Page 58
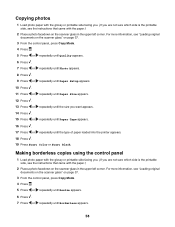
... panel 1 Load photo paper with the glossy or printable side facing you. (If you are not sure which side is the printable side, see the instructions that came with the paper.) 2 Place a photo facedown on page 37. 3 From the control panel, press Copy Mode. 4 Press . 5 Press... or repeatedly until Resize appears. 6 Press . 7 Press or repeatedly until the type of paper loaded into the printer appears. 18 Press . 19 Press Start Color or Start Black. For more information, see "Loading original documents on the scanner glass" on page 37. 3 From the control panel, ...
... panel 1 Load photo paper with the glossy or printable side facing you. (If you are not sure which side is the printable side, see the instructions that came with the paper.) 2 Place a photo facedown on page 37. 3 From the control panel, press Copy Mode. 4 Press . 5 Press... or repeatedly until Resize appears. 6 Press . 7 Press or repeatedly until the type of paper loaded into the printer appears. 18 Press . 19 Press Start Color or Start Black. For more information, see "Loading original documents on the scanner glass" on page 37. 3 From the control panel, ...
User's Guide
Page 76
...: 1 Click Learn More on the computer screen. 76 Recycling Lexmark products To return Lexmark products to the printer. To prevent the message from appearing again for recycling: 1 Visit our Web site at www.lexmark.com/recycle. 2 Follow the instructions on the message. 2 Click Report a non-Lexmark print cartridge. Refilling a cartridge can affect print quality and may...
...: 1 Click Learn More on the computer screen. 76 Recycling Lexmark products To return Lexmark products to the printer. To prevent the message from appearing again for recycling: 1 Visit our Web site at www.lexmark.com/recycle. 2 Follow the instructions on the message. 2 Click Report a non-Lexmark print cartridge. Refilling a cartridge can affect print quality and may...
User's Guide
Page 79
... remove the power supply from the printer. 4 Reconnect the power supply to the printer. 5 Plug the power cord into the wall outlet. 6 Press to turn the printer on. Disable anti-virus programs 1 Close all New Hardware Found screens. 3 Insert the CD, and then follow the instructions on the computer screen to install ... Start to access the My Computer icon. 4 Double-click the CD-ROM drive icon. 5 If necessary, double-click setup.exe. 6 Follow the instructions on page 100. For more of the following: Check messages If an error message is not lit" on page 78. Page does not print These...
... remove the power supply from the printer. 4 Reconnect the power supply to the printer. 5 Plug the power cord into the wall outlet. 6 Press to turn the printer on. Disable anti-virus programs 1 Close all New Hardware Found screens. 3 Insert the CD, and then follow the instructions on the computer screen to install ... Start to access the My Computer icon. 4 Double-click the CD-ROM drive icon. 5 If necessary, double-click setup.exe. 6 Follow the instructions on page 100. For more of the following: Check messages If an error message is not lit" on page 78. Page does not print These...
User's Guide
Page 91
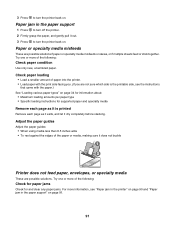
... pull it does not buckle Printer does not feed paper, envelopes, or specialty media These are possible solutions if paper or specialty media misfeeds or skews, or if multiple sheets feed or stick together. Try one or more information, see the instructions that came with the print ...the paper.) See "Loading various paper types" on page 34 for information about: • Maximum loading amounts per paper type • Specific loading instructions for and clear any paper jams. For more of the following : Check paper condition Use only new, unwrinkled paper. Check paper loading • ...
... pull it does not buckle Printer does not feed paper, envelopes, or specialty media These are possible solutions if paper or specialty media misfeeds or skews, or if multiple sheets feed or stick together. Try one or more information, see the instructions that came with the print ...the paper.) See "Loading various paper types" on page 34 for information about: • Maximum loading amounts per paper type • Specific loading instructions for and clear any paper jams. For more of the following : Check paper condition Use only new, unwrinkled paper. Check paper loading • ...
User's Guide
Page 100
... printer, you may need to remove and reinstall the printer software. 1 Click Start ΠPrograms or All Programs ΠLexmark 3500-4500 Series. 2 Select Uninstall. 3 Follow the instructions on the computer screen to remove the printer software. 4 Restart the computer before reinstalling the printer software...printer is the letter of your operating system. 6 Select the file you want appears. 6 Press . to turn off the printer. 2 Press and hold the Settings and Start Color buttons at www.lexmark.com to check for drivers or downloads. 3 Select your printer family. 4 Select your printer...
... printer, you may need to remove and reinstall the printer software. 1 Click Start ΠPrograms or All Programs ΠLexmark 3500-4500 Series. 2 Select Uninstall. 3 Follow the instructions on the computer screen to remove the printer software. 4 Restart the computer before reinstalling the printer software...printer is the letter of your operating system. 6 Select the file you want appears. 6 Press . to turn off the printer. 2 Press and hold the Settings and Start Color buttons at www.lexmark.com to check for drivers or downloads. 3 Select your printer family. 4 Select your printer...


