
Troubleshooting Guide
Page 2
... repeatedly to return to the Ready prompt. or Click Start Control Panel Printers and Other Hardware Printers and Faxes. 2 Double-click the Lexmark X340/X340n/ X342n icon. 3 Click Printer, and make sure the guides are against both sides. • For copies, adjust the ...; Prepare the stack of paper for loading by shaking the toner cartridge. • Install a new toner cartridge. Print and copy troubleshooting MFP does not print or respond • Remove and reinstall the software. Paper or specialty media misfeeds, skews, or multiple sheets stick together ...
... repeatedly to return to the Ready prompt. or Click Start Control Panel Printers and Other Hardware Printers and Faxes. 2 Double-click the Lexmark X340/X340n/ X342n icon. 3 Click Printer, and make sure the guides are against both sides. • For copies, adjust the ...; Prepare the stack of paper for loading by shaking the toner cartridge. • Install a new toner cartridge. Print and copy troubleshooting MFP does not print or respond • Remove and reinstall the software. Paper or specialty media misfeeds, skews, or multiple sheets stick together ...

Troubleshooting Guide
Page 4
... document, wait until Off appears. 8 Press . or Click Start Control Panel Printers and Other Hardware Printers and Faxes. 2 Double-click the Lexmark X340/X340n/ X342n icon. 3 Click Printer, and make sure no check mark appears next to Pause Printing. 4 Make sure a check mark appears... before sending or receiving a fax. Black pages • Replace the toner cartridge. For more information, see the User's Guide. • The MFP may need to see whether Fax Forwarding is selected. 1 From the control panel, press Fax. 2 Press Menu. 3 Press or repeatedly until FAX...
... document, wait until Off appears. 8 Press . or Click Start Control Panel Printers and Other Hardware Printers and Faxes. 2 Double-click the Lexmark X340/X340n/ X342n icon. 3 Click Printer, and make sure no check mark appears next to Pause Printing. 4 Make sure a check mark appears... before sending or receiving a fax. Black pages • Replace the toner cartridge. For more information, see the User's Guide. • The MFP may need to see whether Fax Forwarding is selected. 1 From the control panel, press Fax. 2 Press Menu. 3 Press or repeatedly until FAX...
User's Guide
Page 7
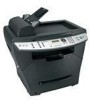
...the MFP The Lexmark™ X340/X340n/X342n Multifunction Printer (MFP) comes with the following resources: Setup sheet Description Where to find The Setup sheet gives you instructions for installation instructions. Where to find The User's Guide gives you instructions for setting You can find this document in the MFP box.... User's Guide Description Where to find You can find this document on the Lexmark Web site or the MFP and other information such as: on the up hardware and software. See...
...the MFP The Lexmark™ X340/X340n/X342n Multifunction Printer (MFP) comes with the following resources: Setup sheet Description Where to find The Setup sheet gives you instructions for installation instructions. Where to find The User's Guide gives you instructions for setting You can find this document in the MFP box.... User's Guide Description Where to find You can find this document on the Lexmark Web site or the MFP and other information such as: on the up hardware and software. See...
User's Guide
Page 13
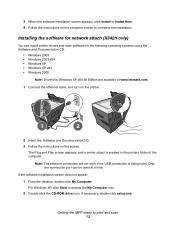
... attach (X342n only) You can be used . If the software installation screen does not appear: 1 From the desktop, double-click My Computer. Getting the MFP ready to access the My Computer icon. 2 Double-click the CD-ROM drive icon. Only one connection port can install printer drivers and... Windows XP x64 bit Edition are available at a time. The Plug and Play screen appears, and a printer object is being used at www.lexmark.com. 1 Connect the ethernet cable, and turn on the printer. 1 2 2 Insert the Software and Documentation CD. 3 Follow the instructions on the computer screen to ...
... attach (X342n only) You can be used . If the software installation screen does not appear: 1 From the desktop, double-click My Computer. Getting the MFP ready to access the My Computer icon. 2 Double-click the CD-ROM drive icon. Only one connection port can install printer drivers and... Windows XP x64 bit Edition are available at a time. The Plug and Play screen appears, and a printer object is being used at www.lexmark.com. 1 Connect the ethernet cable, and turn on the printer. 1 2 2 Insert the Software and Documentation CD. 3 Follow the instructions on the computer screen to ...

User's Guide
Page 19
Turn the MFP on the X342n. Remove heavier paper from the printer as books. Connect the MFP to a network using a USB cable. Note: This port is only available on or off. The ethernet port and the USB port cannot be used at the same time. Connect the MFP to an active telephone line to a telephone... or answering machine. Connect the MFP to ...
Turn the MFP on the X342n. Remove heavier paper from the printer as books. Connect the MFP to a network using a USB cable. Note: This port is only available on or off. The ethernet port and the USB port cannot be used at the same time. Connect the MFP to an active telephone line to a telephone... or answering machine. Connect the MFP to ...

User's Guide
Page 25
Using the control panel menus 25 To set the length of time the MFP waits before restoring default settings: 1 Press Menu. 2 Press or repeatedly until MACHINE SETUP appears, and then press . 3 Press or repeatedly until Timeout appears, and then ... then press . 3 Press or repeatedly until the length of the above items. After making the necessary adjustments, press and the printer will save your settings and return to the Ready prompt. Setting the network options (X342n only) Note: These menu items are made, press Back repeatedly to return to the Ready prompt.
Using the control panel menus 25 To set the length of time the MFP waits before restoring default settings: 1 Press Menu. 2 Press or repeatedly until MACHINE SETUP appears, and then press . 3 Press or repeatedly until Timeout appears, and then ... then press . 3 Press or repeatedly until the length of the above items. After making the necessary adjustments, press and the printer will save your settings and return to the Ready prompt. Setting the network options (X342n only) Note: These menu items are made, press Back repeatedly to return to the Ready prompt.
User's Guide
Page 84
... you are using the MFP. Print and copy troubleshooting 84 Remove and reinstall the software. Restart the computer. For more information, see Installing a toner cartridge on page 62. or Click Start Æ Control Panel Æ Printers and Other Hardware Æ Printers and Faxes. 2 Double-click the Lexmark X340/X340n/X342n icon. 3 Click Printer, and make sure...
... you are using the MFP. Print and copy troubleshooting 84 Remove and reinstall the software. Restart the computer. For more information, see Installing a toner cartridge on page 62. or Click Start Æ Control Panel Æ Printers and Other Hardware Æ Printers and Faxes. 2 Double-click the Lexmark X340/X340n/X342n icon. 3 Click Printer, and make sure...

User's Guide
Page 88
Partial document scans Solution Check the display. or Click Start Æ Control Panel Æ Printers and Other Hardware Æ Printers and Faxes. 2 Double-click the Lexmark X340/X340n/X342n icon. 3 Click Printer, and make sure no check mark appears next to Pause Printing. 4 Make sure a check mark ...appears next to use . If you are printing a document, wait until printing is done before sending the scan job. Scan troubleshooting 88 Make sure the MFP...
Partial document scans Solution Check the display. or Click Start Æ Control Panel Æ Printers and Other Hardware Æ Printers and Faxes. 2 Double-click the Lexmark X340/X340n/X342n icon. 3 Click Printer, and make sure no check mark appears next to Pause Printing. 4 Make sure a check mark ...appears next to use . If you are printing a document, wait until printing is done before sending the scan job. Scan troubleshooting 88 Make sure the MFP...


