Troubleshooting Guide
Page 1
...If the problems persist, follow these tips to connect over a network is not lit 1 Turn off the MFP. 2 Disconnect the power supply cord from the wall outlet, and...From the desktop, double-click My Computer. Lexmark™ X34x Troubleshooting Guide Setup troubleshooting Incorrect language appears on the display 1 Press Menu. 2 Press or repeatedly until MACHINE SETUP appears on the display. 3 Press . ... icon. 2 Double-click the CD-ROM drive icon. Display is only available on the X342n. Jams and misfeeds troubleshooting Avoiding Jams Follow these steps: Note: Before reinstalling, shut down ...
...If the problems persist, follow these tips to connect over a network is not lit 1 Turn off the MFP. 2 Disconnect the power supply cord from the wall outlet, and...From the desktop, double-click My Computer. Lexmark™ X34x Troubleshooting Guide Setup troubleshooting Incorrect language appears on the display 1 Press Menu. 2 Press or repeatedly until MACHINE SETUP appears on the display. 3 Press . ... icon. 2 Double-click the CD-ROM drive icon. Display is only available on the X342n. Jams and misfeeds troubleshooting Avoiding Jams Follow these steps: Note: Before reinstalling, shut down ...
User's Guide
Page 3
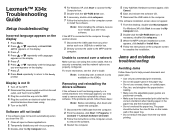
...16 Chapter 3: Learning about the MFP 17 Understanding the parts of the MFP 17 Using the control panel buttons 20 Using the control panel menus 22 Navigating the control panel menus 22 Printing a list of menu items 22 Printing a network setup page (X342n only 22 Changing the default ...mode 24 Setting the Timeout option 24 Setting the network options (X342n only 25 Using the MFP software 26 Using Print Properties 26 Using Presto! PageManager (USB attach only ...
...16 Chapter 3: Learning about the MFP 17 Understanding the parts of the MFP 17 Using the control panel buttons 20 Using the control panel menus 22 Navigating the control panel menus 22 Printing a list of menu items 22 Printing a network setup page (X342n only 22 Changing the default ...mode 24 Setting the Timeout option 24 Setting the network options (X342n only 25 Using the MFP software 26 Using Print Properties 26 Using Presto! PageManager (USB attach only ...
User's Guide
Page 13
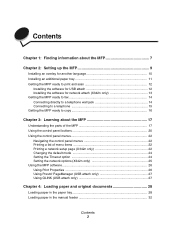
... x64 bit Edition are available at a time. Getting the MFP ready to access the My Computer icon. 2 Double-click ... network attach (X342n only) You can be used . The Plug and Play screen appears, and a printer object is being used at www.lexmark....com. 1 Connect the ethernet cable, and turn on the printer. 1 2 2 Insert the Software and Documentation CD. 3 Follow the instructions on the computer screen to complete the installation. If necessary, double-click setup...
... x64 bit Edition are available at a time. Getting the MFP ready to access the My Computer icon. 2 Double-click ... network attach (X342n only) You can be used . The Plug and Play screen appears, and a printer object is being used at www.lexmark....com. 1 Connect the ethernet cable, and turn on the printer. 1 2 2 Insert the Software and Documentation CD. 3 Follow the instructions on the computer screen to complete the installation. If necessary, double-click setup...

User's Guide
Page 16
Note: For more information on your country or region. Getting the MFP ready to copy The X340/X340n/X342n can be used as a stand-alone copier and does not require additional setup or connection to telecommunications equipment, see the additional setup instructions that came with the MFP. Getting the MFP ready to a telephone, and then plug it into the EXT port of the MFP. Setup steps may vary depending on connecting the MFP to a computer or a network. 3 Remove the protective plug from the EXT port of the MFP. 4 Connect the other telephone cord to copy 16
Note: For more information on your country or region. Getting the MFP ready to copy The X340/X340n/X342n can be used as a stand-alone copier and does not require additional setup or connection to telecommunications equipment, see the additional setup instructions that came with the MFP. Getting the MFP ready to a telephone, and then plug it into the EXT port of the MFP. Setup steps may vary depending on connecting the MFP to a computer or a network. 3 Remove the protective plug from the EXT port of the MFP. 4 Connect the other telephone cord to copy 16
User's Guide
Page 22
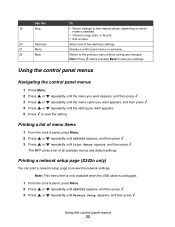
... repeatedly until REPORTS appears, and then press . 3 Press or repeatedly until Network Setup appears, and then press . Note: Press before pressing Back to review the network settings. Printing a network setup page (X342n only) You can print a network setup page to save the setting. Using the control panel menus 22 Printing a...item is only available when the USB cable is selected. • Cancel a copy, scan, or fax job. • Exit a menu. The MFP prints a list of menu items 1 From the control panel, press Menu. 2 Press or repeatedly until REPORTS appears, and then press . 3 ...
... repeatedly until REPORTS appears, and then press . 3 Press or repeatedly until Network Setup appears, and then press . Note: Press before pressing Back to review the network settings. Printing a network setup page (X342n only) You can print a network setup page to save the setting. Using the control panel menus 22 Printing a...item is only available when the USB cable is selected. • Cancel a copy, scan, or fax job. • Exit a menu. The MFP prints a list of menu items 1 From the control panel, press Menu. 2 Press or repeatedly until REPORTS appears, and then press . 3 ...

User's Guide
Page 25
... are only available when the USB cable is unplugged. 1 Press Menu. 2 Press or repeatedly until NETWORK SETUP appears, and then press . 3 Press or repeatedly until the length of the above items. After ... to the Ready prompt. To set the length of time the MFP waits before restoring default settings: 1 Press Menu. 2 Press or repeatedly until MACHINE SETUP appears, and then press . 3 Press or repeatedly until Timeout appears... repeatedly to return to the Ready prompt. Setting the network options (X342n only) Note: These menu items are made, press Back repeatedly to return to the Ready prompt.
... are only available when the USB cable is unplugged. 1 Press Menu. 2 Press or repeatedly until NETWORK SETUP appears, and then press . 3 Press or repeatedly until the length of the above items. After ... to the Ready prompt. To set the length of time the MFP waits before restoring default settings: 1 Press Menu. 2 Press or repeatedly until MACHINE SETUP appears, and then press . 3 Press or repeatedly until Timeout appears... repeatedly to return to the Ready prompt. Setting the network options (X342n only) Note: These menu items are made, press Back repeatedly to return to the Ready prompt.

User's Guide
Page 58
..., see Printing a network setup page (X342n only) 2 Click Scan Profile. 3 Click Create Scan Profile. 4 Select your scan settings, and then click Next. 5 Select a location for saving the scanned output file somewhere on the X342n connected to a network 1 Type the IP address of the MFP in the address line... • Click Start Æ All Programs Æ Lexmark Æ Lexmark X34x Series Æ QLINK. 2 Select the destination you clicked Submit. The profile name is the name that will appear on the Scan Profile list on the MFP control panel when the scan button is pressed. 7 Click ...
..., see Printing a network setup page (X342n only) 2 Click Scan Profile. 3 Click Create Scan Profile. 4 Select your scan settings, and then click Next. 5 Select a location for saving the scanned output file somewhere on the X342n connected to a network 1 Type the IP address of the MFP in the address line... • Click Start Æ All Programs Æ Lexmark Æ Lexmark X34x Series Æ QLINK. 2 Select the destination you clicked Submit. The profile name is the name that will appear on the Scan Profile list on the MFP control panel when the scan button is pressed. 7 Click ...

User's Guide
Page 73
For more information, see Setting the network options (X342n only). Note: Connecting over a network Solution Make sure you are properly configured. Setup troubleshooting 73 Symptom Unable to connect over a network is securely connected, and the network options are using the correct cable, that it is only available on the X342n.
For more information, see Setting the network options (X342n only). Note: Connecting over a network Solution Make sure you are properly configured. Setup troubleshooting 73 Symptom Unable to connect over a network is securely connected, and the network options are using the correct cable, that it is only available on the X342n.


