Troubleshooting Guide
Page 1
... desktop, click Start Programs Lexmark Lexmark Software Uninstall. 3 Follow the instructions on the computer screen to the Ready prompt. Removing and reinstalling the drivers software If the software is not lit 1 Turn off the MFP. 2 Disconnect the power supply cord from the ...; Flex, fan, and straighten the paper before loading. • Make sure the adjustable paper guides are using . 5 Turn on the X342n. If the software installation screen does not appear: 1 From the desktop, double-click My Computer. Jams and misfeeds troubleshooting Avoiding Jams Follow ...
... desktop, click Start Programs Lexmark Lexmark Software Uninstall. 3 Follow the instructions on the computer screen to the Ready prompt. Removing and reinstalling the drivers software If the software is not lit 1 Turn off the MFP. 2 Disconnect the power supply cord from the ...; Flex, fan, and straighten the paper before loading. • Make sure the adjustable paper guides are using . 5 Turn on the X342n. If the software installation screen does not appear: 1 From the desktop, double-click My Computer. Jams and misfeeds troubleshooting Avoiding Jams Follow ...

Troubleshooting Guide
Page 2
...in use new, dry paper. • Make sure the front door is securely latched on both sides of paper into the MFP. Print and copy troubleshooting MFP does not print or respond • Remove and reinstall the software. or Click Start Control Panel Printers and... Other Hardware Printers and Faxes. 2 Double-click the Lexmark X340/X340n/ X342n icon. 3 Click Printer, and make sure the guides are against both sides...
...in use new, dry paper. • Make sure the front door is securely latched on both sides of paper into the MFP. Print and copy troubleshooting MFP does not print or respond • Remove and reinstall the software. or Click Start Control Panel Printers and... Other Hardware Printers and Faxes. 2 Double-click the Lexmark X340/X340n/ X342n icon. 3 Click Printer, and make sure the guides are against both sides...

Troubleshooting Guide
Page 4
...8226; Check the display. or Click Start Control Panel Printers and Other Hardware Printers and Faxes. 2 Double-click the Lexmark X340/X340n/ X342n icon. 3 Click Printer, and make sure that it is working correctly. • If the telephone line is being used by another device, wait ... paused. 1 Click Start Settings Printers and Faxes or Printers. Telephone - For more information, see the User's Guide. • The MFP may need to use . • If you are secure, if applicable: - For more information, see the User's Guide. • Make sure the...
...8226; Check the display. or Click Start Control Panel Printers and Other Hardware Printers and Faxes. 2 Double-click the Lexmark X340/X340n/ X342n icon. 3 Click Printer, and make sure that it is working correctly. • If the telephone line is being used by another device, wait ... paused. 1 Click Start Settings Printers and Faxes or Printers. Telephone - For more information, see the User's Guide. • The MFP may need to use . • If you are secure, if applicable: - For more information, see the User's Guide. • Make sure the...
User's Guide
Page 3
... for another language 10 Installing an additional paper tray 11 Getting the MFP ready to print and scan 12 Installing the software for USB attach 12 Installing the software for network attach (X342n only 13 Getting the MFP ready to fax 14 Connecting directly to a telephone wall jack 14 ...Connecting to a telephone 15 Getting the MFP ready to copy 16 Chapter 3: Learning about the MFP 17 Understanding the parts of the MFP 17 Using the control panel buttons...
... for another language 10 Installing an additional paper tray 11 Getting the MFP ready to print and scan 12 Installing the software for USB attach 12 Installing the software for network attach (X342n only 13 Getting the MFP ready to fax 14 Connecting directly to a telephone wall jack 14 ...Connecting to a telephone 15 Getting the MFP ready to copy 16 Chapter 3: Learning about the MFP 17 Understanding the parts of the MFP 17 Using the control panel buttons...
User's Guide
Page 7
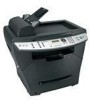
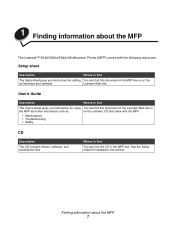
... Description Where to find The User's Guide gives you instructions for using You can find this document on the Lexmark Web site or the MFP and other information such as: on the software CD that came with the following resources: Setup sheet Description Where...You can find this CD in the MFP box or on the up hardware and software. Where to find The Setup sheet gives you instructions for installation instructions. Finding information about the MFP The Lexmark™ X340/X340n/X342n Multifunction Printer (MFP) comes with the MFP. • Maintenance • Troubleshooting...
... Description Where to find The User's Guide gives you instructions for using You can find this document on the Lexmark Web site or the MFP and other information such as: on the software CD that came with the following resources: Setup sheet Description Where...You can find this CD in the MFP box or on the up hardware and software. Where to find The Setup sheet gives you instructions for installation instructions. Finding information about the MFP The Lexmark™ X340/X340n/X342n Multifunction Printer (MFP) comes with the MFP. • Maintenance • Troubleshooting...
User's Guide
Page 13
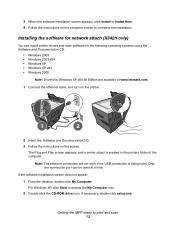
Installing the software for network attach (X342n only) You can be used . Note: The ethernet connection will ...If necessary, double-click setup.exe. The Plug and Play screen appears, and a printer object is being used at www.lexmark.com. 1 Connect the ethernet cable, and turn on the printer. 1 2 2 Insert the Software and Documentation CD.... 3 Follow the instructions on the computer screen to complete the installation. Getting the MFP ready to access the My Computer icon. 2 Double-click the CD-ROM drive icon. Only one connection port can...
Installing the software for network attach (X342n only) You can be used . Note: The ethernet connection will ...If necessary, double-click setup.exe. The Plug and Play screen appears, and a printer object is being used at www.lexmark.com. 1 Connect the ethernet cable, and turn on the printer. 1 2 2 Insert the Software and Documentation CD.... 3 Follow the instructions on the computer screen to complete the installation. Getting the MFP ready to access the My Computer icon. 2 Double-click the CD-ROM drive icon. Only one connection port can...

User's Guide
Page 16
Note: For more information on your country or region. Getting the MFP ready to a telephone, and then plug it into the EXT port of the MFP. 3 Remove the protective plug from the EXT port of the MFP. 4 Connect the other telephone cord to copy 16 Setup steps may vary depending on connecting the MFP to a computer or a network. Getting the MFP ready to copy The X340/X340n/X342n can be used as a stand-alone copier and does not require additional setup or connection to telecommunications equipment, see the additional setup instructions that came with the MFP.
Note: For more information on your country or region. Getting the MFP ready to a telephone, and then plug it into the EXT port of the MFP. 3 Remove the protective plug from the EXT port of the MFP. 4 Connect the other telephone cord to copy 16 Setup steps may vary depending on connecting the MFP to a computer or a network. Getting the MFP ready to copy The X340/X340n/X342n can be used as a stand-alone copier and does not require additional setup or connection to telecommunications equipment, see the additional setup instructions that came with the MFP.

User's Guide
Page 19
Turn the MFP on the X342n. Connect the MFP to a computer using an ethernet cable. Understanding the parts of the MFP. Protect longer sizes of paper that may extend beyond the edge of the MFP 19 Note: This port is only available on or off. Connect the MFP to an active telephone line to a telephone or answering...
Turn the MFP on the X342n. Connect the MFP to a computer using an ethernet cable. Understanding the parts of the MFP. Protect longer sizes of paper that may extend beyond the edge of the MFP 19 Note: This port is only available on or off. Connect the MFP to an active telephone line to a telephone or answering...
User's Guide
Page 22
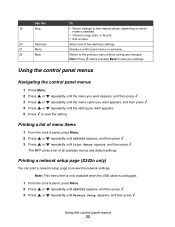
.... 2 Press or repeatedly until REPORTS appears, and then press . 3 Press or repeatedly until Print Menus appears, and then press . The MFP prints a list of five darkness settings. Printing a network setup page (X342n only) You can print a network setup page to the previous menu without saving any changes. Display a control panel menu or...
.... 2 Press or repeatedly until REPORTS appears, and then press . 3 Press or repeatedly until Print Menus appears, and then press . The MFP prints a list of five darkness settings. Printing a network setup page (X342n only) You can print a network setup page to the previous menu without saving any changes. Display a control panel menu or...

User's Guide
Page 25
... making the necessary adjustments, press and the printer will save your settings and return to the Ready prompt. To set the length of time the MFP waits before restoring default settings: 1 Press Menu. 2 Press or repeatedly until MACHINE SETUP appears, and then press . 3 Press or repeatedly until Timeout appears, and then... make adjustments to any of time you want appears, and then press . 5 Press Back repeatedly to return to the Ready prompt. Setting the network options (X342n only) Note: These menu items are made, press Back repeatedly to return to the Ready prompt.
... making the necessary adjustments, press and the printer will save your settings and return to the Ready prompt. To set the length of time the MFP waits before restoring default settings: 1 Press Menu. 2 Press or repeatedly until MACHINE SETUP appears, and then press . 3 Press or repeatedly until Timeout appears, and then... make adjustments to any of time you want appears, and then press . 5 Press Back repeatedly to return to the Ready prompt. Setting the network options (X342n only) Note: These menu items are made, press Back repeatedly to return to the Ready prompt.
User's Guide
Page 54
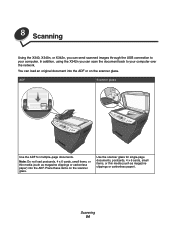
8 Scanning Using the X340, X340n, or X342n, you can send scanned images through the USB connection to your computer. You can load an original document into the ADF. Note: Do not load ... as magazine clippings or carbonless paper) into the ADF or on the scanner glass. Place these items on the scanner glass. In addition, using the X342n you can scan the document back to your computer over the network. Use the scanner glass for multiple-page documents. Scanning 54
8 Scanning Using the X340, X340n, or X342n, you can send scanned images through the USB connection to your computer. You can load an original document into the ADF. Note: Do not load ... as magazine clippings or carbonless paper) into the ADF or on the scanner glass. Place these items on the scanner glass. In addition, using the X342n you can scan the document back to your computer over the network. Use the scanner glass for multiple-page documents. Scanning 54

User's Guide
Page 58
... touch Profiles on the network setup page. Scanning over a network Note: Only available on the desktop. • Click Start Æ All Programs Æ Lexmark Æ Lexmark X34x Series Æ QLINK. 2 Select the destination you want to scan to. 3 Click Edit. 4 Adjust the scan settings. 5 Click OK. The ... on your computer. 6 Enter a profile name. a Go to the MFP, and place your original document in the address line of the MFP in the ADF face up, long edge first. For more information, see Printing a network setup page (X342n only) 2 Click Scan Profile. 3 Click Create Scan Profile. 4 Select...
... touch Profiles on the network setup page. Scanning over a network Note: Only available on the desktop. • Click Start Æ All Programs Æ Lexmark Æ Lexmark X34x Series Æ QLINK. 2 Select the destination you want to scan to. 3 Click Edit. 4 Adjust the scan settings. 5 Click OK. The ... on your computer. 6 Enter a profile name. a Go to the MFP, and place your original document in the address line of the MFP in the ADF face up, long edge first. For more information, see Printing a network setup page (X342n only) 2 Click Scan Profile. 3 Click Create Scan Profile. 4 Select...
User's Guide
Page 70
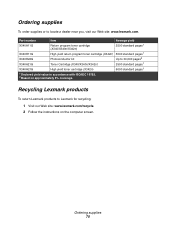
... supplies 70 Ordering supplies To order supplies or to 30,000 pages2 X340A21G Toner Cartridge (X340/X340n/X342n) 2500 standard pages1 X340H21G High yield toner cartridge (X342n) 6000 standard pages1 1 Declared yield value in accordance with ISO/IEC 19752. 2 Based on the... cartridge (X340/X340n/X342n) 2500 standard pages1 X340H11G High yield return program toner cartridge (X342n) 6000 standard pages1 X340H22G Photoconductor kit Up to locate a dealer near you, visit our Web site: www.lexmark.com. Recycling Lexmark products To return Lexmark products to Lexmark for recycling: 1 ...
... supplies 70 Ordering supplies To order supplies or to 30,000 pages2 X340A21G Toner Cartridge (X340/X340n/X342n) 2500 standard pages1 X340H21G High yield toner cartridge (X342n) 6000 standard pages1 1 Declared yield value in accordance with ISO/IEC 19752. 2 Based on the... cartridge (X340/X340n/X342n) 2500 standard pages1 X340H11G High yield return program toner cartridge (X342n) 6000 standard pages1 X340H22G Photoconductor kit Up to locate a dealer near you, visit our Web site: www.lexmark.com. Recycling Lexmark products To return Lexmark products to Lexmark for recycling: 1 ...

User's Guide
Page 73
For more information, see Setting the network options (X342n only). Note: Connecting over a network Solution Make sure you are using the correct cable, that it is only available on the X342n. Setup troubleshooting 73 Symptom Unable to connect over a network is securely connected, and the network options are properly configured.
For more information, see Setting the network options (X342n only). Note: Connecting over a network Solution Make sure you are using the correct cable, that it is only available on the X342n. Setup troubleshooting 73 Symptom Unable to connect over a network is securely connected, and the network options are properly configured.
User's Guide
Page 84
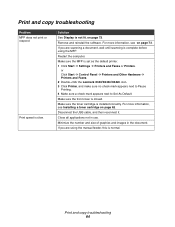
Print and copy troubleshooting Problem MFP does not print or respond Print speed is installed correctly. Make sure the toner cartridge is slow. Close all applications ...page 73. For more information, see on page 72. Make sure the MFP is closed. or Click Start Æ Control Panel Æ Printers and Other Hardware Æ Printers and Faxes. 2 Double-click the Lexmark X340/X340n/X342n icon. 3 Click Printer, and make sure no check mark appears next to...Solution See Display is normal. Minimize the number and size of graphics and images in use. If you are using the MFP.
Print and copy troubleshooting Problem MFP does not print or respond Print speed is installed correctly. Make sure the toner cartridge is slow. Close all applications ...page 73. For more information, see on page 72. Make sure the MFP is closed. or Click Start Æ Control Panel Æ Printers and Other Hardware Æ Printers and Faxes. 2 Double-click the Lexmark X340/X340n/X342n icon. 3 Click Printer, and make sure no check mark appears next to...Solution See Display is normal. Minimize the number and size of graphics and images in use. If you are using the MFP.

User's Guide
Page 88
...scan job. Scan troubleshooting 88 or Click Start Æ Control Panel Æ Printers and Other Hardware Æ Printers and Faxes. 2 Double-click the Lexmark X340/X340n/X342n icon. 3 Click Printer, and make sure no check mark appears next to Pause Printing. 4 Make sure a check mark appears next to use . Restart...correctly into the ADF or on page 35. Scan troubleshooting Problem Scanner does not respond Scans very slowly Scan was unsuccessful. Make sure the MFP is set as the default printer and is an error message, see Setting the paper type and size on the scanner glass. If ...
...scan job. Scan troubleshooting 88 or Click Start Æ Control Panel Æ Printers and Other Hardware Æ Printers and Faxes. 2 Double-click the Lexmark X340/X340n/X342n icon. 3 Click Printer, and make sure no check mark appears next to Pause Printing. 4 Make sure a check mark appears next to use . Restart...correctly into the ADF or on page 35. Scan troubleshooting Problem Scanner does not respond Scans very slowly Scan was unsuccessful. Make sure the MFP is set as the default printer and is an error message, see Setting the paper type and size on the scanner glass. If ...

User's Guide
Page 94
... a circuit different from that may cause undesired operation. Notices Electronic emission notices Federal Communications Commission (FCC) compliance information statement Part 15 The Lexmark X340 (7003-100), X340n (7003-x050), and X342n (7003-110) have been tested and found to comply with the limits for a Class B digital device, pursuant to provide reasonable protection...
... a circuit different from that may cause undesired operation. Notices Electronic emission notices Federal Communications Commission (FCC) compliance information statement Part 15 The Lexmark X340 (7003-100), X340n (7003-x050), and X342n (7003-110) have been tested and found to comply with the limits for a Class B digital device, pursuant to provide reasonable protection...


