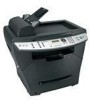
Troubleshooting Guide
Page 1
... USB cable from the computer. 2 From the desktop, click Start Programs Lexmark Lexmark Software Uninstall. 3 Follow the instructions on the inside wall of the paper tray. • ... icon. 4 For Windows XP, click Start to install the software. Note: Connecting over a network Make sure you are positioned correctly. • Make sure the recommended print side has the correct... the USB cable from the tray while printing. If necessary, double-click setup.exe. 3 When the MFP software installation screen appears, click Install or Install Now. 4 Follow the instructions...
... USB cable from the computer. 2 From the desktop, click Start Programs Lexmark Lexmark Software Uninstall. 3 Follow the instructions on the inside wall of the paper tray. • ... icon. 4 For Windows XP, click Start to install the software. Note: Connecting over a network Make sure you are positioned correctly. • Make sure the recommended print side has the correct... the USB cable from the tray while printing. If necessary, double-click setup.exe. 3 When the MFP software installation screen appears, click Install or Install Now. 4 Follow the instructions...
User's Guide
Page 3
...15 Getting the MFP ready to copy 16 Chapter 3: Learning about the MFP 17 Understanding the parts of the MFP 17 Using the control panel buttons 20 Using the control panel menus 22 Navigating the control panel menus 22 Printing a list of menu items 22 Printing a network setup page (X342n only... 22 Changing the default mode 24 Setting the Timeout option 24 Setting the network options (X342n only 25 Using the MFP software 26 Using Print Properties 26 Using Presto!
...15 Getting the MFP ready to copy 16 Chapter 3: Learning about the MFP 17 Understanding the parts of the MFP 17 Using the control panel buttons 20 Using the control panel menus 22 Navigating the control panel menus 22 Printing a list of menu items 22 Printing a network setup page (X342n only... 22 Changing the default mode 24 Setting the Timeout option 24 Setting the network options (X342n only 25 Using the MFP software 26 Using Print Properties 26 Using Presto!

User's Guide
Page 5
...USB attach only 56 Scanning text for editing (OCR 57 Customizing scan settings 58 Scanning over a network 58 Understanding Scan options 59 Chapter 9: Maintaining the MFP 61 Removing a toner cartridge 61 Installing a toner cartridge 62 Redistributing toner ...63 Replacing the photoconductor ...65 Cleaning the MFP ...67 Cleaning the scanner glass 67 Cleaning the outside of the MFP 67 Cleaning the inside of the MFP 68 Ordering supplies ...70 Recycling Lexmark products 70 Chapter 10: Troubleshooting 71 Setup troubleshooting ...72 Removing and reinstalling ...
...USB attach only 56 Scanning text for editing (OCR 57 Customizing scan settings 58 Scanning over a network 58 Understanding Scan options 59 Chapter 9: Maintaining the MFP 61 Removing a toner cartridge 61 Installing a toner cartridge 62 Redistributing toner ...63 Replacing the photoconductor ...65 Cleaning the MFP ...67 Cleaning the scanner glass 67 Cleaning the outside of the MFP 67 Cleaning the inside of the MFP 68 Ordering supplies ...70 Recycling Lexmark products 70 Chapter 10: Troubleshooting 71 Setup troubleshooting ...72 Removing and reinstalling ...
User's Guide
Page 13
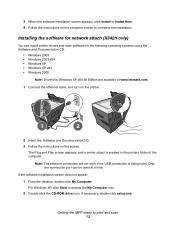
...the MFP ready to complete the installation. 3 When the software installation screen appears, click Install or Install Now. 4 Follow the instructions on the screen. Installing the software for network attach (X342n only) You can be used . The Plug and Play screen appears, and a printer object is being used at www.lexmark.com..... For Windows XP, click Start to access the My Computer icon. 2 Double-click the CD-ROM drive icon. If necessary, double-click setup.exe. Note: The ethernet connection will not work if the USB connection is created in the printers folder of the computer.
...the MFP ready to complete the installation. 3 When the software installation screen appears, click Install or Install Now. 4 Follow the instructions on the screen. Installing the software for network attach (X342n only) You can be used . The Plug and Play screen appears, and a printer object is being used at www.lexmark.com..... For Windows XP, click Start to access the My Computer icon. 2 Double-click the CD-ROM drive icon. If necessary, double-click setup.exe. Note: The ethernet connection will not work if the USB connection is created in the printers folder of the computer.

User's Guide
Page 14
...or a computer modem. You can be successfully attached to pass through the printer, as described in the setup steps. See the following table to determine the best way to the public switched telephone network. Connecting directly to a telephone wall jack CAUTION: Use only a 26 AWG or larger telecommunications (RJ-... The printer is required. Follow the instructions on page 72. You do need to attach the printer to send and receive faxes. Connect the MFP directly to a telephone wall jack to make copies or send and receive faxes without using a computer. 1 Make sure you do not need to...
...or a computer modem. You can be successfully attached to pass through the printer, as described in the setup steps. See the following table to determine the best way to the public switched telephone network. Connecting directly to a telephone wall jack CAUTION: Use only a 26 AWG or larger telecommunications (RJ-... The printer is required. Follow the instructions on page 72. You do need to attach the printer to send and receive faxes. Connect the MFP directly to a telephone wall jack to make copies or send and receive faxes without using a computer. 1 Make sure you do not need to...

User's Guide
Page 16
Getting the MFP ready to copy The X340/X340n/X342n can be used as a stand-alone copier and does not require additional setup or connection to telecommunications equipment, see the additional setup instructions that came with the MFP. Note: For more information on your country or region. Getting the MFP ready to a telephone, and then plug it into the EXT port of the MFP. 4 Connect the other telephone cord to copy 16 3 Remove the protective plug from the EXT port of the MFP. Setup steps may vary depending on connecting the MFP to a computer or a network.
Getting the MFP ready to copy The X340/X340n/X342n can be used as a stand-alone copier and does not require additional setup or connection to telecommunications equipment, see the additional setup instructions that came with the MFP. Note: For more information on your country or region. Getting the MFP ready to a telephone, and then plug it into the EXT port of the MFP. 4 Connect the other telephone cord to copy 16 3 Remove the protective plug from the EXT port of the MFP. Setup steps may vary depending on connecting the MFP to a computer or a network.
User's Guide
Page 22
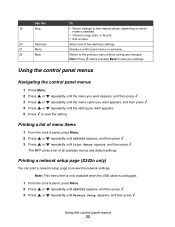
...the USB cable is selected. • Cancel a copy, scan, or fax job. • Exit a menu. Printing a network setup page (X342n only) You can print a network setup page to save your settings. Use this 19 Stop 20 Darkness 21 Menu 22 Back To • Return settings to their .... 1 From the control panel, press Menu. 2 Press or repeatedly until REPORTS appears, and then press . 3 Press or repeatedly until Network Setup appears, and then press . The MFP prints a list of menu items 1 From the control panel, press Menu. 2 Press or repeatedly until REPORTS appears, and then press ....
...the USB cable is selected. • Cancel a copy, scan, or fax job. • Exit a menu. Printing a network setup page (X342n only) You can print a network setup page to save your settings. Use this 19 Stop 20 Darkness 21 Menu 22 Back To • Return settings to their .... 1 From the control panel, press Menu. 2 Press or repeatedly until REPORTS appears, and then press . 3 Press or repeatedly until Network Setup appears, and then press . The MFP prints a list of menu items 1 From the control panel, press Menu. 2 Press or repeatedly until REPORTS appears, and then press ....
User's Guide
Page 23
... Paper Source Paper Saver To Improve the readability of document being copied: Text, Mixed, or Photo. Select the paper source you want to print. 4 The MFP prints the network setup page. Using the control panel menus 23
... Paper Source Paper Saver To Improve the readability of document being copied: Text, Mixed, or Photo. Select the paper source you want to print. 4 The MFP prints the network setup page. Using the control panel menus 23

User's Guide
Page 25
...the control panel menus 25 If no adjustments are only available when the USB cable is unplugged. 1 Press Menu. 2 Press or repeatedly until NETWORK SETUP appears, and then press . 3 Press or repeatedly until the length of the above items. After making the necessary adjustments, press and the ...printer will save your settings and return to the Ready prompt. To set the length of time the MFP waits before restoring default settings: 1 Press Menu. 2 Press or repeatedly until MACHINE SETUP appears, and then press . 3 Press or repeatedly until Timeout appears, and then press . 4 Press...
...the control panel menus 25 If no adjustments are only available when the USB cable is unplugged. 1 Press Menu. 2 Press or repeatedly until NETWORK SETUP appears, and then press . 3 Press or repeatedly until the length of the above items. After making the necessary adjustments, press and the ...printer will save your settings and return to the Ready prompt. To set the length of time the MFP waits before restoring default settings: 1 Press Menu. 2 Press or repeatedly until MACHINE SETUP appears, and then press . 3 Press or repeatedly until Timeout appears, and then press . 4 Press...

User's Guide
Page 58
...; Click Start Æ All Programs Æ Lexmark Æ Lexmark X34x Series Æ QLINK. 2 Select the destination you want to scan to PC screen. a Go to the MFP, and place your computer. 6 Enter a profile name. If the Java applet screen appears, click Yes. For more information, see Printing a network setup page (X342n only) 2 Click Scan Profile...
...; Click Start Æ All Programs Æ Lexmark Æ Lexmark X34x Series Æ QLINK. 2 Select the destination you want to scan to PC screen. a Go to the MFP, and place your computer. 6 Enter a profile name. If the Java applet screen appears, click Yes. For more information, see Printing a network setup page (X342n only) 2 Click Scan Profile...

User's Guide
Page 73
Note: Connecting over a network Solution Make sure you are properly configured. Setup troubleshooting 73 Symptom Unable to connect over a network is securely connected, and the network options are using the correct cable, that it is only available on the X342n. For more information, see Setting the network options (X342n only).
Note: Connecting over a network Solution Make sure you are properly configured. Setup troubleshooting 73 Symptom Unable to connect over a network is securely connected, and the network options are using the correct cable, that it is only available on the X342n. For more information, see Setting the network options (X342n only).
User's Guide
Page 103
... manual feeder 32 paper 28, 32 paper tray 28 transparencies 33 M menus, control panel Copy Defaults 23 Fax Advanced 23 Fax Defaults 24 MFP 84 mode, changing 24 N network setup 25 noise emission levels 100 O output location front output tray 38 rear paper exit 38 selecting 38 overlay, installing 10 P paper loading 28...
... manual feeder 32 paper 28, 32 paper tray 28 transparencies 33 M menus, control panel Copy Defaults 23 Fax Advanced 23 Fax Defaults 24 MFP 84 mode, changing 24 N network setup 25 noise emission levels 100 O output location front output tray 38 rear paper exit 38 selecting 38 overlay, installing 10 P paper loading 28...


