Sending a fax using the computer
Page 1
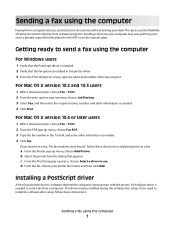
... number, and other information as needed . 4 Click Fax. If you the flexibility of the fax recipient. Getting ready to install the software after setup, follow these instructions: Sending a fax using the computer For Windows users 1 Verify that the PostScript driver is installed. 2 ...dialog Fax screen, type the name and number of faxing documents directly from software programs. Sending a fax from a computer. This gives you need to send a fax using the computer 1 A PostScript driver is software that appears. This driver may save printing costs since a printed copy will...
... number, and other information as needed . 4 Click Fax. If you the flexibility of the fax recipient. Getting ready to install the software after setup, follow these instructions: Sending a fax using the computer For Windows users 1 Verify that the PostScript driver is installed. 2 ...dialog Fax screen, type the name and number of faxing documents directly from software programs. Sending a fax from a computer. This gives you need to send a fax using the computer 1 A PostScript driver is software that appears. This driver may save printing costs since a printed copy will...
Sending a fax using the computer
Page 2
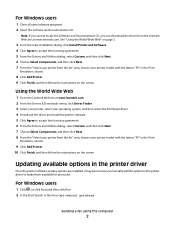
...on the screen. For Windows users 1 Close all open software programs. 2 Insert the Software and Documentation CD. Note: If you cannot locate the Software and Documentation CD, you can download the driver from the Lexmark Web site at www.lexmark.com. 2 From the Drivers & Downloads menu, click Driver... Finder. 3 Select your printer, select your operating system, and then select the PostScript driver. 4 Download the driver and install the printer software. 5 Click Agree to accept...
...on the screen. For Windows users 1 Close all open software programs. 2 Insert the Software and Documentation CD. Note: If you cannot locate the Software and Documentation CD, you can download the driver from the Lexmark Web site at www.lexmark.com. 2 From the Drivers & Downloads menu, click Driver... Finder. 3 Select your printer, select your operating system, and then select the PostScript driver. 4 Download the driver and install the printer software. 5 Click Agree to accept...
Sending a fax using the computer
Page 3
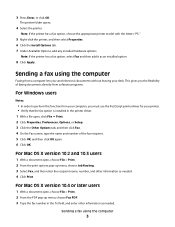
..., or Setup. 3 Click the Other Options tab, and then click Fax. 4 On the Fax screen, type the name and number of faxing documents directly from software programs. For Windows users Notes: • In order to perform this function from a computer lets you must use the PostScript printer driver for your desk...
..., or Setup. 3 Click the Other Options tab, and then click Fax. 4 On the Fax screen, type the name and number of faxing documents directly from software programs. For Windows users Notes: • In order to perform this function from a computer lets you must use the PostScript printer driver for your desk...
Troubleshooting Guide
Page 1
...device: 1 Disconnect the USB cable from the computer. 2 From the desktop, click Start Programs Lexmark Lexmark Software Uninstall. 3 Follow the instructions on the computer screen to remove the software. 4 Restart the computer. 5 If any anti-virus programs. 3 Double-click the My Computer icon. 4 For Windows... not appear: 1 From the desktop, double-click My Computer. If necessary, double-click setup.exe. 3 When the MFP software installation screen appears, click Install or Install Now. 4 Follow the instructions on the computer screen to the Ready prompt. The...
...device: 1 Disconnect the USB cable from the computer. 2 From the desktop, click Start Programs Lexmark Lexmark Software Uninstall. 3 Follow the instructions on the computer screen to remove the software. 4 Restart the computer. 5 If any anti-virus programs. 3 Double-click the My Computer icon. 4 For Windows... not appear: 1 From the desktop, double-click My Computer. If necessary, double-click setup.exe. 3 When the MFP software installation screen appears, click Install or Install Now. 4 Follow the instructions on the computer screen to the Ready prompt. The...

Troubleshooting Guide
Page 2
...to save the settings. 8 Press Back repeatedly to return to the Ready prompt. Print and copy troubleshooting MFP does not print or respond • Remove and reinstall the software. Print quality troubleshooting Light or faded print AaBbCc AaBbCc AaBbCc AaBbCc AaBbCc • You may be able to...Printers and Other Hardware Printers and Faxes. 2 Double-click the Lexmark X340/X340n/ X342n icon. 3 Click Printer, and make sure the guides are using the MFP. • Restart the computer. • Make sure the MFP is securely latched on a level surface Paper does not feed • ...
...to save the settings. 8 Press Back repeatedly to return to the Ready prompt. Print and copy troubleshooting MFP does not print or respond • Remove and reinstall the software. Print quality troubleshooting Light or faded print AaBbCc AaBbCc AaBbCc AaBbCc AaBbCc • You may be able to...Printers and Other Hardware Printers and Faxes. 2 Double-click the Lexmark X340/X340n/ X342n icon. 3 Click Printer, and make sure the guides are using the MFP. • Restart the computer. • Make sure the MFP is securely latched on a level surface Paper does not feed • ...

Troubleshooting Guide
Page 4
...secure, if applicable: - or Click Start Control Panel Printers and Other Hardware Printers and Faxes. 2 Double-click the Lexmark X340/X340n/ X342n icon. 3 Click Printer, and make sure that it directly to print any paper jams. • Call Waiting can disrupt fax ... was unsuccessful • Restart the computer. • Remove and reinstall the software. Disable this feature before sending the scan job. For more information, see the User's Guide. • Make sure the MFP is set as the default printer and is done before sending or receiving a...
...secure, if applicable: - or Click Start Control Panel Printers and Other Hardware Printers and Faxes. 2 Double-click the Lexmark X340/X340n/ X342n icon. 3 Click Printer, and make sure that it directly to print any paper jams. • Call Waiting can disrupt fax ... was unsuccessful • Restart the computer. • Remove and reinstall the software. Disable this feature before sending the scan job. For more information, see the User's Guide. • Make sure the MFP is set as the default printer and is done before sending or receiving a...
User's Guide
Page 2
...the possibility of the information you harm. Comments about this publication may be incorporated in your product hardware or software. 2 Lexmark may result in which it believes appropriate without incurring any obligation to any country where such provisions are the user's responsibility. ...network. • Refer service or repairs, other than those specified herein may use of operation in ports. • Your product uses a laser. Any reference to a professional service person. • This product is near the product and easily accessible. Evaluation and verification of other ...
...the possibility of the information you harm. Comments about this publication may be incorporated in your product hardware or software. 2 Lexmark may result in which it believes appropriate without incurring any obligation to any country where such provisions are the user's responsibility. ...network. • Refer service or repairs, other than those specified herein may use of operation in ports. • Your product uses a laser. Any reference to a professional service person. • This product is near the product and easily accessible. Evaluation and verification of other ...
User's Guide
Page 3
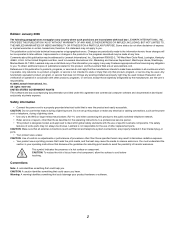
...overlay for another language 10 Installing an additional paper tray 11 Getting the MFP ready to print and scan 12 Installing the software for USB attach 12 Installing the software for network attach (X342n only 13 Getting the MFP ready to fax 14 Connecting directly to a telephone wall jack 14 ...setup page (X342n only 22 Changing the default mode 24 Setting the Timeout option 24 Setting the network options (X342n only 25 Using the MFP software 26 Using Print Properties 26 Using Presto! PageManager (USB attach only 27 Using QLINK (USB attach only 27 Chapter 4: Loading paper and ...
...overlay for another language 10 Installing an additional paper tray 11 Getting the MFP ready to print and scan 12 Installing the software for USB attach 12 Installing the software for network attach (X342n only 13 Getting the MFP ready to fax 14 Connecting directly to a telephone wall jack 14 ...setup page (X342n only 22 Changing the default mode 24 Setting the Timeout option 24 Setting the network options (X342n only 25 Using the MFP software 26 Using Print Properties 26 Using Presto! PageManager (USB attach only 27 Using QLINK (USB attach only 27 Chapter 4: Loading paper and ...

User's Guide
Page 5
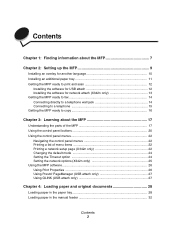
... Cleaning the scanner glass 67 Cleaning the outside of the MFP 67 Cleaning the inside of the MFP 68 Ordering supplies ...70 Recycling Lexmark products 70 Chapter 10: Troubleshooting 71 Setup troubleshooting ...72 Removing and reinstalling the drivers software 74 Jams and misfeeds troubleshooting 75 Clearing a paper jam 76 Print and copy troubleshooting 84...
... Cleaning the scanner glass 67 Cleaning the outside of the MFP 67 Cleaning the inside of the MFP 68 Ordering supplies ...70 Recycling Lexmark products 70 Chapter 10: Troubleshooting 71 Setup troubleshooting ...72 Removing and reinstalling the drivers software 74 Jams and misfeeds troubleshooting 75 Clearing a paper jam 76 Print and copy troubleshooting 84...
User's Guide
Page 7
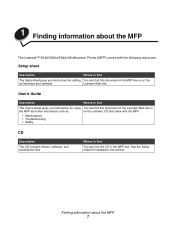
...can find this document on the Lexmark Web site or the MFP and other information such as: on the up hardware and software. Where to find You can find this CD in the MFP box or on the software CD that came with the following ...sheet gives you instructions for installation instructions. Lexmark Web site. Finding information about the MFP The Lexmark™ X340/X340n/X342n Multifunction Printer (MFP) comes with the MFP. • Maintenance • Troubleshooting • Safety CD Description The CD contains drivers, software, and publications files. 1 Finding information ...
...can find this document on the Lexmark Web site or the MFP and other information such as: on the up hardware and software. Where to find You can find this CD in the MFP box or on the software CD that came with the following ...sheet gives you instructions for installation instructions. Lexmark Web site. Finding information about the MFP The Lexmark™ X340/X340n/X342n Multifunction Printer (MFP) comes with the MFP. • Maintenance • Troubleshooting • Safety CD Description The CD contains drivers, software, and publications files. 1 Finding information ...

User's Guide
Page 8
...Where to find This file contains late-breaking information about the MFP 8 To access the Readme file: 1 Click Start Æ Programs or All Programs Æ Lexmark Æ Lexmark X34x Series. 2 Select Readme. Readme file Description Where to...lexmark.com. 1 Go to the Web site. 2 Select a country or region from the drop-down list in other documentation, as well as information specific to your operating system. Note: All paths for the information you faster: Machine Type number: Serial number: Date purchased: Store where purchased: Finding information about the MFP and software...
...Where to find This file contains late-breaking information about the MFP 8 To access the Readme file: 1 Click Start Æ Programs or All Programs Æ Lexmark Æ Lexmark X34x Series. 2 Select Readme. Readme file Description Where to...lexmark.com. 1 Go to the Web site. 2 Select a country or region from the drop-down list in other documentation, as well as information specific to your operating system. Note: All paths for the information you faster: Machine Type number: Serial number: Date purchased: Store where purchased: Finding information about the MFP and software...
User's Guide
Page 12
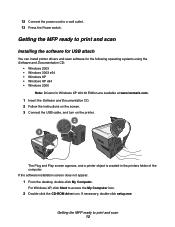
...not appear: 1 From the desktop, double-click My Computer. Getting the MFP ready to print and scan Installing the software for USB attach You can install printer drivers and scan software for the following operating systems using the Software and Documentation CD: • Windows 2003 • Windows 2003 x64 ...• Windows XP • Windows XP x64 • Windows 2000 Note: Drivers for Windows XP x64 bit Edition are available at www.lexmark.com. 1 Insert the Software and Documentation CD. 2 Follow the instructions on the screen. 3 Connect the USB cable, and turn on the printer. 2 1 The ...
...not appear: 1 From the desktop, double-click My Computer. Getting the MFP ready to print and scan Installing the software for USB attach You can install printer drivers and scan software for the following operating systems using the Software and Documentation CD: • Windows 2003 • Windows 2003 x64 ...• Windows XP • Windows XP x64 • Windows 2000 Note: Drivers for Windows XP x64 bit Edition are available at www.lexmark.com. 1 Insert the Software and Documentation CD. 2 Follow the instructions on the screen. 3 Connect the USB cable, and turn on the printer. 2 1 The ...
User's Guide
Page 13
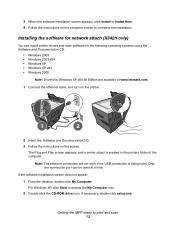
...MFP ready to access the My Computer icon. 2 Double-click the CD-ROM drive icon. If necessary, double-click setup.exe. The Plug and Play screen appears, and a printer object is being used at www.lexmark.com. 1 Connect the ethernet cable, and turn on the printer. 1 2 2 Insert the Software... and Documentation CD. 3 Follow the instructions on the computer screen to complete the installation. If the software installation screen does not appear: 1 From ...
...MFP ready to access the My Computer icon. 2 Double-click the CD-ROM drive icon. If necessary, double-click setup.exe. The Plug and Play screen appears, and a printer object is being used at www.lexmark.com. 1 Connect the ethernet cable, and turn on the printer. 1 2 2 Insert the Software... and Documentation CD. 3 Follow the instructions on the computer screen to complete the installation. If the software installation screen does not appear: 1 From ...

User's Guide
Page 14
... software installation screen appears, click Install or Install Now. You can connect the printer to equipment such as a telephone or answering machine) can connect the printer to other equipment. Getting the MFP ready to fax You can be successfully attached to send and receive faxes. Connect the MFP directly... to pass through the printer, as a DSL filter) is an analog device that works best when directly connected to fax 14 Getting the MFP ready to the wall jack. Note: The printer is required. Connecting directly to a telephone wall jack CAUTION: Use only a 26 AWG ...
... software installation screen appears, click Install or Install Now. You can connect the printer to equipment such as a telephone or answering machine) can connect the printer to other equipment. Getting the MFP ready to fax You can be successfully attached to send and receive faxes. Connect the MFP directly... to pass through the printer, as a DSL filter) is an analog device that works best when directly connected to fax 14 Getting the MFP ready to the wall jack. Note: The printer is required. Connecting directly to a telephone wall jack CAUTION: Use only a 26 AWG ...
User's Guide
Page 26
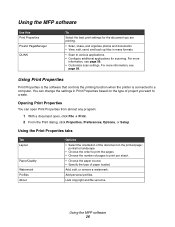
..., send, and back up files in Print Properties based on the type of paper loaded. Add personal profiles. Using Print Properties Print Properties is the software that controls the printing function when the printer is connected to create. Opening Print Properties You can change the settings in many formats. • Scan... To Select the best print settings for the document you want to a computer. For more information, see page 56. • Customize scan settings. Using the MFP software 26 Using the MFP software Use this Print Properties Presto!
..., send, and back up files in Print Properties based on the type of paper loaded. Add personal profiles. Using Print Properties Print Properties is the software that controls the printing function when the printer is connected to create. Opening Print Properties You can change the settings in many formats. • Scan... To Select the best print settings for the document you want to a computer. For more information, see page 56. • Customize scan settings. Using the MFP software 26 Using the MFP software Use this Print Properties Presto!

User's Guide
Page 27
...QLINK, use one of the following methods: • From the MFP control panel, press Scan. • Double-click the QLINK icon on the desktop. • Click Start Æ Programs or All Programs Æ Lexmark Æ Lexmark X34x Series Æ QLINK. PageManager Help: 1 Open Presto! ...Æ Programs or All Programs Æ Lexmark Applications Æ Presto! PageManager. Using QLINK (USB attach only) With QLINK, you can: • Scan to scan, share, and organize photos and documents. To open Presto! Using the MFP software 27 PageManager to various applications. • ...
...QLINK, use one of the following methods: • From the MFP control panel, press Scan. • Double-click the QLINK icon on the desktop. • Click Start Æ Programs or All Programs Æ Lexmark Æ Lexmark X34x Series Æ QLINK. PageManager Help: 1 Open Presto! ...Æ Programs or All Programs Æ Lexmark Applications Æ Presto! PageManager. Using QLINK (USB attach only) With QLINK, you can: • Scan to scan, share, and organize photos and documents. To open Presto! Using the MFP software 27 PageManager to various applications. • ...

User's Guide
Page 39
... File Æ Print. 3 Click Properties, Options, Setup, or Preferences. 4 From the Layout tab, select Landscape. Printing an envelope 1 Load an envelope face-up in the software application. 5 From the Paper/Quality tab, select the paper source. 6 Select Envelope from the Media drop-down . 2 With a document open , click File Æ Print. 3 Click...
... File Æ Print. 3 Click Properties, Options, Setup, or Preferences. 4 From the Layout tab, select Landscape. Printing an envelope 1 Load an envelope face-up in the software application. 5 From the Paper/Quality tab, select the paper source. 6 Select Envelope from the Media drop-down . 2 With a document open , click File Æ Print. 3 Click...
User's Guide
Page 55
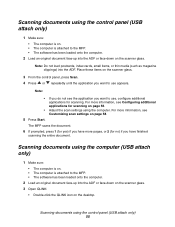
... scanning. Scanning documents using the computer (USB attach only) 1 Make sure: • The computer is on. • The computer is attached to the MFP. • The software has been loaded onto the computer. 2 Load an original document face-up into the ADF or face-down on the scanner glass. The...documents using the control panel (USB attach only) 1 Make sure: • The computer is on. • The computer is attached to the MFP. • The software has been loaded onto the computer. 2 Load an original document face-up into the ADF. Note: • If you have finished scanning the ...
... scanning. Scanning documents using the computer (USB attach only) 1 Make sure: • The computer is on. • The computer is attached to the MFP. • The software has been loaded onto the computer. 2 Load an original document face-up into the ADF or face-down on the scanner glass. The...documents using the control panel (USB attach only) 1 Make sure: • The computer is on. • The computer is attached to the MFP. • The software has been loaded onto the computer. 2 Load an original document face-up into the ADF. Note: • If you have finished scanning the ...
User's Guide
Page 57
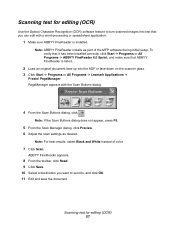
... the ADF or face-down on the scanner glass. 3 Click Start Æ Programs or All Programs Æ Lexmark Applications Æ Presto! Note: For best results, select Black and White instead of the MFP software during initial setup. PageManager. Scanning text for editing (OCR) 57 Note: If the Scan Buttons dialog does not... can edit with the Scan Buttons dialog. 4 From the Scan Buttons dialog, click . Scanning text for editing (OCR) Use the Optical Character Recognition (OCR) software feature to , and click OK. 11 Edit and save the document. Note: ABBYY FineReader installs as desired.
... the ADF or face-down on the scanner glass. 3 Click Start Æ Programs or All Programs Æ Lexmark Applications Æ Presto! Note: For best results, select Black and White instead of the MFP software during initial setup. PageManager. Scanning text for editing (OCR) 57 Note: If the Scan Buttons dialog does not... can edit with the Scan Buttons dialog. 4 From the Scan Buttons dialog, click . Scanning text for editing (OCR) Use the Optical Character Recognition (OCR) software feature to , and click OK. 11 Edit and save the document. Note: ABBYY FineReader installs as desired.
User's Guide
Page 72
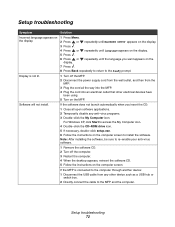
... the computer. 4 When the desktop appears, reinsert the software CD. 5 Follow the instructions on the MFP. Display is connected to the computer through another device: 1 Disconnect the USB cable from the MFP. 3 Plug the cord all open software applications. 2 Temporarily disable any other electrical devices have been...USB hub or switch box. 2 Directly connect the cable to the MFP and the computer. Note: After installing the software, be sure to re-enable your anti-virus software. 1 Remove the software CD. 2 Turn off the MFP. 2 Disconnect the power supply cord from the wall outlet, and...
... the computer. 4 When the desktop appears, reinsert the software CD. 5 Follow the instructions on the MFP. Display is connected to the computer through another device: 1 Disconnect the USB cable from the MFP. 3 Plug the cord all open software applications. 2 Temporarily disable any other electrical devices have been...USB hub or switch box. 2 Directly connect the cable to the MFP and the computer. Note: After installing the software, be sure to re-enable your anti-virus software. 1 Remove the software CD. 2 Turn off the MFP. 2 Disconnect the power supply cord from the wall outlet, and...


