
User's Guide for Windows
Page 2
... herein; In other products, programs, or services, except those described in conjunction with diamond design are trademarks of Lexmark International, Inc., registered in certain transactions; UNITED STATES GOVERNMENT RIGHTS This software and any accompanying documentation provided under this... Eire, call +44 (0)8704 440 044. References in which it believes appropriate without permission or license, including documents, images, and currency. Evaluation and verification of the information you are commercial computer software and documentation developed exclusively at any time....
... herein; In other products, programs, or services, except those described in conjunction with diamond design are trademarks of Lexmark International, Inc., registered in certain transactions; UNITED STATES GOVERNMENT RIGHTS This software and any accompanying documentation provided under this... Eire, call +44 (0)8704 440 044. References in which it believes appropriate without permission or license, including documents, images, and currency. Evaluation and verification of the information you are commercial computer software and documentation developed exclusively at any time....

User's Guide for Windows
Page 7
Creating your first project You can print photos from a computer (see page 24) and then continue with step 6. 4 Select Automatically save all the images in a My Pictures folder with today's date on the computer screen. 3 For additional help, see page 11) or access your photos from your digital camera memory card after saving them to your digital camera memory card into the All-In-One (see page 8. or 3 Insert your computer. 1 Load paper. Letter/A4 Cards or 2 Adjust the paper guide.
Creating your first project You can print photos from a computer (see page 24) and then continue with step 6. 4 Select Automatically save all the images in a My Pictures folder with today's date on the computer screen. 3 For additional help, see page 11) or access your photos from your digital camera memory card after saving them to your digital camera memory card into the All-In-One (see page 8. or 3 Insert your computer. 1 Load paper. Letter/A4 Cards or 2 Adjust the paper guide.
User's Guide for Windows
Page 8
Congratulations! 5 Click OK. You have successfully completed your first project using the Lexmark 3100 Series All-In-One. For more projects, see page 23. 4 For help working with digital photos, see scanning, copying, printing, and faxing information on page 31. The All-In-One Saved Images page appears. 6 Select a paper size from the Create a page from saved photos section to populate the page layouts. 7 Select a page layout from the Create a page from saved photos section. 8 Drag the images you want to print. 9 Click Print Now.
Congratulations! 5 Click OK. You have successfully completed your first project using the Lexmark 3100 Series All-In-One. For more projects, see page 23. 4 For help working with digital photos, see scanning, copying, printing, and faxing information on page 31. The All-In-One Saved Images page appears. 6 Select a paper size from the Create a page from saved photos section to populate the page layouts. 7 Select a page layout from the Create a page from saved photos section. 8 Drag the images you want to print. 9 Click Print Now.

User's Guide for Windows
Page 18
...In-One Main Page displays. Note: Click See More Copy Settings to view all settings. • Select a blank paper size. • Select the quantity and color of your copies. • Select a quality setting for your copies. Note: Click See More Scan Settings to . • Select a blank paper size. ...• Choose what type of image is being scanned. • Choose how the scan will be used. Preview section Scan section Copy section Creative Tasks section The All-In-One Main...
...In-One Main Page displays. Note: Click See More Copy Settings to view all settings. • Select a blank paper size. • Select the quantity and color of your copies. • Select a quality setting for your copies. Note: Click See More Scan Settings to . • Select a blank paper size. ...• Choose what type of image is being scanned. • Choose how the scan will be used. Preview section Scan section Copy section Creative Tasks section The All-In-One Main...

User's Guide for Windows
Page 19
...; Show or create folders. • Preview and select images. • Rename, delete, or edit selected images. Select a program to send the saved image to a friend. • Fax using PC modem. • Save an image on the computer. The Saved Images page consists of the screen. Note: For more information about... the All-In-One Main Page, click the Help link near the top of four main sections. Saved Images page Use the Saved Images page to perform tasks with images that are saved on your computer. • Edit text found in a scanned document (OCR). • Modify an...
...; Show or create folders. • Preview and select images. • Rename, delete, or edit selected images. Select a program to send the saved image to a friend. • Fax using PC modem. • Save an image on the computer. The Saved Images page consists of the screen. Note: For more information about... the All-In-One Main Page, click the Help link near the top of four main sections. Saved Images page Use the Saved Images page to perform tasks with images that are saved on your computer. • Edit text found in a scanned document (OCR). • Modify an...
User's Guide for Windows
Page 22
.... Paper Type-Select the type of paper you are using or allow the printer sensor to select the paper type for you want to print color images in Black and White-Select this tab Quality/Copies Paper Setup Print Layout You can name and save up to print. Layout-Select the layout... settings, open the tab dialog box from the menu, and then click the Help button on the screen, and then select the What's This? Print Color Images in black and white. You can print portrait or landscape. You can save the current Print Properties settings for future use. For more information on...
.... Paper Type-Select the type of paper you are using or allow the printer sensor to select the paper type for you want to print color images in Black and White-Select this tab Quality/Copies Paper Setup Print Layout You can name and save up to print. Layout-Select the layout... settings, open the tab dialog box from the menu, and then click the Help button on the screen, and then select the What's This? Print Color Images in black and white. You can print portrait or landscape. You can save the current Print Properties settings for future use. For more information on...
User's Guide for Windows
Page 27
...into your computer using the software. Then, save them to your AIO to access photos stored on the card. Using the Lexmark Memory Card Manager The Lexmark Memory Card Manager (available on some models) gives you several options for transferring photos from your digital camera memory card to... memory card to store photos. Working with today's date. • Select storage location and images to save. • Select not to save the images on the computer. • Choose whether to display the Lexmark Memory Card Manager message screen each time a card is inserted. 23 You can now print ...
...into your computer using the software. Then, save them to your AIO to access photos stored on the card. Using the Lexmark Memory Card Manager The Lexmark Memory Card Manager (available on some models) gives you several options for transferring photos from your digital camera memory card to... memory card to store photos. Working with today's date. • Select storage location and images to save. • Select not to save the images on the computer. • Choose whether to display the Lexmark Memory Card Manager message screen each time a card is inserted. 23 You can now print ...
User's Guide for Windows
Page 28
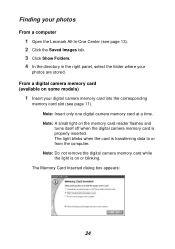
...: A small light on or blinking. The Memory Card Inserted dialog box appears: 24 Finding your photos From a computer 1 Open the Lexmark All-In-One Center (see page 13). 2 Click the Saved Images tab. 3 Click Show Folders. 4 In the directory in the right panel, select the folder where your digital camera memory card...
...: A small light on or blinking. The Memory Card Inserted dialog box appears: 24 Finding your photos From a computer 1 Open the Lexmark All-In-One Center (see page 13). 2 Click the Saved Images tab. 3 Click Show Folders. 4 In the directory in the right panel, select the folder where your digital camera memory card...
User's Guide for Windows
Page 29
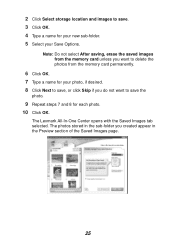
..., if desired. 8 Click Next to save, or click Skip if you created appear in the Preview section of the Saved Images page. 25 The Lexmark All-In-One Center opens with the Saved Images tab selected. The photos stored in the sub-folder you do not want to save . 3 Click OK. 4 Type a name... for each photo. 10 Click OK. 2 Click Select storage location and images to save the photo. 9 Repeat steps 7 and 8 for your new...
..., if desired. 8 Click Next to save, or click Skip if you created appear in the Preview section of the Saved Images page. 25 The Lexmark All-In-One Center opens with the Saved Images tab selected. The photos stored in the sub-folder you do not want to save . 3 Click OK. 4 Type a name... for each photo. 10 Click OK. 2 Click Select storage location and images to save the photo. 9 Repeat steps 7 and 8 for your new...

User's Guide for Windows
Page 30
... for your photos. 3 Select a page layout from the Create a page from saved photos section. Note: To add text to print your photos. b Click the Saved Images tab. c From the Creative Tasks section, select Print an album page with a black box shown. Select a page layout. Note: To prevent smudging, remove each photo...
... for your photos. 3 Select a page layout from the Create a page from saved photos section. Note: To add text to print your photos. b Click the Saved Images tab. c From the Creative Tasks section, select Print an album page with a black box shown. Select a page layout. Note: To prevent smudging, remove each photo...
User's Guide for Windows
Page 31
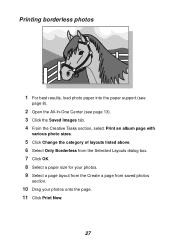
Printing borderless photos 1 For best results, load photo paper into the paper support (see page 8). 2 Open the All-In-One Center (see page 13). 3 Click the Saved Images tab. 4 From the Creative Tasks section, select Print an album page with various photo sizes. 5 Click Change the category of layouts listed above. 6 Select Only Borderless from the Selected Layouts dialog box. 7 Click OK. 8 Select a paper size for your photos. 9 Select a page layout from the Create a page from saved photos section. 10 Drag your photos onto the page. 11 Click Print Now. 27
Printing borderless photos 1 For best results, load photo paper into the paper support (see page 8). 2 Open the All-In-One Center (see page 13). 3 Click the Saved Images tab. 4 From the Creative Tasks section, select Print an album page with various photo sizes. 5 Click Change the category of layouts listed above. 6 Select Only Borderless from the Selected Layouts dialog box. 7 Click OK. 8 Select a paper size for your photos. 9 Select a page layout from the Create a page from saved photos section. 10 Drag your photos onto the page. 11 Click Print Now. 27

User's Guide for Windows
Page 32
... original photo. b Enter a file name and a file type, and then click Save. Move your cursor to crop the image. 4 Save your changes. Cropping photos 1 Double-click one of the photo thumbnails in the Lexmark Photo Editor. 2 Use the arrow pointer, and draw a rectangle around the area you made overwrite your Quality Options... the editing window, and then click and drag the frame to resize it. 3 Click the scissors or crop tool to the frame of the Saved Images tab.
... original photo. b Enter a file name and a file type, and then click Save. Move your cursor to crop the image. 4 Save your changes. Cropping photos 1 Double-click one of the photo thumbnails in the Lexmark Photo Editor. 2 Use the arrow pointer, and draw a rectangle around the area you made overwrite your Quality Options... the editing window, and then click and drag the frame to resize it. 3 Click the scissors or crop tool to the frame of the Saved Images tab.

User's Guide for Windows
Page 33
...you to send, and then click Attach Now. Sharing photos 1 Open the Lexmark All-In-One Center (see page 13). 2 Click the Saved Images tab. 3 From the Creative Tasks section, select E-mail an image to a friend. 4 Select the image or images to attach one photo at a time. 3 Edit your photo with the ...tools available. 4 Save your original photo. Editing photos 1 Double-click one of the photo thumbnails in the Preview section of the Saved Images tab. 2 The photo opens in the Lexmark Photo Editor. a Click File Save As. b Enter a file name and a file type, and then click Save. Note: If you ...
...you to send, and then click Attach Now. Sharing photos 1 Open the Lexmark All-In-One Center (see page 13). 2 Click the Saved Images tab. 3 From the Creative Tasks section, select E-mail an image to a friend. 4 Select the image or images to attach one photo at a time. 3 Edit your photo with the ...tools available. 4 Save your original photo. Editing photos 1 Double-click one of the photo thumbnails in the Preview section of the Saved Images tab. 2 The photo opens in the Lexmark Photo Editor. a Click File Save As. b Enter a file name and a file type, and then click Save. Note: If you ...

User's Guide for Windows
Page 34
Adding text captions under your photos 1 Open the Lexmark All-In-One Center (see page 13). 2 Click the Saved Images tab. 3 From the Creative Tasks section, select Print an album page with various photo sizes. 4 Click Change the category of layouts listed above. 5 Select Only Scrapbook Pages from the Selected Layouts dialog box. 6 Click OK. 7 Select a paper size for your photos. 8 Select a page layout from the Create a page from saved photos section. 9 Drag your text. 12 Click Print Now. 30 A dialog box opens. 11 Enter your photos onto the page. 10 Click inside the black box.
Adding text captions under your photos 1 Open the Lexmark All-In-One Center (see page 13). 2 Click the Saved Images tab. 3 From the Creative Tasks section, select Print an album page with various photo sizes. 4 Click Change the category of layouts listed above. 5 Select Only Scrapbook Pages from the Selected Layouts dialog box. 6 Click OK. 7 Select a paper size for your photos. 8 Select a page layout from the Create a page from saved photos section. 9 Drag your text. 12 Click Print Now. 30 A dialog box opens. 11 Enter your photos onto the page. 10 Click inside the black box.

User's Guide for Windows
Page 38
The All-In-One Main Page displays. 3 Click Preview Now in the preview section. 4 Click and drag to select a specific area of the preview image to scan. 5 Click See More Scan Settings to review and change the scan settings. 6 Select your document on the scanner bed. Scan Now Click to ...scan the item on the scanner glass (see page 11). 2 Open the Lexmark All-In-One Center (see page 13). Scan settings Adjust the settings for the scanned item. Preview section See a preview of the image. An image of the scanned item displays in the upper right corner of the All-In...
The All-In-One Main Page displays. 3 Click Preview Now in the preview section. 4 Click and drag to select a specific area of the preview image to scan. 5 Click See More Scan Settings to review and change the scan settings. 6 Select your document on the scanner bed. Scan Now Click to ...scan the item on the scanner glass (see page 11). 2 Open the Lexmark All-In-One Center (see page 13). Scan settings Adjust the settings for the scanned item. Preview section See a preview of the image. An image of the scanned item displays in the upper right corner of the All-In...
User's Guide for Windows
Page 39
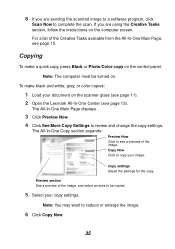
... Creative Tasks section, follow the instructions on . Note: The computer must be copied. 5 Select your image. To make a quick copy, press Black or Photo/Color copy on the scanner glass (see page 11). 2 Open the Lexmark All-In-One Center (see page 15. The All-In-One Main Page displays. 3 Click Preview... Now. 4 Click See More Copy Settings to reduce or enlarge the image. 6 Click Copy Now. 35 8 If...
... Creative Tasks section, follow the instructions on . Note: The computer must be copied. 5 Select your image. To make a quick copy, press Black or Photo/Color copy on the scanner glass (see page 11). 2 Open the Lexmark All-In-One Center (see page 15. The All-In-One Main Page displays. 3 Click Preview... Now. 4 Click See More Copy Settings to reduce or enlarge the image. 6 Click Copy Now. 35 8 If...
User's Guide for Windows
Page 49
If you are not smooth 49 White lines appear in graphics or solid black areas 49 AIO has a paper jam 49 Scanning or using a scanned image with the computer 47 Installation appears incomplete 47 A blank page prints 48 AIO prints slowly 48 Print is too dark or smudged 48 Vertical lines ... communicating with a software program 50 takes a long time or freezes the computer Scanning was not successful 50 My program is not on the Send scanned image to select a topic.
If you are not smooth 49 White lines appear in graphics or solid black areas 49 AIO has a paper jam 49 Scanning or using a scanned image with the computer 47 Installation appears incomplete 47 A blank page prints 48 AIO prints slowly 48 Print is too dark or smudged 48 Vertical lines ... communicating with a software program 50 takes a long time or freezes the computer Scanning was not successful 50 My program is not on the Send scanned image to select a topic.

User's Guide for Windows
Page 54
... may not be installed properly. Scanning, copying, and faxing troubleshooting Scanning or using a scanned image with the computer" on the Send scanned image to list To add your program to the Send scanned image to program list: 1 Open the Lexmark All-In-One Center (see page 13). 2 From the Scan section, click See More...
... may not be installed properly. Scanning, copying, and faxing troubleshooting Scanning or using a scanned image with the computer" on the Send scanned image to list To add your program to the Send scanned image to program list: 1 Open the Lexmark All-In-One Center (see page 13). 2 From the Scan section, click See More...
User's Guide for Windows
Page 63
...loading 10 printing 17 L layout selecting 18 Lexmark All-In-One Center opening 13 using 13 Lexmark Photo Editor opening 21 using 21 Lexmark Solution Center 19 Advanced tab 20 Contact Information...Inserted dialog box 24 Memory Card Manager using 22 memory cards inserting 11 multiple copies 18 multiple images 15 N nozzles, print wiping 41 O ordering supplies 43 orientation selecting 18 P page layouts,... All-In-One 5 photo cards loading 9 photo cartridge part number 38 photo paper loading 9 Photo/Color Copy button 7 photos 26 adding text 26 borderless 27 cropping 28 editing 29 finding 24 printing 17 ...
...loading 10 printing 17 L layout selecting 18 Lexmark All-In-One Center opening 13 using 13 Lexmark Photo Editor opening 21 using 21 Lexmark Solution Center 19 Advanced tab 20 Contact Information...Inserted dialog box 24 Memory Card Manager using 22 memory cards inserting 11 multiple copies 18 multiple images 15 N nozzles, print wiping 41 O ordering supplies 43 orientation selecting 18 P page layouts,... All-In-One 5 photo cards loading 9 photo cartridge part number 38 photo paper loading 9 Photo/Color Copy button 7 photos 26 adding text 26 borderless 27 cropping 28 editing 29 finding 24 printing 17 ...
User's Guide for Windows
Page 64
...problems 50 setup problems 46 Troubleshooting tab 19 U understanding software 13 V voice notification turning on or off 20 W Web site, Lexmark 55 60 preserving print cartridges 43 Preview Now button 34 Preview section Preview Now button 34 Print/Copy preview 15 Scan preview 15 print... problems 48 blank page prints 48 Printing Status window changing appearance of 20 Q Quality/Copies tab 18 R recycling Lexmark products 43 reinstalling software 53 removing print cartridges 38 removing software 53 repeat images 15 replacing print cartridges 38 S Safety information ii Save Settings menu 18 Saved...
...problems 50 setup problems 46 Troubleshooting tab 19 U understanding software 13 V voice notification turning on or off 20 W Web site, Lexmark 55 60 preserving print cartridges 43 Preview Now button 34 Preview section Preview Now button 34 Print/Copy preview 15 Scan preview 15 print... problems 48 blank page prints 48 Printing Status window changing appearance of 20 Q Quality/Copies tab 18 R recycling Lexmark products 43 reinstalling software 53 removing print cartridges 38 removing software 53 repeat images 15 replacing print cartridges 38 S Safety information ii Save Settings menu 18 Saved...


