
User's Guide
Page 61
... quality • Blank pages • Dark print • Faded print • Incorrect colors • Light and dark bands in print • Skewed lines • Smudges • Streaks • White lines in print Check ink Review steps to step 2. 2 Clean the print cartridge nozzles. If you want, follow these steps..."Partial document or photo prints" on page 63 Improving print quality Check paper • Use the appropriate paper for best results use Lexmark Premium Photo Paper or Lexmark Photo Paper. • Use a paper that is still not satisfactory, replace the print cartridges.
... quality • Blank pages • Dark print • Faded print • Incorrect colors • Light and dark bands in print • Skewed lines • Smudges • Streaks • White lines in print Check ink Review steps to step 2. 2 Clean the print cartridge nozzles. If you want, follow these steps..."Partial document or photo prints" on page 63 Improving print quality Check paper • Use the appropriate paper for best results use Lexmark Premium Photo Paper or Lexmark Photo Paper. • Use a paper that is still not satisfactory, replace the print cartridges.

User's Guide
Page 64
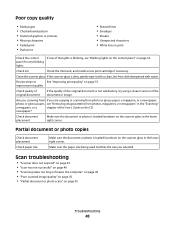
... long or freezes the computer" on page 65 • "Poor scanned image quality" on page 66 • "Partial document or photo scans" on page 52. Review steps to See "Improving print quality" on page 66 Troubleshooting 64 improve print quality Check quality of original document If the quality of the original...
... long or freezes the computer" on page 65 • "Poor scanned image quality" on page 66 • "Partial document or photo scans" on page 52. Review steps to See "Improving print quality" on page 66 Troubleshooting 64 improve print quality Check quality of original document If the quality of the original...
User's Guide
Page 66
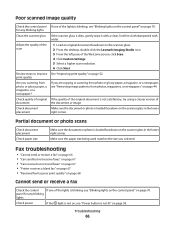
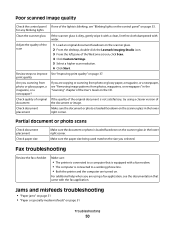
... the paper size being used matches the size you scanning from photos, magazines, or newspapers" on the scanner glass. 2 From the desktop, double-click the Lexmark Imaging Studio icon. 3 From the left pane of document the document or image. Poor scanned image quality Check the control panel If one of the... Are you selected. Check document placement Make sure the document or photo is not on, see "Blinking lights on the control panel" on page 58. Review steps to improve See "Improving print quality" on the scanner glass in the lower right corner.
... the paper size being used matches the size you scanning from photos, magazines, or newspapers" on the scanner glass. 2 From the desktop, double-click the Lexmark Imaging Studio icon. 3 From the left pane of document the document or image. Poor scanned image quality Check the control panel If one of the... Are you selected. Check document placement Make sure the document or photo is not on, see "Blinking lights on the control panel" on page 58. Review steps to improve See "Improving print quality" on the scanner glass in the lower right corner.
User's Guide
Page 68
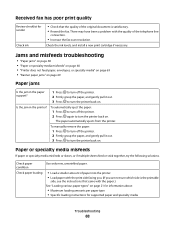
... media" on page 69 • "Banner paper jams" on page 69 Paper jams Is the jam in the printer? Received fax has poor print quality Review checklist for supported paper and specialty media Troubleshooting 68
... media" on page 69 • "Banner paper jams" on page 69 Paper jams Is the jam in the printer? Received fax has poor print quality Review checklist for supported paper and specialty media Troubleshooting 68
User's Guide
Page 70
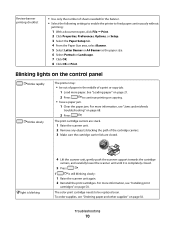
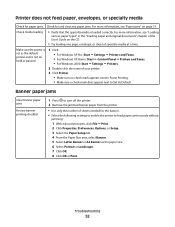
... 6 Select Portrait or Landscape. 7 Click OK. 8 Click OK or Print. To order supplies, see "Installing print cartridges" on page 56. Review banner printing checklist • Use only the number of sheets needed for the banner. • Select the following settings to enable the printer to ...paper" on page 68. 2 Press . For more information, see "Ordering paper and other supplies" on page 50. If is completely closed . The color print cartridge needs to be out of paper in the middle of the cartridge carriers. 3 Make sure the cartridge carrier lids are closed . 5 Press ...
... 6 Select Portrait or Landscape. 7 Click OK. 8 Click OK or Print. To order supplies, see "Installing print cartridges" on page 56. Review banner printing checklist • Use only the number of sheets needed for the banner. • Select the following settings to enable the printer to ...paper" on page 68. 2 Press . For more information, see "Ordering paper and other supplies" on page 50. If is completely closed . The color print cartridge needs to be out of paper in the middle of the cartridge carriers. 3 Make sure the cartridge carrier lids are closed . 5 Press ...

Getting Started
Page 45
...• Blank pages • Dark print • Faded print • Incorrect colors • Light and dark bands in print • Skewed lines • Smudges • Streaks • White lines in print Check ink Review steps to step 2. 2 Clean the print cartridge nozzles. If print quality has...• "Photo smudges" on page 47 Improving print quality Check paper • Use the appropriate paper for best results use Lexmark Premium Photo Paper or Lexmark Photo Paper. • Use a paper that is still not satisfactory, replace the print cartridges. Check print cartridges If the ...
...• Blank pages • Dark print • Faded print • Incorrect colors • Light and dark bands in print • Skewed lines • Smudges • Streaks • White lines in print Check ink Review steps to step 2. 2 Clean the print cartridge nozzles. If print quality has...• "Photo smudges" on page 47 Improving print quality Check paper • Use the appropriate paper for best results use Lexmark Premium Photo Paper or Lexmark Photo Paper. • Use a paper that is still not satisfactory, replace the print cartridges. Check print cartridges If the ...
Getting Started
Page 48
... patterns from photos, magazines, or newspapers" in the "Scanning" a magazine, or a chapter of the User's Guide on the scanner glass in the lower right corner. Review steps to See "Improving print quality" on page 53. Are you scanning from If you selected. Check document placement Make sure the document or photo...
... patterns from photos, magazines, or newspapers" in the "Scanning" a magazine, or a chapter of the User's Guide on the scanner glass in the lower right corner. Review steps to See "Improving print quality" on page 53. Are you scanning from If you selected. Check document placement Make sure the document or photo...
Getting Started
Page 50
Adjust the quality of the scan 1 Load an original document facedown on page 37. Review steps to improve See "Improving print quality" on the scanner glass. 2 From the desktop, double-click the Lexmark Imaging Studio icon. 3 From the left pane of the Welcome screen, click Scan. 4 Click Custom Settings. 5 Select a higher scan ...copying or scanning from photo or glossy paper, a magazine, or a newspaper, see "Blinking lights on the control panel" on page 51 Troubleshooting 50 Fax troubleshooting Review the fax checklist Make sure: • The printer is loaded facedown on .
Adjust the quality of the scan 1 Load an original document facedown on page 37. Review steps to improve See "Improving print quality" on the scanner glass. 2 From the desktop, double-click the Lexmark Imaging Studio icon. 3 From the left pane of the Welcome screen, click Scan. 4 Click Custom Settings. 5 Select a higher scan ...copying or scanning from photo or glossy paper, a magazine, or a newspaper, see "Blinking lights on the control panel" on page 51 Troubleshooting 50 Fax troubleshooting Review the fax checklist Make sure: • The printer is loaded facedown on .
Getting Started
Page 52
Banner paper jams Clear banner paper jams Review banner printing checklist 1 Press to Set As Default. Troubleshooting 52 Make sure the printer is set as the paper size. 6 Select Portrait or Landscape. 7 Click ...
Banner paper jams Clear banner paper jams Review banner printing checklist 1 Press to Set As Default. Troubleshooting 52 Make sure the printer is set as the paper size. 6 Select Portrait or Landscape. 7 Click ...